Service Manual
Page 8
...8Ć3 Reassembly 8Ć3 Safety Precautions 8Ć3 Electrostatic Discharge (ESD) Precautions 8Ć4 Required Tools 8Ć5 Installing a RAM or ROM SIMM 8Ć6 Removing the Bail Assembly 8Ć7 Removing the Top Cover 8Ć8 Removing ...262;52 9 Preventive Maintenance Moisture on Printer 9Ć2 Level of Printer Usage 9Ć2 Friction on Slider Rod 9Ć2 Noisy Carriage Wheel 9Ć2 Ink Spilling 9Ć3 Belt Swelling 9Ć3 Cleaning the Printer 9Ć4 General Cleaning 9Ć4 Cleaning the Drive Roller 9Ć4 vi Contents HP DesignJet 430, 450C and 455CA...
...8Ć3 Reassembly 8Ć3 Safety Precautions 8Ć3 Electrostatic Discharge (ESD) Precautions 8Ć4 Required Tools 8Ć5 Installing a RAM or ROM SIMM 8Ć6 Removing the Bail Assembly 8Ć7 Removing the Top Cover 8Ć8 Removing ...262;52 9 Preventive Maintenance Moisture on Printer 9Ć2 Level of Printer Usage 9Ć2 Friction on Slider Rod 9Ć2 Noisy Carriage Wheel 9Ć2 Ink Spilling 9Ć3 Belt Swelling 9Ć3 Cleaning the Printer 9Ć4 General Cleaning 9Ć4 Cleaning the Drive Roller 9Ć4 vi Contents HP DesignJet 430, 450C and 455CA...
Service Manual
Page 124
...;3 Reassembly 8Ć3 Safety Precautions 8Ć3 Electrostatic Discharge (ESD) Precautions 8Ć4 Required Tools 8Ć5 Installing a RAM or ROM SIMM 8Ć6 Removing the Bail Assembly 8Ć7 Removing the Top Cover 8Ć8...Belt 8Ć41 Removing the DriveĆBelt Pulley 8Ć42 Removing the Drive Roller 8Ć44 Reinstalling the Drive Roller 8Ć45 Removing the PinchĆArm Lift Mechanism 8Ć47 Removing the Overdrive Assembly 8Ć50 Removing the Entry Platen 8Ć52 8-2 HP DesignJet 430, 450C and 455CA Printers Removal and Installation
...;3 Reassembly 8Ć3 Safety Precautions 8Ć3 Electrostatic Discharge (ESD) Precautions 8Ć4 Required Tools 8Ć5 Installing a RAM or ROM SIMM 8Ć6 Removing the Bail Assembly 8Ć7 Removing the Top Cover 8Ć8...Belt 8Ć41 Removing the DriveĆBelt Pulley 8Ć42 Removing the Drive Roller 8Ć44 Reinstalling the Drive Roller 8Ć45 Removing the PinchĆArm Lift Mechanism 8Ć47 Removing the Overdrive Assembly 8Ć50 Removing the Entry Platen 8Ć52 8-2 HP DesignJet 430, 450C and 455CA Printers Removal and Installation

Service Manual
Page 140
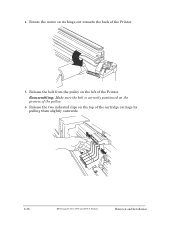
...to the right of the Printer. 8-18 HP DesignJet 430, 450C and 455CA Printers Removal and Installation Slightly rotate the motor on its hinge until the indicated part of the black plastic is parallel with the side of the motor, press the black plastic tab on top of the Printer. Beam Black Plastic 5.... Disconnect the carriageĆmotor cable from the main PCA (connector MOT Y), and from the motor shaft. Press the carriage motor towards the left, and remove the belt from the clip at the back of the ...
...to the right of the Printer. 8-18 HP DesignJet 430, 450C and 455CA Printers Removal and Installation Slightly rotate the motor on its hinge until the indicated part of the black plastic is parallel with the side of the motor, press the black plastic tab on top of the Printer. Beam Black Plastic 5.... Disconnect the carriageĆmotor cable from the main PCA (connector MOT Y), and from the motor shaft. Press the carriage motor towards the left, and remove the belt from the clip at the back of the ...

Service Manual
Page 141
The motor may be stiff. Position this part inside the chassis beam. Removal and Installation HP DesignJet 430, 450C and 455CA Printers 8-19 Also, make sure the belt is one spring on the motor assembly which fits onto the protruding plastic part on the grooves of the motor. There is correctly positioned on top of the shaft. Installation 1.
The motor may be stiff. Position this part inside the chassis beam. Removal and Installation HP DesignJet 430, 450C and 455CA Printers 8-19 Also, make sure the belt is one spring on the motor assembly which fits onto the protruding plastic part on the grooves of the motor. There is correctly positioned on top of the shaft. Installation 1.
Service Manual
Page 159
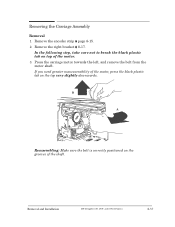
Remove the encoder strip ' page 8Ć15. 2. Remove the right bracket ' 8Ć17. If you need greater maneuverability of the motor, press the black plastic tab on top of the shaft. Press the carriage motor towards the left, and remove the belt from the motor shaft. Removing the Carriage Assembly Removal 1. In the following step, take care not to break the black plastic tab on the top very slightly downwards. Removal and Installation HP DesignJet 430, 450C and 455CA Printers 8-37 B A Reassembling: Make sure the belt is correctly positioned on the grooves of the motor. 3.
Remove the encoder strip ' page 8Ć15. 2. Remove the right bracket ' 8Ć17. If you need greater maneuverability of the motor, press the black plastic tab on top of the shaft. Press the carriage motor towards the left, and remove the belt from the motor shaft. Removing the Carriage Assembly Removal 1. In the following step, take care not to break the black plastic tab on the top very slightly downwards. Removal and Installation HP DesignJet 430, 450C and 455CA Printers 8-37 B A Reassembling: Make sure the belt is correctly positioned on the grooves of the motor. 3.
Service Manual
Page 160
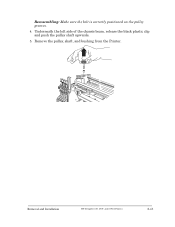
Rotate the motor on the grooves of the Printer. 5. Reassembling: Make sure the belt is correctly positioned on its hinge out towards the back of the pulley. 6. Release the two indicated clips on the left of the cartridge carriage by pulling them slightly outwards. 8-38 HP DesignJet 430, 450C and 455CA Printers Removal and Installation 4. Release the belt from the pulley on the top of the Printer.
Rotate the motor on the grooves of the Printer. 5. Reassembling: Make sure the belt is correctly positioned on its hinge out towards the back of the pulley. 6. Release the two indicated clips on the left of the cartridge carriage by pulling them slightly outwards. 8-38 HP DesignJet 430, 450C and 455CA Printers Removal and Installation 4. Release the belt from the pulley on the top of the Printer.
Service Manual
Page 162
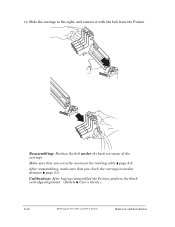
Make sure that you correctly reconnect the trailing cable ' page 8Ć8. After reassembling, make sure that you check the carriageĆto the right, and remove it with the belt from the Printer. Slide the carriage to Ćmedia distance ' page 5Ć5. 10. Calibration: After having reassembled the Printer, perform the black cartridgeĆalignment. (Details ' User's Guide.) 8-40 HP DesignJet 430, 450C and 455CA Printers Removal and Installation Reassembling: Position the belt under the back extrusion of the carriage.
Make sure that you correctly reconnect the trailing cable ' page 8Ć8. After reassembling, make sure that you check the carriageĆto the right, and remove it with the belt from the Printer. Slide the carriage to Ćmedia distance ' page 5Ć5. 10. Calibration: After having reassembled the Printer, perform the black cartridgeĆalignment. (Details ' User's Guide.) 8-40 HP DesignJet 430, 450C and 455CA Printers Removal and Installation Reassembling: Position the belt under the back extrusion of the carriage.
Service Manual
Page 163
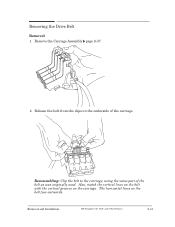
Reassembling: Clip the belt to the carriage, using the same part of the carriage. Also, match the vertical lines on the belt with the vertical grooves on the belt face outwards. Removal and Installation HP DesignJet 430, 450C and 455CA Printers 8-41 The horizontal lines on the carriage. Removing the Drive Belt Removal 1. Release the belt from the clips on the underside of the belt as was originally used. Remove the Carriage Assembly ' page 8Ć37. 2.
Reassembling: Clip the belt to the carriage, using the same part of the carriage. Also, match the vertical lines on the belt with the vertical grooves on the belt face outwards. Removal and Installation HP DesignJet 430, 450C and 455CA Printers 8-41 The horizontal lines on the carriage. Removing the Drive Belt Removal 1. Release the belt from the clips on the underside of the belt as was originally used. Remove the Carriage Assembly ' page 8Ć37. 2.
Service Manual
Page 164
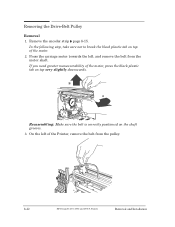
... on the shaft grooves. 3. B A Reassembling: Make sure the belt is correctly positioned on top very slightly downwards. Remove the encoder strip ' page 8Ć15. On the left , and remove the belt from the pulley. 8-42 HP DesignJet 430, 450C and 455CA Printers Removal and Installation Removing the DriveĆBelt Pulley Removal 1. Press the carriage motor towards the...
... on the shaft grooves. 3. B A Reassembling: Make sure the belt is correctly positioned on top very slightly downwards. Remove the encoder strip ' page 8Ć15. On the left , and remove the belt from the pulley. 8-42 HP DesignJet 430, 450C and 455CA Printers Removal and Installation Removing the DriveĆBelt Pulley Removal 1. Press the carriage motor towards the...
Service Manual
Page 165
Underneath the left side of the chassis beam, release the black plastic clip and push the pulley shaft upwards. 5. Remove the pulley, shaft, and bushing from the Printer. Removal and Installation HP DesignJet 430, 450C and 455CA Printers 8-43 Reassembling: Make sure the belt is correctly positioned on the pulley grooves. 4.
Underneath the left side of the chassis beam, release the black plastic clip and push the pulley shaft upwards. 5. Remove the pulley, shaft, and bushing from the Printer. Removal and Installation HP DesignJet 430, 450C and 455CA Printers 8-43 Reassembling: Make sure the belt is correctly positioned on the pulley grooves. 4.

Service Manual
Page 179
... to 0% used. Belt Swelling To prevent new belts from swelling incorrectly, keep them in their bags with dissicant until you clear the EEROM or replace the electronics module, the factory spittoon value is almost full. Keep in mind that if you need to install them. Preventive Maintenance HP DesignJet 430, 450C and 455CA Printers 9-3 Ink Spilling The...
... to 0% used. Belt Swelling To prevent new belts from swelling incorrectly, keep them in their bags with dissicant until you clear the EEROM or replace the electronics module, the factory spittoon value is almost full. Keep in mind that if you need to install them. Preventive Maintenance HP DesignJet 430, 450C and 455CA Printers 9-3 Ink Spilling The...

Service Manual
Page 203
...release, firmware, 4Ć29 Removal and Installation, Bail Assembly and Star Wheel Assembly, 8Ć7 removing bailĆlift mechanism, 8Ć28 belt, 8Ć41 carriage motor, 8Ć18 cartridge carriage, 8Ć37 drive belt, 8Ć41 drive roller, 8Ć44 driveĆbelt pulley, 8Ć42 driveĆroller gear..., 8Ć44 rollĆfeed, assembly, 10Ć2 Rollfeed Assembly part numbers, 7Ć6 removing, 8Ć9 ROM, 4Ć3, 10Ć7 SIMM, installing, 8Ć6 RSĆ232ĆC, interface, 10Ć8 cables, 7Ć27 HP DesignJet 430, 450C and 455CA Printers Index-7
...release, firmware, 4Ć29 Removal and Installation, Bail Assembly and Star Wheel Assembly, 8Ć7 removing bailĆlift mechanism, 8Ć28 belt, 8Ć41 carriage motor, 8Ć18 cartridge carriage, 8Ć37 drive belt, 8Ć41 drive roller, 8Ć44 driveĆbelt pulley, 8Ć42 driveĆroller gear..., 8Ć44 rollĆfeed, assembly, 10Ć2 Rollfeed Assembly part numbers, 7Ć6 removing, 8Ć9 ROM, 4Ć3, 10Ć7 SIMM, installing, 8Ć6 RSĆ232ĆC, interface, 10Ć8 cables, 7Ć27 HP DesignJet 430, 450C and 455CA Printers Index-7


