Service Manual
Page 6
... a remote firmware update 63 5 Theory of operation Introduction 67 Basic operation of the printer 67 General descriptions 69 DC controller PCA 69 Power supply 71 Laser/scanner assembly 76 Paper pickup system 78 Paper pickup and feed block 79 Printing from ...tray 1 80 Printing from tray 2 82 Media skew prevention 85 Fixing/delivery block 86 Printer jam detection 87 Printing from the 500-sheet feeder 90 Printing from the 1,500-sheet feeder 92 Envelope feeder 95 Envelope feeder...
... a remote firmware update 63 5 Theory of operation Introduction 67 Basic operation of the printer 67 General descriptions 69 DC controller PCA 69 Power supply 71 Laser/scanner assembly 76 Paper pickup system 78 Paper pickup and feed block 79 Printing from ...tray 1 80 Printing from tray 2 82 Media skew prevention 85 Fixing/delivery block 86 Printer jam detection 87 Printing from the 500-sheet feeder 90 Printing from the 1,500-sheet feeder 92 Envelope feeder 95 Envelope feeder...

Service Manual
Page 11
Replacing the stapler unit (1 of 6 111 Figure 42. DC controller PCA block diagram 69 Figure 7. Laser/scanner assembly 76 Figure 13. Printer paper pickup and feed block diagram 78 Figure 15. Tray 1 pickup 81 Figure 18. Staple mode feed and delivery diagram (5 of ... delivery diagram (4 of figures ix Stapler unit I /O block diagram 98 Figure 30. Developing the image 122 List of 6 111 Figure 41. Envelope feeder pickup and feed diagram 96 Figure 29. Staple mode feed and delivery diagram (3 of the photosensitive drum 120 Figure 52. Primary charging of 6 ...
Replacing the stapler unit (1 of 6 111 Figure 42. DC controller PCA block diagram 69 Figure 7. Laser/scanner assembly 76 Figure 13. Printer paper pickup and feed block diagram 78 Figure 15. Tray 1 pickup 81 Figure 18. Staple mode feed and delivery diagram (5 of ... delivery diagram (4 of figures ix Stapler unit I /O block diagram 98 Figure 30. Developing the image 122 List of 6 111 Figure 41. Envelope feeder pickup and feed diagram 96 Figure 29. Staple mode feed and delivery diagram (3 of the photosensitive drum 120 Figure 52. Primary charging of 6 ...
Service Manual
Page 14
... 2 342 Figure 220. Envelope feeder accessory wiring diagram 353 Figure 231. Main assemblies (3 of printer PCAs 338 Figure 216. Jetdirect page 256 Figure 206. Location of 3 374 Figure 241. Location of 1,500-sheet paper feeder main parts (1 of 4 224 Figure 198. 1,500-sheet feeder paper-pickup drive assembly 225 Figure 199. HP LaserJet 4300 wiring diagram 349 Figure...
... 2 342 Figure 220. Envelope feeder accessory wiring diagram 353 Figure 231. Main assemblies (3 of printer PCAs 338 Figure 216. Jetdirect page 256 Figure 206. Location of 3 374 Figure 241. Location of 1,500-sheet paper feeder main parts (1 of 4 224 Figure 198. 1,500-sheet feeder paper-pickup drive assembly 225 Figure 199. HP LaserJet 4300 wiring diagram 349 Figure...

Service Manual
Page 17
... 31. Stapler/stacker components 107 Table 36. Causes for wrinkled or folded paper (part two, paper path exit 304 Table 52. Printer weights 7 Table 3. Paper weight equivalents 15 Table 14. Envelope feeder accessory 12 Table 12. Control-panel lights 36 Table 16. Retrieve job menu 41 Table 19. Paper-handling menu 42 Table...
... 31. Stapler/stacker components 107 Table 36. Causes for wrinkled or folded paper (part two, paper path exit 304 Table 52. Printer weights 7 Table 3. Paper weight equivalents 15 Table 14. Envelope feeder accessory 12 Table 12. Control-panel lights 36 Table 16. Retrieve job menu 41 Table 19. Paper-handling menu 42 Table...

Service Manual
Page 32
Table 10. Envelope feeder accessory Size Dimensions Monarch #7-3/4 98 by 191 mm (3.9 by 7.5 inches) Commercial#10 105 by 241 mm (4.1 by 9.5 inches) DL ISO 110 by 220 mm (4.3 by 8.7 ... by 257 mm (7.2 by 10.1 inches) A5 148 by 210 mm (5.8 by 14 inches) 60 to 120 g/m2 (16 to 28 lb) Capacity 75 envelopes 12 Printer description Q2431-90912 Duplex accessory media specifications Size Dimensions Weight Letter 216 by 279 mm (8.5 by 11 inches) A4 210 by 297 mm (8.3 by 11...
Table 10. Envelope feeder accessory Size Dimensions Monarch #7-3/4 98 by 191 mm (3.9 by 7.5 inches) Commercial#10 105 by 241 mm (4.1 by 9.5 inches) DL ISO 110 by 220 mm (4.3 by 8.7 ... by 257 mm (7.2 by 10.1 inches) A5 148 by 210 mm (5.8 by 14 inches) 60 to 120 g/m2 (16 to 28 lb) Capacity 75 envelopes 12 Printer description Q2431-90912 Duplex accessory media specifications Size Dimensions Weight Letter 216 by 279 mm (8.5 by 11 inches) A4 210 by 297 mm (8.3 by 11...

Service Manual
Page 37
... tray 1: Use standard and custom sizes from the same manufacturer. q Sizes in the optional envelope feeder: Standard sizes from tray 1. If you do not have an optional envelope feeder, always print envelopes from Monarch (98 by 191 mm, or 3.9 by 7.5 inches) to B5 (ISO) ... are now making envelopes optimized for laser printers. q Weight: The weight of the envelope rather than diagonal seams. This style might cause problems.) q Condition: Make sure that envelopes are not wrinkled, nicked, or otherwise damaged. Envelopes with adhesive strips or flaps Envelopes that folds over ...
... tray 1: Use standard and custom sizes from the same manufacturer. q Sizes in the optional envelope feeder: Standard sizes from tray 1. If you do not have an optional envelope feeder, always print envelopes from Monarch (98 by 191 mm, or 3.9 by 7.5 inches) to B5 (ISO) ... are now making envelopes optimized for laser printers. q Weight: The weight of the envelope rather than diagonal seams. This style might cause problems.) q Condition: Make sure that envelopes are not wrinkled, nicked, or otherwise damaged. Envelopes with adhesive strips or flaps Envelopes that folds over ...

Service Manual
Page 86
Envelope feeder 95 Envelope feeder pickup and feeding 96 Envelope feeder jam detection 97 Envelope feeder pickup delay jam 97 Envelope feeder pickup stationary jam 97 Duplexer 98 Reversing and duplexer pickup 99 Duplexer jam detection 100 Stacker and stapler/stacker 101 ...Resolution Enhancement technology 127 EconoMode 128 Input/output 128 Parallel interface 128 Expanded I/O 128 Flash 128 Hard-disk accessory 128 CPU 128 Printer memory 129 Read-only memory 129 Random-access memory 129 DIMM slots 129 Firmware DIMM 129 Nonvolatile memory 129 Memory Enhancement technology 129...
Envelope feeder 95 Envelope feeder pickup and feeding 96 Envelope feeder jam detection 97 Envelope feeder pickup delay jam 97 Envelope feeder pickup stationary jam 97 Duplexer 98 Reversing and duplexer pickup 99 Duplexer jam detection 100 Stacker and stapler/stacker 101 ...Resolution Enhancement technology 127 EconoMode 128 Input/output 128 Parallel interface 128 Expanded I/O 128 Flash 128 Hard-disk accessory 128 CPU 128 Printer memory 129 Read-only memory 129 Random-access memory 129 DIMM slots 129 Firmware DIMM 129 Nonvolatile memory 129 Memory Enhancement technology 129...
Service Manual
Page 87
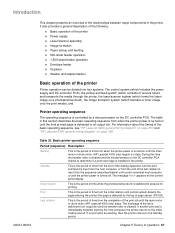
... (HP LaserJet 4300 only) stops. During this section describes the basic operating sequence from when the printer power is controlled by the host computer) the printer returns to prepare for printing. It also provides a general description of the following: q Basic operation of the printer q Power supply q Laser/scanner assembly q Image formation q Paper pickup and feeding q 500-sheet feeder...
... (HP LaserJet 4300 only) stops. During this section describes the basic operating sequence from when the printer power is controlled by the host computer) the printer returns to prepare for printing. It also provides a general description of the following: q Basic operation of the printer q Power supply q Laser/scanner assembly q Image formation q Paper pickup and feeding q 500-sheet feeder...
Service Manual
Page 89
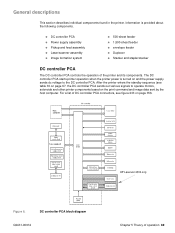
... assembly q Laser/scanner assembly q Image formation system q 500-sheet feeder q 1,500-sheet feeder q envelope feeder q Duplexer q Stacker and stapler/stacker DC controller PCA The DC controller PCA controls the operation of operation 69 The DC controller PCA starts printer operation when the printer power is provided... data sent by the host computer. DC controller PCA block diagram Q2431-90912 Chapter 5 Theory of the printer and its components. HP LaserJet 4300 only Figure 6. Information is turned on page 67. the DC controller PCA sends out various signals to the...
... assembly q Laser/scanner assembly q Image formation system q 500-sheet feeder q 1,500-sheet feeder q envelope feeder q Duplexer q Stacker and stapler/stacker DC controller PCA The DC controller PCA controls the operation of operation 69 The DC controller PCA starts printer operation when the printer power is provided... data sent by the host computer. DC controller PCA block diagram Q2431-90912 Chapter 5 Theory of the printer and its components. HP LaserJet 4300 only Figure 6. Information is turned on page 67. the DC controller PCA sends out various signals to the...

Service Manual
Page 115
... envelope-feeder driver with the DC controller PCA. Envelope feeder The envelope-feeder driver controls the operation sequences of operation 95 Figure 27. An 8-bit microprocessor in response to the envelope feeder, which then generates +5 v for the integrated circuits. The printer delivers a charge of +24 vdc to the command. The envelope-feeder driver activates the solenoid in the envelope feeder driver controls the envelope-feeder...
... envelope-feeder driver with the DC controller PCA. Envelope feeder The envelope-feeder driver controls the operation sequences of operation 95 Figure 27. An 8-bit microprocessor in response to the envelope feeder, which then generates +5 v for the integrated circuits. The printer delivers a charge of +24 vdc to the command. The envelope-feeder driver activates the solenoid in the envelope feeder driver controls the envelope-feeder...

Service Manual
Page 116
... diagram 96 Theory of the envelope. Envelope feeder pickup and feeding In the envelope feeder, the envelope sensor (PS901) detects the presence of envelopes and the envelope-size sensor (PS903) detects the width of operation Q2431-90912 Figure 28. The registration assembly corrects any unnecessary envelopes and the envelope travels to rotate. The envelope travels through the printer paper path and is...
... diagram 96 Theory of the envelope. Envelope feeder pickup and feeding In the envelope feeder, the envelope sensor (PS901) detects the presence of envelopes and the envelope-size sensor (PS903) detects the width of operation Q2431-90912 Figure 28. The registration assembly corrects any unnecessary envelopes and the envelope travels to rotate. The envelope travels through the printer paper path and is...

Service Manual
Page 117
... several times before determining that a jam has occurred. For more information about jam messages, see "Numerical printer messages" on page 274. Envelope feeder jam detection The envelope feeder uses the envelope multiple feed sensor (PS902) along with sensors in the envelope feeder, the error message 13.XX.YY appears on the control-panel display. For more information about...
... several times before determining that a jam has occurred. For more information about jam messages, see "Numerical printer messages" on page 274. Envelope feeder jam detection The envelope feeder uses the envelope multiple feed sensor (PS902) along with sensors in the envelope feeder, the error message 13.XX.YY appears on the control-panel display. For more information about...

Service Manual
Page 159
... pivot pins in the lower mounting slots (callout 2) and rotate the roller into place. Tray 1 pickup roller (1 of 2) 2. Note Tray 1 pickup roller If the optional envelope feeder accessory is installed, press the release button that are located on the left side and remove it snaps into the...
... pivot pins in the lower mounting slots (callout 2) and rotate the roller into place. Tray 1 pickup roller (1 of 2) 2. Note Tray 1 pickup roller If the optional envelope feeder accessory is installed, press the release button that are located on the left side and remove it snaps into the...

Service Manual
Page 160
Figure 64. Remove the front accessory cover (not shown). See "Accessory covers and the tray 2 extension door" on the left side and remove it. Carefully twist the screwdriver to step 2. 1. Tray 1 separation pad 140 Removing and replacing parts Q2431-90912 Insert the tip of a a small flat-blade screwdriver under the tray 1 separation pad. 3. Remove the tray 1 separation pad. Note Tray 1 separation pad If the optional envelope feeder accessory is installed, press the release button that is on page 143. 2. Then proceed to dislodge the separation pad.
Figure 64. Remove the front accessory cover (not shown). See "Accessory covers and the tray 2 extension door" on the left side and remove it. Carefully twist the screwdriver to step 2. 1. Tray 1 separation pad 140 Removing and replacing parts Q2431-90912 Insert the tip of a a small flat-blade screwdriver under the tray 1 separation pad. 3. Remove the tray 1 separation pad. Note Tray 1 separation pad If the optional envelope feeder accessory is installed, press the release button that is on page 143. 2. Then proceed to dislodge the separation pad.

Service Manual
Page 163
... 69. Grasp the front accessory cover (the mounting position for the optional envelope feeder) and pull it straight out of the printer to release it, and then lift it up to service the printer. 1. Rotate the cover toward the front of the printer. Open tray 1. Accessory covers (2 of 4) 2. Accessory covers (1 of 4) Q2431-90912 Chapter 6 Removing...
... 69. Grasp the front accessory cover (the mounting position for the optional envelope feeder) and pull it straight out of the printer to release it, and then lift it up to service the printer. 1. Rotate the cover toward the front of the printer. Open tray 1. Accessory covers (2 of 4) 2. Accessory covers (1 of 4) Q2431-90912 Chapter 6 Removing...

Service Manual
Page 170
... the switch connecting rod (callout 3). 150 Removing and replacing parts Q2431-90912 Open the formatter door and rotate the right-side cover away from the printer and lift it up to remove it 2 Figure 81. Reinstall note Right-side cover (4 of 4) 5. open tray 1 to release it . 23 Figure 82. Right-side... embossed on the locking tab to locate this arrow). 4. Use a small flat-blade screwdriver to push in on the pickup gear cover near the optional envelope feeder power connector (not shown;
... the switch connecting rod (callout 3). 150 Removing and replacing parts Q2431-90912 Open the formatter door and rotate the right-side cover away from the printer and lift it up to remove it 2 Figure 81. Reinstall note Right-side cover (4 of 4) 5. open tray 1 to release it . 23 Figure 82. Right-side... embossed on the locking tab to locate this arrow). 4. Use a small flat-blade screwdriver to push in on the pickup gear cover near the optional envelope feeder power connector (not shown;

Service Manual
Page 249
... stapler/stacker motors and solenoids 346 Stacker and stapler/stacker PCAs 347 Printer and accessory wiring diagrams 348 HP LaserJet 4200 wiring diagram 348 HP LaserJet 4300 wiring diagram 349 500-sheet feeder wiring diagram 350 1,500-sheet feeder wiring diagram 351 Duplex accessory wiring diagram 352 Envelope feeder accessory wiring diagram 353 Stacker accessory wiring diagram 354 Stapler/stacker...
... stapler/stacker motors and solenoids 346 Stacker and stapler/stacker PCAs 347 Printer and accessory wiring diagrams 348 HP LaserJet 4200 wiring diagram 348 HP LaserJet 4300 wiring diagram 349 500-sheet feeder wiring diagram 350 1,500-sheet feeder wiring diagram 351 Duplex accessory wiring diagram 352 Envelope feeder accessory wiring diagram 353 Stacker accessory wiring diagram 354 Stapler/stacker...
Service Manual
Page 278
... step through the instructions. 258 Troubleshooting Q2431-90912 If the problem persists, replace the envelope feeder. The printer job language 1. Contact the network systems administrator to remove the sealing tape. 2. Turn off the printer. 2. Turn on the printer. 4. BAD ENVELOPE FEEDER CONNECTION The envelope feeder is not functioning. 1. Try to change settings. the messages that did not exist in...
... step through the instructions. 258 Troubleshooting Q2431-90912 If the problem persists, replace the envelope feeder. The printer job language 1. Contact the network systems administrator to remove the sealing tape. 2. Turn off the printer. 2. Turn on the printer. 4. BAD ENVELOPE FEEDER CONNECTION The envelope feeder is not functioning. 1. Try to change settings. the messages that did not exist in...

Service Manual
Page 280
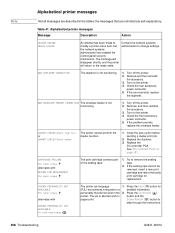
If the error persists, replace the EIO disk drive ENVELOPE FEEDER EMPTY The envelope feeder is full. 1. Refill the envelope feeder. 2. Turn off and then back on to delete the message from the display. 3. Turn the printer on page 160. 4. Printing can continue for example, a command to download... After number (PIN) was unsuccessful because the file system is empty. 1. Alphabetical printer messages (continued) Message Description Action EIO DISK X NOT FUNCTIONAL For help press The EIO disk in HP Web Jetadmin. 2. Press the SELECT ( ) button to continue. See "Firmware DIMM...
If the error persists, replace the EIO disk drive ENVELOPE FEEDER EMPTY The envelope feeder is full. 1. Refill the envelope feeder. 2. Turn off and then back on to delete the message from the display. 3. Turn the printer on page 160. 4. Printing can continue for example, a command to download... After number (PIN) was unsuccessful because the file system is empty. 1. Alphabetical printer messages (continued) Message Description Action EIO DISK X NOT FUNCTIONAL For help press The EIO disk in HP Web Jetadmin. 2. Press the SELECT ( ) button to continue. See "Firmware DIMM...

Service Manual
Page 315
... poor print quality. If the location of media is not obvious, look for jammed paper or other than those specified in the jam message. Optional envelope feeder 3. Chapter 7 Troubleshooting 295 Note Q2431-90912 Jam locations 1. When clearing jams, be very careful not to clear a jam message. 1 2 7 6 4 5 3 Figure 206.... print cartridge. Paper-path troubleshooting Note Overview If a jam message appears on page 298. You might remain in the printer after a few pages are indicated in this section for information about clearing the jam. Then see "Persistent jams" on the...
... poor print quality. If the location of media is not obvious, look for jammed paper or other than those specified in the jam message. Optional envelope feeder 3. Chapter 7 Troubleshooting 295 Note Q2431-90912 Jam locations 1. When clearing jams, be very careful not to clear a jam message. 1 2 7 6 4 5 3 Figure 206.... print cartridge. Paper-path troubleshooting Note Overview If a jam message appears on page 298. You might remain in the printer after a few pages are indicated in this section for information about clearing the jam. Then see "Persistent jams" on the...


