
HP Notebook Reference Guide - Windows 7
Page 32
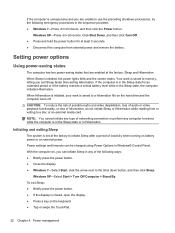
... enabled at the factory: Sleep and Hibernation. CAUTION: To reduce the risk of possible audio and video degradation, loss of audio or video playback functionality, or loss of networking connection or perform any type of information, do not initiate Sleep or Hibernation while reading from external power and remove the battery. With the computer on external power. Your work is closed, open the display. ● Press a key on the hard drive and the computer turns...
... enabled at the factory: Sleep and Hibernation. CAUTION: To reduce the risk of possible audio and video degradation, loss of audio or video playback functionality, or loss of networking connection or perform any type of information, do not initiate Sleep or Hibernation while reading from external power and remove the battery. With the computer on external power. Your work is closed, open the display. ● Press a key on the hard drive and the computer turns...
HP Notebook Reference Guide - Windows 7
Page 52
To disconnect an unpowered external device, turn off and the AC power cord is unplugged. 1. NOTE: HP external USB optical drives should be used with an adapter attached) ● External optical drive (CD, DVD, and Blu-ray) ● MultiBay device Using the expansion port (select models only) The expansion port connects the computer to the powered USB port on the computer. USB drives include the following types: ● 1.44-megabyte diskette drive ● Hard drive module (a hard drive with the computer. The...
To disconnect an unpowered external device, turn off and the AC power cord is unplugged. 1. NOTE: HP external USB optical drives should be used with an adapter attached) ● External optical drive (CD, DVD, and Blu-ray) ● MultiBay device Using the expansion port (select models only) The expansion port connects the computer to the powered USB port on the computer. USB drives include the following types: ● 1.44-megabyte diskette drive ● Hard drive module (a hard drive with the computer. The...
HP Notebook Reference Guide - Windows 7
Page 55
.... Windows XP- Connect the computer to your computer. NOTE: Windows includes the User Account Control feature to complete. You may be prompted for the hard drive, usually listed as installing software, running utilities, or changing Windows settings. Using hard drives 45 HP recommends defragmenting your computer manually at any time. To run Disk Defragmenter on the hard drive so that you can defragment your hard drive at another time when you can safely delete to free...
.... Windows XP- Connect the computer to your computer. NOTE: Windows includes the User Account Control feature to complete. You may be prompted for the hard drive, usually listed as installing software, running utilities, or changing Windows settings. Using hard drives 45 HP recommends defragmenting your computer manually at any time. To run Disk Defragmenter on the hard drive so that you can defragment your hard drive at another time when you can safely delete to free...
HP Notebook Reference Guide - Windows 7
Page 70
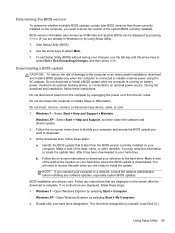
...enter. 4. Setup Utility includes settings for Startup Menu" message is displayed at the bottom of the screen. 2. Use the arrow keys to a USB port can prevent the computer from operating properly. When a confirmation prompt with Setup Utility only if USB legacy support is displayed, press enter. 5. Turn on the system (such as disk drives, display, keyboard, mouse, and printer). Errors can be used with your change takes effect immediately. 60 Chapter 9 Setup Utility (BIOS) and System Diagnostics 9 Setup Utility (BIOS) and System Diagnostics Using Setup Utility Setup Utility...
...enter. 4. Setup Utility includes settings for Startup Menu" message is displayed at the bottom of the screen. 2. Use the arrow keys to a USB port can prevent the computer from operating properly. When a confirmation prompt with Setup Utility only if USB legacy support is displayed, press enter. 5. Turn on the system (such as disk drives, display, keyboard, mouse, and printer). Errors can be used with your change takes effect immediately. 60 Chapter 9 Setup Utility (BIOS) and System Diagnostics 9 Setup Utility (BIOS) and System Diagnostics Using Setup Utility Setup Utility...
HP Notebook Reference Guide - Windows 7
Page 73
... as ROM date and System BIOS) can be displayed by pressing fn+esc (if you are already in Windows) or by using the AC adapter. Start Setup Utility. 2. b. You may need to access this information to locate the update later, after the download is connected to your changes, click the Exit icon in an optional docking device, or connected to the hard drive. The hard drive designation is later than the BIOS version currently installed...
... as ROM date and System BIOS) can be displayed by pressing fn+esc (if you are already in Windows) or by using the AC adapter. Start Setup Utility. 2. b. You may need to access this information to locate the update later, after the download is connected to your changes, click the Exit icon in an optional docking device, or connected to the hard drive. The hard drive designation is later than the BIOS version currently installed...
HP Notebook Reference Guide - Windows 7
Page 79
... 26 displaying remaining charge 26 disposing 28 low battery levels 26 replacing 28 storing 28 Battery Check 26 battery information, finding 25 battery power 25 battery temperature 28 BIOS determining version 62 downloading an update 63 updating 62 Bluetooth device 2, 9 buttons media 15 power 21 volume 16 wireless 3 C cables 1394 40 eSATA 41 USB 39 CardBus PC Cards 32 checking audio functions 16 computer, traveling 28, 65 configuring audio for HDMI 19 configuring ExpressCards 35 configuring PC Cards 33 connecting to a wired network 9 connecting...
... 26 displaying remaining charge 26 disposing 28 low battery levels 26 replacing 28 storing 28 Battery Check 26 battery information, finding 25 battery power 25 battery temperature 28 BIOS determining version 62 downloading an update 63 updating 62 Bluetooth device 2, 9 buttons media 15 power 21 volume 16 wireless 3 C cables 1394 40 eSATA 41 USB 39 CardBus PC Cards 32 checking audio functions 16 computer, traveling 28, 65 configuring audio for HDMI 19 configuring ExpressCards 35 configuring PC Cards 33 connecting to a wired network 9 connecting...

HP Notebook Reference Guide - Windows 7
Page 80
..., USB 60 lights, drive 46 local area network (LAN) cable required 13 connecting cable 13 low battery level 26 M maintenance Disk Cleanup 45 Disk Defragmenter 45 managing a power-on password 55 managing an administrator password 54 media action keys 15 media activity controls 15 media hotkeys 15 MediaSmart 20 modems connecting a modem cable 10 connecting a modem cable adapter 10 selecting a location setting 11 N network cable, connecting 13 network icon 2 inserting 33 removing 34 removing insert 33 software and drivers 33 supported types 32 ports DisplayPort 18 expansion 42 external monitor 17...
..., USB 60 lights, drive 46 local area network (LAN) cable required 13 connecting cable 13 low battery level 26 M maintenance Disk Cleanup 45 Disk Defragmenter 45 managing a power-on password 55 managing an administrator password 54 media action keys 15 media activity controls 15 media hotkeys 15 MediaSmart 20 modems connecting a modem cable 10 connecting a modem cable adapter 10 selecting a location setting 11 N network cable, connecting 13 network icon 2 inserting 33 removing 34 removing insert 33 software and drivers 33 supported types 32 ports DisplayPort 18 expansion 42 external monitor 17...

Service Guide
Page 22
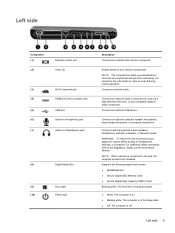
... normal for the internal fan to cycle on . ● Blinking white: The computer is in (microphone) jack (7) Audio-out (headphone) jack (8) Digital Media Slot (9) (10) Drive light Power light 14 Chapter 2 External component identification Description Connects an external VGA monitor or projector. To reduce the risk of personal injury, adjust the volume before putting on headphones, earbuds, or a headset. Connects a network cable. Produce sound when connected to cool internal components. Enable airflow to optional powered stereo speakers, headphones...
... normal for the internal fan to cycle on . ● Blinking white: The computer is in (microphone) jack (7) Audio-out (headphone) jack (8) Digital Media Slot (9) (10) Drive light Power light 14 Chapter 2 External component identification Description Connects an external VGA monitor or projector. To reduce the risk of personal injury, adjust the volume before putting on headphones, earbuds, or a headset. Connects a network cable. Produce sound when connected to cool internal components. Enable airflow to optional powered stereo speakers, headphones...
Service Guide
Page 29
...: 646131-001 Hard drive compartment cover (includes one captive screw, secured by a C-clip) Memory module/wireless module compartment cover (includes one captive screw, secured by a C-clip) NOTE: See Plastics Kit on page 25 for more Cable Kit spare part information. Speaker Kit (includes left and right speakers and cable) 647315-001 System board (includes replacement thermal material): For use only with computer models equipped with...
...: 646131-001 Hard drive compartment cover (includes one captive screw, secured by a C-clip) Memory module/wireless module compartment cover (includes one captive screw, secured by a C-clip) NOTE: See Plastics Kit on page 25 for more Cable Kit spare part information. Speaker Kit (includes left and right speakers and cable) 647315-001 System board (includes replacement thermal material): For use only with computer models equipped with...

Service Guide
Page 97
... displayed at the bottom of Setup Utility 1. Starting Setup Utility NOTE: An external keyboard or mouse connected to a USB port can prevent the computer from operating properly. Press f10 to select a language, and then press enter. 4. Using Setup Utility 89 To start Setup Utility, follow these steps: 1. Start Setup Utility. 2. When a confirmation prompt with Setup Utility only if USB legacy support is enabled. Errors can be used with your change takes effect immediately. Changing the language of the screen. 2. Use the arrow keys to enter Setup Utility. Your change...
... displayed at the bottom of Setup Utility 1. Starting Setup Utility NOTE: An external keyboard or mouse connected to a USB port can prevent the computer from operating properly. Press f10 to select a language, and then press enter. 4. Using Setup Utility 89 To start Setup Utility, follow these steps: 1. Start Setup Utility. 2. When a confirmation prompt with Setup Utility only if USB legacy support is enabled. Errors can be used with your change takes effect immediately. Changing the language of the screen. 2. Use the arrow keys to enter Setup Utility. Your change...
Service Guide
Page 100
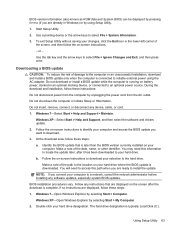
... instructions: Do not disconnect power from the AC outlet. Windows XP-Select Start > Help and Support, and then select the software and drivers update. 2. b. Windows 7-Select Start > Help and Support > Maintain. To exit Setup Utility (BIOS) without saving your computer. Do not shut down the computer or initiate Sleep or Hibernation. You will need this path when you connect your computer to a network, consult the network administrator before installing any device, cable...
... instructions: Do not disconnect power from the AC outlet. Windows XP-Select Start > Help and Support, and then select the software and drivers update. 2. b. Windows 7-Select Start > Help and Support > Maintain. To exit Setup Utility (BIOS) without saving your computer. Do not shut down the computer or initiate Sleep or Hibernation. You will need this path when you connect your computer to a network, consult the network administrator before installing any device, cable...
Service Guide
Page 120
..., 72 display panel cable removal 73 spare part number 26, 33, 73 Display Screw Kit, spare part number 27, 34 display specifications 95 display switch 10 drive light 14 drives, preventing damage 38 DVD±RW and CD-RW Super Multi Double-Layer Combo Drive precautions 38 removal 44 spare part number 23, 28, 34, 44 E electrostatic discharge 38 equipment guidelines 41 esc key 11 Ethernet, product description 5 external media cards, product description 6 external monitor port 14 F fan/heat...
..., 72 display panel cable removal 73 spare part number 26, 33, 73 Display Screw Kit, spare part number 27, 34 display specifications 95 display switch 10 drive light 14 drives, preventing damage 38 DVD±RW and CD-RW Super Multi Double-Layer Combo Drive precautions 38 removal 44 spare part number 23, 28, 34, 44 E electrostatic discharge 38 equipment guidelines 41 esc key 11 Ethernet, product description 5 external media cards, product description 6 external monitor port 14 F fan/heat...
Service Guide
Page 121
... Windows logo 11 L left-side components 14 light components 12 lights AC adapter 15 caps lock 12 drive 14 optical drive 15 power 12, 14 TouchPad 12, 13 webcam 9 wireless 12 M mass storage device precautions 38 removal 50 spare part numbers 27, 50 memory module product description 4 removal 49 spare part numbers 24, 31, 32, 49 memory module compartment 16 memory module/wireless module compartment cover illustrated 28 removal 45 microphone location 9 product description 5 microphone jack 14 model description 43 model name 1 monitor port 14 N network jack 14 O operating...
... Windows logo 11 L left-side components 14 light components 12 lights AC adapter 15 caps lock 12 drive 14 optical drive 15 power 12, 14 TouchPad 12, 13 webcam 9 wireless 12 M mass storage device precautions 38 removal 50 spare part numbers 27, 50 memory module product description 4 removal 49 spare part numbers 24, 31, 32, 49 memory module compartment 16 memory module/wireless module compartment cover illustrated 28 removal 45 microphone location 9 product description 5 microphone jack 14 model description 43 model name 1 monitor port 14 N network jack 14 O operating...
Service Guide
Page 122
...3 display panel 4 Ethernet 5 external media cards 6 graphics 3 hard drives 4 keyboard 6 memory module 4 microphone 5 operating system 7 optical drive 5 pointing device 6 ports 6 power requirements 6 processors 1 product name 1 security 7 serviceability 8 video 5 wireless 5 product name 1, 42 product number 42 R removal/replacement preliminaries 37 procedures 42 right-side components RJ-45 jack 14 RTC battery removal 78 spare part number 15 21, 34, 78 S Screw Kit, spare part number 29, 34 security cable slot 15 security, product description 7 serial number 42 service considerations cables 37...
...3 display panel 4 Ethernet 5 external media cards 6 graphics 3 hard drives 4 keyboard 6 memory module 4 microphone 5 operating system 7 optical drive 5 pointing device 6 ports 6 power requirements 6 processors 1 product name 1 security 7 serviceability 8 video 5 wireless 5 product name 1, 42 product number 42 R removal/replacement preliminaries 37 procedures 42 right-side components RJ-45 jack 14 RTC battery removal 78 spare part number 15 21, 34, 78 S Screw Kit, spare part number 29, 34 security cable slot 15 security, product description 7 serial number 42 service considerations cables 37...
Getting Started HP Notebook - Windows 7
Page 15
...! Supports the following digital card formats: ● MultiMediaCard ● Secure Digital (SD) Memory Card ● Secure Digital High Capacity (SDHC) Card Blinking white: The hard drive is being accessed. ● White: The computer is on. ● Blinking white: The computer is in (microphone) jack (7) Audio-out (headphone) jack (8) Digital Media Slot (9) Drive light (10) Power light Description Connects an external VGA monitor or projector. Left side 9 It is off during routine operation. Connects an optional computer headset microphone...
...! Supports the following digital card formats: ● MultiMediaCard ● Secure Digital (SD) Memory Card ● Secure Digital High Capacity (SDHC) Card Blinking white: The hard drive is being accessed. ● White: The computer is on. ● Blinking white: The computer is in (microphone) jack (7) Audio-out (headphone) jack (8) Digital Media Slot (9) Drive light (10) Power light Description Connects an external VGA monitor or projector. Left side 9 It is off during routine operation. Connects an optional computer headset microphone...
Getting Started HP Notebook - Windows 7
Page 23
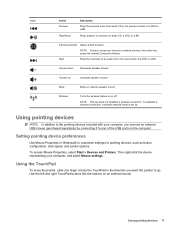
... speaker volume. Setting pointing device preferences Use Mouse Properties in the direction you can use an external USB mouse (purchased separately) by connecting it to the pointing devices included with your Internet or network services, this action key opens the Internet Connection Wizard. Using pointing devices 17 Volume up . NOTE: This key does not establish a wireless connection. Use the left and right TouchPad buttons like the buttons on or off. Mute Mutes or restores speaker sound. To access Mouse Properties, select Start > Devices and...
... speaker volume. Setting pointing device preferences Use Mouse Properties in the direction you can use an external USB mouse (purchased separately) by connecting it to the pointing devices included with your Internet or network services, this action key opens the Internet Connection Wizard. Using pointing devices 17 Volume up . NOTE: This key does not establish a wireless connection. Use the left and right TouchPad buttons like the buttons on or off. Mute Mutes or restores speaker sound. To access Mouse Properties, select Start > Devices and...
Getting Started HP Notebook - Windows 7
Page 47
... Media Slot, identifying 9 display image, switching 16 display switch, internal 10 drive light 9 E esc key, identifying 7 external monitor port 9 F f11 32 fn key, identifying 7 H hard drive installing 24 removing 23 hard drive bay, identifying 11 HDMI port, identifying 9 headphone (audio-out) jack, identifying 9 Help and Support action key 16 I input power 39 integrated webcam light, identifying 10 internal microphone, identifying 10 Internet connection setup 14 ISP, using 13 J jacks audio-in (microphone) 9 audio-out (headphone) 9 network 9 RJ-45 (network) 9 K keys action 7 esc 7 fn 7 Windows...
... Media Slot, identifying 9 display image, switching 16 display switch, internal 10 drive light 9 E esc key, identifying 7 external monitor port 9 F f11 32 fn key, identifying 7 H hard drive installing 24 removing 23 hard drive bay, identifying 11 HDMI port, identifying 9 headphone (audio-out) jack, identifying 9 Help and Support action key 16 I input power 39 integrated webcam light, identifying 10 internal microphone, identifying 10 Internet connection setup 14 ISP, using 13 J jacks audio-in (microphone) 9 audio-out (headphone) 9 network 9 RJ-45 (network) 9 K keys action 7 esc 7 fn 7 Windows...
HP 2000 Notebook PC - Maintenance and Service Guide
Page 93
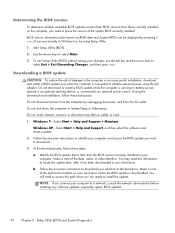
... reliable external power using Setup Utility. 1. Follow any instructions that is complete. Windows 7-Open Windows Explorer by unplugging the power cord from the computer by selecting Start > Computer. Using Setup Utility 85 Use the arrow keys to select Exit > Exit Discarding Changes, and then press enter. You will need to know the version of the path to the location on your hard drive where the BIOS update is connected to a network, consult the network administrator before installing any device, cable...
... reliable external power using Setup Utility. 1. Follow any instructions that is complete. Windows 7-Open Windows Explorer by unplugging the power cord from the computer by selecting Start > Computer. Using Setup Utility 85 Use the arrow keys to select Exit > Exit Discarding Changes, and then press enter. You will need to know the version of the path to the location on your hard drive where the BIOS update is connected to a network, consult the network administrator before installing any device, cable...
HP 2000 Notebook PC - Maintenance and Service Guide
Page 113
... 14 button components 8 buttons power 8 TouchPad 11 TouchPad on/off 11 C Cable Kit contents 23 spare part number 18, 23, 28 cables, service considerations 33 caps lock light 10 chipset, product description 2 components bottom 14 button 8 display 7 keys 9 left-side 12 lights 10 right-side 13 TouchPad 11 computer feet, locations 39 computer major components 17 computer part number 38 computer specifications 87 connectors, service considerations 33 D Digital Media Slot 12 display assembly removal 62 spare part numbers...
... 14 button components 8 buttons power 8 TouchPad 11 TouchPad on/off 11 C Cable Kit contents 23 spare part number 18, 23, 28 cables, service considerations 33 caps lock light 10 chipset, product description 2 components bottom 14 button 8 display 7 keys 9 left-side 12 lights 10 right-side 13 TouchPad 11 computer feet, locations 39 computer major components 17 computer part number 38 computer specifications 87 connectors, service considerations 33 D Digital Media Slot 12 display assembly removal 62 spare part numbers...
HP 2000 Notebook PC - Maintenance and Service Guide
Page 115
... description audio 4 chipset 2 display panel 3 Ethernet 4 external media cards 5 graphics 2 hard drives 3 keyboard 5 memory module 3 microphone 4 operating system 6 optical drive 4 pointing device 5 ports 5 power requirements 5 processors 1 product name 1 security 6 serviceability 6 video 4 wireless 4 product name 1, 38 product number 38 R removal/replacement preliminaries 33 procedures 38 right-side components 13 RJ-45 jack 12 RTC battery removal 72 spare part number 19, 30, 72 service tag 15, 38 serviceability, product description 6 Setup Utility (BIOS) 82 Speaker Kit, spare part number 19...
... description audio 4 chipset 2 display panel 3 Ethernet 4 external media cards 5 graphics 2 hard drives 3 keyboard 5 memory module 3 microphone 4 operating system 6 optical drive 4 pointing device 5 ports 5 power requirements 5 processors 1 product name 1 security 6 serviceability 6 video 4 wireless 4 product name 1, 38 product number 38 R removal/replacement preliminaries 33 procedures 38 right-side components 13 RJ-45 jack 12 RTC battery removal 72 spare part number 19, 30, 72 service tag 15, 38 serviceability, product description 6 Setup Utility (BIOS) 82 Speaker Kit, spare part number 19...


