HP LaserJet 1160 and 1320 Series - User Guide
Page 7
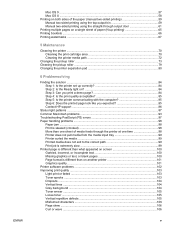
......67 5 Maintenance Cleaning the printer ...70 Cleaning the print cartridge area 70 Cleaning the printer media path 72 Changing the pickup roller ...73 Cleaning the pickup roller ...79 Changing the printer separation pad 80 6 Problemsolving Finding the solution ...84 Step 1: Is the printer set up correctly 84 Step...page 84 Step 4: Is the print quality acceptable 85 Step 5: Is the printer communicating with the computer 85 Step 6: Does the printed page look like you expected 85 Contact HP support ...86 Status light patterns ...87 Common Macintosh problems 93 Troubleshooting PostScript (...
......67 5 Maintenance Cleaning the printer ...70 Cleaning the print cartridge area 70 Cleaning the printer media path 72 Changing the pickup roller ...73 Cleaning the pickup roller ...79 Changing the printer separation pad 80 6 Problemsolving Finding the solution ...84 Step 1: Is the printer set up correctly 84 Step...page 84 Step 4: Is the print quality acceptable 85 Step 5: Is the printer communicating with the computer 85 Step 6: Does the printed page look like you expected 85 Contact HP support ...86 Status light patterns ...87 Common Macintosh problems 93 Troubleshooting PostScript (...
HP LaserJet 1160 and 1320 Series - User Guide
Page 79
5 Maintenance This chapter provides information on the following topics: ● Cleaning the printer ● Changing the pickup roller ● Cleaning the pickup roller ● Changing the printer separation pad ENWW 69
5 Maintenance This chapter provides information on the following topics: ● Cleaning the printer ● Changing the pickup roller ● Cleaning the pickup roller ● Changing the printer separation pad ENWW 69
HP LaserJet 1160 and 1320 Series - User Guide
Page 83
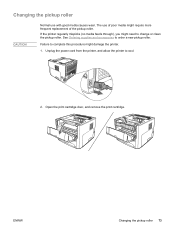
...the pickup roller. ENWW Changing the pickup roller 73 See Ordering supplies and accessories to cool. 2. Open the print cartridge door, and remove the print cartridge. Unplug the power cord from the printer, and allow the printer to order a new pickup roller. Changing the pickup roller ...CAUTION Normal use of poor media might require more frequent replacement of the pickup roller. The use with good media causes wear.
...the pickup roller. ENWW Changing the pickup roller 73 See Ordering supplies and accessories to cool. 2. Open the print cartridge door, and remove the print cartridge. Unplug the power cord from the printer, and allow the printer to order a new pickup roller. Changing the pickup roller ...CAUTION Normal use of poor media might require more frequent replacement of the pickup roller. The use with good media causes wear.
HP LaserJet 1160 and 1320 Series - User Guide
Page 85
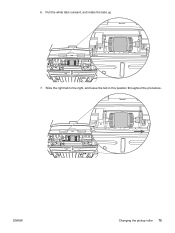
ENWW Changing the pickup roller 75 6. Pull the white tabs outward, and rotate the tabs up. 7. Slide the right tab to the right, and leave the tab in this position throughout the procedure.
ENWW Changing the pickup roller 75 6. Pull the white tabs outward, and rotate the tabs up. 7. Slide the right tab to the right, and leave the tab in this position throughout the procedure.
HP LaserJet 1160 and 1320 Series - User Guide
Page 86
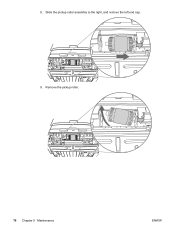
Remove the pickup roller. 76 Chapter 5 Maintenance ENWW 8. Slide the pickup roller assembly to the right, and remove the left end cap. 9.
Remove the pickup roller. 76 Chapter 5 Maintenance ENWW 8. Slide the pickup roller assembly to the right, and remove the left end cap. 9.
HP LaserJet 1160 and 1320 Series - User Guide
Page 87
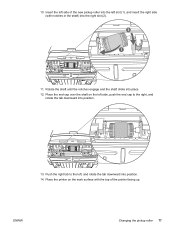
Push the right tab to the right, and rotate the tab downward into the right slot (2). 11. ENWW Changing the pickup roller 77 Rotate the shaft until the notches engage and the shaft clicks into position. 14. 10. Place the printer on the left side of the printer facing up. Insert the left side, push the end cap to the left slot (1), and insert the right side (with the top of the new pickup roller into the left , and rotate the tab downward into place. 12. Place the end cap over the shaft on the work surface with notches in the shaft) into position. 13.
Push the right tab to the right, and rotate the tab downward into the right slot (2). 11. ENWW Changing the pickup roller 77 Rotate the shaft until the notches engage and the shaft clicks into position. 14. 10. Place the printer on the left side of the printer facing up. Insert the left side, push the end cap to the left slot (1), and insert the right side (with the top of the new pickup roller into the left , and rotate the tab downward into place. 12. Place the end cap over the shaft on the work surface with notches in the shaft) into position. 13.
HP LaserJet 1160 and 1320 Series - User Guide
Page 89
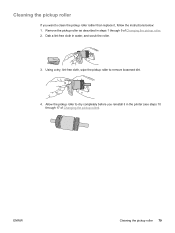
Using a dry, lint-free cloth, wipe the pickup roller to clean the pickup roller rather than replace it in the printer (see steps 10 through 9 of Changing the pickup roller). Remove the pickup roller as described in water, and scrub the roller. 3. Dab a lint-free cloth in steps 1 through 17 of Changing the pickup roller. 2. Allow the pickup roller to dry completely before you want to remove loosened dirt. 4. ENWW Cleaning the pickup roller 79 Cleaning the pickup roller If you reinstall it , follow the instructions below: 1.
Using a dry, lint-free cloth, wipe the pickup roller to clean the pickup roller rather than replace it in the printer (see steps 10 through 9 of Changing the pickup roller). Remove the pickup roller as described in water, and scrub the roller. 3. Dab a lint-free cloth in steps 1 through 17 of Changing the pickup roller. 2. Allow the pickup roller to dry completely before you want to remove loosened dirt. 4. ENWW Cleaning the pickup roller 79 Cleaning the pickup roller If you reinstall it , follow the instructions below: 1.
HP LaserJet 1160 and 1320 Series - User Guide
Page 109
... Curl or wave for more information. See Media paths for more information. ● Make sure that the printer is not in manual feed mode. See Cleaning the pickup roller or Changing the pickup roller for the HP LaserJet 1320 series printer. Use normal media. Print job is up to 20 pages per minute for instructions. This may cause toner...
... Curl or wave for more information. See Media paths for more information. ● Make sure that the printer is not in manual feed mode. See Cleaning the pickup roller or Changing the pickup roller for the HP LaserJet 1320 series printer. Use normal media. Print job is up to 20 pages per minute for instructions. This may cause toner...
HP LaserJet 1160 and 1320 Series - User Guide
Page 159
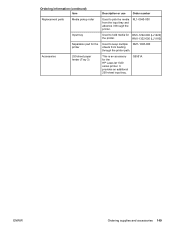
...information (continued) Item Description or use Order number Replacement parts Media pickup roller Used to pick the media from feeding through the printer. RM1-1322-000 (LJ1160) Used to hold media for the HP LaserJet 1320 series printer. It provides an additional 250-sheet input tray. RL1-0540-...000 Input tray Separation pad for the printer Used to keep multiple RM1-1298-...
...information (continued) Item Description or use Order number Replacement parts Media pickup roller Used to pick the media from feeding through the printer. RM1-1322-000 (LJ1160) Used to hold media for the HP LaserJet 1320 series printer. It provides an additional 250-sheet input tray. RL1-0540-...000 Input tray Separation pad for the printer Used to keep multiple RM1-1298-...
HP LaserJet 1160 and 1320 Series - User Guide
Page 177
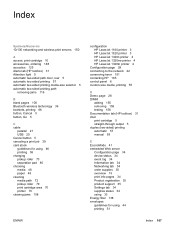
... a print job 39 card stock guidelines for using 46 printing 55 changing pickup roller 73 separation pad 80 choosing media 48 paper 48 cleaning media path 72 pickup roller 79 print cartridge area 70 printer 70 clearing jams 108 configuration HP LaserJet 1160 printer 3 HP LaserJet 1320 printer 3 HP LaserJet 1320n printer 4 HP LaserJet 1320nw printer 4 HP LaserJet 1320tn printer 4 Configuration page 28 connecting to the network 22 conserving toner 151...
... a print job 39 card stock guidelines for using 46 printing 55 changing pickup roller 73 separation pad 80 choosing media 48 paper 48 cleaning media path 72 pickup roller 79 print cartridge area 70 printer 70 clearing jams 108 configuration HP LaserJet 1160 printer 3 HP LaserJet 1320 printer 3 HP LaserJet 1320n printer 4 HP LaserJet 1320nw printer 4 HP LaserJet 1320tn printer 4 Configuration page 28 connecting to the network 22 conserving toner 151...
HP LaserJet 1160 and 1320 Series - User Guide
Page 179
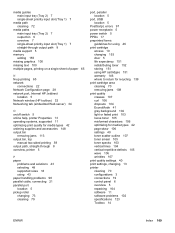
... 65 network connections 22 Network Configuration page 28 network port, Internal HP Jetdirect location 5 Network window (HP toolbox) 32 Networking tab (embedded Web server) 34 O on/off switch 5 online help, printer Properties 13 operating systems, supported 11 optimizing print quality for media ...two-sided printing 59 output path, straight-through 8 overview, printer 5 P paper problems and solutions 43 selecting 48 supported sizes 18 using 43 paper handling problems 98 parallel cable, connecting 21 parallel port location 5 pickup roller changing 73 cleaning 79 port, parallel location 5 port, USB...
... 65 network connections 22 Network Configuration page 28 network port, Internal HP Jetdirect location 5 Network window (HP toolbox) 32 Networking tab (embedded Web server) 34 O on/off switch 5 online help, printer Properties 13 operating systems, supported 11 optimizing print quality for media ...two-sided printing 59 output path, straight-through 8 overview, printer 5 P paper problems and solutions 43 selecting 48 supported sizes 18 using 43 paper handling problems 98 parallel cable, connecting 21 parallel port location 5 pickup roller changing 73 cleaning 79 port, parallel location 5 port, USB...

Service Manual
Page 6
......38 To view the HP Toolbox on Windows systems 39 To view the HP Toolbox on Macintosh systems 39 HP Toolbox sections ...39 Other links ...39 Status tab ...39 Troubleshooting tab ...40 Alerts tab ...40 Documentation tab ...40 Advanced Printer Settings window 41 Network... printer media path 51 Changing the pickup roller ...52 Cleaning the pickup roller ...58 Changing the printer separation pad 59 Cleaning the printer separation pad 63 5 Theory of operation Chapter contents...65 Introduction...66 Internal components...67 Timing...68 Engine control system...70 Laser/scanner system...72 Pickup...
......38 To view the HP Toolbox on Windows systems 39 To view the HP Toolbox on Macintosh systems 39 HP Toolbox sections ...39 Other links ...39 Status tab ...39 Troubleshooting tab ...40 Alerts tab ...40 Documentation tab ...40 Advanced Printer Settings window 41 Network... printer media path 51 Changing the pickup roller ...52 Cleaning the pickup roller ...58 Changing the printer separation pad 59 Cleaning the printer separation pad 63 5 Theory of operation Chapter contents...65 Introduction...66 Internal components...67 Timing...68 Engine control system...70 Laser/scanner system...72 Pickup...
Service Manual
Page 59
4 Maintenance Chapter contents Chapter contents...47 Replacing the print cartridge...48 To replace the print cartridge 48 Cleaning the printer ...49 Cleaning the print-cartridge area 49 Cleaning the printer media path 51 Changing the pickup roller ...52 Cleaning the pickup roller ...58 Changing the printer separation pad 59 Cleaning the printer separation pad 63 ENWW Chapter contents 47
4 Maintenance Chapter contents Chapter contents...47 Replacing the print cartridge...48 To replace the print cartridge 48 Cleaning the printer ...49 Cleaning the print-cartridge area 49 Cleaning the printer media path 51 Changing the pickup roller ...52 Cleaning the pickup roller ...58 Changing the printer separation pad 59 Cleaning the printer separation pad 63 ENWW Chapter contents 47
Service Manual
Page 64
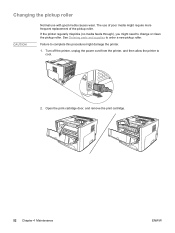
...-cartridge door, and remove the print cartridge. 52 Chapter 4 Maintenance ENWW Changing the pickup roller CAUTION Normal use of poor media might require more frequent replacement of the pickup roller. Failure to complete this procedure might need to change or clean the pickup roller. If the printer regularly mispicks (no media feeds through), you might damage the...
...-cartridge door, and remove the print cartridge. 52 Chapter 4 Maintenance ENWW Changing the pickup roller CAUTION Normal use of poor media might require more frequent replacement of the pickup roller. Failure to complete this procedure might need to change or clean the pickup roller. If the printer regularly mispicks (no media feeds through), you might damage the...
Service Manual
Page 65
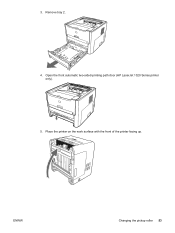
Open the front automatic two-sided-printing path door (HP LaserJet 1320 Series printer only). 5. ENWW Changing the pickup roller 53 Remove tray 2. 4. Place the printer on the work surface with the front of the printer facing up. 3.
Open the front automatic two-sided-printing path door (HP LaserJet 1320 Series printer only). 5. ENWW Changing the pickup roller 53 Remove tray 2. 4. Place the printer on the work surface with the front of the printer facing up. 3.
Service Manual
Page 67
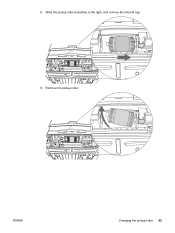
ENWW Changing the pickup roller 55 Slide the pickup roller assembly to the right, and remove the left end cap. 9. Remove the pickup roller. 8.
ENWW Changing the pickup roller 55 Slide the pickup roller assembly to the right, and remove the left end cap. 9. Remove the pickup roller. 8.
Service Manual
Page 68
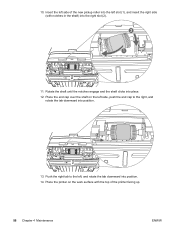
Insert the left side of the new pickup roller into the left slot (1), and insert the right side (with the top of the printer facing up. 56 Chapter 4 Maintenance ENWW Push the right tab to the left side, push the end cap to the right, and rotate the tab downward into position. 14. Place the end cap over the shaft on the work surface with notches in the shaft) into place. 12. Place the printer on the left , and rotate the tab downward into position. 13. 10. Rotate the shaft until the notches engage and the shaft clicks into the right slot (2). 11.
Insert the left side of the new pickup roller into the left slot (1), and insert the right side (with the top of the printer facing up. 56 Chapter 4 Maintenance ENWW Push the right tab to the left side, push the end cap to the right, and rotate the tab downward into position. 14. Place the end cap over the shaft on the work surface with notches in the shaft) into place. 12. Place the printer on the left , and rotate the tab downward into position. 13. 10. Rotate the shaft until the notches engage and the shaft clicks into the right slot (2). 11.
Service Manual
Page 69
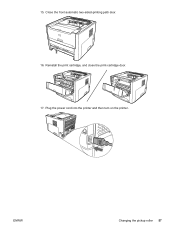
Reinstall the print cartridge, and close the print-cartridge door. 17. Plug the power cord into the printer and then turn on the printer. ENWW Changing the pickup roller 57 Close the front automatic two-sided-printing path door. 16. 15.
Reinstall the print cartridge, and close the print-cartridge door. 17. Plug the power cord into the printer and then turn on the printer. ENWW Changing the pickup roller 57 Close the front automatic two-sided-printing path door. 16. 15.
Service Manual
Page 70
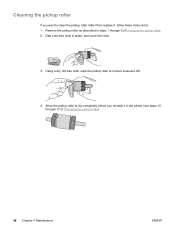
Allow the pickup roller to dry completely before you want to remove loosened dirt. 4. Remove the pickup roller as described in steps 1 through 17 of Changing the pickup roller. 2. Using a dry, lint-free cloth, wipe the pickup roller to clean the pickup roller rather than replace it in water, and scrub the roller. 3. Dab a lint-free cloth in the printer (see steps 10 through 9 of Changing the pickup roller). 58 Chapter 4 Maintenance ENWW Cleaning the pickup roller If you reinstall it , follow these instructions: 1.
Allow the pickup roller to dry completely before you want to remove loosened dirt. 4. Remove the pickup roller as described in steps 1 through 17 of Changing the pickup roller. 2. Using a dry, lint-free cloth, wipe the pickup roller to clean the pickup roller rather than replace it in water, and scrub the roller. 3. Dab a lint-free cloth in the printer (see steps 10 through 9 of Changing the pickup roller). 58 Chapter 4 Maintenance ENWW Cleaning the pickup roller If you reinstall it , follow these instructions: 1.
Service Manual
Page 75
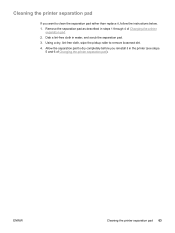
Using a dry, lint-free cloth, wipe the pickup roller to clean the separation pad rather than replace it in the printer (see steps 5 and 6 of Changing the printer separation pad. 2. Remove the separation pad as described in water, and scrub the separation pad. 3. ENWW Cleaning the printer separation pad 63 Cleaning the printer separation pad If you reinstall it , follow the instructions below. 1. Allow the separation pad to dry completely before you want to remove loosened dirt. 4. Dab a lint-free cloth in steps 1 through 4 of Changing the printer separation pad).
Using a dry, lint-free cloth, wipe the pickup roller to clean the separation pad rather than replace it in the printer (see steps 5 and 6 of Changing the printer separation pad. 2. Remove the separation pad as described in water, and scrub the separation pad. 3. ENWW Cleaning the printer separation pad 63 Cleaning the printer separation pad If you reinstall it , follow the instructions below. 1. Allow the separation pad to dry completely before you want to remove loosened dirt. 4. Dab a lint-free cloth in steps 1 through 4 of Changing the printer separation pad).


