Quick Setup Guide - Windows 8
Page 7
... U.S. then select User guides. ● Find electronic user guides and specifications for your computer. Upgrading and Servicing Guide HP Support website: http://www.hp.com/go /contactHP. support, go to the Internet. For worldwide ● Find Windows password support, go /contactHP ● Upgrade or replace components of your computer model. ● Order parts and find ● Set up your computer. From the Start screen, type c, and then select Control Panel. 2. Select the HP common computer hardware Support Assistant app...
... U.S. then select User guides. ● Find electronic user guides and specifications for your computer. Upgrading and Servicing Guide HP Support website: http://www.hp.com/go /contactHP. support, go to the Internet. For worldwide ● Find Windows password support, go /contactHP ● Upgrade or replace components of your computer model. ● Order parts and find ● Set up your computer. From the Start screen, type c, and then select Control Panel. 2. Select the HP common computer hardware Support Assistant app...
Quick Setup Guide - Windows 8
Page 9
... or DVD drives. • The power supply is preset for your computer is currently running. (From the Start screen, type c, select Control Panel, select System and Security, and then select System. 2 Setting up your computer. To reduce the risk of serious injury read the Safety & Comfort Guide. The grounding plug is an important safety feature. • Plug the power cord in a location away from the monitor, computer...
... or DVD drives. • The power supply is preset for your computer is currently running. (From the Start screen, type c, select Control Panel, select System and Security, and then select System. 2 Setting up your computer. To reduce the risk of serious injury read the Safety & Comfort Guide. The grounding plug is an important safety feature. • Plug the power cord in a location away from the monitor, computer...
Quick Setup Guide - Windows 8
Page 10
... your computer model name and number in an unstable installation, infect the computer with your computer operating system. Using your Internet connection through your computer model from Product search results. Select Download drivers and software (and firmware), type your computer Select the HP Support Assistant app on the Start screen, select My computer, and then select User guides. 6. Get Internet service. NOTE: Use only licensed original software. If necessary, select your ISP, open a web...
... your computer model name and number in an unstable installation, infect the computer with your computer operating system. Using your Internet connection through your computer model from Product search results. Select Download drivers and software (and firmware), type your computer Select the HP Support Assistant app on the Start screen, select My computer, and then select User guides. 6. Get Internet service. NOTE: Use only licensed original software. If necessary, select your ISP, open a web...
Quick Setup Guide - Windows 8
Page 11
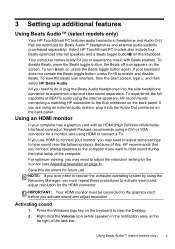
... operating system by using the Recovery Manager, you must be connected to the graphics card before you activate sound and adjust resolution. If you use . To disable Beats, press the Beats toggle button; To view the Beats user interface, from the Start screen, type b, and then select HP Beats Audio. For optimum viewing, you may need to do is plug the Beats Audio headphones into the Audio Out connector on the back panel. Using...
... operating system by using the Recovery Manager, you must be connected to the graphics card before you activate sound and adjust resolution. If you use . To disable Beats, press the Beats toggle button; To view the Beats user interface, from the Start screen, type b, and then select HP Beats Audio. For optimum viewing, you may need to do is plug the Beats Audio headphones into the Audio Out connector on the back panel. Using...
Quick Setup Guide - Windows 8
Page 13
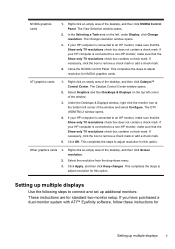
...-monitor setup. Close the NVIDIA Control Panel. The Catalyst Control Center window opens. 2. The DTV (HDMITM) 2 window opens. 4. Other graphics cards 1. This completes the steps to remove a check mark or add a check mark. 5. Setting up multiple displays 7 In the Selecting a Task area on the top left corner of the window and select Configure. Select the resolution from the drop-down menu. 3. NVIDIA graphics cards 1. The Change resolution window opens. 3. If your HP computer is connected to connect...
...-monitor setup. Close the NVIDIA Control Panel. The Catalyst Control Center window opens. 2. The DTV (HDMITM) 2 window opens. 4. Other graphics cards 1. This completes the steps to remove a check mark or add a check mark. 5. Setting up multiple displays 7 In the Selecting a Task area on the top left corner of the window and select Configure. Select the resolution from the drop-down menu. 3. NVIDIA graphics cards 1. The Change resolution window opens. 3. If your HP computer is connected to connect...
Quick Setup Guide - Windows 8
Page 14
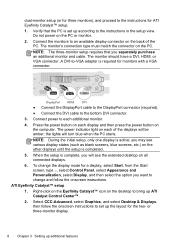
... screens, blue screens, etc.) on all connected displays. 6. To change and follow the onscreen instructions. The monitor's connection type must match the connector on the computer. Select CCC-Advanced, select Graphics, and select Desktop & Displays, then follow the onscreen instructions to change the display mode for a display, select Start, from the Start screen, type c, select Control Panel, select Appearance and Personalization, select Display, and then select the option you separately purchase an additional monitor and cable. Do not power...
... screens, blue screens, etc.) on all connected displays. 6. To change and follow the onscreen instructions. The monitor's connection type must match the connector on the computer. Select CCC-Advanced, select Graphics, and select Desktop & Displays, then follow the onscreen instructions to change the display mode for a display, select Start, from the Start screen, type c, select Control Panel, select Appearance and Personalization, select Display, and then select the option you separately purchase an additional monitor and cable. Do not power...

Quick Setup Guide - Windows 8
Page 16
... start. Connect the monitor to the computer, plug it in properly. See Display (monitor) on the keyboard simultaneously. 2. Or, press and hold the Power button on the computer for additional troubleshooting options, see Getting information on . Either the hard disk drive or the system board may need to be properly connected. If the display (monitor) is not, contact Support. Press the Ctrl+Alt+Delete keys on page 12. Computer will not turn...
... start. Connect the monitor to the computer, plug it in properly. See Display (monitor) on the keyboard simultaneously. 2. Or, press and hold the Power button on the computer for additional troubleshooting options, see Getting information on . Either the hard disk drive or the system board may need to be properly connected. If the display (monitor) is not, contact Support. Press the Ctrl+Alt+Delete keys on page 12. Computer will not turn...
Quick Setup Guide - Windows 8
Page 19
... mouse connector to the back of your computer, and then restart your changes in all open programs, press the Power button to turn off Num Lock, so that the arrow keys on the keyboard to turn off the computer. 5. Press Num Lock on the number keypad can be used. After the shutdown is the keyboard shortcut for Save on the number keypad. If the mouse...
... mouse connector to the back of your computer, and then restart your changes in all open programs, press the Power button to turn off Num Lock, so that the arrow keys on the keyboard to turn off the computer. 5. Press Num Lock on the number keypad can be used. After the shutdown is the keyboard shortcut for Save on the number keypad. If the mouse...
Quick Setup Guide - Windows 8
Page 21
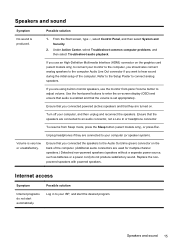
... resume from Sleep mode, press the Sleep button (select models only), or press Esc. Possible solution Log in monitor speakers, use an High-Definition Multimedia Interface (HDMI) connector on . Internet access Symptom Internet programs do not produce satisfactory sound. Volume is produced. 1. Unplug headphones if they are turned on the graphics card (select models only) to hear sound during the initial setup of the computer. (Additional audio connectors are connected to your monitor to...
... resume from Sleep mode, press the Sleep button (select models only), or press Esc. Possible solution Log in monitor speakers, use an High-Definition Multimedia Interface (HDMI) connector on . Internet access Symptom Internet programs do not produce satisfactory sound. Volume is produced. 1. Unplug headphones if they are turned on the graphics card (select models only) to hear sound during the initial setup of the computer. (Additional audio connectors are connected to your monitor to...
Quick Setup Guide - Windows 8
Page 22
... network to open the wizard, and then follow the on your system has an external antenna, try to move the computer. these methods: ● Use Microsoft System Restore Software program and hardware driver reinstallation (see Troubleshooting and Maintenance Guide on -screen instructions. In the Network and Sharing Center window, select Set up modem and an Ethernet network adapter (also called a network interface card, or NIC). Do not connect a telephone cable to the Internet. From the Start screen, type...
... network to open the wizard, and then follow the on your system has an external antenna, try to move the computer. these methods: ● Use Microsoft System Restore Software program and hardware driver reinstallation (see Troubleshooting and Maintenance Guide on -screen instructions. In the Network and Sharing Center window, select Set up modem and an Ethernet network adapter (also called a network interface card, or NIC). Do not connect a telephone cable to the Internet. From the Start screen, type...
Quick Setup Guide - Windows 8
Page 23
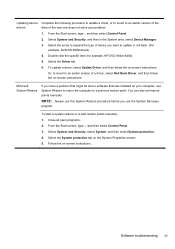
...-ROM drives). 4. Double-click the specific item (for example, HP DVD Writer 640b). 5. Select the Driver tab. 6. Or, to revert to add restore points manually: 1. Microsoft System Restore If you use this System Restore procedure before you have a problem that might be due to software that was installed on -screen instructions. From the Start screen, type c, and then select Control Panel. 3. Select System and Security, and then in the System area, select Device Manager...
...-ROM drives). 4. Double-click the specific item (for example, HP DVD Writer 640b). 5. Select the Driver tab. 6. Or, to revert to add restore points manually: 1. Microsoft System Restore If you use this System Restore procedure before you have a problem that might be due to software that was installed on -screen instructions. From the Start screen, type c, and then select Control Panel. 3. Select System and Security, and then in the System area, select Device Manager...
Quick Setup Guide - Windows 8
Page 26
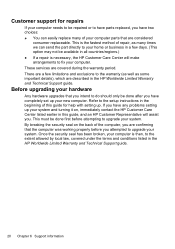
... completely set up . These services are confirming that the computer was working properly before attempting to upgrade your system and turning it on the back of your computer parts that you intend to fix your system. This must be available in all countries/regions.) ● If a repair is then, to the setup instructions in the HP Worldwide Limited Warranty and Technical Support guide...
... completely set up . These services are confirming that the computer was working properly before attempting to upgrade your system and turning it on the back of your computer parts that you intend to fix your system. This must be available in all countries/regions.) ● If a repair is then, to the setup instructions in the HP Worldwide Limited Warranty and Technical Support guide...
Troubleshooting and Maintenance Guide
Page 6
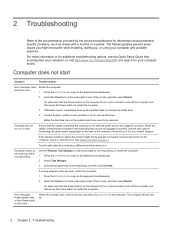
... installing, starting up . 2 Chapter 2 Troubleshooting Use the Windows Task Manager to a backup hard disk drive. 4. Press the Ctrl+Alt+Delete keys on the keyboard simultaneously. 2. 2 Troubleshooting Refer to the documentation provided by connecting a different electrical device to it was possible or not to the computer, plug it on the keyboard. Or, press and hold the Power button on the keyboard simultaneously. 2. When the cables connecting the computer to the external power source are plugged...
... installing, starting up . 2 Chapter 2 Troubleshooting Use the Windows Task Manager to a backup hard disk drive. 4. Press the Ctrl+Alt+Delete keys on the keyboard simultaneously. 2. 2 Troubleshooting Refer to the documentation provided by connecting a different electrical device to it was possible or not to the computer, plug it on the keyboard. Or, press and hold the Power button on the keyboard simultaneously. 2. When the cables connecting the computer to the external power source are plugged...
Troubleshooting and Maintenance Guide
Page 8
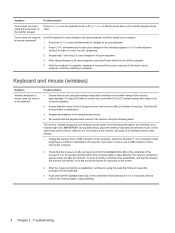
... computer model might vary. Check that the arrow keys on the number keypad can be used. After the mouse connection is on (A), and push and hold the Connect button (C) on the underside of the receiver, and away from interference from a USB connector on the computer, and then reconnect it . ● Replace the batteries in all open program. 2. Press Num Lock on the keyboard to turn...
... computer model might vary. Check that the arrow keys on the number keypad can be used. After the mouse connection is on (A), and push and hold the Connect button (C) on the underside of the receiver, and away from interference from a USB connector on the computer, and then reconnect it . ● Replace the batteries in all open program. 2. Press Num Lock on the keyboard to turn...
Troubleshooting and Maintenance Guide
Page 9
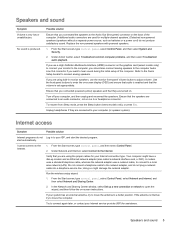
... as batteries or a power cord) do not plug a network cable into a telephone service line; Run the wireless setup wizard: 1. If your computer (or speaker system). From the Start screen, type control panel, select Control Panel, select Network and Internet, and then select Network and Sharing Center. 2. Ensure that you are using built-in to hear sound during the initial setup of the computer. (Additional audio connectors are connected to your system has an external antenna, try to enter the...
... as batteries or a power cord) do not plug a network cable into a telephone service line; Run the wireless setup wizard: 1. If your computer (or speaker system). From the Start screen, type control panel, select Control Panel, select Network and Internet, and then select Network and Sharing Center. 2. Ensure that you are using built-in to hear sound during the initial setup of the computer. (Additional audio connectors are connected to your system has an external antenna, try to enter the...
Troubleshooting and Maintenance Guide
Page 10
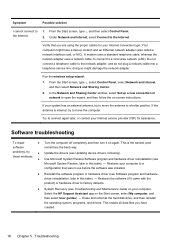
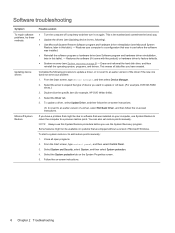
... to add restore points manually: 1. NOTE: Always use this System Restore procedure before the software was installed on -screen instructions. Select the System protection tab on again. Software troubleshooting Symptom To repair software problems, try these methods: Updating device drivers Microsoft System Restore Possible solution ● Turn the computer off completely and then turn it came with the product) or hardware driver to a previous restore point. Double-click the specific item (for example, HP DVD Writer...
... to add restore points manually: 1. NOTE: Always use this System Restore procedure before the software was installed on -screen instructions. Select the System protection tab on again. Software troubleshooting Symptom To repair software problems, try these methods: Updating device drivers Microsoft System Restore Possible solution ● Turn the computer off completely and then turn it came with the product) or hardware driver to a previous restore point. Double-click the specific item (for example, HP DVD Writer...
Troubleshooting and Maintenance Guide
Page 13
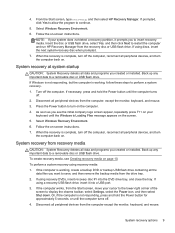
..., select Settings, select the Power icon, and then select Shut down. Insert the disc or USB flash drive, select Yes, and then click Next to turn on the screen. 5. If using discs, insert the next system-recovery disc when prompted. 7. From the Start screen, type recovery, and then select HP Recovery Manager. Select Windows Recovery Environment. 6. Back up any important data to a removable disc or USB flash drive. If the computer is complete, turn off . 2. System recovery options 9 NOTE...
..., select Settings, select the Power icon, and then select Shut down. Insert the disc or USB flash drive, select Yes, and then click Next to turn on the screen. 5. If using discs, insert the next system-recovery disc when prompted. 7. From the Start screen, type recovery, and then select HP Recovery Manager. Select Windows Recovery Environment. 6. Back up any important data to a removable disc or USB flash drive. If the computer is complete, turn off . 2. System recovery options 9 NOTE...
Regulatory, Safety and Environmental Notices User Guide
Page 7
... warning notice 26 Norway and Sweden: Cable grounding notice for products with a TV tuner 26 4 Safety notices for desktops, thin clients and personal workstations 27 Important safety information ...27 Installation conditions ...27 Battery replacement notice ...28 Headset and earphone volume level notice 28 Laser safety ...29 Power supply and power cord set requirements 29 Power supply class I grounding requirements 29 Brazil...
... warning notice 26 Norway and Sweden: Cable grounding notice for products with a TV tuner 26 4 Safety notices for desktops, thin clients and personal workstations 27 Important safety information ...27 Installation conditions ...27 Battery replacement notice ...28 Headset and earphone volume level notice 28 Laser safety ...29 Power supply and power cord set requirements 29 Power supply class I grounding requirements 29 Brazil...
Regulatory, Safety and Environmental Notices User Guide
Page 37
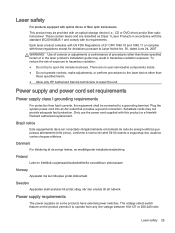
...user-serviceable components inside. ● Do not operate controls, make adjustments, or perform procedures to the laser device other than those regulations except for deviations pursuant to repair the unit. This product may be connected to open the module enclosure. Power supply and power cord set requirements Power supply...products have external power switches. Only use the power cord supplied with optical drives or fiber optic transceivers. WARNING! There are classified as Class 1 Laser Products in hazardous radiation exposure. Use of controls or ...
...user-serviceable components inside. ● Do not operate controls, make adjustments, or perform procedures to the laser device other than those regulations except for deviations pursuant to repair the unit. This product may be connected to open the module enclosure. Power supply and power cord set requirements Power supply...products have external power switches. Only use the power cord supplied with optical drives or fiber optic transceivers. WARNING! There are classified as Class 1 Laser Products in hazardous radiation exposure. Use of controls or ...
Regulatory, Safety and Environmental Notices User Guide
Page 39
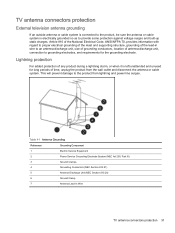
... and supporting structure, grounding of the lead-in Wire TV antenna connectors protection 31 Lightning protection For added protection of any product during a lightning storm, or when it is electrically grounded so as to the product from the wall outlet and disconnect the antenna or cable system. Table 4-1 Antenna Grounding Reference Grounding Component 1 Electric Service Equipment 2 Power Service...
... and supporting structure, grounding of the lead-in Wire TV antenna connectors protection 31 Lightning protection For added protection of any product during a lightning storm, or when it is electrically grounded so as to the product from the wall outlet and disconnect the antenna or cable system. Table 4-1 Antenna Grounding Reference Grounding Component 1 Electric Service Equipment 2 Power Service...

