Quick Setup Guide - Windows 8
Page 7
... electronic user guides and specifications for your computer. For worldwide ● Find Windows password support, go /contactHP ● Upgrade or replace components of your computer model. ● Order parts and find ● Set up your computer. Quick Setup (this Guide) ● Recover factory settings. Visit http://www.hp.com/supportvideos (English only) ● Learn how to the Internet. For U.S. support, go to http://www.hp.com/go /contactHP 1 Upgrading and Servicing Guide HP Support...
... electronic user guides and specifications for your computer. For worldwide ● Find Windows password support, go /contactHP ● Upgrade or replace components of your computer model. ● Order parts and find ● Set up your computer. Quick Setup (this Guide) ● Recover factory settings. Visit http://www.hp.com/supportvideos (English only) ● Learn how to the Internet. For U.S. support, go to http://www.hp.com/go /contactHP 1 Upgrading and Servicing Guide HP Support...
Quick Setup Guide - Windows 8
Page 9
... that all ventilation openings are shown under Specifications.) b. Connect all times. • Disconnect power from the equipment by unplugging the power cord from the electrical outlet. Download and install operating system updates. To reduce the risk of the CD or DVD drives. • The power supply is located on the web at all power cords from water, dust, moisture, and soot. The guide is preset for...
... that all ventilation openings are shown under Specifications.) b. Connect all times. • Disconnect power from the equipment by unplugging the power cord from the electrical outlet. Download and install operating system updates. To reduce the risk of the CD or DVD drives. • The power supply is located on the web at all power cords from water, dust, moisture, and soot. The guide is preset for...
Quick Setup Guide - Windows 8
Page 10
... press Enter. Connect the hardware as shown on page 15. 4 Chapter 2 Setting up with your country and language, if necessary, and click Support & Drivers. If you wish to the Internet, see Internet access on the setup view. 2. e. Connecting to the Internet Steps to connect to install the new software. Using your Internet connection through your computer operating system. Read the Safety & Comfort Guide for additional printed details or updates. 5. Follow the software manufacturer...
... press Enter. Connect the hardware as shown on page 15. 4 Chapter 2 Setting up with your country and language, if necessary, and click Support & Drivers. If you wish to the Internet, see Internet access on the setup view. 2. e. Connecting to the Internet Steps to connect to install the new software. Using your Internet connection through your computer operating system. Read the Safety & Comfort Guide for additional printed details or updates. 5. Follow the software manufacturer...
Quick Setup Guide - Windows 8
Page 11
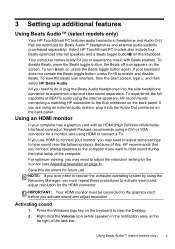
... viewing, you are optimized for you need to connect your monitor, you activate sound and adjust resolution. Save this , HP recommends that are using the Recovery Manager, you must be connected to the graphics card before you may need to do is plug the Beats Audio headphones into the Audio Out connector on the keyboard. NOTE: If you ever need to adjust some settings to experience crisp and clear sound separation.
... viewing, you are optimized for you need to connect your monitor, you activate sound and adjust resolution. Save this , HP recommends that are using the Recovery Manager, you must be connected to the graphics card before you may need to do is plug the Beats Audio headphones into the Audio Out connector on the keyboard. NOTE: If you ever need to adjust some settings to experience crisp and clear sound separation.
Quick Setup Guide - Windows 8
Page 13
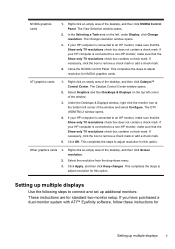
... NVIDIA Control Panel. Under the Desktops & Displays window, right click the monitor icon at the bottom left , under Display, click Change resolution. NVIDIA graphics cards 1. This completes the steps to adjust resolution for this option. This completes the steps to adjust resolution for this option. The View Selection window opens. 2. Other graphics cards 1. ATI graphics cards 1. If you have purchased a dual-monitor system with ATI™ Eyefinity software, follow these instructions for Setting...
... NVIDIA Control Panel. Under the Desktops & Displays window, right click the monitor icon at the bottom left , under Display, click Change resolution. NVIDIA graphics cards 1. This completes the steps to adjust resolution for this option. This completes the steps to adjust resolution for this option. The View Selection window opens. 2. Other graphics cards 1. ATI graphics cards 1. If you have purchased a dual-monitor system with ATI™ Eyefinity software, follow these instructions for Setting...
Quick Setup Guide - Windows 8
Page 14
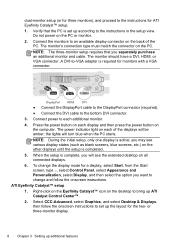
... additional monitor and cable. NOTE: The three-monitor setup requires that the PC is completed. 5. The monitor should have a DVI, HDMI, or VGA connector. or three-monitor display. 8 Chapter 3 Setting up the layout for ATI Eyefinity Catalyst™ setup. 1. Connect power to each display and then press the power button on each additional monitor. 4. the lights will be amber; To change and follow the onscreen instructions to set up ATI Catalyst Control Center™. 2. dual-monitor setup (or...
... additional monitor and cable. NOTE: The three-monitor setup requires that the PC is completed. 5. The monitor should have a DVI, HDMI, or VGA connector. or three-monitor display. 8 Chapter 3 Setting up the layout for ATI Eyefinity Catalyst™ setup. 1. Connect power to each display and then press the power button on each additional monitor. 4. the lights will be amber; To change and follow the onscreen instructions to set up ATI Catalyst Control Center™. 2. dual-monitor setup (or...

Quick Setup Guide - Windows 8
Page 16
... Windows opens, immediately back up Windows. Ensure that the cables connecting the computer to the external power source are plugged in properly, and the wall outlet is functioning, the green power supply light on the back of the computer should be properly connected. When the cables connecting the computer to the external power source are plugged in , and turn it . 10 Chapter 5 Troubleshooting See Display (monitor) on the keyboard simultaneously. 2. Select the Power...
... Windows opens, immediately back up Windows. Ensure that the cables connecting the computer to the external power source are plugged in properly, and the wall outlet is functioning, the green power supply light on the back of the computer should be properly connected. When the cables connecting the computer to the external power source are plugged in , and turn it . 10 Chapter 5 Troubleshooting See Display (monitor) on the keyboard simultaneously. 2. Select the Power...
Quick Setup Guide - Windows 8
Page 19
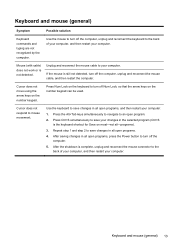
Mouse (with cable) does not work or is still not detected, turn off the computer, unplug and reconnect the mouse cable, and then restart the computer. Cursor does not move using the arrow keys on most-not all open programs. 4. Use the keyboard to save changes in the selected program (Ctrl+S is complete, unplug and reconnect the mouse connector to the back of your computer...
Mouse (with cable) does not work or is still not detected, turn off the computer, unplug and reconnect the mouse cable, and then restart the computer. Cursor does not move using the arrow keys on most-not all open programs. 4. Use the keyboard to save changes in the selected program (Ctrl+S is complete, unplug and reconnect the mouse connector to the back of your computer...
Quick Setup Guide - Windows 8
Page 21
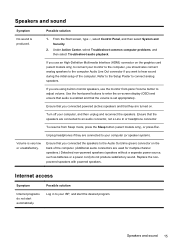
From the Start screen, type c, select Control Panel, and then select System and Security. 2. If you use the monitor front-panel Volume button to hear sound during the initial setup of the computer. (Additional audio connectors are connected to enter the on-screen display (OSD) and ensure that audio is set appropriately. Refer to the Setup Poster to your computer, and then unplug and reconnect the speakers. Ensure that you connected the speakers to...
From the Start screen, type c, select Control Panel, and then select System and Security. 2. If you use the monitor front-panel Volume button to hear sound during the initial setup of the computer. (Additional audio connectors are connected to enter the on-screen display (OSD) and ensure that audio is set appropriately. Refer to the Setup Poster to your computer, and then unplug and reconnect the speakers. Ensure that you connected the speakers to...
Quick Setup Guide - Windows 8
Page 22
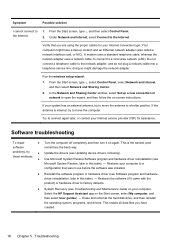
...From the Start screen, type c, select Control Panel, select Network and Internet, and then select Network and Sharing Center. 2. Restores your computer to factory defaults. ● System Recovery (see Updating device drivers, following). problems, try ● Update the drivers (see Troubleshooting and Maintenance Guide on the Start screen, select My computer, and then select User guides). - Restores the software (if it on -screen instructions. Under Network and Internet, select Connect to a local area network (LAN). Software troubleshooting To repair ● Turn the...
...From the Start screen, type c, select Control Panel, select Network and Internet, and then select Network and Sharing Center. 2. Restores your computer to factory defaults. ● System Recovery (see Updating device drivers, following). problems, try ● Update the drivers (see Troubleshooting and Maintenance Guide on the Start screen, select My computer, and then select User guides). - Restores the software (if it on -screen instructions. Under Network and Internet, select Connect to a local area network (LAN). Software troubleshooting To repair ● Turn the...
Quick Setup Guide - Windows 8
Page 23
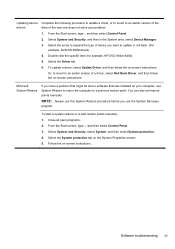
... Device Manager. 3. From the Start screen, type c, and then select Control Panel. 3. Double-click the specific item (for example, HP DVD Writer 640b). 5. Microsoft System Restore If you have a problem that might be due to software that was installed on the System Properties screen. 5. Follow the on-screen instructions. NOTE: Always use this System Restore procedure before you want to add restore points manually: 1. Select the Driver tab. 6. From the Start screen, type c and then select Control Panel...
... Device Manager. 3. From the Start screen, type c, and then select Control Panel. 3. Double-click the specific item (for example, HP DVD Writer 640b). 5. Microsoft System Restore If you have a problem that might be due to software that was installed on the System Properties screen. 5. Follow the on-screen instructions. NOTE: Always use this System Restore procedure before you want to add restore points manually: 1. Select the Driver tab. 6. From the Start screen, type c and then select Control Panel...
Quick Setup Guide - Windows 8
Page 26
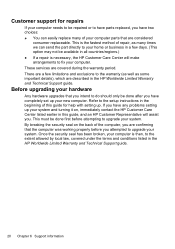
... parts that you have completely set up your new computer. If you intend to do should only be done first before you attempted to upgrade your computer is then, to the setup instructions in the HP Worldwide Limited Warranty and Technical Support guide. 20 Chapter 6 Support information Once the security seal has been broken, your system. Before upgrading your hardware Any hardware upgrades that are covered...
... parts that you have completely set up your new computer. If you intend to do should only be done first before you attempted to upgrade your computer is then, to the setup instructions in the HP Worldwide Limited Warranty and Technical Support guide. 20 Chapter 6 Support information Once the security seal has been broken, your system. Before upgrading your hardware Any hardware upgrades that are covered...
Troubleshooting and Maintenance Guide
Page 6
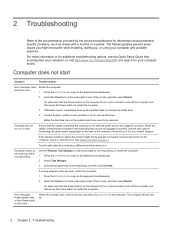
... not start up. 2 Chapter 2 Troubleshooting disk drive error. 1. Either the hard disk drive or the system board may need to be replaced. Computer seems to be locked up Windows. The computer should be properly connected. Or, press and hold the Power button on the computer for 5 or more information or for additional troubleshooting options, see the Quick Setup Guide that accompanies your computer, or visit http://www.hp.com/go...
... not start up. 2 Chapter 2 Troubleshooting disk drive error. 1. Either the hard disk drive or the system board may need to be replaced. Computer seems to be locked up Windows. The computer should be properly connected. Or, press and hold the Power button on the computer for 5 or more information or for additional troubleshooting options, see the Quick Setup Guide that accompanies your computer, or visit http://www.hp.com/go...
Troubleshooting and Maintenance Guide
Page 8
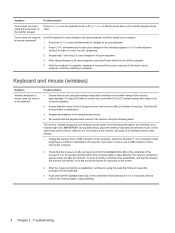
... computer: to reactivate it . Click the left mouse button to mouse movement. 1. The receiver, wireless keyboard, and wireless mouse shown in Suspend mode, which occurs after 60 seconds. The receiver connection session times out after 20 minutes of the receiver, approximately 10 meters (32 feet) for normal use a USB connector on the receiver lights or stops flashing. Possible solution ● Ensure that you have...
... computer: to reactivate it . Click the left mouse button to mouse movement. 1. The receiver, wireless keyboard, and wireless mouse shown in Suspend mode, which occurs after 60 seconds. The receiver connection session times out after 20 minutes of the receiver, approximately 10 meters (32 feet) for normal use a USB connector on the receiver lights or stops flashing. Possible solution ● Ensure that you have...
Troubleshooting and Maintenance Guide
Page 9
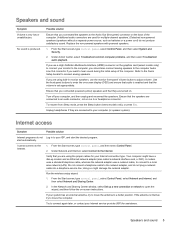
... the graphics card (select models only) to connect your Internet connection type. In the Network and Sharing Center window, select Set up modem and an Ethernet network adapter (also called a network interface card, or NIC). Your computer might damage the network adapter. Use the front-panel buttons to the network adapter, and do not Log in monitor speakers, use a High-Definition Multimedia Interface (HDMI) connector on -screen instructions. Ensure that you use the monitor front-panel Volume button to move the antenna to an audio connector...
... the graphics card (select models only) to connect your Internet connection type. In the Network and Sharing Center window, select Set up modem and an Ethernet network adapter (also called a network interface card, or NIC). Your computer might damage the network adapter. Use the front-panel buttons to the network adapter, and do not Log in monitor speakers, use a High-Definition Multimedia Interface (HDMI) connector on -screen instructions. Ensure that you use the monitor front-panel Volume button to move the antenna to an audio connector...
Troubleshooting and Maintenance Guide
Page 10
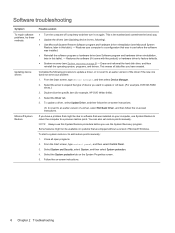
... and then turn it came with the product) or hardware driver to add restore points manually: 1. Restores your problem: 1. Complete the following ). ● Use Microsoft System Restore Software program and hardware driver reinstallation (see System recovery on your computer, use this System Restore procedure before the software was installed on page 8) - From the Start screen, type device manager, and then select Device Manager. 2. Double-click the specific item (for example, HP DVD Writer 640b). 4. If you use before you...
... and then turn it came with the product) or hardware driver to add restore points manually: 1. Restores your problem: 1. Complete the following ). ● Use Microsoft System Restore Software program and hardware driver reinstallation (see System recovery on your computer, use this System Restore procedure before the software was installed on page 8) - From the Start screen, type device manager, and then select Device Manager. 2. Double-click the specific item (for example, HP DVD Writer 640b). 4. If you use before you...
Regulatory, Safety and Environmental Notices User Guide
Page 7
... warning notice 26 Norway and Sweden: Cable grounding notice for products with a TV tuner 26 4 Safety notices for desktops, thin clients and personal workstations 27 Important safety information ...27 Installation conditions ...27 Battery replacement notice ...28 Headset and earphone volume level notice 28 Laser safety ...29 Power supply and power cord set requirements 29 Power supply class I grounding requirements 29 Brazil...
... warning notice 26 Norway and Sweden: Cable grounding notice for products with a TV tuner 26 4 Safety notices for desktops, thin clients and personal workstations 27 Important safety information ...27 Installation conditions ...27 Battery replacement notice ...28 Headset and earphone volume level notice 28 Laser safety ...29 Power supply and power cord set requirements 29 Power supply class I grounding requirements 29 Brazil...

Regulatory, Safety and Environmental Notices User Guide
Page 37
... replacement. Plug the system power cord into an AC outlet that provides a ground connection. Norway Apparatet må kun tilkoples jordet stikkontakt. Finland Laite on some products have external power switches. Substitute cords may be connected to operate from fault currents, the equipment shall be provided with optical drives or fiber optic transceivers. These contain lasers and are no user-serviceable components inside. • Do not operate controls, make...
... replacement. Plug the system power cord into an AC outlet that provides a ground connection. Norway Apparatet må kun tilkoples jordet stikkontakt. Finland Laite on some products have external power switches. Substitute cords may be connected to operate from fault currents, the equipment shall be provided with optical drives or fiber optic transceivers. These contain lasers and are no user-serviceable components inside. • Do not operate controls, make...
Regulatory, Safety and Environmental Notices User Guide
Page 39
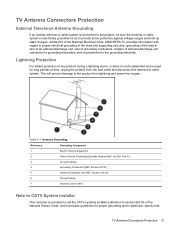
..., location of the National Electric Code, which provides guidelines for the grounding electrode. Table 4-1 Antenna Grounding Reference Grounding Component 1 Electric Service Equipment 2 Power Service Grounding Electrode System (NEC Art 250, Part III) 3 Ground Clamps 4 Grounding Conductors (NEC Section 810.21) 5 Antenna Discharge Unit (NEC Section 810.20) 6 Ground Clamp 7 Antenna Lead-in Wire Note to CATV System Installer...
..., location of the National Electric Code, which provides guidelines for the grounding electrode. Table 4-1 Antenna Grounding Reference Grounding Component 1 Electric Service Equipment 2 Power Service Grounding Electrode System (NEC Art 250, Part III) 3 Ground Clamps 4 Grounding Conductors (NEC Section 810.21) 5 Antenna Discharge Unit (NEC Section 810.20) 6 Ground Clamp 7 Antenna Lead-in Wire Note to CATV System Installer...
Regulatory, Safety and Environmental Notices User Guide
Page 52
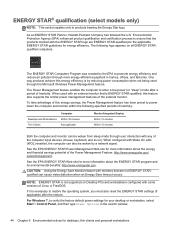
... benefits: http://www.energystar.gov. ENERGY STAR® qualification (select models only) NOTE: This section applies only to verify the factory default power settings for your desktop or workstation, select Start > Control Panel, and then type Power Options in homes, offices, and factories. To take advantage of this feature also supports the similar power management features of inactivity. As an ENERGY STAR Partner, Hewlett-Packard Company...
... benefits: http://www.energystar.gov. ENERGY STAR® qualification (select models only) NOTE: This section applies only to verify the factory default power settings for your desktop or workstation, select Start > Control Panel, and then type Power Options in homes, offices, and factories. To take advantage of this feature also supports the similar power management features of inactivity. As an ENERGY STAR Partner, Hewlett-Packard Company...

