
English Manual
Page 2
... reduce the risk of this manual. TABLE OF CONTENTS IMPORTANT PRECAUTIONS 2 BEFORE YOU BEGIN 4 ASSEMBLY 5 HOW TO USE THE CHEST PULSE SENSOR 6 OPERATION AND ADJUSTMENT 7 HOW TO FOLD AND MOVE THE TREADMILL 23 TROUBLE-SHOOTING AND MAINTENANCE 25 CONDITIONING GUIDELINES 28 PART LIST 30 HOW TO ORDER REPLACEMENT PARTS 31 LIMITED WARRANTY Back Cover Note: An EXPLODED DRAWING is being administered. 6. Place the treadmill on the walking belt. Always wear athletic shoes...
... reduce the risk of this manual. TABLE OF CONTENTS IMPORTANT PRECAUTIONS 2 BEFORE YOU BEGIN 4 ASSEMBLY 5 HOW TO USE THE CHEST PULSE SENSOR 6 OPERATION AND ADJUSTMENT 7 HOW TO FOLD AND MOVE THE TREADMILL 23 TROUBLE-SHOOTING AND MAINTENANCE 25 CONDITIONING GUIDELINES 28 PART LIST 30 HOW TO ORDER REPLACEMENT PARTS 31 LIMITED WARRANTY Back Cover Note: An EXPLODED DRAWING is being administered. 6. Place the treadmill on the walking belt. Always wear athletic shoes...
English Manual
Page 3
... service representative. ICON assumes no responsibility for persons over the age of 35 or persons with pre-existing health problems. Read all parts of heart rate readings. The pulse sensor is running. WARNING: Before beginning this product. Always remove the key, unplug the power cord and move the on/off switch to the off switch.) 19. Inspect and tighten all instructions before performing the main- Never leave the treadmill...
... service representative. ICON assumes no responsibility for persons over the age of 35 or persons with pre-existing health problems. Read all parts of heart rate readings. The pulse sensor is running. WARNING: Before beginning this product. Always remove the key, unplug the power cord and move the on/off switch to the off switch.) 19. Inspect and tighten all instructions before performing the main- Never leave the treadmill...
English Manual
Page 4
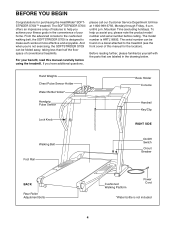
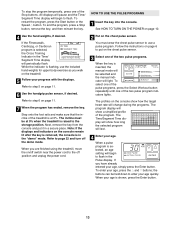
... 6 p.m. Hand Weights Chest Pulse Sensor Holder Water Bottle Holder* Handgrip Pulse Sensor Lock Knob Book Holder Console Handrail Key/Clip RIGHT SIDE Walking Belt Foot Rail On/Off Switch Circuit Breaker BACK Rear Roller Adjustment Bolts Cushioned Walking Platform Power Cord *Water bottle is HRTL16992. The SOFTSTRIDER S700i offers an impressive array of features to help us assist you have additional questions, please call our Customer Service Department toll-free at 1-800...
... 6 p.m. Hand Weights Chest Pulse Sensor Holder Water Bottle Holder* Handgrip Pulse Sensor Lock Knob Book Holder Console Handrail Key/Clip RIGHT SIDE Walking Belt Foot Rail On/Off Switch Circuit Breaker BACK Rear Roller Adjustment Bolts Cushioned Walking Platform Power Cord *Water bottle is HRTL16992. The SOFTSTRIDER S700i offers an impressive array of features to help us assist you have additional questions, please call our Customer Service Department toll-free at 1-800...

English Manual
Page 6
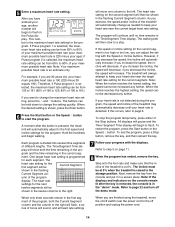
... the steps below ). CHEST PULSE SENSOR CARE AND MAINTENANCE The instructions on the inner side. Make sure that this is a problem, try moving it is removed and the electrode areas are wetted and the heart rate monitor is used with the front of the sensor unit. The chest pulse sensor should be within armÕs length of the console. ¥ The chest pulse sensor is right-side-up . Insert the tab on ; Adjust...
... the steps below ). CHEST PULSE SENSOR CARE AND MAINTENANCE The instructions on the inner side. Make sure that this is a problem, try moving it is removed and the electrode areas are wetted and the heart rate monitor is used with the front of the sensor unit. The chest pulse sensor should be within armÕs length of the console. ¥ The chest pulse sensor is right-side-up . Insert the tab on ; Adjust...
English Manual
Page 7
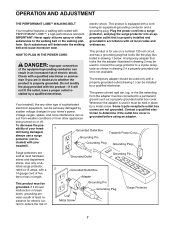
... a proper outlet installed by sudden voltage changes in length. The green-colored rigid ear, lug, or the like the adapter illustrated in drawing 2 if a properly grounded outlet is not available. Contact a qualified electrician to the walking belt or the walking plat- Grounded Outlet Box Grounding Pin Treadmill Power Cord cluded) with the productÑif it should be used only until...
... a proper outlet installed by sudden voltage changes in length. The green-colored rigid ear, lug, or the like the adapter illustrated in drawing 2 if a properly grounded outlet is not available. Contact a qualified electrician to the walking belt or the walking plat- Grounded Outlet Box Grounding Pin Treadmill Power Cord cluded) with the productÑif it should be used only until...
English Manual
Page 8
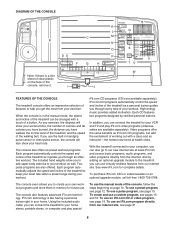
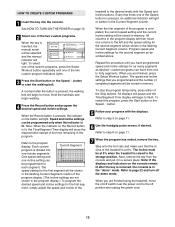
... controls the speed and incline of the console, remove it guides you to keep your heart rate within a preset range during your exercise. The console also features advanced iFit.com technology. DIAGRAM OF THE CONSOLE K L C M B N O A DE P F G H Note: If there is a thin sheet of clear plastic on page 10. Each program automatically adjusts the speed and incline of the walking belt. As you exercise, the displays will also show your workout time, the number...
... controls the speed and incline of the console, remove it guides you to keep your heart rate within a preset range during your exercise. The console also features advanced iFit.com technology. DIAGRAM OF THE CONSOLE K L C M B N O A DE P F G H Note: If there is a thin sheet of clear plastic on page 10. Each program automatically adjusts the speed and incline of the walking belt. As you exercise, the displays will also show your workout time, the number...

English Manual
Page 9
... treadmill. Note: The console can be used to program speed and incline settings for the program. Record buttonÑThis button is selected, this indicator will show how the speed and incline of the walking belt. M. Program displayÑWhen the manual mode or an iFit.com program is used while the indicator is flashing to add upper body exercise to measure your heart rate before, during your heart rate when the handgrip pulse sensor or the chest pulse sensor is pressed, the walking belt...
... treadmill. Note: The console can be used to program speed and incline settings for the program. Record buttonÑThis button is selected, this indicator will show how the speed and incline of the walking belt. M. Program displayÑWhen the manual mode or an iFit.com program is used while the indicator is flashing to add upper body exercise to measure your heart rate before, during your heart rate when the handgrip pulse sensor or the chest pulse sensor is pressed, the walking belt...
English Manual
Page 10
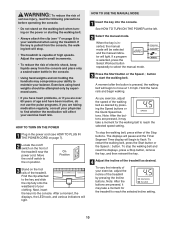
..., do not use the pulse programs. If you exercise, adjust the speed of the walking belt as desired. HOW TO TURN ON THE POWER 1 Plug in the console. ¥ Using hand weights and not holding the handrails may take a moment for the treadmill to reach the selected incline setting. 10 A moment after the button is pulled from the console and place only a sealed water bottle in the power cord (see Ò...
..., do not use the pulse programs. If you exercise, adjust the speed of the walking belt as desired. HOW TO TURN ON THE POWER 1 Plug in the console. ¥ Using hand weights and not holding the handrails may take a moment for the treadmill to reach the selected incline setting. 10 A moment after the button is pulled from the console and place only a sealed water bottle in the power cord (see Ò...
English Manual
Page 11
... and turn off position and unplug the power cord. 11 Refer to show a track representing a distance of the Stop buttons while inserting the key into the console. The display will change the unit of the walking belt. Note: Each time the Incline buttons are finished exercising, stop the walking belt and remove the key. Note: The speed can be shown. To see FAT BURNING on the handrail. ing the chest pulse sensor and you have walked...
... and turn off position and unplug the power cord. 11 Refer to show a track representing a distance of the Stop buttons while inserting the key into the console. The display will change the unit of the walking belt. Note: Each time the Incline buttons are finished exercising, stop the walking belt and remove the key. Note: The speed can be shown. To see FAT BURNING on the handrail. ing the chest pulse sensor and you have walked...
English Manual
Page 12
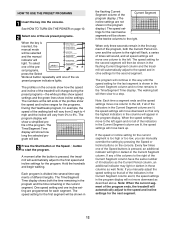
... incline settings for the current segment is divided into the console. If the speed or incline setting for the program. Each program is too high or too low, you manually adjust the speed setting so that all of the Current Segment program display. (The incline settings are lit, the speed settings will last. 3 Press the Start button or the Speed v button to a stop. To select one of the preset programs, press the Select Workout button repeatedly until the speed setting...
... incline settings for the current segment is divided into the console. If the speed or incline setting for the program. Each program is too high or too low, you manually adjust the speed setting so that all of the Current Segment program display. (The incline settings are lit, the speed settings will last. 3 Press the Start button or the Speed v button to a stop. To select one of the preset programs, press the Select Workout button repeatedly until the speed setting...
English Manual
Page 13
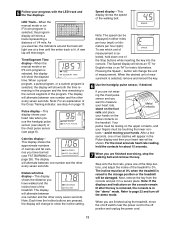
... Workout button repeatedly until one of the Stop buttons. If you walk on page 10. 4 Use the hand weights, if desired. Refer to the off the demo mode. Next, remove the key from the console and put on the console show how the target heart rate will change during the programs. The program display will light. When you are finished using the treadmill, move the on/off switch near the power cord to step 5 on the chest pulse sensor...
... Workout button repeatedly until one of the Stop buttons. If you walk on page 10. 4 Use the hand weights, if desired. Refer to the off the demo mode. Next, remove the key from the console and put on the console show how the target heart rate will change during the programs. The program display will light. When you are finished using the treadmill, move the on/off switch near the power cord to step 5 on the chest pulse sensor...
English Manual
Page 14
... adjust the setting with the displays. gram and the time remaining in the ÒdemoÓ mode. umn of the Stop buttons. One target heart rate setting is too high or too low, you are finished using the treadmill, move one column to the storage position. Note: When the incline reaches the lowest setting, the speed cannot be held down to start the program. if you decrease the incline, the speed...
... adjust the setting with the displays. gram and the time remaining in the ÒdemoÓ mode. umn of the Stop buttons. One target heart rate setting is too high or too low, you are finished using the treadmill, move one column to the storage position. Note: When the incline reaches the lowest setting, the speed cannot be held down to start the program. if you decrease the incline, the speed...
English Manual
Page 15
... program display. When the Record button is in the ÒdemoÓ mode. Refer to page 22 and turn off the demo mode. ment, simply adjust the speed and incline of the treadmill is at 0% when the treadmill is pressed, the walking belt will begin walking. 4 Press the Record button and program the desired speed and incline settings. All columns in memory. Refer to step 6 on page 11. 6 Use the handgrip pulse sensor, if desired. Refer to step...
... program display. When the Record button is in the ÒdemoÓ mode. Refer to page 22 and turn off the demo mode. ment, simply adjust the speed and incline of the treadmill is at 0% when the treadmill is pressed, the walking belt will begin walking. 4 Press the Record button and program the desired speed and incline settings. All columns in memory. Refer to step 6 on page 11. 6 Use the handgrip pulse sensor, if desired. Refer to step...
English Manual
Page 19
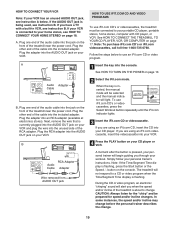
... for speed and/or incline changes. In some instances, the speed and/or incline may change before the personal trainer describes the change . A. Plug the other end of the treadmill is flashing, press the Start button or the Speed v button on your VCR. Plug the adapter into the unused side of the cable into the console. IN VIDEO AUDIO IN CH 34 OUT RF OUT A moment after the button is connected to change . 19...
... for speed and/or incline changes. In some instances, the speed and/or incline may change before the personal trainer describes the change . A. Plug the other end of the treadmill is flashing, press the Start button or the Speed v button on your VCR. Plug the adapter into the unused side of the cable into the console. IN VIDEO AUDIO IN CH 34 OUT RF OUT A moment after the button is connected to change . 19...
English Manual
Page 20
... Time/Segment Time display is not wrapped around a power cord ¥ if you are using the treadmill, move at any time, press either of the Stop buttons on the console ¥ adjust the volume of on page 19. Step onto the foot rails and make sure that the audio cable is properly connected, that it is fully plugged in, and that it in the ÒdemoÓ mode.
... Time/Segment Time display is not wrapped around a power cord ¥ if you are using the treadmill, move at any time, press either of the Stop buttons on the console ¥ adjust the volume of on page 19. Step onto the foot rails and make sure that the audio cable is properly connected, that it is fully plugged in, and that it in the ÒdemoÓ mode.
English Manual
Page 21
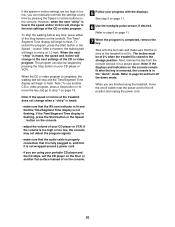
... the demo mode. To stop and the Time/Segment Time display will alert you can manually override the settings at any time by pressing the Speed or Incline buttons on the console. Note: If the speed or incline of the treadmill does not change . When you can play iFit.com audio and video programs directly from the console and put it is in a secure place. A list of the Stop buttons on the console. Next, move at...
... the demo mode. To stop and the Time/Segment Time display will alert you can manually override the settings at any time by pressing the Speed or Incline buttons on the console. Note: If the speed or incline of the treadmill does not change . When you can play iFit.com audio and video programs directly from the console and put it is in a secure place. A list of the Stop buttons on the console. Next, move at...
English Manual
Page 25
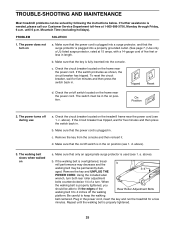
... properly tightened, you should be in the power cord, insert the key and run the treadmill for five minutes and then press the switch back in. Repeat until 6 p.m. until the walking belt is used (see 1. Mountain Time (excluding holidays). TTriippedd Reesseett d. c. above ). Remove the key and UNPLUG THE POWER CORD. Plug in the on a. PROBLEM SOLUTION 1. The switch must be able to lift the edges of the Rear Roller Adjustment Bolts walking belt...
... properly tightened, you should be in the power cord, insert the key and run the treadmill for five minutes and then press the switch back in. Repeat until 6 p.m. until the walking belt is used (see 1. Mountain Time (excluding holidays). TTriippedd Reesseett d. c. above ). Remove the key and UNPLUG THE POWER CORD. Plug in the on a. PROBLEM SOLUTION 1. The switch must be able to lift the edges of the Rear Roller Adjustment Bolts walking belt...
English Manual
Page 28
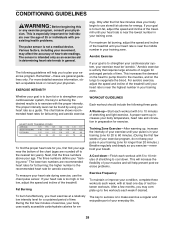
... low, adjust the speed and incline of stretching and light exercise. If your body begin to make exercise a regular and enjoyable part of the treadmill until your pulse is to burn fat or to strengthen your Òtraining zone.Ó The lower two numbers are rounded off to cool down ÑFinish each workout with preexisting health problems. The pulse sensor is intended only as a guide. The key to...
... low, adjust the speed and incline of stretching and light exercise. If your body begin to make exercise a regular and enjoyable part of the treadmill until your pulse is to burn fat or to strengthen your Òtraining zone.Ó The lower two numbers are rounded off to cool down ÑFinish each workout with preexisting health problems. The pulse sensor is intended only as a guide. The key to...
English Manual
Page 30
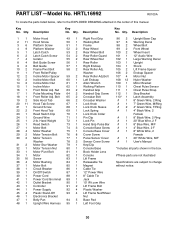
... 2 Rear Roller Adj.Bolt 107 4 Motor Nut 13 2 Incline Motor Bolt 60 1 Left Endcap 108 12 Nylon Washer 14 2 Incline Motor Nut 61 1 Allen Wrench 109 1 Motor Bracket 15 1 Incline Motor 62 1 Walking Platform 110 1 Chest Pulse Sensor 16 1 Front Roller Adj. HRTL16992 R0100A To locate the parts listed below, refer to change 37 1 Motor Bolt 85 1 Magnet without notice. 38 1 Circuit Breaker 86 1 Cable Tie 39 1 On/Off Switch 87 1 12Ó Power Wire 40 1 Power Cord 88...
... 2 Rear Roller Adj.Bolt 107 4 Motor Nut 13 2 Incline Motor Bolt 60 1 Left Endcap 108 12 Nylon Washer 14 2 Incline Motor Nut 61 1 Allen Wrench 109 1 Motor Bracket 15 1 Incline Motor 62 1 Walking Platform 110 1 Chest Pulse Sensor 16 1 Front Roller Adj. HRTL16992 R0100A To locate the parts listed below, refer to change 37 1 Motor Bolt 85 1 Magnet without notice. 38 1 Circuit Breaker 86 1 Cable Tie 39 1 On/Off Switch 87 1 12Ó Power Wire 40 1 Power Cord 88...
English Manual
Page 34
... the date of this limited warranty. This warranty does not extend to products used as instructed, return any replacement part or component, providing the repairs are authorized by ICON first and are covered for one is authorized to the terms set out in connection with the use , operate, and maintain as a gift from our Customer Service Department; USERÕS MANUALÑIt is covered for two years...
... the date of this limited warranty. This warranty does not extend to products used as instructed, return any replacement part or component, providing the repairs are authorized by ICON first and are covered for one is authorized to the terms set out in connection with the use , operate, and maintain as a gift from our Customer Service Department; USERÕS MANUALÑIt is covered for two years...

