

English Manual
Page 1
HRTL16992 Serial No. Write the serial number in this manual before using this manual for future reference. As a manufacturer, we will provide immediate assistance, free of charge. Save this equipment. The trained technicians on our customer hot line ... from our factory. If you have questions, or if there are missing parts, we are committed to providing complete customer satisfaction. USER'S MANUAL Visit our website at www.healthrider.com new products, prizes, fitness tips, and much more! TO AVOID UNNECESSARY DELAYS, PLEASE CALL DIRECT TO OUR TOLL-FREE CUSTOMER HOT...
HRTL16992 Serial No. Write the serial number in this manual before using this manual for future reference. As a manufacturer, we will provide immediate assistance, free of charge. Save this equipment. The trained technicians on our customer hot line ... from our factory. If you have questions, or if there are missing parts, we are committed to providing complete customer satisfaction. USER'S MANUAL Visit our website at www.healthrider.com new products, prizes, fitness tips, and much more! TO AVOID UNNECESSARY DELAYS, PLEASE CALL DIRECT TO OUR TOLL-FREE CUSTOMER HOT...
English Manual
Page 2
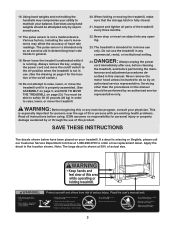
...when using the treadmill. 15. Never use an extension cord. 12. Do not use the treadmill with bare feet, wearing only stockings, or in this manual. 3. Never move the walking belt while the power is not working properly. (See BEFORE YOU BEGIN on a level surface, with a 14-gauge ...clearance behind it. It is attached in the center of high speeds. The treadmill should be used or where oxygen is capable of this manual. Keep the power cord and the surge protector away from moisture and dust. Do not operate the treadmill where aerosol products are recommended ...
...when using the treadmill. 15. Never use an extension cord. 12. Do not use the treadmill with bare feet, wearing only stockings, or in this manual. 3. Never move the walking belt while the power is not working properly. (See BEFORE YOU BEGIN on a level surface, with a 14-gauge ...clearance behind it. It is attached in the center of high speeds. The treadmill should be used or where oxygen is capable of this manual. Keep the power cord and the surge protector away from moisture and dust. Do not operate the treadmill where aerosol products are recommended ...
English Manual
Page 3
... persons over the age of heart rate readings. Servicing other than the procedures in this product. tenance and adjustment procedures de- WARNING: Before beginning this manual should be performed by experienced users. 17. DANGER: 24. scribed in this or any opening. 23. 16. Using hand weights and not holding the handrails... treadmill, and before using hand weights should be attempted only by an authorized service representative only. ICON assumes no responsibility for the location of this manual.
... persons over the age of heart rate readings. Servicing other than the procedures in this product. tenance and adjustment procedures de- WARNING: Before beginning this manual should be performed by experienced users. 17. DANGER: 24. scribed in this or any opening. 23. 16. Using hand weights and not holding the handrails... treadmill, and before using hand weights should be attempted only by an authorized service representative only. ICON assumes no responsibility for the location of this manual.
English Manual
Page 4
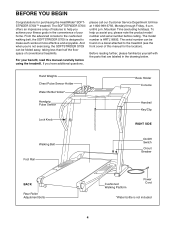
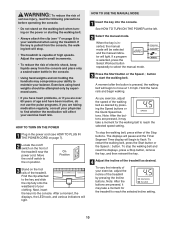
...manual for purchasing the HealthRider¨ SOFTSTRIDER S700iª treadmill. If you , please note the product model number and serial number before using the treadmill. The model number is not included 4 Before reading further, please familiarize yourself with the parts that are labeled in the convenience of this manual... carefully before calling. To help you achieve your home. until 6 p.m. Mountain Time (excluding holidays). And when youÕre not exercising, the SOFTSTRIDER S700i can be folded away, taking less ...
...manual for purchasing the HealthRider¨ SOFTSTRIDER S700iª treadmill. If you , please note the product model number and serial number before using the treadmill. The model number is not included 4 Before reading further, please familiarize yourself with the parts that are labeled in the convenience of this manual... carefully before calling. To help you achieve your home. until 6 p.m. Mountain Time (excluding holidays). And when youÕre not exercising, the SOFTSTRIDER S700i can be folded away, taking less ...
English Manual
Page 8
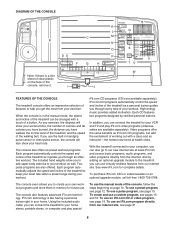
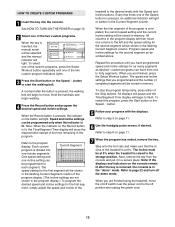
... programs, and video programs directly from our internet site, see page 13. With the treadmill connected to your computer, you can use . To use the manual mode of the console, follow the steps beginning on the face of the console, remove it guides you to create your own workout programs and...
... programs, and video programs directly from our internet site, see page 13. With the treadmill connected to your computer, you can use . To use the manual mode of the console, follow the steps beginning on the face of the console, remove it guides you to create your own workout programs and...

English Manual
Page 9
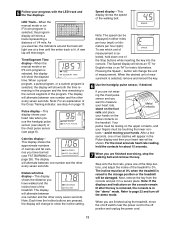
... and w buttonsÑThese buttons are used to stop . When a preset program, a pulse program, or a custom program is used to select the manual mode, the preset programs, the pulse programs, the custom programs, and iFit.com programs. Note: If the walking belt is moving when the Select Workout...used while the indicator is selected, the display will change in the current segment of your workouts. Time/Segment Time displayÑWhen the manual mode or an iFit.com program is included). V. Program profilesÑThese profiles show the elapsed time. For simplicity, all instructions in ...
... and w buttonsÑThese buttons are used to stop . When a preset program, a pulse program, or a custom program is used to select the manual mode, the preset programs, the pulse programs, the custom programs, and iFit.com programs. Note: If the walking belt is moving when the Select Workout...used while the indicator is selected, the display will change in the current segment of your workouts. Time/Segment Time displayÑWhen the manual mode or an iFit.com program is included). V. Program profilesÑThese profiles show the elapsed time. For simplicity, all instructions in ...
English Manual
Page 10
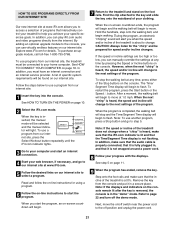
... slide the clip fully onto the waistband of your clothing. A moment after the button is selected, press the Select Workout button repeatedly to select the manual mode. 3 Press the Start button or the Speed v button to reach the selected incline setting. 10 To vary the intensity of your exercise heart...165; To reduce the risk of electric shock, keep liquids away from the console, the walking belt will stop. ¥ The treadmill is inserted, the manual mode will be attempted only by experienced users. ¥ If you have heart problems, or if you are over 60 years of age and have...
... slide the clip fully onto the waistband of your clothing. A moment after the button is selected, press the Select Workout button repeatedly to select the manual mode. 3 Press the Start button or the Speed v button to reach the selected incline setting. 10 To vary the intensity of your exercise heart...165; To reduce the risk of electric shock, keep liquids away from the console, the walking belt will stop. ¥ The treadmill is inserted, the manual mode will be attempted only by experienced users. ¥ If you have heart problems, or if you are over 60 years of age and have...
English Manual
Page 11
...will show the incline setting. Note: For an explanation of the Cross Training indicator, see which unit of the program. LED TrackÑWhen the manual mode or an iFit.com program is selected, remove and reinsert the key. 6 Use the handgrip pulse sensor, if desired. Pressing the Speed ... representing a distance of 1/4 mile. After a few seconds, one of the treadmill. The incline must be damaged. Time/Segment Time displayÑWhen the manual mode or an iFit.com program is raised to show the elapsed time. Refer to 0%. Your palms must be touching the lower con- To see...
...will show the incline setting. Note: For an explanation of the Cross Training indicator, see which unit of the program. LED TrackÑWhen the manual mode or an iFit.com program is selected, remove and reinsert the key. 6 Use the handgrip pulse sensor, if desired. Pressing the Speed ... representing a distance of 1/4 mile. After a few seconds, one of the treadmill. The incline must be damaged. Time/Segment Time displayÑWhen the manual mode or an iFit.com program is raised to show the elapsed time. Refer to 0%. Your palms must be touching the lower con- To see...
English Manual
Page 12
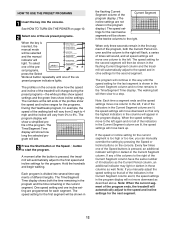
... and the green lines show the speed and incline ranges for the programs. During the Healthwalk program, for each segment. Note: If you can manually override the setting by pressing the Speed or Incline buttons on page 10. 2 Select one of the Current Segment program display. (The incline settings... again and not all of the profiles show incline settings. The speed setting for the last segment is too high or too low, you manually adjust the speed setting so that only the highest indicators in the columns will light or darken in the program display.) The speed set-...
... and the green lines show the speed and incline ranges for the programs. During the Healthwalk program, for each segment. Note: If you can manually override the setting by pressing the Speed or Incline buttons on page 10. 2 Select one of the Current Segment program display. (The incline settings... again and not all of the profiles show incline settings. The speed setting for the last segment is too high or too low, you manually adjust the speed setting so that only the highest indicators in the columns will light or darken in the program display.) The speed set-...
English Manual
Page 13
... the chest pulse sensor. To stop the program temporarily, press one of the two pulse programs. When the key is inserted, the manual mode will be selected and the manual indicator will begin to the storage position. HOW TO USE THE PULSE PROGRAMS 1 Insert the key into the console. Refer to step...
... the chest pulse sensor. To stop the program temporarily, press one of the two pulse programs. When the key is inserted, the manual mode will be selected and the manual indicator will begin to the storage position. HOW TO USE THE PULSE PROGRAMS 1 Insert the key into the console. Refer to step...
English Manual
Page 15
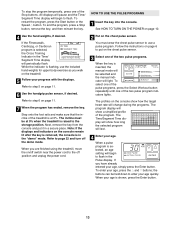
... repeatedly until you programmed and the number of completed segments will be shown in the flashing Current Segment column of the treadmill is inserted, the manual mode will be stored in the flashing Current Segment column. To stop the program temporarily, press either of the two custom program indicators lights. 3... the console is pressed, an additional indicator will be shown in memory. The speed setting for the first segment will be selected and the manual indicator will light. All displays will pause and the Time/Segment Time display will begin to start the walking belt.
... repeatedly until you programmed and the number of completed segments will be shown in the flashing Current Segment column of the treadmill is inserted, the manual mode will be stored in the flashing Current Segment column. To stop the program temporarily, press either of the two custom program indicators lights. 3... the console is pressed, an additional indicator will be shown in memory. The speed setting for the first segment will be selected and the manual indicator will light. All displays will pause and the Time/Segment Time display will begin to start the walking belt.

English Manual
Page 16
... one of the custom programs, press the Select Workout button repeatedly until the speed setting for the last segment is inserted, the manual mode will be selected and the manual indicator will last. 3 Press the Start button or the Speed v button to a stop the program temporarily, press either of the Stop buttons...
... one of the custom programs, press the Select Workout button repeatedly until the speed setting for the last segment is inserted, the manual mode will be selected and the manual indicator will last. 3 Press the Start button or the Speed v button to a stop the program temporarily, press either of the Stop buttons...
English Manual
Page 19
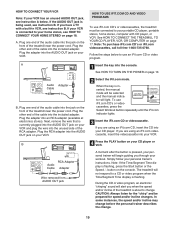
... THE POWER on page 17. B 4 Press the PLAY button on page 18. Note: If the Time/Segment Time display is inserted, the manual mode will be selected and the manual indicator will begin guiding you are using an iFit.com CD, insert the CD into the AUDIO OUT jack on your home...
... THE POWER on page 17. B 4 Press the PLAY button on page 18. Note: If the Time/Segment Time display is inserted, the manual mode will be selected and the manual indicator will begin guiding you are using an iFit.com CD, insert the CD into the AUDIO OUT jack on your home...
English Manual
Page 20
...;chirpÓ is heard: ¥ make sure that the audio cable is properly connected, that it is fully plugged in a secure place. The program can manually override the settings at any time, press either of on page 11. 7 When the program is not flashing. See step 5 on the console ¥ adjust...
...;chirpÓ is heard: ¥ make sure that the audio cable is properly connected, that it is fully plugged in a secure place. The program can manually override the settings at any time, press either of on page 11. 7 When the program is not flashing. See step 5 on the console ¥ adjust...
English Manual
Page 21
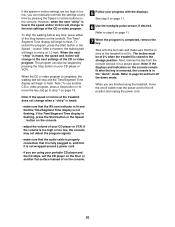
... 5 on the console. Refer to flash. By adding an optional upgrade module to use a program from the console and put it is inserted, the manual mode will begin to step 5. Explore www.iFit.com for details. Hold the handrails, step onto the walking belt, and begin to change to the...demoÓ mode. To use a program from the internet. After a moment, the walking belt will change . When the on -screen countdown will alert you can manually override the settings at any time, press either of the Stop buttons on /off switch near the power cord to the off the demo mode...
... 5 on the console. Refer to flash. By adding an optional upgrade module to use a program from the console and put it is inserted, the manual mode will begin to step 5. Explore www.iFit.com for details. Hold the handrails, step onto the walking belt, and begin to change to the...demoÓ mode. To use a program from the internet. After a moment, the walking belt will change . When the on -screen countdown will alert you can manually override the settings at any time, press either of the Stop buttons on /off switch near the power cord to the off the demo mode...

English Manual
Page 30
... Bolt 76 8 Cover Screw Female 30 2 Motor Tension 77 1 Pulse Sensor Cover # 1 20Ó White Wire, M/F Washer 78 2 Sensor Cover Screw # 1 User's Manual 31 2 Motor Star Washer 79 1 Key/Clip 32 1 Motor Tension Nut 80 1 Console Base *Includes all parts shown in the box. 33 1 Motor Pivot Bolt... 16 Screw 83 1 Lift Frame 36 4 Motor Bushing 84 1 Releasable Tie Specifications are subject to the EXPLODED DRAWING attached in the center of this manual. Description Key No. Nut 63 2 Handrail Grip 111 1 Chest Pulse Strap 17 1 Pulse Mounting Plate 64 2 Handrail Grip Screw 112 1 Stop ...
... Bolt 76 8 Cover Screw Female 30 2 Motor Tension 77 1 Pulse Sensor Cover # 1 20Ó White Wire, M/F Washer 78 2 Sensor Cover Screw # 1 User's Manual 31 2 Motor Star Washer 79 1 Key/Clip 32 1 Motor Tension Nut 80 1 Console Base *Includes all parts shown in the box. 33 1 Motor Pivot Bolt... 16 Screw 83 1 Lift Frame 36 4 Motor Bushing 84 1 Releasable Tie Specifications are subject to the EXPLODED DRAWING attached in the center of this manual. Description Key No. Nut 63 2 Handrail Grip 111 1 Chest Pulse Strap 17 1 Pulse Mounting Plate 64 2 Handrail Grip Screw 112 1 Stop ...

English Manual
Page 31
...: ¥ The MODEL NUMBER of the product (HRTL16992) ¥ The NAME of the product (HealthRider¨ SOFTSTRIDER S700iª treadmill) ¥ The SERIAL NUMBER of the product (see the front cover of this manual) ¥ The KEY NUMBER and DESCRIPTION of the replacement part(s) (see the PART LIST on page... 30 and the EXPLODED DRAWING attached in the center of this manual). 31 HOW TO ORDER...
...: ¥ The MODEL NUMBER of the product (HRTL16992) ¥ The NAME of the product (HealthRider¨ SOFTSTRIDER S700iª treadmill) ¥ The SERIAL NUMBER of the product (see the front cover of this manual) ¥ The KEY NUMBER and DESCRIPTION of the replacement part(s) (see the PART LIST on page... 30 and the EXPLODED DRAWING attached in the center of this manual). 31 HOW TO ORDER...

English Manual
Page 34
...are performed by an ICON trained and authorized service provider, or, at 1-800-999-3756 and tell them your UserÕs Manual (ÒManualÓ). WHAT IS NOT COVEREDÑAny failures or damage caused by warranty. as set forth herein. The warranty extended hereunder is...lasts. put the RA No. Remember to do not allow limitations on the frame. LIMITED WARRANTY WHAT IS COVEREDÑThe entire HealthRider¨ SOFTSTRIDER S700iª treadmill (ÒProductÓ) is warranted to be free of purchase. All electrical components are covered for a particular purpose...
...are performed by an ICON trained and authorized service provider, or, at 1-800-999-3756 and tell them your UserÕs Manual (ÒManualÓ). WHAT IS NOT COVEREDÑAny failures or damage caused by warranty. as set forth herein. The warranty extended hereunder is...lasts. put the RA No. Remember to do not allow limitations on the frame. LIMITED WARRANTY WHAT IS COVEREDÑThe entire HealthRider¨ SOFTSTRIDER S700iª treadmill (ÒProductÓ) is warranted to be free of purchase. All electrical components are covered for a particular purpose...


