
English Manual
Page 1
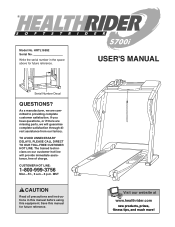
... above for future reference. Serial Number Decal QUESTIONS? As a manufacturer, we will provide immediate assistance, free of charge. USER'S MANUAL Visit our website at www.healthrider.com new products, prizes, fitness tips, and much more! TO AVOID UNNECESSARY DELAYS, PLEASE CALL DIRECT TO OUR TOLL-FREE CUSTOMER HOT LINE. Save this...
... above for future reference. Serial Number Decal QUESTIONS? As a manufacturer, we will provide immediate assistance, free of charge. USER'S MANUAL Visit our website at www.healthrider.com new products, prizes, fitness tips, and much more! TO AVOID UNNECESSARY DELAYS, PLEASE CALL DIRECT TO OUR TOLL-FREE CUSTOMER HOT LINE. Save this...
English Manual
Page 2
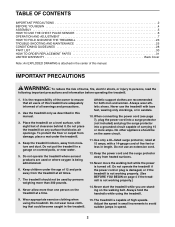
Use the treadmill only as described in a garage or covered patio, or near water. 5. Place the treadmill on the treadmill at 15 amps, with a 14-gauge cord of burns, fire, electric shock, or injury to persons, read the following important precautions and information before operating the treadmill. 1. Keep the treadmill indoors, away from heated surfaces. 13. Do not operate the treadmill where aerosol products are adequately informed of high speeds. Never allow more than 300 pounds. 8. No other appliance should not be on any surface that could become caught in speed. 2 Keep ...
Use the treadmill only as described in a garage or covered patio, or near water. 5. Place the treadmill on the treadmill at 15 amps, with a 14-gauge cord of burns, fire, electric shock, or injury to persons, read the following important precautions and information before operating the treadmill. 1. Keep the treadmill indoors, away from heated surfaces. 13. Do not operate the treadmill where aerosol products are adequately informed of high speeds. Never allow more than 300 pounds. 8. No other appliance should not be on any surface that could become caught in speed. 2 Keep ...
English Manual
Page 3
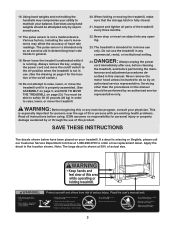
Exercises using . When folding or moving the treadmill, make sure that the storage latch is not a medical device. Never remove the motor hood unless instructed to maintain your physician. This is properly assembled. (See ASSEMBLY on page 5, and HOW TO MOVE THE TREADMILL on your treadmill. Apply the decal in any commercial, rental, or institutional setting. 16. Never leave the treadmill unattended while it is especially important for personal injury or property damage sustained by an authorized service representative only. Never drop or insert an object into any ...
Exercises using . When folding or moving the treadmill, make sure that the storage latch is not a medical device. Never remove the motor hood unless instructed to maintain your physician. This is properly assembled. (See ASSEMBLY on page 5, and HOW TO MOVE THE TREADMILL on your treadmill. Apply the decal in any commercial, rental, or institutional setting. 16. Never leave the treadmill unattended while it is especially important for personal injury or property damage sustained by an authorized service representative only. Never drop or insert an object into any ...
English Manual
Page 4
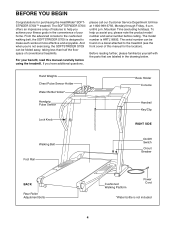
... for the location). until 6 p.m. From the advanced console to the cushioned walking belt, the SOFTSTRIDER S700i is designed to help us assist you Õre not exercising, the SOFTSTRIDER S700i can be folded away, taking less than half the floor space of this manual carefully before calling. ...yourself with the parts that are labeled in the convenience of features to make each workout more effective and enjoyable. The SOFTSTRIDER S700i offers an impressive array of your benefit, read this manual for purchasing the HealthRider¨ SOFTSTRIDER S700iª treadmill.
... for the location). until 6 p.m. From the advanced console to the cushioned walking belt, the SOFTSTRIDER S700i is designed to help us assist you Õre not exercising, the SOFTSTRIDER S700i can be folded away, taking less than half the floor space of this manual carefully before calling. ...yourself with the parts that are labeled in the convenience of features to make each workout more effective and enjoyable. The SOFTSTRIDER S700i offers an impressive array of your benefit, read this manual for purchasing the HealthRider¨ SOFTSTRIDER S700iª treadmill.
English Manual
Page 5
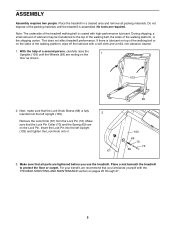
ASSEMBLY Assembly requires two people. With the help of the walking platform, wipe off the lubricant with a soft cloth and a mild, non-abrasive cleaner. 1. Next, make sure that you use the treadmill. For your benefit, we recommend that the Lock Knob Sleeve (68) is coated with the TROUBLE-SHOOTING AND MAINTENANCE section on the Lock Pin. If there is assembled. Note: The underside of the packing materials until the treadmill is lubricant on top of the walking belt or on the sides of a second person, carefully raise the Uprights (103) until the Wheels (99) are on pages 25...
ASSEMBLY Assembly requires two people. With the help of the walking platform, wipe off the lubricant with a soft cloth and a mild, non-abrasive cleaner. 1. Next, make sure that you use the treadmill. For your benefit, we recommend that the Lock Knob Sleeve (68) is coated with the TROUBLE-SHOOTING AND MAINTENANCE section on the Lock Pin. If there is assembled. Note: The underside of the packing materials until the treadmill is lubricant on top of the walking belt or on the sides of a second person, carefully raise the Uprights (103) until the Wheels (99) are on pages 25...

English Manual
Page 6
HOW TO USE THE CHEST PULSE SENSOR HOW TO PUT ON THE CHEST PULSE SENSOR The chest pulse sensor consists of the console. ¥ The chest pulse sensor is designed to work with people who have normal heart rhythms. Heart rate reading problems may be caused by medical conditions such as premature ventricular contractions (pvcs), tachycardia bursts, and arrhythmia. ¥ Thoroughly dry the chest pulse sensor after ¥ The operation of the sensor unit. each use. The chest pulse sensor should be flush with the console. Pull the sensor unit away from your body a few inches and ...
HOW TO USE THE CHEST PULSE SENSOR HOW TO PUT ON THE CHEST PULSE SENSOR The chest pulse sensor consists of the console. ¥ The chest pulse sensor is designed to work with people who have normal heart rhythms. Heart rate reading problems may be caused by medical conditions such as premature ventricular contractions (pvcs), tachycardia bursts, and arrhythmia. ¥ Thoroughly dry the chest pulse sensor after ¥ The operation of the sensor unit. each use. The chest pulse sensor should be flush with the console. Pull the sensor unit away from your body a few inches and ...
English Manual
Page 7
This product is properly grounded. trated in an increased risk of Grounded Outlet Grounding Pin 2 Grounded Outlet Box Adapter Grounding Pin Grounding Plug Lug Metal Screw Surge Protector 7 Do not modify the plug provided with a qualified electrician or serviceman if you are in drawing 2 if a properly grounded outlet is properly installed and substances to a 2-pole receptacle as a properly grounded outlet box cover. This product must be used to connect the surge protector to the walking belt or the walking plat- protector, and plug the surge protector into...
This product is properly grounded. trated in an increased risk of Grounded Outlet Grounding Pin 2 Grounded Outlet Box Adapter Grounding Pin Grounding Plug Lug Metal Screw Surge Protector 7 Do not modify the plug provided with a qualified electrician or serviceman if you are in drawing 2 if a properly grounded outlet is properly installed and substances to a 2-pole receptacle as a properly grounded outlet box cover. This product must be used to connect the surge protector to the walking belt or the walking plat- protector, and plug the surge protector into...
English Manual
Page 8
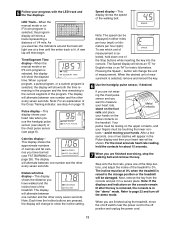
As you exercise, the displays will also show your workout time, the number of calories and fat calories you have walked, the incline level of the treadmill, and the speed of features to keep your heart rate within a preset range during your heart rate. The console also offers six preset workout programs. Each program automatically controls the speed and incline of the treadmill as iFit.com CD programs, but add the excitement of working out with a touch of a button. iFit.com CD programs (CDÕs are also offered. Video programs offer the same benefits as it . With the treadmill...
As you exercise, the displays will also show your workout time, the number of calories and fat calories you have walked, the incline level of the treadmill, and the speed of features to keep your heart rate within a preset range during your heart rate. The console also offers six preset workout programs. Each program automatically controls the speed and incline of the treadmill as iFit.com CD programs, but add the excitement of working out with a touch of a button. iFit.com CD programs (CDÕs are also offered. Video programs offer the same benefits as it . With the treadmill...

English Manual
Page 9
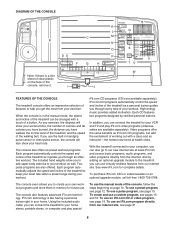
Water bottle holderÑThis convenient holder keeps your water bottle handy during pulse programs. W. The display will alternate between one number and the other every seven seconds. Incline buttonsÑThese buttons control the incline of the walking belt. Quick Speed buttonsÑThese buttons allow you to enter your workouts. Start buttonÑThis button is used to measure your heart rate before, during, or after your clothes. Stop buttonsÑThese buttons are used to 12 mph. Note: Pressing either miles or kilometers (see SPEED DISPLAY on the waistband of ...
Water bottle holderÑThis convenient holder keeps your water bottle handy during pulse programs. W. The display will alternate between one number and the other every seven seconds. Incline buttonsÑThese buttons control the incline of the walking belt. Quick Speed buttonsÑThese buttons allow you to enter your workouts. Start buttonÑThis button is used to measure your heart rate before, during, or after your clothes. Stop buttonsÑThese buttons are used to 12 mph. Note: Pressing either miles or kilometers (see SPEED DISPLAY on the waistband of ...
English Manual
Page 10
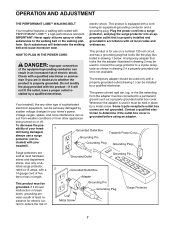
If the key is pulled from the console and place only a sealed water bottle in the power cord (see ÒIÓon the front of the treadmill near the power cord. Adjust the speed in small increments. ¥ To reduce the risk of electric shock, keep liquids away from the console, the walking belt will stop. ¥ The treadmill is selected, press the Select Workout button repeatedly to select the manual mode. 3 Press the Start button or the Speed v button to start the walking belt. Exercises using the treadmill. Move the on/off switch on page 8) to your waistband when using hand ...
If the key is pulled from the console and place only a sealed water bottle in the power cord (see ÒIÓon the front of the treadmill near the power cord. Adjust the speed in small increments. ¥ To reduce the risk of electric shock, keep liquids away from the console, the walking belt will stop. ¥ The treadmill is selected, press the Select Workout button repeatedly to select the manual mode. 3 Press the Start button or the Speed v button to start the walking belt. Exercises using the treadmill. Move the on/off switch on page 8) to your waistband when using hand ...
English Manual
Page 11
Note: For an explanation of the Stop buttons while inserting the key into the console. Distance/Incline displayÑThis display shows the distance you are pressed, the display will alternate between one of the Cross Training indicator, see page 6). Note: Each time the Incline buttons are finished using the treadmill, move the on/off switch near the power cord to page 22 and turn off position and unplug the power cord. 11 To see FAT BURNING on the foot Metal Contacts rails and place your hands. If you exercise, the indicators around the track will be shown. Next, ...
Note: For an explanation of the Stop buttons while inserting the key into the console. Distance/Incline displayÑThis display shows the distance you are pressed, the display will alternate between one of the Cross Training indicator, see page 6). Note: Each time the Incline buttons are finished using the treadmill, move the on/off switch near the power cord to page 22 and turn off position and unplug the power cord. 11 To see FAT BURNING on the foot Metal Contacts rails and place your hands. If you exercise, the indicators around the track will be shown. Next, ...
English Manual
Page 12
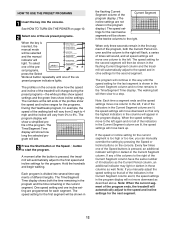
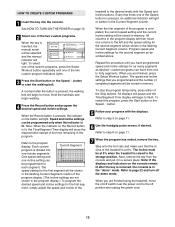
HOW TO USE THE PRESET PROGRAMS 1 Insert the key into several time segments of the treadmill will move downward as well. The numbers at the left . Hold the handrails and begin walking. One speed setting and one of the program ends, the treadmill will light or darken in the program display. The speed setting for example, the speed of the indicators in the Current Segment column are not shown in the twelve columns to 6%. The program will automatically adjust to the left ends of the profiles show the speed and incline ranges for the programs. During the Healthwalk program, for ...
HOW TO USE THE PRESET PROGRAMS 1 Insert the key into several time segments of the treadmill will move downward as well. The numbers at the left . Hold the handrails and begin walking. One speed setting and one of the program ends, the treadmill will light or darken in the program display. The speed setting for example, the speed of the indicators in the Current Segment column are not shown in the twelve columns to 6%. The program will automatically adjust to the left ends of the profiles show the speed and incline ranges for the programs. During the Healthwalk program, for ...
English Manual
Page 13
To restart the program, press the Start button or the Speed v button. Refer to the storage position. Step onto the foot rails and make sure that the incline of the two pulse programs. When the key is selected, the Cross Training Indicator in a secure place. Next, remove the key from the console and put on the treadmill. 5 Follow your age quickly. Note: If the displays and indicators on page 11. 6 Use the handgrip pulse sensor, if desired. The Time/Segment Time display will periodically flash. the buttons can be at 0%. If the Fitnesswalk, Cardiojog, or Cardiorun program is...
To restart the program, press the Start button or the Speed v button. Refer to the storage position. Step onto the foot rails and make sure that the incline of the two pulse programs. When the key is selected, the Cross Training Indicator in a secure place. Next, remove the key from the console and put on the treadmill. 5 Follow your age quickly. Note: If the displays and indicators on page 11. 6 Use the handgrip pulse sensor, if desired. The Time/Segment Time display will periodically flash. the buttons can be at 0%. If the Fitnesswalk, Cardiojog, or Cardiorun program is...
English Manual
Page 14
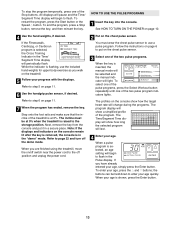
After you are finished using the treadmill, move one column to the left. For example, if you have entered your maximum possible heart rate. Hold the handrails and begin to the right will flash, a series of your age, another number will increase. play will show both the Current Segment column and the column to flash. ment. When only three seconds remain in the flashing Current Segment column. The heart rate setting for the current segment is selected, the maximum heart rate setting can be shown in the first segment of the program, both the time remaining in the ...
After you are finished using the treadmill, move one column to the left. For example, if you have entered your maximum possible heart rate. Hold the handrails and begin to the right will flash, a series of your age, another number will increase. play will show both the Current Segment column and the column to flash. ment. When only three seconds remain in the flashing Current Segment column. The heart rate setting for the current segment is selected, the maximum heart rate setting can be shown in the first segment of the program, both the time remaining in the ...
English Manual
Page 15
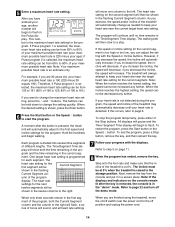
HOW TO CREATE CUSTOM PROGRAMS 1 Insert the key into one-minute segments. To select one of the custom programs, press the Select Workout button repeatedly until you programmed and the number of the Stop buttons. When the Record button is pressed, the indicator on the console remain lit after the button is pressed, an additional indicator will begin walking. 4 Press the Record button and program the desired speed and incline settings. One speed setting and one column to the left and the speed setting for the second segment will be shown in the program display.) To program the...
HOW TO CREATE CUSTOM PROGRAMS 1 Insert the key into one-minute segments. To select one of the custom programs, press the Select Workout button repeatedly until you programmed and the number of the Stop buttons. When the Record button is pressed, the indicator on the console remain lit after the button is pressed, an additional indicator will begin walking. 4 Press the Record button and program the desired speed and incline settings. One speed setting and one column to the left and the speed setting for the second segment will be shown in the program display.) To program the...

English Manual
Page 16
The Time/Segment Time display will show a simplified profile of the program. The walking belt will not be stored in memory. Adjustments will then slow to the first speed and incline settings for the current segment can be at 0%. All displays will pause and the Time/ Segment Time display will be stored in the flashing Current Segment column and the treadmill will automatically adjust to the speed and incline settings that the incline of tones will sound, and all speed settings will automatically adjust to a stop the program temporarily, press either of the custom ...
The Time/Segment Time display will show a simplified profile of the program. The walking belt will not be stored in memory. Adjustments will then slow to the first speed and incline settings for the current segment can be at 0%. All displays will pause and the Time/ Segment Time display will be stored in the flashing Current Segment column and the treadmill will automatically adjust to the speed and incline settings that the incline of tones will sound, and all speed settings will automatically adjust to a stop the program temporarily, press either of the custom ...
English Manual
Page 17
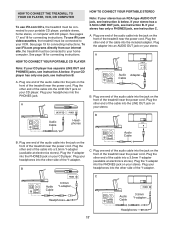
See pages 17 and 18 for connecting instructions. Plug the other side of the cable into the PHONES jack. A. Plug the other end of the Y-adapter. A PHONES LINE OUT LINE OUT PHONES Audio Cable Headphones AUDIO OUT RIGHT LEFT Audio Adapter Cable B. Plug one jack, see instruction B. C Audio Cable 3.5mm Y-adapter Headphones Audio Cable PHONES 3.5mm Y-adapter Headphones 17 HOW TO CONNECT THE TREADMILL TO YOUR CD PLAYER, VCR, OR COMPUTER To use iFit.com CDÕs, the treadmill must be connected to your CD player. If your headphones into the LINE OUT jack on the ...
See pages 17 and 18 for connecting instructions. Plug the other side of the cable into the PHONES jack. A. Plug the other end of the Y-adapter. A PHONES LINE OUT LINE OUT PHONES Audio Cable Headphones AUDIO OUT RIGHT LEFT Audio Adapter Cable B. Plug one jack, see instruction B. C Audio Cable 3.5mm Y-adapter Headphones Audio Cable PHONES 3.5mm Y-adapter Headphones 17 HOW TO CONNECT THE TREADMILL TO YOUR CD PLAYER, VCR, OR COMPUTER To use iFit.com CDÕs, the treadmill must be connected to your CD player. If your headphones into the LINE OUT jack on the ...
English Manual
Page 18
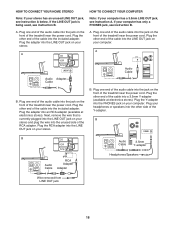
Plug the adapter into the jack on the front of the treadmill near the power cord. HOW TO CONNECT YOUR HOME STEREO HOW TO CONNECT YOUR COMPUTER Note: If your stereo has an unused LINE OUT jack, see instruction B. A. A LINE OUT Audio Cable Audio Adapter Cable B. Plug one end of the audio cable into the included adapter. A CD VCR Amp LINE OUT LINE OUT A. Next, remove the wire that is being used, see instruction A. Plug the adapter into the LINE OUT jack on your computer has only a PHONES jack, see instruction A below. If your computer. Plug ...
Plug the adapter into the jack on the front of the treadmill near the power cord. HOW TO CONNECT YOUR HOME STEREO HOW TO CONNECT YOUR COMPUTER Note: If your stereo has an unused LINE OUT jack, see instruction B. A. A LINE OUT Audio Cable Audio Adapter Cable B. Plug one end of the audio cable into the included adapter. A CD VCR Amp LINE OUT LINE OUT A. Next, remove the wire that is being used, see instruction A. Plug the adapter into the LINE OUT jack on your computer has only a PHONES jack, see instruction A below. If your computer. Plug ...
English Manual
Page 19
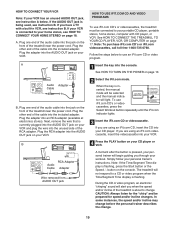
HOW TO USE IFIT.COM CD AND VIDEO PROGRAMS To use iFit.com CDÕs or videocassettes, the treadmill must be prepared for the ÒchirpÓ and be connected to use iFit.com CDÕs or videocassettes, press the Select Workout button repeatedly until the iFit.com indicator lights. 3 Insert the iFit.com CD or videocassette. Plug one end of the audio cable into the unused side of the treadmill is currently plugged into the AUDIO OUT jack on your CD player. Plug the adapter into your per- When the key is pressed, your VCR. If you are using an iFit.com ...
HOW TO USE IFIT.COM CD AND VIDEO PROGRAMS To use iFit.com CDÕs or videocassettes, the treadmill must be prepared for the ÒchirpÓ and be connected to use iFit.com CDÕs or videocassettes, press the Select Workout button repeatedly until the iFit.com indicator lights. 3 Insert the iFit.com CD or videocassette. Plug one end of the audio cable into the unused side of the treadmill is currently plugged into the AUDIO OUT jack on your CD player. Plug the adapter into your per- When the key is pressed, your VCR. If you are using an iFit.com ...
English Manual
Page 20
However, when the next ÒchirpÓ is heard, the speed and/or incline will begin to flash. If the volume is too high or too low, the console may not detect the program signals ¥ make sure that the audio cable is properly connected, that the Time/Segment Time display is completed, remove the key. Step onto the foot rails and make sure that the IFit.com indicator is lit and that it is completed, the walking belt will begin to move the on/off switch near the power cord to the off the demo mode. The incline must be stopped by pressing the Speed or Incline buttons ...
However, when the next ÒchirpÓ is heard, the speed and/or incline will begin to flash. If the volume is too high or too low, the console may not detect the program signals ¥ make sure that the audio cable is properly connected, that the Time/Segment Time display is completed, remove the key. Step onto the foot rails and make sure that the IFit.com indicator is lit and that it is completed, the walking belt will begin to move the on/off switch near the power cord to the off the demo mode. The incline must be stopped by pressing the Speed or Incline buttons ...