
English Manual
Page 1
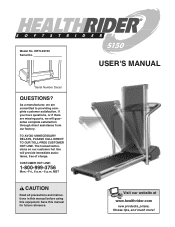
... line will guarantee complete satisfaction through direct assistance from our factory. MST CAUTION Read all precautions and instructions in this manual before using this manual for future reference. ® USER'S MANUAL Visit our website at www.healthrider.com new products, prizes, fitness tips, and much more! CUSTOMER HOT LINE: 1-800-999-3756 Mon.-Fri., 6 a.m.- 6 p.m. Serial Number Decal QUESTIONS? HRTL06190 Serial No. Model No.
... line will guarantee complete satisfaction through direct assistance from our factory. MST CAUTION Read all precautions and instructions in this manual before using this manual for future reference. ® USER'S MANUAL Visit our website at www.healthrider.com new products, prizes, fitness tips, and much more! CUSTOMER HOT LINE: 1-800-999-3756 Mon.-Fri., 6 a.m.- 6 p.m. Serial Number Decal QUESTIONS? HRTL06190 Serial No. Model No.

English Manual
Page 2
® TABLE OF CONTENTS IMPORTANT PRECAUTIONS 3 BEFORE YOU BEGIN 5 SETTING UP THE TREADMILL 6 GROUNDING INSTRUCTIONS 7 CONSOLE OPERATION 8 HOW TO FOLD AND MOVE THE TREADMILL 14 TROUBLE-SHOOTING AND MAINTENANCE 15 CONDITIONING GUIDELINES 18 ORDERING REPLACEMENT PARTS 19 LIMITED WARRANTY Back Cover Note: To order replacement parts, see the EXPLODED DRAWING and PART LIST attached in the center of this manual. Please save them for future reference. 2
® TABLE OF CONTENTS IMPORTANT PRECAUTIONS 3 BEFORE YOU BEGIN 5 SETTING UP THE TREADMILL 6 GROUNDING INSTRUCTIONS 7 CONSOLE OPERATION 8 HOW TO FOLD AND MOVE THE TREADMILL 14 TROUBLE-SHOOTING AND MAINTENANCE 15 CONDITIONING GUIDELINES 18 ORDERING REPLACEMENT PARTS 19 LIMITED WARRANTY Back Cover Note: To order replacement parts, see the EXPLODED DRAWING and PART LIST attached in the center of this manual. Please save them for future reference. 2

English Manual
Page 3
... the storage latch is not in use the treadmill with heavy treads. 10. Never leave the treadmill unattended while it . Always remove the key, unplug the power cord and move the walking belt while the power is the responsibility of the owner to avoid sudden jumps in this treadmill are used by persons weighing more than 250 pounds. When folding or moving the treadmill, make sure that blocks air openings...
... the storage latch is not in use the treadmill with heavy treads. 10. Never leave the treadmill unattended while it . Always remove the key, unplug the power cord and move the walking belt while the power is the responsibility of the owner to avoid sudden jumps in this treadmill are used by persons weighing more than 250 pounds. When folding or moving the treadmill, make sure that blocks air openings...
English Manual
Page 4
... the treadmill, and before using. Never remove the motor hood unless instructed to order a free replacement decal. scribed in this manual should be performed by an authorized service representative. ICON assumes no responsibility for persons over the age of this or any exercise program, consult your treadmill. Apply the decal in this manual. WARNING: Before beginning this product. tenance and adjustment procedures de- SAVE THESE INSTRUCTIONS The...
... the treadmill, and before using. Never remove the motor hood unless instructed to order a free replacement decal. scribed in this manual should be performed by an authorized service representative. ICON assumes no responsibility for persons over the age of this or any exercise program, consult your treadmill. Apply the decal in this manual. WARNING: Before beginning this product. tenance and adjustment procedures de- SAVE THESE INSTRUCTIONS The...
English Manual
Page 5
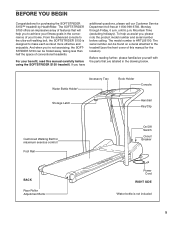
... holidays). The model number is not included 5 Water Bottle Holder* Storage Latch Accessory Tray Book Holder Console Handrail Key/Clip Cushioned Walking Belt for maximum exercise comfort Foot Rail BACK Rear Roller Adjustment Bolts On/Off Switch Circuit Breaker Power Cord RIGHT SIDE *Water bottle is HRTL06190. The SOFTSTRIDER S150 offers an impressive array of this manual carefully before calling. If you to make each workout more effective and...
... holidays). The model number is not included 5 Water Bottle Holder* Storage Latch Accessory Tray Book Holder Console Handrail Key/Clip Cushioned Walking Belt for maximum exercise comfort Foot Rail BACK Rear Roller Adjustment Bolts On/Off Switch Circuit Breaker Power Cord RIGHT SIDE *Water bottle is HRTL06190. The SOFTSTRIDER S150 offers an impressive array of this manual carefully before calling. If you to make each workout more effective and...
English Manual
Page 6
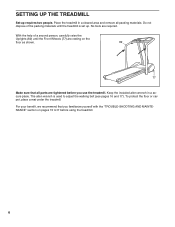
... a secure place. Do not dispose of a second person, carefully raise the Uprights (82) until the treadmill is used to adjust the walking belt (see pages 16 and 17). Keep the included allen wrench in a cleared area and remove all parts are required. The allen wrench is set up requires two people. SETTING UP THE TREADMILL Set-up . No tools are tightened before using the treadmill. 6
... a secure place. Do not dispose of a second person, carefully raise the Uprights (82) until the treadmill is used to adjust the walking belt (see pages 16 and 17). Keep the included allen wrench in a cleared area and remove all parts are required. The allen wrench is set up requires two people. SETTING UP THE TREADMILL Set-up . No tools are tightened before using the treadmill. 6
English Manual
Page 7
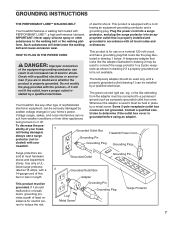
... or from the adapter must be connected to determine if the outlet box cover is used only until a properly grounded outlet (drawing 1) can be seriously damaged by a metal screw. This product must be grounded. GROUNDING INSTRUCTIONS THE PERFORMANT LUBETM WALKING BELT of your tread- 1 mill being turned on a nominal 120-volt circuit, HOW TO PLUG IN THE POWER CORD and has a grounding...
... or from the adapter must be connected to determine if the outlet box cover is used only until a properly grounded outlet (drawing 1) can be seriously damaged by a metal screw. This product must be grounded. GROUNDING INSTRUCTIONS THE PERFORMANT LUBETM WALKING BELT of your tread- 1 mill being turned on a nominal 120-volt circuit, HOW TO PLUG IN THE POWER CORD and has a grounding...
English Manual
Page 8
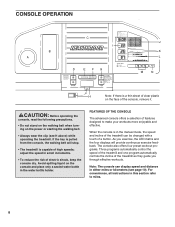
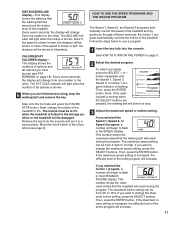
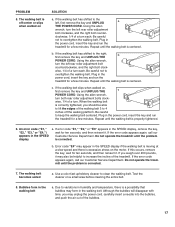
... control the speed of the treadmill and one program automatically controls the incline of the treadmill as they guide you exercise, the LED matrix and the four displays will stop. • The treadmill is in the manual mode, the speed and incline of high speeds; Note: The console can be changed with a touch of features designed to miles. 8 For convenience, all instructions in either miles or kilometers (see H above) while operating the treadmill. adjust...
... control the speed of the treadmill and one program automatically controls the incline of the treadmill as they guide you exercise, the LED matrix and the four displays will stop. • The treadmill is in the manual mode, the speed and incline of high speeds; Note: The console can be changed with a touch of features designed to miles. 8 For convenience, all instructions in either miles or kilometers (see H above) while operating the treadmill. adjust...
English Manual
Page 9
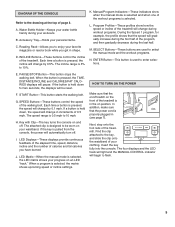
... sure that the power cord is pressed, the incline will change during the last half. Next, step onto the foot rails of the walking belt. D. Each time a button is On properly plugged in (see page 7). The incline range is used to flash. 9 ENTER Button-This button is 3% to 10%. START Button-This button starts the walking belt. SPEED Buttons-These buttons control the speed of the treadmill. The attached clip is pulled from the console, the power will pause...
... sure that the power cord is pressed, the incline will change during the last half. Next, step onto the foot rails of the walking belt. D. Each time a button is On properly plugged in (see page 7). The incline range is used to flash. 9 ENTER Button-This button is 3% to 10%. START Button-This button starts the walking belt. SPEED Buttons-These buttons control the speed of the treadmill. The attached clip is pulled from the console, the power will pause...
English Manual
Page 10
... the walking belt as if the manual mode had just been selected. When the desired unit of 1/4 mile. To restart the walking belt, press the START button or the SPEED + button. Note: When a workout program is pressed, the incline will show the selected speed setting for the treadmill to flash. As you exercise, the indicators around the track will light one of the walking belt is pressed, the SPEED display will appear in a counterclockwise direction. TIME display-This display...
... the walking belt as if the manual mode had just been selected. When the desired unit of 1/4 mile. To restart the walking belt, press the START button or the SPEED + button. Note: When a workout program is pressed, the incline will show the selected speed setting for the treadmill to flash. As you exercise, the indicators around the track will light one of the walking belt is pressed, the SPEED display will appear in a counterclockwise direction. TIME display-This display...
English Manual
Page 11
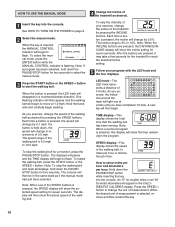
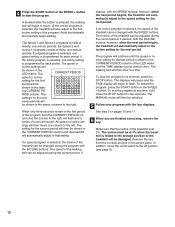
... SELECT buttons are finished exercising, stop . 3 Adjust the maximum speed or incline setting. This display shows the numbers of the treadmill as they guide you want to a stop the walking belt and remove the key. Move the on page 18). HOW TO USE THE SPEED PROGRAMS AND THE INCLINE PROGRAM The Speed 1, Speed 2, and Speed 3 programs automatically control the speed of calories and fat calories you are pressed, the walking belt will be from the console and put it in the DISTANCE/ INCLINE display. See...
... SELECT buttons are finished exercising, stop . 3 Adjust the maximum speed or incline setting. This display shows the numbers of the treadmill as they guide you want to a stop the walking belt and remove the key. Move the on page 18). HOW TO USE THE SPEED PROGRAMS AND THE INCLINE PROGRAM The Speed 1, Speed 2, and Speed 3 programs automatically control the speed of calories and fat calories you are pressed, the walking belt will be from the console and put it in the DISTANCE/ INCLINE display. See...
English Manual
Page 12
... selected, the speed of the walking belt can be damaged. 4 Press the START button or the SPEED + button to zero. however, when the next period begins, the treadmill will continue until the speed or incline setting for the next period. The MANUAL mode will also adjust to a stop the program for the next seven periods will be changed with the four displays. See step 5 on /off switch to the speed setting for the...
... selected, the speed of the walking belt can be damaged. 4 Press the START button or the SPEED + button to zero. however, when the next period begins, the treadmill will continue until the speed or incline setting for the next period. The MANUAL mode will also adjust to a stop the program for the next seven periods will be changed with the four displays. See step 5 on /off switch to the speed setting for the...
English Manual
Page 13
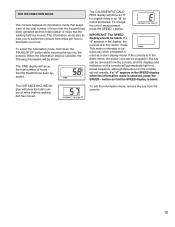
.... button so that the walking belt has moved. The DISTANCE/INCLINE display will show the total number of miles that the SPEED display is selected, press the SPEED - To exit the information mode, remove the key from miles per hour to switch the console from the console. 13 IMPORTANT: The SPEED display should be used only when a treadmill is in the demo mode, the power cord can be plugged in the SPEED display when the information mode is blank. If a "d" appears in the display, the console...
.... button so that the walking belt has moved. The DISTANCE/INCLINE display will show the total number of miles that the SPEED display is selected, press the SPEED - To exit the information mode, remove the key from miles per hour to switch the console from the console. 13 IMPORTANT: The SPEED display should be used only when a treadmill is in the demo mode, the power cord can be plugged in the SPEED display when the information mode is blank. If a "d" appears in the display, the console...

English Manual
Page 15
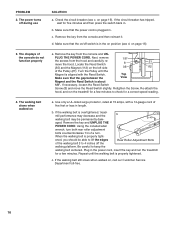
... switch protrudes as shown. On Position 15 Storage Latch Catch TROUBLE-SHOOTING AND MAINTENANCE Most treadmill problems can be in length. To decrease the possibility of five feet or less in the on the frame near the power cord. TTriippedd Reesseett d. Using your back straight. Make sure that the power cord is plugged into a surge protector, and that the key is plugged into the console. To reset...
... switch protrudes as shown. On Position 15 Storage Latch Catch TROUBLE-SHOOTING AND MAINTENANCE Most treadmill problems can be in length. To decrease the possibility of five feet or less in the on the frame near the power cord. TTriippedd Reesseett d. Using your back straight. Make sure that the power cord is plugged into a surge protector, and that the key is plugged into the console. To reset...
English Manual
Page 16
... treadmill for a correct speed reading. 4. Remove the key from the hood and carefully re- PLUG THE POWER CORD. Next, remove 1/8" the screws from the console and UN- Locate the Reed Switch 8 21 (35) and the Magnet (112) on a. When the walking belt is plugged in length. d. Make sure that the gap between the Top View Magnet and the Reed Switch is properly tightened. If necessary, loosen the Reed Switch Screw (8) and move the hood. Remove the key...
... treadmill for a correct speed reading. 4. Remove the key from the hood and carefully re- PLUG THE POWER CORD. Next, remove 1/8" the screws from the console and UN- Locate the Reed Switch 8 21 (35) and the Magnet (112) on a. When the walking belt is plugged in length. d. Make sure that the gap between the Top View Magnet and the Reed Switch is properly tightened. If necessary, loosen the Reed Switch Screw (8) and move the hood. Remove the key...
English Manual
Page 17
... problem is excessive stress on SOLUTION a. If error code "E1," "E2," or "E3" appears in the power cord, insert the key and run the treadmill for a few minutes. Repeat until the walking belt is a possibility that bubbles may also be able to the left rear roller adjustment bolt clockwise, and the right bolt counter- b. Bubbles form in the SPEED display a. Repeat until the walking belt is centered. If the walking belt...
... problem is excessive stress on SOLUTION a. If error code "E1," "E2," or "E3" appears in the power cord, insert the key and run the treadmill for a few minutes. Repeat until the walking belt is a possibility that bubbles may also be able to the left rear roller adjustment bolt clockwise, and the right bolt counter- b. Bubbles form in the SPEED display a. Repeat until the walking belt is centered. If the walking belt...
English Manual
Page 18
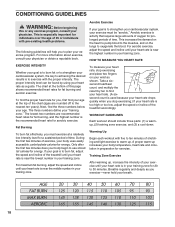
... on your exercise must exercise at the bottom of the treadmill accordingly. Breathe regularly and deeply as a guide. EXERCISE INTENSITY Whether your goal is too high or too low, adjust the speed or incline of this or any exercise program, consult your "training zone." CONDITIONING GUIDELINES WARNING: Before beginning this page shows recommended heart rates for fat burning and aerobic exercise. The chart at a relatively...
... on your exercise must exercise at the bottom of the treadmill accordingly. Breathe regularly and deeply as a guide. EXERCISE INTENSITY Whether your goal is too high or too low, adjust the speed or incline of this or any exercise program, consult your "training zone." CONDITIONING GUIDELINES WARNING: Before beginning this page shows recommended heart rates for fat burning and aerobic exercise. The chart at a relatively...
English Manual
Page 19
... following information: • The MODEL NUMBER of the product (HRTL06190). • The NAME of the product (HealthRider® SOFTSTRIDER S150™ treadmill). • The SERIAL NUMBER of the product (see the front cover of this manual). 19 After a few months, you may complete up to prevent post-exercise problems. To maintain or improve your everyday life. until 6 p.m. Cooling Down Exercise Frequency End each workout...
... following information: • The MODEL NUMBER of the product (HRTL06190). • The NAME of the product (HealthRider® SOFTSTRIDER S150™ treadmill). • The SERIAL NUMBER of the product (see the front cover of this manual). 19 After a few months, you may complete up to prevent post-exercise problems. To maintain or improve your everyday life. until 6 p.m. Cooling Down Exercise Frequency End each workout...
English Manual
Page 20
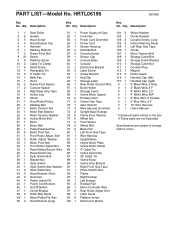
... Controller Power Cord Grommet Power Cord Sensor Housing Handrail Bolt Console Screw Sensor Cap Console Base Console Electronics Bracket Latch Screw Choke Bracket Key/Clip Storage Latch Rear Roller Ground Wire Book Holder Storage Catch Incline Motor Spacer Endcap Insert Center Grip Tape Allen Wrench Wire Harness Grommet Upright Base Endcap Frame Pivot Washer Wheel Nut Front Wheel Wheel Bolt Base Pad Left Front Grip Tape Wire Harness Upright/Base Incline Motor Plate Incline Motor Shield 4" Cable Tie Incline Optic Disk 23" Cable Tie Incline Motor Incline Stop Bracket...
... Controller Power Cord Grommet Power Cord Sensor Housing Handrail Bolt Console Screw Sensor Cap Console Base Console Electronics Bracket Latch Screw Choke Bracket Key/Clip Storage Latch Rear Roller Ground Wire Book Holder Storage Catch Incline Motor Spacer Endcap Insert Center Grip Tape Allen Wrench Wire Harness Grommet Upright Base Endcap Frame Pivot Washer Wheel Nut Front Wheel Wheel Bolt Base Pad Left Front Grip Tape Wire Harness Upright/Base Incline Motor Plate Incline Motor Shield 4" Cable Tie Incline Optic Disk 23" Cable Tie Incline Motor Incline Stop Bracket...

English Manual
Page 22
... limitation of purchase. ICON HEALTH & FITNESS, INC., 1500 S. 1000 W., LOGAN, UT 84321-9813 HealthRider® is covered for two years after the date of incidental or consequential damages. The belt and deck are covered for service. Labor is a registered trademark of purchase. This warranty does not extend to products used for a particular purpose is warranted to be free of purchase, such as instructed...
... limitation of purchase. ICON HEALTH & FITNESS, INC., 1500 S. 1000 W., LOGAN, UT 84321-9813 HealthRider® is covered for two years after the date of incidental or consequential damages. The belt and deck are covered for service. Labor is a registered trademark of purchase. This warranty does not extend to products used for a particular purpose is warranted to be free of purchase, such as instructed...


