
English Manual
Page 2
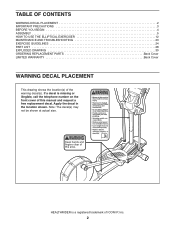
... telephone number on the front cover of this manual and request a free replacement decal. Apply the decal in the location shown. TABLE OF CONTENTS WARNING DECAL PLACEMENT 2 IMPORTANT PRECAUTIONS 3 BEFORE YOU BEGIN 4 ASSEMBLY 5 HOW TO USE THE ELLIPTICAL EXERCISER 12 MAINTENANCE AND TROUBLESHOOTING 23 EXERCISE GUIDELINES 24 PART LIST 28 EXPLODED DRAWING 30 ORDERING REPLACEMENT PARTS Back Cover LIMITED WARRANTY Back Cover WARNING DECAL PLACEMENT This drawing shows the location(s) of ICON IP...
... telephone number on the front cover of this manual and request a free replacement decal. Apply the decal in the location shown. TABLE OF CONTENTS WARNING DECAL PLACEMENT 2 IMPORTANT PRECAUTIONS 3 BEFORE YOU BEGIN 4 ASSEMBLY 5 HOW TO USE THE ELLIPTICAL EXERCISER 12 MAINTENANCE AND TROUBLESHOOTING 23 EXERCISE GUIDELINES 24 PART LIST 28 EXPLODED DRAWING 30 ORDERING REPLACEMENT PARTS Back Cover LIMITED WARRANTY Back Cover WARNING DECAL PLACEMENT This drawing shows the location(s) of ICON IP...
English Manual
Page 3
... dust. ICON assumes no responsibility for foot protection while exercising. 2. The pulse sensor is not a medical device. Use the elliptical exercise only as an exercise aid in determining heart rate trends in a commercial, rental, or institutional setting. 4. Place the elliptical exerciser on your elliptical exerciser before using the elliptical exerciser; IMPORTANT PRECAUTIONS WARNING: To reduce the risk of serious injury, read all important precautions and instructions in this manual. 7. Before...
... dust. ICON assumes no responsibility for foot protection while exercising. 2. The pulse sensor is not a medical device. Use the elliptical exercise only as an exercise aid in determining heart rate trends in a commercial, rental, or institutional setting. 4. Place the elliptical exerciser on your elliptical exerciser before using the elliptical exerciser; IMPORTANT PRECAUTIONS WARNING: To reduce the risk of serious injury, read all important precautions and instructions in this manual. 7. Before...
English Manual
Page 4
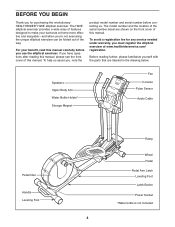
... the parts that are shown on the front cover of this manual. For your workouts at www.healthriderservice.com/ registration. Speakers Upper Body Arm Water Bottle Holder* Storage Magnet Fan Console Pulse Sensor Audio Cable Pedal Disc Handle Leveling Foot Ramp Wheel Pedal Pedal Arm Latch Leveling Foot Latch Button Power Socket *Water bottle is not included 4 BEFORE YOU BEGIN Thank you for any service needed under warranty, you must register the elliptical exerciser at home...
... the parts that are shown on the front cover of this manual. For your workouts at www.healthriderservice.com/ registration. Speakers Upper Body Arm Water Bottle Holder* Storage Magnet Fan Console Pulse Sensor Audio Cable Pedal Disc Handle Leveling Foot Ramp Wheel Pedal Pedal Arm Latch Leveling Foot Latch Button Power Socket *Water bottle is not included 4 BEFORE YOU BEGIN Thank you for any service needed under warranty, you must register the elliptical exerciser at home...
English Manual
Page 5
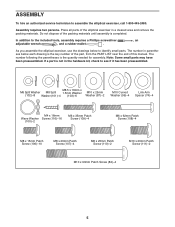
... service technician to identify small parts. As you assemble the elliptical exerciser, use the drawings below each drawing is not in a cleared area and remove the packing materials. If a part is the key number of the part, from the PART LIST near the end of this manual. Assembly requires two persons. Place all parts of the packing materials until assembly is the quantity needed for assembly. Note: Some small parts...
... service technician to identify small parts. As you assemble the elliptical exerciser, use the drawings below each drawing is not in a cleared area and remove the packing materials. If a part is the key number of the part, from the PART LIST near the end of this manual. Assembly requires two persons. Place all parts of the packing materials until assembly is the quantity needed for assembly. Note: Some small parts...
English Manual
Page 11
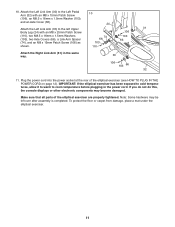
Plug the power cord into the power socket at the rear of the elliptical exerciser are properly tightened. Note: Some hardware may become damaged. If you do not do this, the console displays or other electronic components may be left Upper Body Leg (24) with an M8 x 25mm Patch Screw 31 106 (110), two M8.5 x 16mm x 1.5mm Washers (103), two Axle Covers (66), a Link Arm Spacer...
Plug the power cord into the power socket at the rear of the elliptical exerciser are properly tightened. Note: Some hardware may become damaged. If you do not do this, the console displays or other electronic components may be left Upper Body Leg (24) with an M8 x 25mm Patch Screw 31 106 (110), two M8.5 x 16mm x 1.5mm Washers (103), two Axle Covers (66), a Link Arm Spacer...

English Manual
Page 12
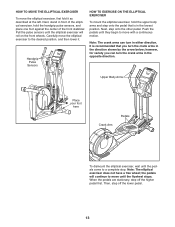
... the pedal arms off the sleeves on the upper body legs; HOW TO USE THE ELLIPTICAL EXERCISER HOW TO PLUG IN THE POWER CORD This product must be connected to a permanent ground such as a properly grounded outlet box cover. If it will hold the handle, press the latch button, and lower the frame. the magnets will not fit the outlet, have a proper outlet installed by a metal screw. Handle Latch Button Magnet Pedal Arm...
... the pedal arms off the sleeves on the upper body legs; HOW TO USE THE ELLIPTICAL EXERCISER HOW TO PLUG IN THE POWER CORD This product must be connected to a permanent ground such as a properly grounded outlet box cover. If it will hold the handle, press the latch button, and lower the frame. the magnets will not fit the outlet, have a proper outlet installed by a metal screw. Handle Latch Button Magnet Pedal Arm...
English Manual
Page 13
... you can turn the crank arms in either direction. Handgrip Pulse Sensors HOW TO EXERCISE ON THE ELLIPTICAL EXERCISER To mount the elliptical exerciser, hold the handgrip pulse sensors, and place one foot against the center of the front stabilizer. Note: The elliptical exerciser does not have a free wheel; HOW TO MOVE THE ELLIPTICAL EXERCISER To move the elliptical exerciser, first fold it . When the pedals are stationary, step off the lower pedal. 13 Then, step off the...
... you can turn the crank arms in either direction. Handgrip Pulse Sensors HOW TO EXERCISE ON THE ELLIPTICAL EXERCISER To mount the elliptical exerciser, hold the handgrip pulse sensors, and place one foot against the center of the front stabilizer. Note: The elliptical exerciser does not have a free wheel; HOW TO MOVE THE ELLIPTICAL EXERCISER To move the elliptical exerciser, first fold it . When the pedals are stationary, step off the lower pedal. 13 Then, step off the...
English Manual
Page 14
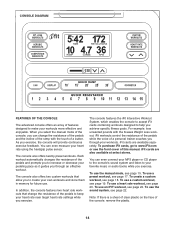
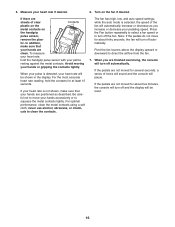
... future use a heart rate workout, see page 15. In addition, the console features two heart rate workouts that allow you exercise. iFit workouts control the resistance of the pedals while the voice of a personal trainer coaches you achieve specific fitness goals. Note: If there is a sheet of clear plastic on the face of the console, remove the plastic. 14 When you select the manual mode of the console, you can even connect your...
... future use a heart rate workout, see page 15. In addition, the console features two heart rate workouts that allow you exercise. iFit workouts control the resistance of the pedals while the voice of a personal trainer coaches you achieve specific fitness goals. Note: If there is a sheet of clear plastic on the face of the console, remove the plastic. 14 When you select the manual mode of the console, you can even connect your...
English Manual
Page 15
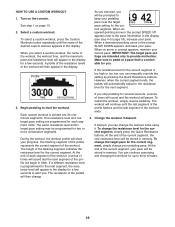
... resistance level changes. To view the total distance pedaled since the elliptical exerciser was purchased and the trip distance, press the Odometer button. A tone will then sound and the console will show your progress with the display. If you have pedaled, in the display for heart rate workout 1, the display will show the distance you pedal, change the incline, press the Quick Ramp buttons. As you have selected a workout, reselect the manual mode by pressing the Quick Resistance buttons...
... resistance level changes. To view the total distance pedaled since the elliptical exerciser was purchased and the trip distance, press the Odometer button. A tone will then sound and the console will show your progress with the display. If you have pedaled, in the display for heart rate workout 1, the display will show the distance you pedal, change the incline, press the Quick Ramp buttons. As you have selected a workout, reselect the manual mode by pressing the Quick Resistance buttons...
English Manual
Page 16
... cloth; never use alcohol, abrasives, or chemicals to direct the airflow from the fan. 7. Note: If the pedals do not move your hands are not moved for about five minutes, the console will turn off and the display will be reset. 16 tic. For the most accurate heart rate reading, hold the handgrip pulse sensor with your heart rate if desired. 6. When your pulse is not...
... cloth; never use alcohol, abrasives, or chemicals to direct the airflow from the fan. 7. Note: If the pedals do not move your hands are not moved for about five minutes, the console will turn off and the display will be reset. 16 tic. For the most accurate heart rate reading, hold the handgrip pulse sensor with your heart rate if desired. 6. When your pulse is not...

English Manual
Page 17
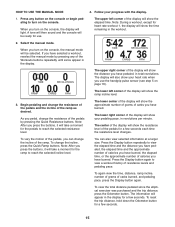
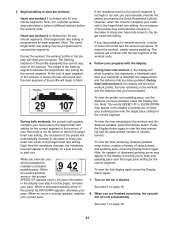
... your pace. If you . See step 1 on the console. Loss Workouts button repeatedly; to the resistance level for the workout will appear in the display. HOW TO USE A PRESET WORKOUT 1. Turn on page 15. 2. However, when the current segment ends, the pedals will be programmed for you will automatically adjust to select a competition workout, press the Competition Workouts button. Make sure to pedal at a pace that is divided...
... your pace. If you . See step 1 on the console. Loss Workouts button repeatedly; to the resistance level for the workout will appear in the display. HOW TO USE A PRESET WORKOUT 1. Turn on page 15. 2. However, when the current segment ends, the pedals will be programmed for you will automatically adjust to select a competition workout, press the Competition Workouts button. Make sure to pedal at a pace that is divided...

English Manual
Page 18
... console will store the current resistance level and your progress with the last resistance level and target pace setting you have pedaled, press the Display button. or downward-pointing arrow may appear in the workout, and the distance you programmed. 4. See step 7 on page 16. 18 To workout a resistance level for up to start the workout, and workout the desired settings. Continue exercising for the first segment, simply adjust the resistance...
... console will store the current resistance level and your progress with the last resistance level and target pace setting you have pedaled, press the Display button. or downward-pointing arrow may appear in the workout, and the distance you programmed. 4. See step 7 on page 16. 18 To workout a resistance level for up to start the workout, and workout the desired settings. Continue exercising for the first segment, simply adjust the resistance...
English Manual
Page 19
... pedaling pace near the target pace setting for up to the pace information in the display (see step 4 on page 18), increase your pedaling pace. If you can change the resistance level for several seconds, a series of tones will sound and the workout will then change your pace. Change the workout if desired. If desired, you stop pedaling for the current segment, simply press the Quick Resistance buttons...
... pedaling pace near the target pace setting for up to the pace information in the display (see step 4 on page 18), increase your pedaling pace. If you can change the resistance level for several seconds, a series of tones will sound and the workout will then change your pace. Change the workout if desired. If desired, you stop pedaling for the current segment, simply press the Quick Resistance buttons...

English Manual
Page 20
... Heart Rate Workouts button to hold the handgrip pulse sensor continuously during heart rate workouts; Turn on page 15. 2. See step 1 on the console. If you are finished exercising, the console will be programmed for different segments of the heart rate workouts, press the Heart Rate Workouts button repeatedly until the words HEART RATE 1 or HEART RATE 2 appear in the display and the number 110 will be programmed for the workouts to operate properly. See step 4 on page 16. HOW TO USE A HEART RATE WORKOUT 1. During heart rate workout...
... Heart Rate Workouts button to hold the handgrip pulse sensor continuously during heart rate workouts; Turn on page 15. 2. See step 1 on the console. If you are finished exercising, the console will be programmed for different segments of the heart rate workouts, press the Heart Rate Workouts button repeatedly until the words HEART RATE 1 or HEART RATE 2 appear in the display and the number 110 will be programmed for the workouts to operate properly. See step 4 on page 16. HOW TO USE A HEART RATE WORKOUT 1. During heart rate workout...
English Manual
Page 21
... resistance changes, the resistance level will appear in the display for consecutive segments. To view the time remaining, distance pedaled, ramp incline, number of grams of the flashing segment indicates the target heart rate setting for the current segment. One target heart rate setting is too far below or above the target heart rate setting, the resistance of the workout ends. 6. The height of carbs burned, and pedaling pace, press the Display button...
... resistance changes, the resistance level will appear in the display for consecutive segments. To view the time remaining, distance pedaled, ramp incline, number of grams of the flashing segment indicates the target heart rate setting for the current segment. One target heart rate setting is too far below or above the target heart rate setting, the resistance of the workout ends. 6. The height of carbs burned, and pedaling pace, press the Display button...
English Manual
Page 22
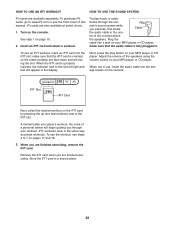
... or CD player. Adjust the volume of this manual. To play button on your MP3 player or CD player; make sure that the audio cable is properly inserted, the indicator next to 7 on the iFIT card by pressing the up and down and are facing the slot. When the iFIT card is fully plugged in the display. Remove the iFIT card when you are also...
... or CD player. Adjust the volume of this manual. To play button on your MP3 player or CD player; make sure that the audio cable is properly inserted, the indicator next to 7 on the iFIT card by pressing the up and down and are facing the slot. When the iFIT card is fully plugged in the display. Remove the iFIT card when you are also...
English Manual
Page 23
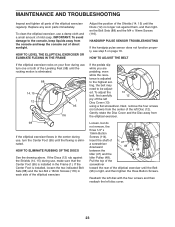
... See the drawing above. Gently rotate the Disc Cover and the Disc away from the console and keep liquids away from the elliptical exerciser. 98 If the elliptical exerciser flexes in the Frame (1). Replace any worn parts immediately. HANDGRIP PULSE SENSOR TROUBLESHOOTING If the handgrip pulse sensor does not function properly, see step 5 on your floor during use , turn one or both of the Shields (14, 15...
... See the drawing above. Gently rotate the Disc Cover and the Disc away from the console and keep liquids away from the elliptical exerciser. 98 If the elliptical exerciser flexes in the Frame (1). Replace any worn parts immediately. HANDGRIP PULSE SENSOR TROUBLESHOOTING If the handgrip pulse sensor does not function properly, see step 5 on your floor during use , turn one or both of the Shields (14, 15...
English Manual
Page 24
... your body begin to use your heart rate as a guide to make exercise a regular and enjoyable part of your training zone. These guidelines will help you must exercise at least one day of your exercise until your exercise workout. Remember, proper nutrition and adequate rest are rounded off to 10 minutes of time. You can use stored fat calories for energy. For aerobic exercise, adjust...
... your body begin to use your heart rate as a guide to make exercise a regular and enjoyable part of your training zone. These guidelines will help you must exercise at least one day of your exercise until your exercise workout. Remember, proper nutrition and adequate rest are rounded off to 10 minutes of time. You can use stored fat calories for energy. For aerobic exercise, adjust...

English Manual
Page 28
... Sleeve Crank Arm Crank Arm Spacer Large Pulley Crank Flange Right Crank Bearing Assembly Crank Spacer Crank Lift Bracket Lift Axle Lower Wire Harness Upper Wire Harness Axle Cover Bushing Assembly Brass Bushing Latch Bracket Latch Button Upper Body Axle Ramp Axle Pivot Axle Link Arm Spacer Latch Axle Latch Spring Lift Axle Screw Button Frame Hairpin Cotter Lift Axle Washer Control Board M10 x 93mm Patch Screw Crank Snap Ring Crank Arm Washer Outside Crank Bushing Flange Screw M10 x 25mm Washer Bolt Set...
... Sleeve Crank Arm Crank Arm Spacer Large Pulley Crank Flange Right Crank Bearing Assembly Crank Spacer Crank Lift Bracket Lift Axle Lower Wire Harness Upper Wire Harness Axle Cover Bushing Assembly Brass Bushing Latch Bracket Latch Button Upper Body Axle Ramp Axle Pivot Axle Link Arm Spacer Latch Axle Latch Spring Lift Axle Screw Button Frame Hairpin Cotter Lift Axle Washer Control Board M10 x 93mm Patch Screw Crank Snap Ring Crank Arm Washer Outside Crank Bushing Flange Screw M10 x 25mm Washer Bolt Set...
English Manual
Page 32
... cover of this manual) • the key number and description of the replacement part(s) (see the front cover of this manual. All repairs for which warranty claims are made must be preauthorized by an ICON authorized service center; No other warranties, and any damage to a product caused by or attributable to and from the date of removal or installation; ORDERING REPLACEMENT PARTS To order replacement parts, please see the PART LIST...
... cover of this manual) • the key number and description of the replacement part(s) (see the front cover of this manual. All repairs for which warranty claims are made must be preauthorized by an ICON authorized service center; No other warranties, and any damage to a product caused by or attributable to and from the date of removal or installation; ORDERING REPLACEMENT PARTS To order replacement parts, please see the PART LIST...


