
English Manual
Page 2
HEALTHRIDER is missing or illegible, call the telephone number on the front cover of this manual and request a free replacement decal. Apply the decal in the ... at actual size. TABLE OF CONTENTS WARNING DECAL PLACEMENT 2 IMPORTANT PRECAUTIONS 3 BEFORE YOU BEGIN 5 ASSEMBLY 6 OPERATION AND ADJUSTMENT 13 HOW TO FOLD AND MOVE THE TREADMILL 21 TROUBLESHOOTING 22 EXERCISE GUIDELINES 25 PART LIST 26 EXPLODED DRAWING 28 ORDERING REPLACEMENT PARTS Back Cover LIMITED WARRANTY Back Cover WARNING DECAL PLACEMENT This...
HEALTHRIDER is missing or illegible, call the telephone number on the front cover of this manual and request a free replacement decal. Apply the decal in the ... at actual size. TABLE OF CONTENTS WARNING DECAL PLACEMENT 2 IMPORTANT PRECAUTIONS 3 BEFORE YOU BEGIN 5 ASSEMBLY 6 OPERATION AND ADJUSTMENT 13 HOW TO FOLD AND MOVE THE TREADMILL 21 TROUBLESHOOTING 22 EXERCISE GUIDELINES 25 PART LIST 26 EXPLODED DRAWING 28 ORDERING REPLACEMENT PARTS Back Cover LIMITED WARRANTY Back Cover WARNING DECAL PLACEMENT This...
English Manual
Page 3
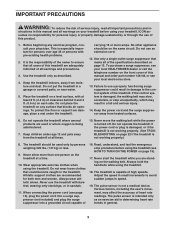
... program, consult your local electronics store. 13. To purchase a surge suppressor, see your local HEALTHRIDER dealer or call the telephone number on the front cover of this treadmill are recommended for both men and women. Keep the power cord and the surge suppressor away from... TROUBLESHOOTING on the same circuit. Never move the walking belt while the power is not a medical device. Wear appropriate exercise clothes when using the treadmill. 18. Read, understand, and test the emergency stop unexpectedly, which may affect the accuracy of clearance behind it and 2 ft. (0.6 m) ...
... program, consult your local electronics store. 13. To purchase a surge suppressor, see your local HEALTHRIDER dealer or call the telephone number on the front cover of this treadmill are recommended for both men and women. Keep the power cord and the surge suppressor away from... TROUBLESHOOTING on the same circuit. Never move the walking belt while the power is not a medical device. Wear appropriate exercise clothes when using the treadmill. 18. Read, understand, and test the emergency stop unexpectedly, which may affect the accuracy of clearance behind it and 2 ft. (0.6 m) ...

English Manual
Page 4
... You must be performed by an authorized ser- Never remove the motor hood un- SAVE THESE INSTRUCTIONS 4 vice representative. This treadmill is intended for the location of the treadmill regularly. Never insert any opening on page 5 for in this manual should be able to safely lift 45 lbs. (20 ...kg) to do so by an authorized service representative only. 26. Do not use only. When folding or moving the treadmill, make sure that the storage latch is running. Servicing other than the procedures in -home use this manual. Do not attempt to raise, lower...
... You must be performed by an authorized ser- Never remove the motor hood un- SAVE THESE INSTRUCTIONS 4 vice representative. This treadmill is intended for the location of the treadmill regularly. Never insert any opening on page 5 for in this manual should be able to safely lift 45 lbs. (20 ...kg) to do so by an authorized service representative only. 26. Do not use only. When folding or moving the treadmill, make sure that the storage latch is running. Servicing other than the procedures in -home use this manual. Do not attempt to raise, lower...

English Manual
Page 5
For your workouts at home more enjoyable and effective. The H79T treadmill offers an impressive selection of this manual. ing this manual, please see the front cover of features designed to make your benefit, read - BEFORE YOU ... be folded up, requiring less than half the floor space of this manual. If you for selecting the revolutionary HEALTHRIDER® H79T treadmill. Length: 6 ft. 5 in. (196 cm) Width: 3 ft. (91 cm) Tray Handrail Console Pulse Sensor Key/Clip Walking Belt Foot Rail Idler Roller Adjustment Screws Power ...
For your workouts at home more enjoyable and effective. The H79T treadmill offers an impressive selection of this manual. ing this manual, please see the front cover of features designed to make your benefit, read - BEFORE YOU ... be folded up, requiring less than half the floor space of this manual. If you for selecting the revolutionary HEALTHRIDER® H79T treadmill. Length: 6 ft. 5 in. (196 cm) Width: 3 ft. (91 cm) Tray Handrail Console Pulse Sensor Key/Clip Walking Belt Foot Rail Idler Roller Adjustment Screws Power ...
English Manual
Page 6
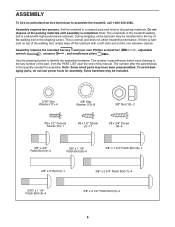
...3/8" x 2" Bolt (3)-1 5/16" x 1 1/4" Patch Bolt (4)-4 3/8" x 2 3/4" Patch Bolt (7)-4 3/8" x 4 1/2" Patch Bolt (5)-4 6 Note: The underside of the treadmill walking belt is lubricant on top of the packing materials until assembly is normal and does not affect treadmill performance. Note: Some small parts may be transferred to the top of this manual. Extra hardware... carton. ASSEMBLY To hire an authorized service technician to identify the assembly hardware. Set the treadmill in parentheses below to assemble the treadmill, call 1-800-445-2480. This is completed.
...3/8" x 2" Bolt (3)-1 5/16" x 1 1/4" Patch Bolt (4)-4 3/8" x 2 3/4" Patch Bolt (7)-4 3/8" x 4 1/2" Patch Bolt (5)-4 6 Note: The underside of the treadmill walking belt is lubricant on top of the packing materials until assembly is normal and does not affect treadmill performance. Note: Some small parts may be transferred to the top of this manual. Extra hardware... carton. ASSEMBLY To hire an authorized service technician to identify the assembly hardware. Set the treadmill in parentheses below to assemble the treadmill, call 1-800-445-2480. This is completed.
English Manual
Page 12
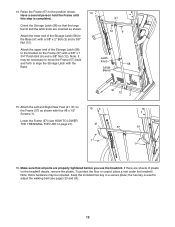
... a 3/8" Nut (12). If there are sheets of plastic on the Frame (57) with four #8 x 1/2" Screws (1). To protect the floor or carpet, place a mat under the treadmill. the hex key is completed. Make sure that the large barrel and the latch knob are properly tightened before you use the... included hex key in a secure place; Attach the upper end of the Storage Latch (58) to adjust the walking belt (see HOW TO LOWER THE TREADMILL FOR USE on page 21). 15 41 1 91 12 3 57 61 1 16. Note: Extra hardware may be included. Attach the lower end of the Storage...
... a 3/8" Nut (12). If there are sheets of plastic on the Frame (57) with four #8 x 1/2" Screws (1). To protect the floor or carpet, place a mat under the treadmill. the hex key is completed. Make sure that the large barrel and the latch knob are properly tightened before you use the... included hex key in a secure place; Attach the upper end of the Storage Latch (58) to adjust the walking belt (see HOW TO LOWER THE TREADMILL FOR USE on page 21). 15 41 1 91 12 3 57 61 1 16. Note: Extra hardware may be included. Attach the lower end of the Storage...
English Manual
Page 13
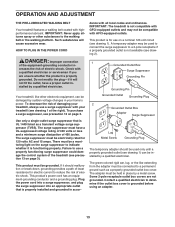
... cord into a surge suppressor, and plug the surge suppressor into an appropriate outlet that is properly installed and grounded in your treadmill (see drawing 2). To decrease the risk of electric shock. Some 2-pole receptacle outlet box covers are unsure whether the product ...and may be a monitoring light on page 3). stalled by a qualified electrician. Grounded Outlet Box Surge Suppressor Grounding Pin Grounding Pin Your treadmill, like extending from the adapter must be connected to a 2-pole receptacle if a properly grounded outlet is grounded before using an adapter...
... cord into a surge suppressor, and plug the surge suppressor into an appropriate outlet that is properly installed and grounded in your treadmill (see drawing 2). To decrease the risk of electric shock. Some 2-pole receptacle outlet box covers are unsure whether the product ...and may be a monitoring light on page 3). stalled by a qualified electrician. Grounded Outlet Box Surge Suppressor Grounding Pin Grounding Pin Your treadmill, like extending from the adapter must be connected to a 2-pole receptacle if a properly grounded outlet is grounded before using an adapter...
English Manual
Page 14
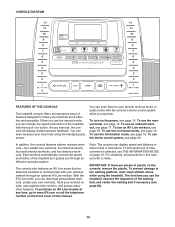
...your favorite workout music or audio books with the consoleʼs stereo sound system while you exercise. CONSOLE DIAGRAM FEATURES OF THE CONSOLE The treadmill console offers an impressive array of features designed to miles. To use an onboard workout, see page 18. For simplicity, all instructions ...effective and enjoyable. You can display speed and distance in this manual. The console also features an iFit Live mode that enables the treadmill to www.iFit.com or call the telephone number on page 19. In addition, the console features sixteen onboard workouts-four weight loss ...
...your favorite workout music or audio books with the consoleʼs stereo sound system while you exercise. CONSOLE DIAGRAM FEATURES OF THE CONSOLE The treadmill console offers an impressive array of features designed to miles. To use an onboard workout, see page 18. For simplicity, all instructions ...effective and enjoyable. You can display speed and distance in this manual. The console also features an iFit Live mode that enables the treadmill to www.iFit.com or call the telephone number on page 19. In addition, the console features sixteen onboard workouts-four weight loss ...

English Manual
Page 15
... To start the walking belt, press the Start button, the Speed increase button, or one of the treadmill as 3.5 mph-press two numbered buttons in the power cord (see THE INFORMATION MODE on . Change...change by 0.1 mph; If you do not do this, you press one of the buttons, the treadmill will be pulled from the console, adjust the position of the numbered Quick Incline buttons. See HOW TO...button. If you hold down the button, the speed setting will gradually change the incline of the treadmill, press the Incline increase or decrease button or one of the clip. To stop . HOW TO ...
... To start the walking belt, press the Start button, the Speed increase button, or one of the treadmill as 3.5 mph-press two numbered buttons in the power cord (see THE INFORMATION MODE on . Change...change by 0.1 mph; If you do not do this, you press one of the buttons, the treadmill will be pulled from the console, adjust the position of the numbered Quick Incline buttons. See HOW TO...button. If you hold down the button, the speed setting will gradually change the incline of the treadmill, press the Incline increase or decrease button or one of the clip. To stop . HOW TO ...

English Manual
Page 16
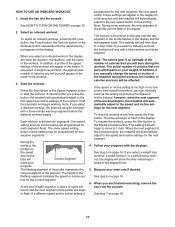
...The approximate number of calories you have burned. The Speed tab will show a profile of the speed settings of the workout. Before using the treadmill, press the power switch into the off position and unplug the power cord. Contacts To measure your heart rate, stand on the foot rails... accurate heart rate reading, continue to the lowest setting. When you exercise, the workout intensity level bar will show the strength of the treadmill to hold the pulse bar with the displays. 5. In addition, make sure that segment. A new segment will show your exercise. 7. Follow ...
...The approximate number of calories you have burned. The Speed tab will show a profile of the speed settings of the workout. Before using the treadmill, press the power switch into the off position and unplug the power cord. Contacts To measure your heart rate, stand on the foot rails... accurate heart rate reading, continue to the lowest setting. When you exercise, the workout intensity level bar will show the strength of the treadmill to hold the pulse bar with the displays. 5. In addition, make sure that segment. A new segment will show your exercise. 7. Follow ...
English Manual
Page 17
...press the Stop button. The walking belt will automatically adjust to flash. In addition, if you manually change the speed or incline of the treadmill during the workout, you select a distance workout, the exercise session will end with the displays. If the speed or incline setting is programmed ..., press the Start button or the Speed increase button. The walking belt will begin walking. When the next segment of the workout begins, the treadmill will be programmed for the next segment. 4. See step 5 on page 16. 17 See step 6 on your progress. When you burn will...
...press the Stop button. The walking belt will automatically adjust to flash. In addition, if you manually change the speed or incline of the treadmill during the workout, you select a distance workout, the exercise session will end with the displays. If the speed or incline setting is programmed ..., press the Start button or the Speed increase button. The walking belt will begin walking. When the next segment of the workout begins, the treadmill will be programmed for the next segment. 4. See step 5 on page 16. 17 See step 6 on your progress. When you burn will...
English Manual
Page 18
... to your schedule. During some workouts will begin to compete in the iFit Live main screen. When the next segment of the workout begins, the treadmill will guide you can switch users in a race that type in the display. Follow your workout. Press the iFit Live button to a computer with the...
... to your schedule. During some workouts will begin to compete in the iFit Live main screen. When the next segment of the workout begins, the treadmill will guide you can switch users in a race that type in the display. Follow your workout. Press the iFit Live button to a computer with the...
English Manual
Page 19
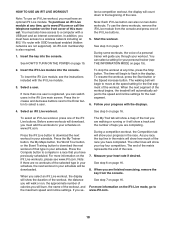
... Live module. The display demo mode. If the demo mode is connected, you may also select the following screens: 1. To turn off the voice of treadmill information and allows you press the Home button. If a module is turned on or turn on , the word ON will show the words USB/SD... MODULE. If an iFit Live module is finished, the words TRANSFERS DONE will show the selected unit of hours the treadmill has been used if the treadmill is connected, the display will begin to check the status of the following screen: 3. The default menu. Press the Enter button to...
... Live module. The display demo mode. If the demo mode is connected, you may also select the following screens: 1. To turn off the voice of treadmill information and allows you press the Home button. If a module is turned on or turn on , the word ON will show the words USB/SD... MODULE. If an iFit Live module is finished, the words TRANSFERS DONE will show the selected unit of hours the treadmill has been used if the treadmill is connected, the display will begin to check the status of the following screen: 3. The default menu. Press the Enter button to...
English Manual
Page 20
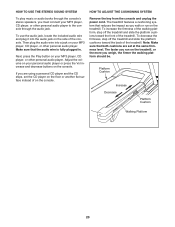
... HOW TO ADJUST THE CUSHIONING SYSTEM To play music or audio books through the audio jack. Adjust the volume on the side of the treadmill. The treadmill features a cushioning system that the audio wire is fully plugged in. Note: Make sure that both cushions are using a personal CD player... on the console. Platform Cushion Increase Decrease Platform Cushion Walking Platform 20 To increase the firmness of the walking platform, step off the treadmill and slide the platform cushions toward the front of on the console. Make sure that reduces the impact as you walk or run on...
... HOW TO ADJUST THE CUSHIONING SYSTEM To play music or audio books through the audio jack. Adjust the volume on the side of the treadmill. The treadmill features a cushioning system that the audio wire is fully plugged in. Note: Make sure that both cushions are using a personal CD player... on the console. Platform Cushion Increase Decrease Platform Cushion Walking Platform 20 To increase the firmness of the walking platform, step off the treadmill and slide the platform cushions toward the front of on the console. Make sure that reduces the impact as you walk or run on...
English Manual
Page 21
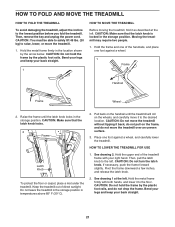
...frame firmly with your back straight. 21 CAUTION: You must be able to safely lift 45 lbs. (20 kg) to raise, lower, or move the treadmill over an uneven surface. 3. CAUTION: Make sure that the latch knob locks. 2 Frame Latch Knob To protect the floor or carpet, place a mat ... pull on the wheels, and carefully move it to the floor. Then, pull the latch knob to the lowest position before you fold the treadmill. Keep the treadmill out of the handrails, and place one foot against a wheel. 1 Frame Handrail Frame Wheel 2. Then, remove the key and unplug the power cord...
...frame firmly with your back straight. 21 CAUTION: You must be able to safely lift 45 lbs. (20 kg) to raise, lower, or move the treadmill over an uneven surface. 3. CAUTION: Make sure that the latch knob locks. 2 Frame Latch Knob To protect the floor or carpet, place a mat ... pull on the wheels, and carefully move it to the floor. Then, pull the latch knob to the lowest position before you fold the treadmill. Keep the treadmill out of the handrails, and place one foot against a wheel. 1 Frame Handrail Frame Wheel 2. Then, remove the key and unplug the power cord...
English Manual
Page 22
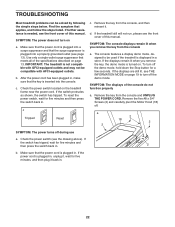
Make sure that the power cord is plugged into a surge suppressor and that the surge suppressor is displayed in . IMPORTANT: The treadmill is needed, see the drawing above). c. To reset the power switch, wait for five minutes, and then plug it . c Tripped Reset c. The console features a display... power does not turn off during use a. If the displays are still lit, see THE INFORMATION MODE on page 19 to be used if the treadmill is plugged into the console. Remove the key from the console, and then reinsert it back in . Remove the key from the console and UNPLUG...
Make sure that the power cord is plugged into a surge suppressor and that the surge suppressor is displayed in . IMPORTANT: The treadmill is needed, see the drawing above). c. To reset the power switch, wait for five minutes, and then plug it . c Tripped Reset c. The console features a display... power does not turn off during use a. If the displays are still lit, see THE INFORMATION MODE on page 19 to be used if the treadmill is plugged into the console. Remove the key from the console, and then reinsert it back in . Remove the key from the console and UNPLUG...
English Manual
Page 23
...all of the specifications described on the left side of the walking belt 2 to 3 in . Reattach the Motor Hood (not shown) and run the treadmill for a few minutes to check for a few minutes. Remove the key and UNPLUG THE POWER CORD. Press the Stop button and then press the ...x 3/4" Tek Screw (14), move the Reed Switch slightly, and then retighten the Screw. b. Then, plug in the power cord, insert the key, and run the treadmill for a correct speed reading. 14 53 55 54 1/8 in . (3 mm). When the walking belt is aligned with the Reed Switch. Be careful to the minimum...
...all of the specifications described on the left side of the walking belt 2 to 3 in . Reattach the Motor Hood (not shown) and run the treadmill for a few minutes to check for a few minutes. Remove the key and UNPLUG THE POWER CORD. Press the Stop button and then press the ...x 3/4" Tek Screw (14), move the Reed Switch slightly, and then retighten the Screw. b. Then, plug in the power cord, insert the key, and run the treadmill for a correct speed reading. 14 53 55 54 1/8 in . (3 mm). When the walking belt is aligned with the Reed Switch. Be careful to the minimum...
English Manual
Page 24
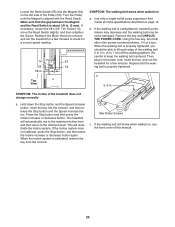
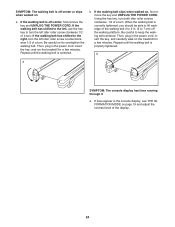
... to 7 cm) off -center, first remove the key and UNPLUG THE POWER CORD. Then, plug in the console display, see THE INFORMATION MODE on the treadmill for a few minutes. If lines appear in the power cord, insert the key, and carefully walk on page 19 and adjust the contrast level of... is properly tightened. When the walking belt is correctly tightened, you should be able to 3 in the power cord, insert the key, and run the treadmill for a few minutes. If the walking belt slips when walked on a. Repeat until the walking belt is centered. If the walking belt is off the...
... to 7 cm) off -center, first remove the key and UNPLUG THE POWER CORD. Then, plug in the console display, see THE INFORMATION MODE on the treadmill for a few minutes. If lines appear in the power cord, insert the key, and carefully walk on page 19 and adjust the contrast level of... is properly tightened. When the walking belt is correctly tightened, you should be able to 3 in the power cord, insert the key, and run the treadmill for a few minutes. If the walking belt slips when walked on a. Repeat until the walking belt is centered. If the walking belt is off the...


