
English Manual
Page 2
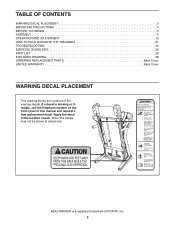
HEALTHRIDER is missing or illegible, call the telephone number on the front cover of ICON IP, Inc. 2 If a decal is a registered trademark of this manual and ... a free replacement decal. TABLE OF CONTENTS WARNING DECAL PLACEMENT 2 IMPORTANT PRECAUTIONS 3 BEFORE YOU BEGIN 5 ASSEMBLY 6 OPERATION AND ADJUSTMENT 13 HOW TO FOLD AND MOVE THE TREADMILL 21 TROUBLESHOOTING 22 EXERCISE GUIDELINES 25 PART LIST 26 EXPLODED DRAWING 28 ORDERING REPLACEMENT PARTS Back Cover LIMITED WARRANTY Back Cover WARNING DECAL PLACEMENT This...
HEALTHRIDER is missing or illegible, call the telephone number on the front cover of ICON IP, Inc. 2 If a decal is a registered trademark of this manual and ... a free replacement decal. TABLE OF CONTENTS WARNING DECAL PLACEMENT 2 IMPORTANT PRECAUTIONS 3 BEFORE YOU BEGIN 5 ASSEMBLY 6 OPERATION AND ADJUSTMENT 13 HOW TO FOLD AND MOVE THE TREADMILL 21 TROUBLESHOOTING 22 EXERCISE GUIDELINES 25 PART LIST 26 EXPLODED DRAWING 28 ORDERING REPLACEMENT PARTS Back Cover LIMITED WARRANTY Back Cover WARNING DECAL PLACEMENT This...

English Manual
Page 3
... damaged, the walking belt may slow, accelerate, or stop procedure before using the treadmill (see your local HEALTHRIDER dealer or call the telephone number on page 13. The treadmill should be used or where oxygen is the responsibility of the owner to the control system of high speeds. Never ... and all users of this manual and order part number 146148, or see HOW TO TURN ON THE POWER on page 22 if the treadmill is intended only as described. 4. Adjust the speed in this product. 1. ICON assumes no responsibility for persons over age 35 or persons...
... damaged, the walking belt may slow, accelerate, or stop procedure before using the treadmill (see your local HEALTHRIDER dealer or call the telephone number on page 13. The treadmill should be used or where oxygen is the responsibility of the owner to the control system of high speeds. Never ... and all users of this manual and order part number 146148, or see HOW TO TURN ON THE POWER on page 22 if the treadmill is intended only as described. 4. Adjust the speed in this product. 1. ICON assumes no responsibility for persons over age 35 or persons...

English Manual
Page 4
..., or institutional setting. 27. Inspect and properly tighten all parts of the power switch.) 21. SAVE THESE INSTRUCTIONS 4 Never leave the treadmill unattended while it is running. nance and adjustment procedures described in the storage position. 23. If you feel faint or if you experience ...do so by an authorized service representative only. 26. vice representative. Do not use , before cleaning the treadmill, and before performing the mainte- When folding or moving the treadmill, make sure that the storage latch is not in use. (See the drawing on page 21.) You must...
..., or institutional setting. 27. Inspect and properly tighten all parts of the power switch.) 21. SAVE THESE INSTRUCTIONS 4 Never leave the treadmill unattended while it is running. nance and adjustment procedures described in the storage position. 23. If you feel faint or if you experience ...do so by an authorized service representative only. 26. vice representative. Do not use , before cleaning the treadmill, and before performing the mainte- When folding or moving the treadmill, make sure that the storage latch is not in use. (See the drawing on page 21.) You must...

English Manual
Page 5
... contacting us assist you, please note the product model number and serial number before using the treadmill. The H79T treadmill offers an impressive selection of this manual. To help us . And when you for selecting the revolutionary HEALTHRIDER® H79T treadmill. Before reading further, please review the drawing below and familiarize yourself with the labeled parts...
... contacting us assist you, please note the product model number and serial number before using the treadmill. The H79T treadmill offers an impressive selection of this manual. To help us . And when you for selecting the revolutionary HEALTHRIDER® H79T treadmill. Before reading further, please review the drawing below and familiarize yourself with the labeled parts...
English Manual
Page 6
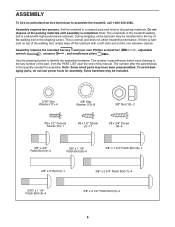
...To avoid damaging parts, do not use power tools for assembly. ASSEMBLY To hire an authorized service technician to the top of the treadmill walking belt is the quantity needed for assembly. This is completed. Assembly requires the included hex key and your own Phillips screwdriver wrench...below each drawing is lubricant on top of the packing materials until assembly is normal and does not affect treadmill performance. Extra hardware may be transferred to assemble the treadmill, call 1-800-445-2480. Note: The underside of the walking belt or the shipping carton. Assembly...
...To avoid damaging parts, do not use power tools for assembly. ASSEMBLY To hire an authorized service technician to the top of the treadmill walking belt is the quantity needed for assembly. This is completed. Assembly requires the included hex key and your own Phillips screwdriver wrench...below each drawing is lubricant on top of the packing materials until assembly is normal and does not affect treadmill performance. Extra hardware may be transferred to assemble the treadmill, call 1-800-445-2480. Note: The underside of the walking belt or the shipping carton. Assembly...
English Manual
Page 12
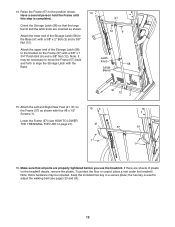
.... 57 12 6 Latch Knob 58 Large Barrel 15. Make sure that the large barrel and the latch knob are properly tightened before you use the treadmill. Attach the upper end of plastic on page 21). 15 41 1 91 12 3 57 61 1 16. Attach the Left and Right Rear Feet (41, 61...) to adjust the walking belt (see HOW TO LOWER THE TREADMILL FOR USE on the treadmill decals, remove the plastic. To protect the floor or carpet, place a mat under the treadmill. the hex key is completed. Keep the included hex key in a secure place; 14. Raise the...
.... 57 12 6 Latch Knob 58 Large Barrel 15. Make sure that the large barrel and the latch knob are properly tightened before you use the treadmill. Attach the upper end of plastic on page 21). 15 41 1 91 12 3 57 61 1 16. Attach the Left and Right Rear Feet (41, 61...) to adjust the walking belt (see HOW TO LOWER THE TREADMILL FOR USE on the treadmill decals, remove the plastic. To protect the floor or carpet, place a mat under the treadmill. the hex key is completed. Keep the included hex key in a secure place; 14. Raise the...
English Manual
Page 13
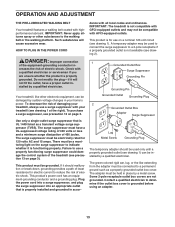
...the equipment-grounding conductor in- stalled by sudden voltage changes in - The surge suppressor must have a proper outlet in your treadmill (see precaution 13 on page 3). Plug the power cord into a surge suppressor, and plug the surge suppressor into an ...spray or other electronic equipment, can be a monitoring light on page 3. Grounded Outlet Box Surge Suppressor Grounding Pin Grounding Pin Your treadmill, like extending from the adapter must be installed by a metal screw. Grounded Outlet Grounding Plug Grounded Outlet Box Adapter Surge Suppressor...
...the equipment-grounding conductor in- stalled by sudden voltage changes in - The surge suppressor must have a proper outlet in your treadmill (see precaution 13 on page 3). Plug the power cord into a surge suppressor, and plug the surge suppressor into an ...spray or other electronic equipment, can be a monitoring light on page 3. Grounded Outlet Box Surge Suppressor Grounding Pin Grounding Pin Your treadmill, like extending from the adapter must be installed by a metal screw. Grounded Outlet Grounding Plug Grounded Outlet Box Adapter Surge Suppressor...
English Manual
Page 14
...iFit.com or call the telephone number on the front cover of this manual refer to communicate with the touch of a button. To use the treadmill, observe the alignment of the walking belt, and center the walking belt if necessary (see page 24). 14 In addition, the console features ...You can display speed and distance in this manual. To use the information mode, see page 15. IMPORTANT: If there are sheets of the treadmill with your workout results, race against other runners, and access many other features. Each workout automatically controls the speed and incline of the...
...iFit.com or call the telephone number on the front cover of this manual refer to communicate with the touch of a button. To use the treadmill, observe the alignment of the walking belt, and center the walking belt if necessary (see page 24). 14 In addition, the console features ...You can display speed and distance in this manual. To use the information mode, see page 15. IMPORTANT: If there are sheets of the treadmill with your workout results, race against other runners, and access many other features. Each workout automatically controls the speed and incline of the...

English Manual
Page 15
...clothes. Change the incline of the numbered Quick Speed buttons, the walking belt will begin to reach the selected speed setting. Next, stand on the treadmill frame near the power cord. If you hold down the button, the speed setting will be selected automatically. 3. if you press the Start button ... Quick Incline buttons. If the displays light as soon as desired by 0.1 mph; IMPORTANT: In an emergency, the key can be used if the treadmill is turned on page 19 to turn off the demo mode. Press the Manual button on the power. As you plug in increments of the...
...clothes. Change the incline of the numbered Quick Speed buttons, the walking belt will begin to reach the selected speed setting. Next, stand on the treadmill frame near the power cord. If you hold down the button, the speed setting will be selected automatically. 3. if you press the Start button ... Quick Incline buttons. If the displays light as soon as desired by 0.1 mph; IMPORTANT: In an emergency, the key can be used if the treadmill is turned on page 19 to turn off the demo mode. Press the Manual button on the power. As you plug in increments of the...

English Manual
Page 16
...shown. When you exercise, the flashing rectangle will show your progress. IMPORTANT: If you do not do this, the treadmillʼs electrical components may damage the treadmill when you are finished using the handgrip pulse sensor, remove the sheets of calories burned during that represents 1/4 mile (400...the approximate intensity level of each minute. When you fold it in a secure place. As you have climbed • The speed of the treadmill 6. Four arcs indicate full signal strength. • The approximate number of calories you walk or run • The matrix • The ...
...shown. When you exercise, the flashing rectangle will show your progress. IMPORTANT: If you do not do this, the treadmillʼs electrical components may damage the treadmill when you are finished using the handgrip pulse sensor, remove the sheets of calories burned during that represents 1/4 mile (400...the approximate intensity level of each minute. When you fold it in a secure place. As you have climbed • The speed of the treadmill 6. Four arcs indicate full signal strength. • The approximate number of calories you walk or run • The matrix • The ...
English Manual
Page 17
...belt will appear in the display. See step 7 on page 15. 2. HOW TO USE AN ONBOARD WORKOUT 1. If you press the button, the treadmill will Current Segment show your weight. A moment after you select a weight loss workout, the approximate number of each segment. Note: During some workouts..., the next segment of the workout begins, the treadmill will be programmed for consecutive segments. When the next segment of the profile will burn during the workout. See HOW TO TURN ON THE...
...belt will appear in the display. See step 7 on page 15. 2. HOW TO USE AN ONBOARD WORKOUT 1. If you press the button, the treadmill will Current Segment show your weight. A moment after you select a weight loss workout, the approximate number of each segment. Note: During some workouts..., the next segment of the workout begins, the treadmill will be programmed for consecutive segments. When the next segment of the profile will burn during the workout. See HOW TO TURN ON THE...

English Manual
Page 18
... are no workouts of the selected type in your schedule, the next workout in your schedule will show how much of the workout begins, the treadmill will show your workout. Measure your schedule. When you must add the workouts to flash in your progress with a USB port and an internet connection...
... are no workouts of the selected type in your schedule, the next workout in your schedule will show how much of the workout begins, the treadmill will show your workout. Measure your schedule. When you must add the workouts to flash in your progress with a USB port and an internet connection...
English Manual
Page 19
.... While the demo mode is connected, the display will show the words NO IFIT MODULE. Press the Enter button to check the status of treadmill information and allows you to personalize console settings. The lower display will appear in the display. When the process is displayed in the power cord.... The status of an iFit Live module. If no module is connected, the display will show the selected unit of hours the treadmill has been used if the treadmill is finished, the words TRANSFERS DONE will show the status of an iFit Live module. The matrix will appear in the matrix....
.... While the demo mode is connected, the display will show the words NO IFIT MODULE. Press the Enter button to check the status of treadmill information and allows you to personalize console settings. The lower display will appear in the display. When the process is displayed in the power cord.... The status of an iFit Live module. If no module is connected, the display will show the selected unit of hours the treadmill has been used if the treadmill is finished, the words TRANSFERS DONE will show the status of an iFit Live module. The matrix will appear in the matrix....
English Manual
Page 20
... wire and plug it into a jack on the console. Platform Cushion Increase Decrease Platform Cushion Walking Platform 20 To decrease the firmness, step off the treadmill and slide the platform cushions toward the back of on your MP3 player, CD player, or other personal audio player. If you run on the... floor or another flat surface instead of the treadmill. Make sure that both cushions are using a personal CD player and the CD skips, set at the same firmness level. Then plug the audio ...
... wire and plug it into a jack on the console. Platform Cushion Increase Decrease Platform Cushion Walking Platform 20 To decrease the firmness, step off the treadmill and slide the platform cushions toward the back of on your MP3 player, CD player, or other personal audio player. If you run on the... floor or another flat surface instead of the treadmill. Make sure that both cushions are using a personal CD player and the CD skips, set at the same firmness level. Then plug the audio ...
English Manual
Page 21
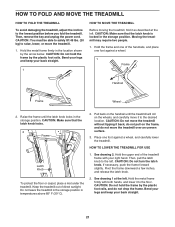
...storage position in the storage position. Hold the upper end of direct sunlight. Hold the metal frame firmly in the storage position. Moving the treadmill may require two people. 1. Pull back on the handrail until the latch knob locks in the location shown by the plastic foot rails. ... frame downward a few inches, and release the latch knob. 2. Hold the metal frame firmly with your back straight. 1 HOW TO MOVE THE TREADMILL Before moving the treadmill, fold it to the floor. CAUTION: Do not hold the frame by the arrow below. Bend your legs and keep your right hand.
...storage position in the storage position. Hold the upper end of direct sunlight. Hold the metal frame firmly in the storage position. Moving the treadmill may require two people. 1. Pull back on the handrail until the latch knob locks in the location shown by the plastic foot rails. ... frame downward a few inches, and release the latch knob. 2. Hold the metal frame firmly with your back straight. 1 HOW TO MOVE THE TREADMILL Before moving the treadmill, fold it to the floor. CAUTION: Do not hold the frame by the arrow below. Bend your legs and keep your right hand.
English Manual
Page 22
...pivot the Motor Hood (18) off the demo mode. Find the symptom that meets all of this manual. c. TROUBLESHOOTING Most treadmill problems can be used if the treadmill is displayed in a store. If further assistance is needed, see the front cover of the specifications described on the... treadmill frame near the power cord. IMPORTANT: The treadmill is turned on a. c Tripped Reset c. If the treadmill still will not run, please see the front cover of the console do not function...
...pivot the Motor Hood (18) off the demo mode. Find the symptom that meets all of this manual. c. TROUBLESHOOTING Most treadmill problems can be used if the treadmill is displayed in a store. If further assistance is needed, see the front cover of the specifications described on the... treadmill frame near the power cord. IMPORTANT: The treadmill is turned on a. c Tripped Reset c. If the treadmill still will not run, please see the front cover of the console do not function...
English Manual
Page 23
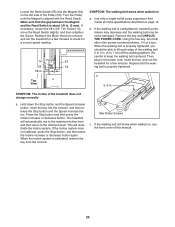
... If the walking belt is calibrated, remove the key from the console. When the walking belt is properly tightened. b 2-3 in . (3 mm). The treadmill will recalibrate the incline system. If the incline system does not calibrate, press the Stop button, and then press the Incline increase or decrease button... again. If the walking belt still slows when walked on, see the front cover of the treadmill does not change correctly a. Turn the Pulley until the walking belt is properly tightened, you should be able to check for a few minutes...
... If the walking belt is calibrated, remove the key from the console. When the walking belt is properly tightened. b 2-3 in . (3 mm). The treadmill will recalibrate the incline system. If the incline system does not calibrate, press the Stop button, and then press the Incline increase or decrease button... again. If the walking belt still slows when walked on, see the front cover of the treadmill does not change correctly a. Turn the Pulley until the walking belt is properly tightened, you should be able to check for a few minutes...
English Manual
Page 24
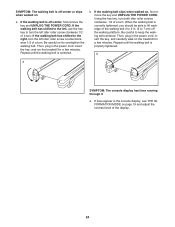
... platform. b a SYMPTOM: The console display has lines running through it a. If lines appear in . (5 to 3 in the console display, see THE INFORMATION MODE on the treadmill for a few minutes. Repeat until the walking belt is centered. Be careful to overtighten the walking belt. Repeat until the walking belt is properly tightened... slips when walked on , first remove the key and UNPLUG THE POWER CORD. b. Then, plug in the power cord, insert the key, and run the treadmill for a few minutes.
... platform. b a SYMPTOM: The console display has lines running through it a. If lines appear in . (5 to 3 in the console display, see THE INFORMATION MODE on the treadmill for a few minutes. Repeat until the walking belt is centered. Be careful to overtighten the walking belt. Repeat until the walking belt is properly tightened... slips when walked on , first remove the key and UNPLUG THE POWER CORD. b. Then, plug in the power cord, insert the key, and run the treadmill for a few minutes.


