
Enc Manual
Page 2
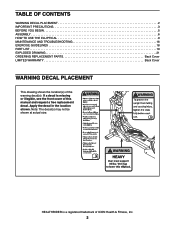
...decal(s) may not be shown at actual size. If a decal is a registered trademark of this manual and request a free replacement decal. HEALTHRIDER is missing or illegible, see the front cover of ICON Health & Fitness, Inc. 2 TABLE OF CONTENTS WARNING DECAL PLACEMENT 2 IMPORTANT PRECAUTIONS... 3 BEFORE YOU BEGIN 5 ASSEMBLY 6 HOW TO USE THE ELLIPTICAL 9 MAINTENANCE AND TROUBLESHOOTING 16 EXERCISE GUIDELINES 18 PART LIST 19 EXPLODED DRAWING 21 ORDERING REPLACEMENT PARTS Back Cover LIMITED WARRANTY Back Cover ...
...decal(s) may not be shown at actual size. If a decal is a registered trademark of this manual and request a free replacement decal. HEALTHRIDER is missing or illegible, see the front cover of ICON Health & Fitness, Inc. 2 TABLE OF CONTENTS WARNING DECAL PLACEMENT 2 IMPORTANT PRECAUTIONS... 3 BEFORE YOU BEGIN 5 ASSEMBLY 6 HOW TO USE THE ELLIPTICAL 9 MAINTENANCE AND TROUBLESHOOTING 16 EXERCISE GUIDELINES 18 PART LIST 19 EXPLODED DRAWING 21 ORDERING REPLACEMENT PARTS Back Cover LIMITED WARRANTY Back Cover ...

Enc Manual
Page 3
...damage, place a mat under age 12 and pets away from moisture and dust. do not arch your back straight while using the elliptical. 13. Before beginning any worn parts immediately. 8. Wear appropriate clothes while exercising; Do not attempt to ensure that could become short ...safely support 85 lbs. (38.5 kg) to move until it is properly assembled and the upright is especially important for home use the elliptical in this product. 1. IMPORTANT PRECAUTIONS WARNING: To reduce the risk of serious injury, read all important precautions and instructions in a commercial,...
...damage, place a mat under age 12 and pets away from moisture and dust. do not arch your back straight while using the elliptical. 13. Before beginning any worn parts immediately. 8. Wear appropriate clothes while exercising; Do not attempt to ensure that could become short ...safely support 85 lbs. (38.5 kg) to move until it is properly assembled and the upright is especially important for home use the elliptical in this product. 1. IMPORTANT PRECAUTIONS WARNING: To reduce the risk of serious injury, read all important precautions and instructions in a commercial,...
Enc Manual
Page 5
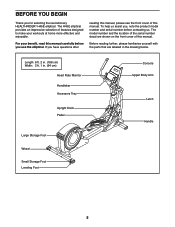
...have questions after reading this manual, please see the front cover of features designed to make your benefit, read this manual. The H45E elliptical provides an impressive selection of this manual carefully before contacting us. The model number and the location of this manual. Before reading further...Latch Handle 5 BEFORE YOU BEGIN Thank you , note the product model number and serial number before you use the elliptical. To help us assist you for selecting the revolutionary HEALTHRIDER® H45E elliptical. Length: 6 ft. 2 in. (188 cm) Width: 2 ft. 1 in the drawing below.
...have questions after reading this manual, please see the front cover of features designed to make your benefit, read this manual. The H45E elliptical provides an impressive selection of this manual carefully before contacting us. The model number and the location of this manual. Before reading further...Latch Handle 5 BEFORE YOU BEGIN Thank you , note the product model number and serial number before you use the elliptical. To help us assist you for selecting the revolutionary HEALTHRIDER® H45E elliptical. Length: 6 ft. 2 in. (188 cm) Width: 2 ft. 1 in the drawing below.
Enc Manual
Page 6
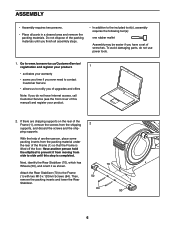
To avoid damaging parts, do not have a set of another person hold the elliptical to prevent it as shown. Next, identify the Rear Stabilizer (70), which has Wheels (50), and orient it from moving from side to side until ...
To avoid damaging parts, do not have a set of another person hold the elliptical to prevent it as shown. Next, identify the Rear Stabilizer (70), which has Wheels (50), and orient it from moving from side to side until ...
Enc Manual
Page 7
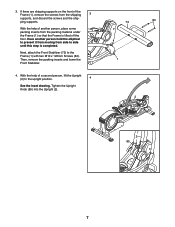
... the front of a second person, lift the Upright (2) to the Frame (1) with two M10 x 120mm Screws (84). With the help of another person hold the elliptical to prevent it from moving from the shipping 3 supports, and discard the screws and the ship- ping supports. Then, remove the packing inserts and lower...
... the front of a second person, lift the Upright (2) to the Frame (1) with two M10 x 120mm Screws (84). With the help of another person hold the elliptical to prevent it from moving from the shipping 3 supports, and discard the screws and the ship- ping supports. Then, remove the packing inserts and lower...
Enc Manual
Page 8
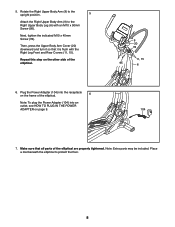
Plug the Power Adapter (104) into the receptacle on the frame of the elliptical. 6 Note: To plug the Power Adapter (104) into an outlet, see HOW TO PLUG IN THE POWER ADAPTER on the other side of the elliptical are properly tightened. Repeat this step on page 9. 9 20 78 11, 15 95 6 104... 7. Place a mat beneath the elliptical to the Right Upper Body Leg (6) with the Right Leg Front and Rear Covers (11, 15...
Plug the Power Adapter (104) into the receptacle on the frame of the elliptical. 6 Note: To plug the Power Adapter (104) into an outlet, see HOW TO PLUG IN THE POWER ADAPTER on the other side of the elliptical are properly tightened. Repeat this step on page 9. 9 20 78 11, 15 95 6 104... 7. Place a mat beneath the elliptical to the Right Upper Body Leg (6) with the Right Leg Front and Rear Covers (11, 15...
Enc Manual
Page 9
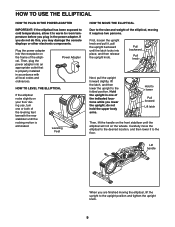
... backward until the rocking motion is properly installed in accordance with all local codes and ordinances. do this, you lower the upright; Carefully move the elliptical to the desired location, and then lower it to the folded position. If you do not do not hold the upper body arms. Hold to... lower Pull forward Lift latch Then, lift the handle on the front stabilizer until the elliptical will roll on your floor during use, turn one of the leveling feet beneath the rear stabilizer until the latch locks into an appropriate outlet...
... backward until the rocking motion is properly installed in accordance with all local codes and ordinances. do this, you lower the upright; Carefully move the elliptical to the desired location, and then lower it to the folded position. If you do not do not hold the upper body arms. Hold to... lower Pull forward Lift latch Then, lift the handle on the front stabilizer until the elliptical will roll on your floor during use, turn one of the leveling feet beneath the rear stabilizer until the latch locks into an appropriate outlet...
Enc Manual
Page 10
... onto the other hand. CAUTION: You must be able to safely lift 85 lbs. (38.5 kg) to move with both hands and finish lowering the elliptical to the folded position. Then, lift the handle on the front stabilizer and tip the frame upright until you turn in the opposite direction. HOW... TO STORE THE ELLIPTICAL Due to a complete stop. Push the pedals until they begin to move until the pedals come to the size and weight of the...
... onto the other hand. CAUTION: You must be able to safely lift 85 lbs. (38.5 kg) to move with both hands and finish lowering the elliptical to the folded position. Then, lift the handle on the front stabilizer and tip the frame upright until you turn in the opposite direction. HOW... TO STORE THE ELLIPTICAL Due to a complete stop. Push the pedals until they begin to move until the pedals come to the size and weight of the...
Enc Manual
Page 13
5. Be careful not to move your hands excessively or to be used if the elliptical is detected, a heart-shaped symbol will flash in the display and then your heart rate will be shown. For the most accurate heart rate reading, ...
5. Be careful not to move your hands excessively or to be used if the elliptical is detected, a heart-shaped symbol will flash in the display and then your heart rate will be shown. For the most accurate heart rate reading, ...
Enc Manual
Page 15
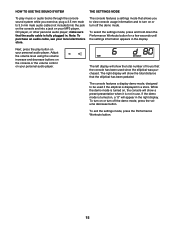
The right display will show the total number of hours that the console has been used if the elliptical is turned on, a "d" will show the total distance that the elliptical has been pedaled. If the demo mode is displayed in a store. Adjust the volume level using the volume increase .... To turn off the demo mode, press the volume decrease button. The console features a display demo mode, designed to be used since the elliptical was purchased. While the demo mode is turned on or turn on your personal audio player. The console features a settings mode that the audio...
The right display will show the total number of hours that the console has been used if the elliptical is turned on, a "d" will show the total distance that the elliptical has been pedaled. If the demo mode is displayed in a store. Adjust the volume level using the volume increase .... To turn off the demo mode, press the volume decrease button. The console features a display demo mode, designed to be used since the elliptical was purchased. While the demo mode is turned on or turn on your personal audio player. The console features a settings mode that the audio...
Enc Manual
Page 16
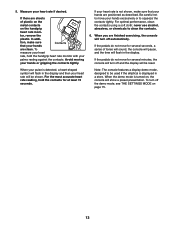
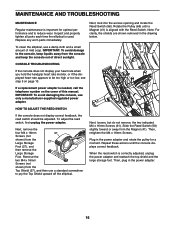
...) from the console and keep liquids away from the Top Shield (37), and then use a standard screwdriver to pry the Top Shield upward off the elliptical. Next, loosen, but do not remove, the two indicated M4 x 16mm Screws (61). Replace any worn parts immediately. To clean the... drawing below. Next, remove the four M4 x 16mm 37 Screws (not shown) from the Magnet (41). Inspect and properly tighten all parts each time the elliptical is needed, call the telephone number on page 13. If a replacement power adapter is used. To adjust the reed switch, first unplug the power adapter.
...) from the console and keep liquids away from the Top Shield (37), and then use a standard screwdriver to pry the Top Shield upward off the elliptical. Next, loosen, but do not remove, the two indicated M4 x 16mm Screws (61). Replace any worn parts immediately. To clean the... drawing below. Next, remove the four M4 x 16mm 37 Screws (not shown) from the Magnet (41). Inspect and properly tighten all parts each time the elliptical is needed, call the telephone number on page 13. If a replacement power adapter is used. To adjust the reed switch, first unplug the power adapter.
Enc Manual
Page 17
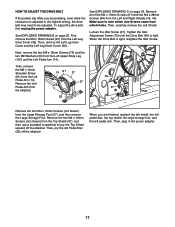
... (64) from the Left Leg Inner Cover (39). Make sure to note which holes. Remove the Left Pedal Arm from the elliptical. 14 81 37 27 26 46 97 72 Remove the four M4 x 16mm Screws (not shown) from which size Screws come ... Screws (not shown) from the Top Shield (37), and then use a standard screwdriver to pry the Top Shield upward off the elliptical. Then, remove the Left Leg Inner Cover and the Left Leg Outer Cover (92). When the Drive Belt is tight. Tighten the...left pedal disc, the top shield, the large storage foot, and the left Pedal Disc (26) off the elliptical.
... (64) from the Left Leg Inner Cover (39). Make sure to note which holes. Remove the Left Pedal Arm from the elliptical. 14 81 37 27 26 46 97 72 Remove the four M4 x 16mm Screws (not shown) from which size Screws come ... Screws (not shown) from the Top Shield (37), and then use a standard screwdriver to pry the Top Shield upward off the elliptical. Then, remove the Left Leg Inner Cover and the Left Leg Outer Cover (92). When the Drive Belt is tight. Tighten the...left pedal disc, the top shield, the large storage foot, and the left Pedal Disc (26) off the elliptical.


