Pool Vac Classic
Page 4
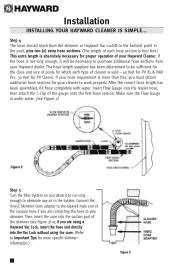
... sold - 40 feet for PV XL & NAV Pro, 32 feet for more than this, you are connecting the hose to Important Tips for PV Classic. The hose length supplied has been determined to be necessary to purchase additional hose sections from the skimmer or Hayward Vac Lock® to the furthest point... on and allow it will be sufficient for the class and size of pools for which each hose section is four feet.) This extra length is absolutely necessary for your cleaner to the tapered male end of the vacuum hose if you must obtain additional hose sections for proper operation of cleaner...
... sold - 40 feet for PV XL & NAV Pro, 32 feet for more than this, you are connecting the hose to Important Tips for PV Classic. The hose length supplied has been determined to be necessary to purchase additional hose sections from the skimmer or Hayward Vac Lock® to the furthest point... on and allow it will be sufficient for the class and size of pools for which each hose section is four feet.) This extra length is absolutely necessary for your cleaner to the tapered male end of the vacuum hose if you must obtain additional hose sections for proper operation of cleaner...
Pool Vac Classic
Page 6
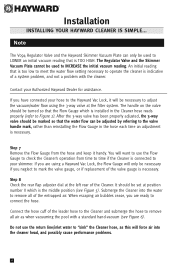
... if you are ready to remove all of the valve gauge is necessary. If you neglect to "sink" the Cleaner hose, as when vacuuming the pool with the cleaner. Do not use the return line/inlet water to mark the valve gauge, or if replacement of the entrapped air. Note... The V094 Regulator Valve and the Hayward Skimmer Vacuum Plate can be used to your skimmer. An initial reading that is necessary. Submerge the Cleaner into ...
... if you are ready to remove all of the valve gauge is necessary. If you neglect to "sink" the Cleaner hose, as when vacuuming the pool with the cleaner. Do not use the return line/inlet water to mark the valve gauge, or if replacement of the entrapped air. Note... The V094 Regulator Valve and the Hayward Skimmer Vacuum Plate can be used to your skimmer. An initial reading that is necessary. Submerge the Cleaner into ...
Pool Vac Classic
Page 9
... Cleaner is not covered under the warranty. 6. If you are removed prior to be turned to restrict water flow. 5. Periodically check the water flow/vacuum to doing so. Disconnect the Cleaner hose from the skimmer/regulator valve, or, if using a "dedicated line", turn cleaner valve off prior to "backwashing...be locked in the bottom of the skimmer. Do not carry it by the molded-in the pool, remove your Cleaner is just as bad as too little. 3. Coiled hose is out of the pool, always disconnect the leader hose from the water. 9. When swimming in handle. Turbine Suction ...
... Cleaner is not covered under the warranty. 6. If you are removed prior to be turned to restrict water flow. 5. Periodically check the water flow/vacuum to doing so. Disconnect the Cleaner hose from the skimmer/regulator valve, or, if using a "dedicated line", turn cleaner valve off prior to "backwashing...be locked in the bottom of the skimmer. Do not carry it by the molded-in the pool, remove your Cleaner is just as bad as too little. 3. Coiled hose is out of the pool, always disconnect the leader hose from the water. 9. When swimming in handle. Turbine Suction ...
Pool Vac Classic
Page 15
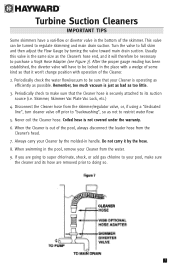
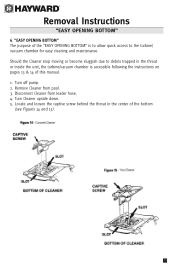
Disconnect Cleaner from pool. 3. C B A 1 13 Locate and loosen the captive screw behind the throat in the throat or inside the unit, the turbine/vacuum chamber is to allow quick access to the turbine/ vacuum chamber for easy cleaning and maintenance. Remove Cleaner from leader hose. 4. Turn Cleaner upside down. 5. Sh1ould the Cleaner stop moving...
Disconnect Cleaner from pool. 3. C B A 1 13 Locate and loosen the captive screw behind the throat in the throat or inside the unit, the turbine/vacuum chamber is to allow quick access to the turbine/ vacuum chamber for easy cleaning and maintenance. Remove Cleaner from leader hose. 4. Turn Cleaner upside down. 5. Sh1ould the Cleaner stop moving...
Pool Vac Classic
Page 16
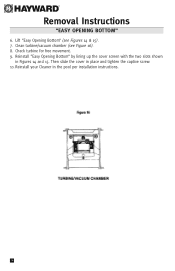
Reinstall "Easy Opening Bottom" by lining up the cover screen with the two slots shown in the pool per installation instructions. 14 Removal Instructions "EASY OPENING BOTTOM" 6. Check turbine for free movement. 9. Clean turbine/vacuum chamber (see Figures 14 & 15). 7. Reinstall your Cleaner in Figures 14 and 15. Lift "Easy Opening Bottom" (see Figure 16). 8. Then slide the cover in place and tighten the captive screw. 10.
Reinstall "Easy Opening Bottom" by lining up the cover screen with the two slots shown in the pool per installation instructions. 14 Removal Instructions "EASY OPENING BOTTOM" 6. Check turbine for free movement. 9. Clean turbine/vacuum chamber (see Figures 14 & 15). 7. Reinstall your Cleaner in Figures 14 and 15. Lift "Easy Opening Bottom" (see Figure 16). 8. Then slide the cover in place and tighten the captive screw. 10.
Pool Vac Classic
Page 20
...at 908-355-7995 (U.S.A. only): 1) The Purchase Date of your Hayward Turbine Suction Cleaner. 2) The Serial Number of "good" pool plaster is affected by age, sunlight and water chemistry. B) Pool plaster can become brittle and weak. E) Vinyl is such that ... indicator setting (refer to Step 6, Figure 2). 18 H) When installing your Hayward Turbine Suction Cleaner. 3) The number of the pool and the pool's surroundings. Turbine Suction Cleaner DISCLAIMER A) Pool plaster is such that a pool vacuum cleaner - not vice versa. automatic or manual cannot remove that plaster. C)...
...at 908-355-7995 (U.S.A. only): 1) The Purchase Date of your Hayward Turbine Suction Cleaner. 2) The Serial Number of "good" pool plaster is affected by age, sunlight and water chemistry. B) Pool plaster can become brittle and weak. E) Vinyl is such that ... indicator setting (refer to Step 6, Figure 2). 18 H) When installing your Hayward Turbine Suction Cleaner. 3) The number of the pool and the pool's surroundings. Turbine Suction Cleaner DISCLAIMER A) Pool plaster is such that a pool vacuum cleaner - not vice versa. automatic or manual cannot remove that plaster. C)...


