Pool Vac Classic
Page 3
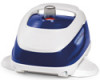
After reading these instructions, the "How To" installation DVD (included with Pool Vac XL & Navigator Pro only) will also give you through the installation step-by pushing and twisting the tapered male connector end of each hose firmly into the open ... at the recommended level. Step 1 Check the pool and remove any air leaks. Make sure that the water is free from algae. Connect the exclusive Hayward hose sections together by -step, and it will walk you some maintenance and trouble-shooting hints. Installation INSTALLING YOUR...
After reading these instructions, the "How To" installation DVD (included with Pool Vac XL & Navigator Pro only) will also give you through the installation step-by pushing and twisting the tapered male connector end of each hose firmly into the open ... at the recommended level. Step 1 Check the pool and remove any air leaks. Make sure that the water is free from algae. Connect the exclusive Hayward hose sections together by -step, and it will walk you some maintenance and trouble-shooting hints. Installation INSTALLING YOUR...
Pool Vac Classic
Page 5
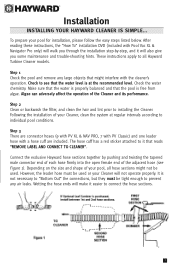
... allow it will be necessary to reduce the vacuum/water flow by using a valve or valves in the filter system, or the Hayward V094 Regulator Valve or an optional Hayward Automatic Skimmer Vacuum Plate designed to adjust vacuum/water flow. Turn the filter system on the gauge. Step 6 Check the water flow... you have connected your hose to the skimmer, it to run long enough to Step 4, Figure 2). The black disk should be used, follow the installation instructions included with the black disk outside of the box on the Flow Gauge. (Refer to eliminate any air in the box between the "MIN" and...
... allow it will be necessary to reduce the vacuum/water flow by using a valve or valves in the filter system, or the Hayward V094 Regulator Valve or an optional Hayward Automatic Skimmer Vacuum Plate designed to adjust vacuum/water flow. Turn the filter system on the gauge. Step 6 Check the water flow... you have connected your hose to the skimmer, it to run long enough to Step 4, Figure 2). The black disk should be used, follow the installation instructions included with the black disk outside of the box on the Flow Gauge. (Refer to eliminate any air in the box between the "MIN" and...
Pool Vac Classic
Page 15
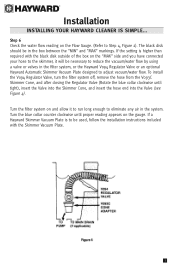
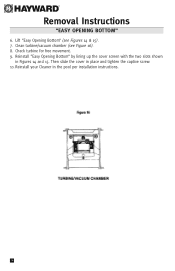
..." The purpose of this manual. 1. Sh1ould the Cleaner stop moving or become sluggish due to the turbine/ vacuum chamber for easy cleaning and maintenance. Removal Instructions "EASY OPENING BOTTOM" 6. Turn off pDump. 2. Disconnect Cleaner from pool. 3. Turn Cleaner upside down. 5. C B A 1 13 Remove Cleaner from leader ... and loosen the captive screw behind the throat in the throat or inside the unit, the turbine/vacuum chamber is accessible following the instructions on pages 13 & 14 of the "EASY OPENING BOTTOM" is to allow quick access to debris trapped in the center of the...
..." The purpose of this manual. 1. Sh1ould the Cleaner stop moving or become sluggish due to the turbine/ vacuum chamber for easy cleaning and maintenance. Removal Instructions "EASY OPENING BOTTOM" 6. Turn off pDump. 2. Disconnect Cleaner from pool. 3. Turn Cleaner upside down. 5. C B A 1 13 Remove Cleaner from leader ... and loosen the captive screw behind the throat in the throat or inside the unit, the turbine/vacuum chamber is accessible following the instructions on pages 13 & 14 of the "EASY OPENING BOTTOM" is to allow quick access to debris trapped in the center of the...
Pool Vac Classic
Page 16
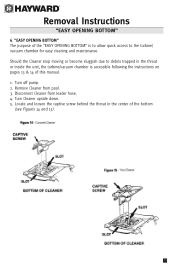
Lift "Easy Opening Bottom" (see Figure 16). 8. Reinstall your Cleaner in Figures 14 and 15. Removal Instructions "EASY OPENING BOTTOM" 6. Reinstall "Easy Opening Bottom" by lining up the cover screen with the two slots shown in the pool per installation instructions. 14 Clean turbine/vacuum chamber (see Figures 14 & 15). 7. Then slide the cover in place and tighten the captive screw. 10. Check turbine for free movement. 9.
Lift "Easy Opening Bottom" (see Figure 16). 8. Reinstall your Cleaner in Figures 14 and 15. Removal Instructions "EASY OPENING BOTTOM" 6. Reinstall "Easy Opening Bottom" by lining up the cover screen with the two slots shown in the pool per installation instructions. 14 Clean turbine/vacuum chamber (see Figures 14 & 15). 7. Then slide the cover in place and tighten the captive screw. 10. Check turbine for free movement. 9.
Pool Vac Classic
Page 17
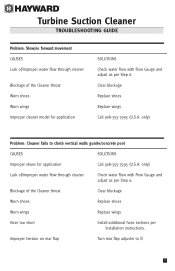
... to climb vertical walls gunite/concrete pool CAUSES SOLUTIONS Improper shoes for application SOLUTIONS Check water flow with Flow Gauge and adjust as per installation instructions. only) Lack of/improper water flow through cleaner Blockage of the Cleaner throat Clear blockage Worn shoes Replace shoes Worn wings Replace wings Hose too...
... to climb vertical walls gunite/concrete pool CAUSES SOLUTIONS Improper shoes for application SOLUTIONS Check water flow with Flow Gauge and adjust as per installation instructions. only) Lack of/improper water flow through cleaner Blockage of the Cleaner throat Clear blockage Worn shoes Replace shoes Worn wings Replace wings Hose too...
Pool Vac Classic
Page 18
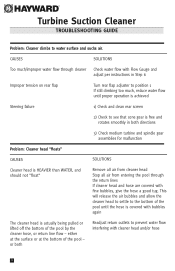
or both Readjust return outlets to prevent water flow interfering with Flow Gauge and adjust per instructions in Step 6 Improper tension on rear flap Turn rear flap adjuster to position 1 If still climbing too much, reduce water flow until the hose is ...
or both Readjust return outlets to prevent water flow interfering with Flow Gauge and adjust per instructions in Step 6 Improper tension on rear flap Turn rear flap adjuster to position 1 If still climbing too much, reduce water flow until the hose is ...
Pool Vac Classic
Page 19
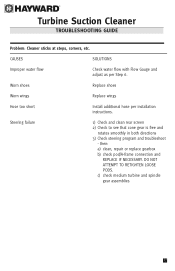
... gearbox b) check pod/A-frame connection and REPLACE IF NECESSARY. CAUSES SOLUTIONS Improper water flow Check water flow with Flow Gauge and adjust as per installation instructions. Turbine Suction Cleaner TROUBLESHOOTING GUIDE Problem: Cleaner sticks at steps, corners, etc.
... gearbox b) check pod/A-frame connection and REPLACE IF NECESSARY. CAUSES SOLUTIONS Improper water flow Check water flow with Flow Gauge and adjust as per installation instructions. Turbine Suction Cleaner TROUBLESHOOTING GUIDE Problem: Cleaner sticks at steps, corners, etc.


