Pool Vac Classic
Page 2
... proper installation of your Cleaner. Because this is a remote possibility that power source. For Your Records Record the following information for your convienience 1) Purchase Date 2) Serial Number Pool Vac XL Navigator Pro LIMITED WARRANTY Pool Vac Classic LIMITED WARRANTY Note Hayward Turbine Cleaners should be taken to return the pool to that a "service call" may be relative to "pre-installations" condition. Because the operation and performance of the Cleaner in your pool...
... proper installation of your Cleaner. Because this is a remote possibility that power source. For Your Records Record the following information for your convienience 1) Purchase Date 2) Serial Number Pool Vac XL Navigator Pro LIMITED WARRANTY Pool Vac Classic LIMITED WARRANTY Note Hayward Turbine Cleaners should be taken to return the pool to that a "service call" may be relative to "pre-installations" condition. Because the operation and performance of the Cleaner in your pool...
Pool Vac Classic
Page 3
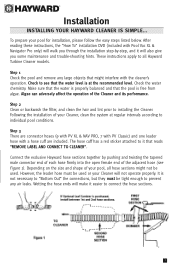
... the open female end of your Cleaner will not operate properly. Wetting the hose ends will walk you some maintenance and trouble-shooting hints. Make sure that the water is properly balanced and that the water level is free from algae. Step 1 Check the pool and remove any air leaks. Check the water chemistry. However, the leader hose must be used or your Cleaner, clean the system at the recommended level. The hose cuff...
... the open female end of your Cleaner will not operate properly. Wetting the hose ends will walk you some maintenance and trouble-shooting hints. Make sure that the water is properly balanced and that the water level is free from algae. Step 1 Check the pool and remove any air leaks. Check the water chemistry. However, the leader hose must be used or your Cleaner, clean the system at the recommended level. The hose cuff...
Pool Vac Classic
Page 4
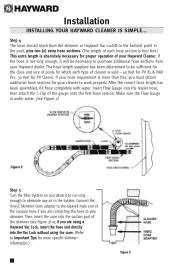
..., it to run long enough to Important Tips for more than this, you are using a Hayward Vac Lock, insert the hose end directly into the Vac Lock without using the cone. (Refer to eliminate any air in the pool, plus two (2) extra hose sections. (The length of each type of the vacuum hose if you must obtain additional hose sections for proper operation of your skimmer. Insert Flow Gauge into the...
..., it to run long enough to Important Tips for more than this, you are using a Hayward Vac Lock, insert the hose end directly into the Vac Lock without using the cone. (Refer to eliminate any air in the pool, plus two (2) extra hose sections. (The length of each type of the vacuum hose if you must obtain additional hose sections for proper operation of your skimmer. Insert Flow Gauge into the...
Pool Vac Classic
Page 5
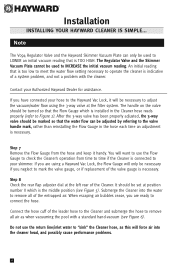
... Vacuum Plate is higher than required with the Skimmer Vacuum Plate. 3 If the setting is to be necessary to eliminate any air in the system. Step 6 Check the water flow reading on the "MAX" side and you have connected your hose to the skimmer, it to run long enough to reduce the vacuum/water flow by using a valve or valves in the box between the "MIN" and "MAX" markings. Installation INSTALLING YOUR HAYWARD CLEANER...
... Vacuum Plate is higher than required with the Skimmer Vacuum Plate. 3 If the setting is to be necessary to eliminate any air in the system. Step 6 Check the water flow reading on the "MAX" side and you have connected your hose to the skimmer, it to run long enough to reduce the vacuum/water flow by using a valve or valves in the box between the "MIN" and "MAX" markings. Installation INSTALLING YOUR HAYWARD CLEANER...
Pool Vac Classic
Page 6
... the valve gauge is connected to "sink" the Cleaner hose, as when vacuuming the pool with the cleaner. The Regulator Valve and the Skimmer Vacuum Plate cannot be used to LOWER an initial vacuum reading that the water flow can only be adjusted by referring to mark the valve gauge, or if replacement of the Cleaner. Note The V094 Regulator Valve and the Hayward Skimmer Vacuum Plate can be used to adjust the vacuum/water flow using a Hayward Vac Lock, the Flow Gauge...
... the valve gauge is connected to "sink" the Cleaner hose, as when vacuuming the pool with the cleaner. The Regulator Valve and the Skimmer Vacuum Plate cannot be used to LOWER an initial vacuum reading that the water flow can only be adjusted by referring to mark the valve gauge, or if replacement of the Cleaner. Note The V094 Regulator Valve and the Hayward Skimmer Vacuum Plate can be used to adjust the vacuum/water flow using a Hayward Vac Lock, the Flow Gauge...
Pool Vac Classic
Page 7
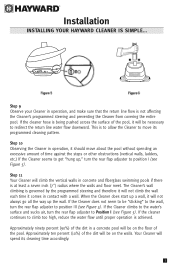
... to Position I (see Figure 5). If the Cleaner climbs to the water's surface and sucks air, turn the rear flap adjuster to get "hung up the wall. The Cleaner's wall climbing is at least a seven inch (7") radius where the walls and floor meet. Installation INSTALLING YOUR HAYWARD CLEANER IS SIMPLE... If the cleaner continues to climb too high, reduce the water flow until proper operation is...
... to Position I (see Figure 5). If the Cleaner climbs to the water's surface and sucks air, turn the rear flap adjuster to get "hung up the wall. The Cleaner's wall climbing is at least a seven inch (7") radius where the walls and floor meet. Installation INSTALLING YOUR HAYWARD CLEANER IS SIMPLE... If the cleaner continues to climb too high, reduce the water flow until proper operation is...

Pool Vac Classic
Page 8
... V094 Regulator Valve to control water flow through the Cleaner (see Figure 3). 6 In some cases it will not need a V094 Regulator Valve (see Figure 4). However, normal dirt and debris do not climb the vertical walls of most likely will be a valve, float or cover over the holes. When removing the Cleaner from the cleaner. 1. Three basic types are not covered under the Hayward warranty. The rear...
... V094 Regulator Valve to control water flow through the Cleaner (see Figure 3). 6 In some cases it will not need a V094 Regulator Valve (see Figure 4). However, normal dirt and debris do not climb the vertical walls of most likely will be a valve, float or cover over the holes. When removing the Cleaner from the cleaner. 1. Three basic types are not covered under the Hayward warranty. The rear...
Pool Vac Classic
Page 9
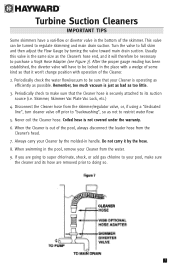
... gas chlorine to restrict water flow. 5. Do not carry it will have a vari-flow or diverter valve in the pool, remove your pool, make sure the cleaner and its suction source (i.e. Disconnect the Cleaner hose from the Cleaner's head. 7. Turbine Suction Cleaners IMPORTANT TIPS Some skimmers have to be locked in handle. Remember, too much vacuum is not covered under the warranty. 6. Periodically check to make sure that it won't change position...
... gas chlorine to restrict water flow. 5. Do not carry it will have a vari-flow or diverter valve in the pool, remove your pool, make sure the cleaner and its suction source (i.e. Disconnect the Cleaner hose from the Cleaner's head. 7. Turbine Suction Cleaners IMPORTANT TIPS Some skimmers have to be locked in handle. Remember, too much vacuum is not covered under the warranty. 6. Periodically check to make sure that it won't change position...
Pool Vac Classic
Page 10
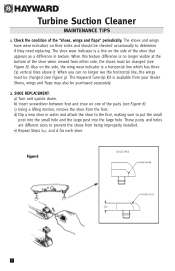
... sure to determine if they need replacing. Check the condition of the shoe when viewed from your dealer. d) Dip a new shoe in texture. c) Using a lifting motion, remove the shoe from being improperly installed. b) Insert screwdriver between foot and shoe on the side of the pads (see Figure 8). These posts and holes are different sizes to prevent the shoes...
... sure to determine if they need replacing. Check the condition of the shoe when viewed from your dealer. d) Dip a new shoe in texture. c) Using a lifting motion, remove the shoe from being improperly installed. b) Insert screwdriver between foot and shoe on the side of the pads (see Figure 8). These posts and holes are different sizes to prevent the shoes...
Pool Vac Classic
Page 12
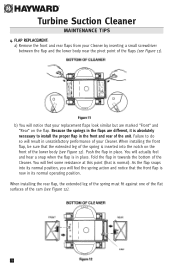
...Cleaner. Turbine Suction Cleaner MAINTENANCE TIPS 4. Because the springs in place. Fold the flap in unsatisfactory performance of the unit. When installing the rear flap, the extended leg of the spring must fit against one of the flat surfaces of the flaps (see Figure 12). 10 FLAP REPLACEMENT: a) Remove...the Cleaner. b) You will result in towards the bottom of the lower body (see Figure 12). Push the flap in its normal operating position. As the flap snaps into the notch on the flap. Failure to install the proper flap in the front and rear of your replacement ...
...Cleaner. Turbine Suction Cleaner MAINTENANCE TIPS 4. Because the springs in place. Fold the flap in unsatisfactory performance of the unit. When installing the rear flap, the extended leg of the spring must fit against one of the flat surfaces of the flaps (see Figure 12). 10 FLAP REPLACEMENT: a) Remove...the Cleaner. b) You will result in towards the bottom of the lower body (see Figure 12). Push the flap in its normal operating position. As the flap snaps into the notch on the flap. Failure to install the proper flap in the front and rear of your replacement ...

Pool Vac Classic
Page 13
Pool Vac XL MAINTENANCE TIPS 5. POOL VAC XL SKIRT/MID SECTION REPLACEMENT: Replacement of the Handle and pu8 sh the Top 7 6 Cover down in the four screws previously removed. Turn off the Middle Body. 4 4. Insert the 1/8" flat screwdriver into the Handle. 11 Lift the Handle off pool pump Remove PoDol Vac XL from pool Disconnect suction hose from cleaner Change out steps - 1 1 2 1. Replace the Handle. 7. Engage the Top Cover rear hooks...
Pool Vac XL MAINTENANCE TIPS 5. POOL VAC XL SKIRT/MID SECTION REPLACEMENT: Replacement of the Handle and pu8 sh the Top 7 6 Cover down in the four screws previously removed. Turn off the Middle Body. 4 4. Insert the 1/8" flat screwdriver into the Handle. 11 Lift the Handle off pool pump Remove PoDol Vac XL from pool Disconnect suction hose from cleaner Change out steps - 1 1 2 1. Replace the Handle. 7. Engage the Top Cover rear hooks...
Pool Vac Classic
Page 14
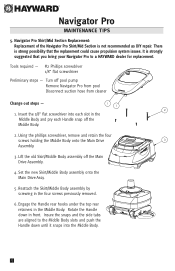
... each Handle snap off the 3 Middle Body. 2. Set the new Skirt/Middle Body assembly onto the Main Drive Assy. 5. It is strongly suggested that the replacement could cause propulsion system issues. Lift the old Skirt/Middle Body assembly off pool pump Remove Navigator Pro from pool Disconnect suction hose from cleaner Change out steps - 2 1 1 1. Insert the 1/8" flat screwdriver into the Middle Body. 6 5 4 3 2 3 2 12 Navigator Pro MAINTENANCE TIPS 5.
... each Handle snap off the 3 Middle Body. 2. Set the new Skirt/Middle Body assembly onto the Main Drive Assy. 5. It is strongly suggested that the replacement could cause propulsion system issues. Lift the old Skirt/Middle Body assembly off pool pump Remove Navigator Pro from pool Disconnect suction hose from cleaner Change out steps - 2 1 1 1. Insert the 1/8" flat screwdriver into the Middle Body. 6 5 4 3 2 3 2 12 Navigator Pro MAINTENANCE TIPS 5.
Pool Vac Classic
Page 15
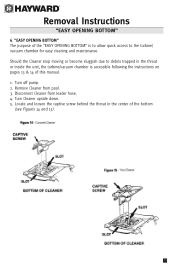
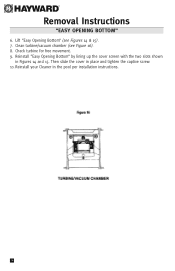
... quick access to the turbine/ vacuum chamber for easy cleaning and maintenance. Sh1ould the Cleaner stop moving or become sluggish due to debris trapped in the center of this manual. 1. Removal Instructions "EASY OPENING BOTTOM" 6. C B A 1 13 Turn off pDump. 2. Remove Cleaner from leader hose. 4. Disconnect Cleaner from pool. 3. "EASY OPENING BOTTOM" The purpose of the "EASY OPENING BOTTOM" is accessible following the instructions on pages 13 & 14...
... quick access to the turbine/ vacuum chamber for easy cleaning and maintenance. Sh1ould the Cleaner stop moving or become sluggish due to debris trapped in the center of this manual. 1. Removal Instructions "EASY OPENING BOTTOM" 6. C B A 1 13 Turn off pDump. 2. Remove Cleaner from leader hose. 4. Disconnect Cleaner from pool. 3. "EASY OPENING BOTTOM" The purpose of the "EASY OPENING BOTTOM" is accessible following the instructions on pages 13 & 14...
Pool Vac Classic
Page 16
Lift "Easy Opening Bottom" (see Figure 16). 8. Removal Instructions "EASY OPENING BOTTOM" 6. Check turbine for free movement. 9. Reinstall "Easy Opening Bottom" by lining up the cover screen with the two slots shown in place and tighten the captive screw. 10. Then slide the cover in Figures 14 and 15. Clean turbine/vacuum chamber (see Figures 14 & 15). 7. Reinstall your Cleaner in the pool per installation instructions. 14
Lift "Easy Opening Bottom" (see Figure 16). 8. Removal Instructions "EASY OPENING BOTTOM" 6. Check turbine for free movement. 9. Reinstall "Easy Opening Bottom" by lining up the cover screen with the two slots shown in place and tighten the captive screw. 10. Then slide the cover in Figures 14 and 15. Clean turbine/vacuum chamber (see Figures 14 & 15). 7. Reinstall your Cleaner in the pool per installation instructions. 14
Pool Vac Classic
Page 17
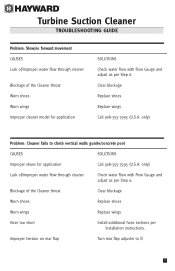
.../improper water flow through cleaner Blockage of the Cleaner throat Worn shoes Worn wings Improper cleaner model for application Call 908-355-7995 (U.S.A. Blockage of the Cleaner throat Clear blockage Worn shoes Replace shoes Worn wings Replace wings Hose too short Install additional hose sections per Step 6. Turbine Suction Cleaner TROUBLESHOOTING GUIDE Problem: Slow/no forward movement CAUSES Lack of/improper water flow through cleaner Check water flow with Flow Gauge and adjust as per installation instructions. only) Problem: Cleaner...
.../improper water flow through cleaner Blockage of the Cleaner throat Worn shoes Worn wings Improper cleaner model for application Call 908-355-7995 (U.S.A. Blockage of the Cleaner throat Clear blockage Worn shoes Replace shoes Worn wings Replace wings Hose too short Install additional hose sections per Step 6. Turbine Suction Cleaner TROUBLESHOOTING GUIDE Problem: Slow/no forward movement CAUSES Lack of/improper water flow through cleaner Check water flow with Flow Gauge and adjust as per installation instructions. only) Problem: Cleaner...
Pool Vac Classic
Page 18
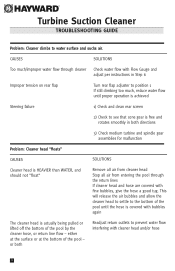
... WATER, and should not "float" Remove all air from cleaner head Stop all air from entering the pool through the return lines If cleaner head and hose are covered with bubbles again The cleaner head is free and rotates smoothly in Step 6 Improper tension on rear flap Turn rear flap adjuster to position 1 If still climbing too much /improper water flow through cleaner Check water flow with Flow Gauge and adjust per instructions...
... WATER, and should not "float" Remove all air from cleaner head Stop all air from entering the pool through the return lines If cleaner head and hose are covered with bubbles again The cleaner head is free and rotates smoothly in Step 6 Improper tension on rear flap Turn rear flap adjuster to position 1 If still climbing too much /improper water flow through cleaner Check water flow with Flow Gauge and adjust per instructions...
Pool Vac Classic
Page 19
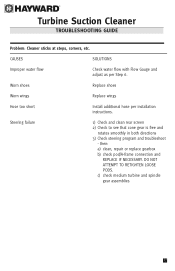
... cone gear is free and rotates smoothly in both directions 3) Check steering program and troubleshoot - CAUSES SOLUTIONS Improper water flow Check water flow with Flow Gauge and adjust as per installation instructions. DO NOT ATTEMPT TO RETIGHTEN LOOSE PODS. then: a) clean, repair or replace gearbox b) check pod/A-frame connection and REPLACE IF NECESSARY. Turbine Suction Cleaner TROUBLESHOOTING GUIDE Problem: Cleaner sticks at steps, corners, etc. Worn shoes Replace shoes Worn wings Replace wings Hose too short Install additional hose per Step...
... cone gear is free and rotates smoothly in both directions 3) Check steering program and troubleshoot - CAUSES SOLUTIONS Improper water flow Check water flow with Flow Gauge and adjust as per installation instructions. DO NOT ATTEMPT TO RETIGHTEN LOOSE PODS. then: a) clean, repair or replace gearbox b) check pod/A-frame connection and REPLACE IF NECESSARY. Turbine Suction Cleaner TROUBLESHOOTING GUIDE Problem: Cleaner sticks at steps, corners, etc. Worn shoes Replace shoes Worn wings Replace wings Hose too short Install additional hose per Step...
Pool Vac Classic
Page 20
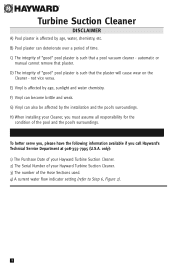
... your Hayward Turbine Suction Cleaner. 2) The Serial Number of "good" pool plaster is such that the plaster will cause wear on the Cleaner - C) The integrity of the Hose Sections used. 4) A current water flow indicator setting (refer to Step 6, Figure 2). 18 E) Vinyl is affected by age, water, chemistry, etc. H) When installing your Hayward Turbine Suction Cleaner. 3) The number of "good" pool plaster is such that a pool vacuum cleaner - Turbine Suction Cleaner DISCLAIMER A) Pool...
... your Hayward Turbine Suction Cleaner. 2) The Serial Number of "good" pool plaster is such that the plaster will cause wear on the Cleaner - C) The integrity of the Hose Sections used. 4) A current water flow indicator setting (refer to Step 6, Figure 2). 18 E) Vinyl is affected by age, water, chemistry, etc. H) When installing your Hayward Turbine Suction Cleaner. 3) The number of "good" pool plaster is such that a pool vacuum cleaner - Turbine Suction Cleaner DISCLAIMER A) Pool...
Pool Vac Classic
Page 21
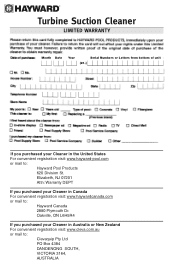
Turbine Suction Cleaner LIMITED WARRANTY Month Date Year Serial Numbers or Letters from bottom of unit (21-) If you purchased your Cleaner in Australia or New Zealand For convenient registration visit: www.cleva.com.au or mail to : Hayward Pool Products 620 Division St. Elizabeth, NJ 07201 Attn: Warranty DEPT If you purchased your Cleaner in Canada For convenient registration visit...
Turbine Suction Cleaner LIMITED WARRANTY Month Date Year Serial Numbers or Letters from bottom of unit (21-) If you purchased your Cleaner in Australia or New Zealand For convenient registration visit: www.cleva.com.au or mail to : Hayward Pool Products 620 Division St. Elizabeth, NJ 07201 Attn: Warranty DEPT If you purchased your Cleaner in Canada For convenient registration visit...
Pool Vac Classic
Page 22
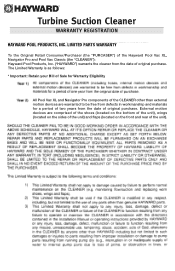
... are warranted to be free from defects in workmanship and materials for Warranty Eligibility All Pool Vac XL and Navigator Pro components of the CLEANER other than external motion devices are comprised of the shoes (located on the ...bottom of the unit), wings (located on the sides of the unit) and flaps (located on the front and rear of the unit). 22 LIMITED PARTS WARRANTY To the Original Retail Consumer/Purchaser (the "PURCASER") of the Hayward Pool Vac XL, Navigator Pro and Pool Vac Classic (the "CLEANER"): Hayward Pool...
... are warranted to be free from defects in workmanship and materials for Warranty Eligibility All Pool Vac XL and Navigator Pro components of the CLEANER other than external motion devices are comprised of the shoes (located on the ...bottom of the unit), wings (located on the sides of the unit) and flaps (located on the front and rear of the unit). 22 LIMITED PARTS WARRANTY To the Original Retail Consumer/Purchaser (the "PURCASER") of the Hayward Pool Vac XL, Navigator Pro and Pool Vac Classic (the "CLEANER"): Hayward Pool...


