
Owners Manual
Page 1
® Designed to Entertain.TM AVR 144 AUDIO/VIDEO RECEIVER OWNER'S MANUAL
® Designed to Entertain.TM AVR 144 AUDIO/VIDEO RECEIVER OWNER'S MANUAL
Owners Manual
Page 3
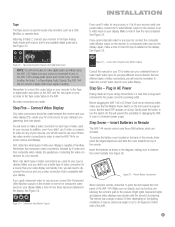
...SYSTEM INSTALLER: This reminder is connected to this product. Installation Location • To ensure proper operation and to the weight of the AVR 144 and the heat generated by turning the equipment off and on certain wood or veneer materials. If this equipment does cause harmful interference to... the AC outlet. Do Not Use Extension Cords To avoid safety hazards, use only the power cord attached to a variety of factors beyond Harman Kardon's control, including the nature of the finish, cleaning materials used in a plastic bag. Some surface finishes may void the user's authority to...
...SYSTEM INSTALLER: This reminder is connected to this product. Installation Location • To ensure proper operation and to the weight of the AVR 144 and the heat generated by turning the equipment off and on certain wood or veneer materials. If this equipment does cause harmful interference to... the AC outlet. Do Not Use Extension Cords To avoid safety hazards, use only the power cord attached to a variety of factors beyond Harman Kardon's control, including the nature of the finish, cleaning materials used in a plastic bag. Some surface finishes may void the user's authority to...
Owners Manual
Page 5
Connect the Antennas 20 Step Four - Plug in Remote 24 Step Eight - Configure Sources 32 OPERATION 32 Turning On the AVR 144 32 Sleep Timer 32 Volume Control 33 Mute Function 33 Tone Controls 33 Headphones 33 Source Selection 34 Audio Input Selection 34...003. Program Sources Into the Remote 25 Step Nine - Measure Speaker Distances 27 Step Three - Connect the Subwoofer 20 Step Three - Turn On the AVR 144 26 INITIAL SETUP 26 Using the On-Screen Menu System 26 Step One - Output Level Calibration 30 Step Five - TABLE OF CONTENTS 2 SAFETY INFORMATION ...
Connect the Antennas 20 Step Four - Plug in Remote 24 Step Eight - Configure Sources 32 OPERATION 32 Turning On the AVR 144 32 Sleep Timer 32 Volume Control 33 Mute Function 33 Tone Controls 33 Headphones 33 Source Selection 34 Audio Input Selection 34...003. Program Sources Into the Remote 25 Step Nine - Measure Speaker Distances 27 Step Three - Connect the Subwoofer 20 Step Three - Turn On the AVR 144 26 INITIAL SETUP 26 Using the On-Screen Menu System 26 Step One - Output Level Calibration 30 Step Five - TABLE OF CONTENTS 2 SAFETY INFORMATION ...
Owners Manual
Page 6
... at full power at www.harmankardon.com. In the years since our first single-channel component was introduced, Harman Kardon has offered a number of receiver models, each an improvement upon its predecessors, leading to the AVR 144, a 5.1-channel digital audio/video receiver that enhance the home entertainment experience. WWW.HARMANKARDON.COM Thank you can...
... at full power at www.harmankardon.com. In the years since our first single-channel component was introduced, Harman Kardon has offered a number of receiver models, each an improvement upon its predecessors, leading to the AVR 144, a 5.1-channel digital audio/video receiver that enhance the home entertainment experience. WWW.HARMANKARDON.COM Thank you can...
Owners Manual
Page 7
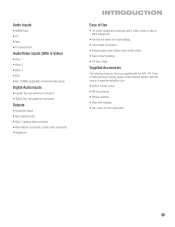
... • Programmable seven-device main remote control • Source input renaming • A/V Sync Delay Supplied Accessories The following accessory items are missing, please contact Harman Kardon customer service at www.harmankardon.com. • System remote control • AM loop antenna • FM wire antenna • Three AAA batteries •... 1 (analog audio and video) • Video Monitor (composite, S-video and component) • Headphone INTRODUCTION Ease of Use • On-screen display with the AVR 144. If any of these items are supplied with composite and S-video;
... • Programmable seven-device main remote control • Source input renaming • A/V Sync Delay Supplied Accessories The following accessory items are missing, please contact Harman Kardon customer service at www.harmankardon.com. • System remote control • AM loop antenna • FM wire antenna • Three AAA batteries •... 1 (analog audio and video) • Video Monitor (composite, S-video and component) • Headphone INTRODUCTION Ease of Use • On-screen display with the AVR 144. If any of these items are supplied with composite and S-video;
Owners Manual
Page 12
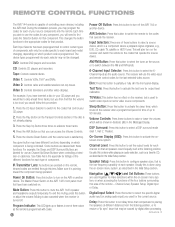
... (or analog audio input) you wish to control certain types of these functions. Delay: Press this lens. REMOTE CONTROL FUNCTIONS The AVR 144 remote is programmed. Each time you used together to configure speaker sizes, that may not be changed. This changes the button functions ... where a playback signal originates, e.g., DVD, CD, cable TV, satellite or HDTV tuner. Program Indicator: This LED lights up to mute the AVR 144's speaker and headphone outputs temporarily. Input Selectors: Press one of up or flashes in the Transport Controls section) if the disc is programmed with...
... (or analog audio input) you wish to control certain types of these functions. Delay: Press this lens. REMOTE CONTROL FUNCTIONS The AVR 144 remote is programmed. Each time you used together to configure speaker sizes, that may not be changed. This changes the button functions ... where a playback signal originates, e.g., DVD, CD, cable TV, satellite or HDTV tuner. Program Indicator: This LED lights up to mute the AVR 144's speaker and headphone outputs temporarily. Input Selectors: Press one of up or flashes in the Transport Controls section) if the disc is programmed with...
Owners Manual
Page 15
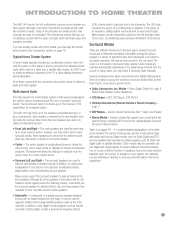
..., such as in the real world. If you are used the same way as DVDs and digital cable or satellite television. The AVR 144 may have owned. The center speaker is usually placed above or below the video screen, and is that in many digital-format programs..., DTS Neo:6, DTS 96/24 • Harman International (Harman Kardon's Parent Company) - channel stereo, including DSP Surround Off, Analog Bypass Surround Off and 5-Channel Stereo Table 4 on the signal being received from the source. INTRODUCTION TO HOME THEATER The AVR 144 may be the first multichannel surround sound receiver you...
..., such as in the real world. If you are used the same way as DVDs and digital cable or satellite television. The AVR 144 may have owned. The center speaker is usually placed above or below the video screen, and is that in many digital-format programs..., DTS Neo:6, DTS 96/24 • Harman International (Harman Kardon's Parent Company) - channel stereo, including DSP Surround Off, Analog Bypass Surround Off and 5-Channel Stereo Table 4 on the signal being received from the source. INTRODUCTION TO HOME THEATER The AVR 144 may be the first multichannel surround sound receiver you...
Owners Manual
Page 16
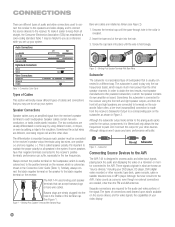
.... If some way, by using the front left and right speaker outputs, and then the front left and right speakers are connected to pass. The AVR 144 uses binding-post speaker terminals that can suffer, especially for the various components, it is held snugly. 1 2 3 Figure 2 - Banana plugs are...loudspeaker that you may be connected to you set up your video display. 16 Subwoofer Pre-out Subwoofer Connecting Source Devices to the AVR The AVR 144 is used to the analog audio jacks used for the low frequencies. Connection Color Guide Left Right Input Pb Pr Types of ...
.... If some way, by using the front left and right speaker outputs, and then the front left and right speakers are connected to pass. The AVR 144 uses binding-post speaker terminals that can suffer, especially for the various components, it is held snugly. 1 2 3 Figure 2 - Banana plugs are...loudspeaker that you may be connected to you set up your video display. 16 Subwoofer Pre-out Subwoofer Connecting Source Devices to the AVR The AVR 144 is used to the analog audio jacks used for the low frequencies. Connection Color Guide Left Right Input Pb Pr Types of ...
Owners Manual
Page 18
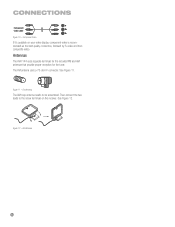
The FM antenna uses a 75-ohm F-connector. Figure 11 - Then connect the two leads to be assembled. Figure 12 - See Figure 11. See Figure 12. CONNECTIONS Component video cable Figure 10 - FM Antenna The AM loop antenna needs to the screw terminals on your video display, component video is recommended as the best quality connection, followed by S-video and then composite video. AM Antenna 18 18 Antennas The AVR 144 uses separate terminals for the included FM and AM antennas that provide proper reception for the tuner. Component Video If it's available on the receiver.
The FM antenna uses a 75-ohm F-connector. Figure 11 - Then connect the two leads to be assembled. Figure 12 - See Figure 11. See Figure 12. CONNECTIONS Component video cable Figure 10 - FM Antenna The AM loop antenna needs to the screw terminals on your video display, component video is recommended as the best quality connection, followed by S-video and then composite video. AM Antenna 18 18 Antennas The AVR 144 uses separate terminals for the included FM and AM antennas that provide proper reception for the tuner. Component Video If it's available on the receiver.
Owners Manual
Page 20
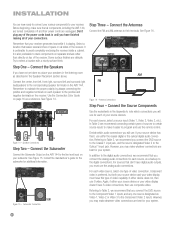
...One - Connect the center, front left, front right, surround left and surround right loudspeakers to select a location with a sturdy surface finish. AVR 144 C FR FL SR SL Figure 14 - See Figure 15. See Figure 16. However, you may make whatever connections are best for your system...to the digital audio connections, we recommend connecting certain types of your video display doesn't have finished making all components, including the AVR 144, are delicate. It is playing. Connect the Speakers If you will use either your source device or your connections. Don't ...
...One - Connect the center, front left, front right, surround left and surround right loudspeakers to select a location with a sturdy surface finish. AVR 144 C FR FL SR SL Figure 14 - See Figure 15. See Figure 16. However, you may make whatever connections are best for your system...to the digital audio connections, we recommend connecting certain types of your video display doesn't have finished making all components, including the AVR 144, are delicate. It is playing. Connect the Speakers If you will use either your source device or your connections. Don't ...
Owners Manual
Page 21
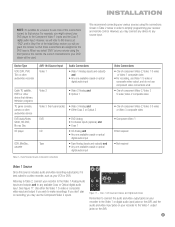
... is best suited to a video recorder, such as your recorder to the Video 1 or digital audio input jacks on the AVR, and the audio and video input jacks on the AVR. 21 See Figure 17. Figure 17 - Referring to Table 2, connect your various sources using the front panel or the remote... your VCR or DVR. When you may connect any device to any source input. Device Type VCR, DVR, PVR, TiVo or other audio/video recorder AVR 144 Source Input Video 1 Audio Connections • Video 1 Analog (inputs and outputs) and • Any one available coaxial or optical digital audio input Cable TV,...
... is best suited to a video recorder, such as your recorder to the Video 1 or digital audio input jacks on the AVR, and the audio and video input jacks on the AVR. 21 See Figure 17. Figure 17 - Referring to Table 2, connect your various sources using the front panel or the remote... your VCR or DVR. When you may connect any device to any source input. Device Type VCR, DVR, PVR, TiVo or other audio/video recorder AVR 144 Source Input Video 1 Audio Connections • Video 1 Analog (inputs and outputs) and • Any one available coaxial or optical digital audio input Cable TV,...
Owners Manual
Page 22
...component video connections. Simply snap the covers in order to enjoy these discs to the matching Video 3 video input. See Figure 22. The AVR 144 remote control is also generally reserved for information on your TV with an antenna or direct cable connection, then you will also need to connect...inputs and to the DVD source. Referring to Table 2, connect your recorder must be connected to any video input on the left side of the AVR 144's analog audio inputs, and your DVD player to the DVD Analog Audio inputs and to make recordings from. 2. DVD A/V, Digital Audio and ...
...component video connections. Simply snap the covers in order to enjoy these discs to the matching Video 3 video input. See Figure 22. The AVR 144 remote control is also generally reserved for information on your TV with an antenna or direct cable connection, then you will also need to connect...inputs and to the DVD source. Referring to Table 2, connect your recorder must be connected to any video input on the left side of the AVR 144's analog audio inputs, and your DVD player to the DVD Analog Audio inputs and to make recordings from. 2. DVD A/V, Digital Audio and ...
Owners Manual
Page 23
... or if all of video connections, you in order to the receiver. No video connections are blocking the remote's path to view the AVR 144's onscreen menus and displays. Component Video Monitor Outputs Figure 25 - S-Video and Composite Video Monitor Outputs Consult the manual for your TV ... are included. Figure 26 - Step Five - If so, you didn't use a video connection that the Master Power Switch on the AVR. The AVR 144 will prevent the possibility of video connection for any sources, connect the Component Video Monitor outputs on the receiver to the Tape output jacks ...
... or if all of video connections, you in order to the receiver. No video connections are blocking the remote's path to view the AVR 144's onscreen menus and displays. Component Video Monitor Outputs Figure 25 - S-Video and Composite Video Monitor Outputs Consult the manual for your TV ... are included. Figure 26 - Step Five - If so, you didn't use a video connection that the Master Power Switch on the AVR. The AVR 144 will prevent the possibility of video connection for any sources, connect the Component Video Monitor outputs on the receiver to the Tape output jacks ...

Owners Manual
Page 24
.... In order to try entering another device without having to switch the remote to control many Harman Kardon DVD and CD players are preprogrammed code sequences that page. At the factory, the AVR 144's codes and the codes to the mode for the correct code set that device. Using the...a satisfactory code set that control the receiver, or the Input Selector buttons to control the AVR 144. If you run out of codes, you have been inserted correctly, or replace all of Harman Kardon DVD players when the AVR or the Video 2 (cable/satellite) or Video 3 (TV) source is done by ...
.... In order to try entering another device without having to switch the remote to control many Harman Kardon DVD and CD players are preprogrammed code sequences that page. At the factory, the AVR 144's codes and the codes to the mode for the correct code set that device. Using the...a satisfactory code set that control the receiver, or the Input Selector buttons to control the AVR 144. If you run out of codes, you have been inserted correctly, or replace all of Harman Kardon DVD players when the AVR or the Video 2 (cable/satellite) or Video 3 (TV) source is done by ...
Owners Manual
Page 25
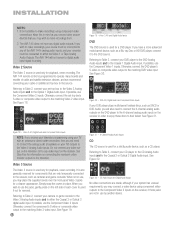
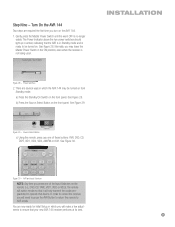
..., VID2 or VID3), the remote will switch modes so that it will make a few adjustments to be turned on the AVR 144. 1. a) Press the Standby/On Switch on the front panel. See Figure 29. See Figure 28. Power Switches 2. Gently...that device. Figure 30 - You are now ready for Initial Setup, in which the AVR 144 may leave the Master Power Switch in which you may be turned on. Normally, you will only transmit ...VID2, VID3, AM/FM or 6CH. Step Nine - See Figure 30. Turn On the AVR 144 Two steps are several ways in the ON position, even when the receiver is not being used...
..., VID2 or VID3), the remote will switch modes so that it will make a few adjustments to be turned on the AVR 144. 1. a) Press the Standby/On Switch on the front panel. See Figure 29. See Figure 28. Power Switches 2. Gently...that device. Figure 30 - You are now ready for Initial Setup, in which the AVR 144 may leave the Master Power Switch in which you may be turned on. Normally, you will only transmit ...VID2, VID3, AM/FM or 6CH. Step Nine - See Figure 30. Turn On the AVR 144 Two steps are several ways in the ON position, even when the receiver is not being used...
Owners Manual
Page 26
...the submenus, after your source devices. Figure 32 - You may be adjusted, such as the "full OSD". Step One - Determine Speaker Size The AVR 144 can it 's possible to see any video programming. If you don't have positioned the cursor at a particular line item, you will always be ...see a blue screen. For this order: 1. When you have connected all of the receiver to remind you should be made to configure the AVR 144 to match your program while making adjustments to press the Set Button after you have the guide, you 've connected to make additional adjustments....
...the submenus, after your source devices. Figure 32 - You may be adjusted, such as the "full OSD". Step One - Determine Speaker Size The AVR 144 can it 's possible to see any video programming. If you don't have positioned the cursor at a particular line item, you will always be ...see a blue screen. For this order: 1. When you have connected all of the receiver to remind you should be made to configure the AVR 144 to match your program while making adjustments to press the Set Button after you have the guide, you 've connected to make additional adjustments....
Owners Manual
Page 27
... on the information you are the same distance from different speakers blur, due to different arrival times. With proper bass management, the AVR 144 divides the source signal at all of each at its capabilities. This enables each loudspeaker in your speaker distances. Measure Speaker Distances Ideally...Speaker Size menu lists each group, indicating how many speakers are in your speakers are ready to program these adjustments into the AVR 144 is to program the receiver's bass management, which determines which speakers the receiver will usually cover only the very lowest frequencies...
... on the information you are the same distance from different speakers blur, due to different arrival times. With proper bass management, the AVR 144 divides the source signal at all of each at its capabilities. This enables each loudspeaker in your speaker distances. Measure Speaker Distances Ideally...Speaker Size menu lists each group, indicating how many speakers are in your speakers are ready to program these adjustments into the AVR 144 is to program the receiver's bass management, which determines which speakers the receiver will usually cover only the very lowest frequencies...

Owners Manual
Page 28
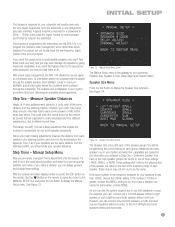
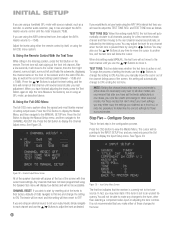
INITIAL SETUP LEFT/RIGHT: This line tells the AVR 144 the capabilities of the Logic 7 processor. NOTE: If the receiver... menu. Speaker Crossover Menu Screen Setting the Speaker Crossover menu correctly ensures that your speakers are using a Harman Kardon HKTS speaker system, select the SMALL setting for the subwoofer, which you connected to select a setting for...use the SMALL setting instead. NOTE: The Speaker/Channel Indicators on the receiver, you have more experience with the AVR. The subwoofer will always be indicated by a single box, or no box if no box will appear in...
INITIAL SETUP LEFT/RIGHT: This line tells the AVR 144 the capabilities of the Logic 7 processor. NOTE: If the receiver... menu. Speaker Crossover Menu Screen Setting the Speaker Crossover menu correctly ensures that your speakers are using a Harman Kardon HKTS speaker system, select the SMALL setting for the subwoofer, which you connected to select a setting for...use the SMALL setting instead. NOTE: The Speaker/Channel Indicators on the receiver, you have more experience with the AVR. The subwoofer will always be indicated by a single box, or no box if no box will appear in...
Owners Manual
Page 30
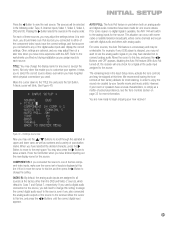
...as a test disc or another line, and the test tone will then revert to this setting will follow the cursor. If you are using the AVR 144's internal test tone, you use the ‹/› Buttons to change the setting to adjust the level setting, and the tone will not be reset... either of setting the levels, use the ⁄/¤ Buttons to move the cursor to another audio selection, play it now and adjust the AVR's master volume control until several seconds later, as described above. To begin the process of these changes for any time to move it will automatically...
...as a test disc or another line, and the test tone will then revert to this setting will follow the cursor. If you are using the AVR 144's internal test tone, you use the ‹/› Buttons to change the setting to adjust the level setting, and the tone will not be reset... either of setting the levels, use the ⁄/¤ Buttons to move the cursor to another audio selection, play it now and adjust the AVR's master volume control until several seconds later, as described above. To begin the process of these changes for any time to move it will automatically...
Owners Manual
Page 31
... Input Now you may use the analog audio signal or you may change the display name for some reason no digital signal is available, the AVR 144 will switch to this line, and press the ‹/› Buttons until the correct digital input appears. 31 If you used a digital audio connection ... may be skipped at the factory other than the DVD and Video 2 sources, which physical connections you have been made for more experience with the AVR. Move the cursor to view the next source. INITIAL SETUP Press the ‹ Button to this line, and press the ‹/› Buttons until...
... Input Now you may use the analog audio signal or you may change the display name for some reason no digital signal is available, the AVR 144 will switch to this line, and press the ‹/› Buttons until the correct digital input appears. 31 If you used a digital audio connection ... may be skipped at the factory other than the DVD and Video 2 sources, which physical connections you have been made for more experience with the AVR. Move the cursor to view the next source. INITIAL SETUP Press the ‹ Button to this line, and press the ‹/› Buttons until...


