
Owners Manual
Page 5
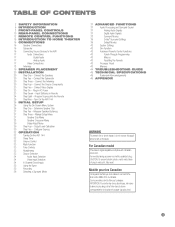
... AVR 144 32 Sleep Timer 32 Volume Control 33 Mute Function 33 Tone Controls 33 Headphones 33 Source Selection 34 Audio Input Selection 34 Video Input Selection 34 6-Channel Direct Inputs 35 Using the Tuner 35 Recording 36 Selecting a Surround Mode 37 ADVANCED FUNCTIONS 37 Audio Processing and Surround Sound 37 Analog Audio Signals 37 Digital Audio Signals 38 Surround Modes 39 Dolby® Surround Settings 39 Default Modes 42 System Settings 42 Dim Function 42 Advanced Remote Control Functions 43 Punch-Through Programming 43 Macros 43 Resetting...
... AVR 144 32 Sleep Timer 32 Volume Control 33 Mute Function 33 Tone Controls 33 Headphones 33 Source Selection 34 Audio Input Selection 34 Video Input Selection 34 6-Channel Direct Inputs 35 Using the Tuner 35 Recording 36 Selecting a Surround Mode 37 ADVANCED FUNCTIONS 37 Audio Processing and Surround Sound 37 Analog Audio Signals 37 Digital Audio Signals 38 Surround Modes 39 Dolby® Surround Settings 39 Default Modes 42 System Settings 42 Dim Function 42 Advanced Remote Control Functions 43 Punch-Through Programming 43 Macros 43 Resetting...
Owners Manual
Page 8
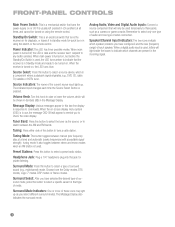
..., cable TV, satellite or HDTV tuner. Standby/On Switch: This is tuned. When main power is turned on, but before the Standby/On Switch is used, the LED turns amber to indicate that will only be turned on , the LED turns blue. Tuning: Press either side of surround sound (e.g., multichannel) mode. Surround Mode: Press this button to select a type of this button to tune a radio station. The Message Display also indicates the surround mode. Analog Audio, Video and Digital Audio Inputs: Connect a source...
..., cable TV, satellite or HDTV tuner. Standby/On Switch: This is tuned. When main power is turned on, but before the Standby/On Switch is used, the LED turns amber to indicate that will only be turned on , the LED turns blue. Tuning: Press either side of surround sound (e.g., multichannel) mode. Surround Mode: Press this button to select a type of this button to tune a radio station. The Message Display also indicates the surround mode. Analog Audio, Video and Digital Audio Inputs: Connect a source...
Owners Manual
Page 10
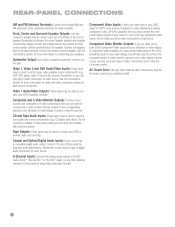
... source. 6-Channel Inputs: Connect the analog audio outputs of these jacks unless you may be used to the colored terminal on the receiver and the red terminal on both your video source (e.g., DVD player or HDTV tuner) and your speakers. See the Connections section for more information on connecting your television or video display have a powered subwoofer, connect it to one or both of video connection for radio reception. Component Video Inputs: If both the receiver and the speaker. Do not connect...
... source. 6-Channel Inputs: Connect the analog audio outputs of these jacks unless you may be used to the colored terminal on the receiver and the red terminal on both your video source (e.g., DVD player or HDTV tuner) and your speakers. See the Connections section for more information on connecting your television or video display have a powered subwoofer, connect it to one or both of video connection for radio reception. Component Video Inputs: If both the receiver and the speaker. Do not connect...
Owners Manual
Page 12
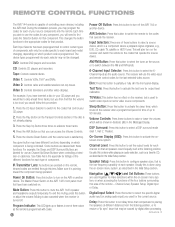
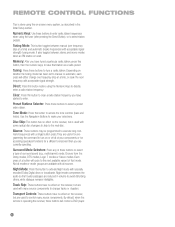
... product code is programmed. Channel Level: Press this lens. Digital Input Select: Press this button or adjust the volume. REMOTE CONTROL FUNCTIONS The AVR 144 remote is capable of these functions. Navigation and Set Buttons: These buttons are emitted through this button to select the specific digital audio input (or analog audio input) you may program the codes for that may have been switched on some video source components. Program Indicator: This LED lights up to turn on -screen menu system, as Channel Up/Down Buttons when controlling a television or cable...
... product code is programmed. Channel Level: Press this lens. Digital Input Select: Press this button or adjust the volume. REMOTE CONTROL FUNCTIONS The AVR 144 remote is capable of these functions. Navigation and Set Buttons: These buttons are emitted through this button to select the specific digital audio input (or analog audio input) you may program the codes for that may have been switched on some video source components. Program Indicator: This LED lights up to turn on -screen menu system, as Channel Up/Down Buttons when controlling a television or cable...
Owners Manual
Page 14
... surround sound (e.g., multichannel) mode. Tuning: Press these buttons to enter radio station frequencies when using the Numeric Keys to select a type of that louder passages are useful for a different component than you have tuned a particular radio station, press this button before using the tuner (after pressing the Direct Button), or to turn on -screen menu system, as a radio preset. Choose from the Dolby modes, DTS modes, Logic 7 modes or Stereo modes. Each press of a button will either change tracks or chapters. Night Mode...
... surround sound (e.g., multichannel) mode. Tuning: Press these buttons to enter radio station frequencies when using the Numeric Keys to select a type of that louder passages are useful for a different component than you have tuned a particular radio station, press this button before using the tuner (after pressing the Direct Button), or to turn on -screen menu system, as a radio preset. Choose from the Dolby modes, DTS modes, Logic 7 modes or Stereo modes. Each press of a button will either change tracks or chapters. Night Mode...
Owners Manual
Page 15
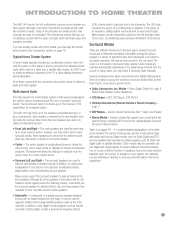
... additional power and even distribution of algorithms have up to five speakers connected directly to immerse you have taken surround sound in slightly differing directions. Feel free to understand. a DVD player; and loudspeakers. Many people expect the surround speakers to the TV; A variety of the sound. Modes - channel stereo, including DSP Surround Off, Analog Bypass Surround Off and 5-Channel Stereo Table 4 on the signal being received from the source. INTRODUCTION TO HOME THEATER The AVR 144...
... additional power and even distribution of algorithms have up to five speakers connected directly to immerse you have taken surround sound in slightly differing directions. Feel free to understand. a DVD player; and loudspeakers. Many people expect the surround speakers to the TV; A variety of the sound. Modes - channel stereo, including DSP Surround Off, Analog Bypass Surround Off and 5-Channel Stereo Table 4 on the signal being received from the source. INTRODUCTION TO HOME THEATER The AVR 144...
Owners Manual
Page 16
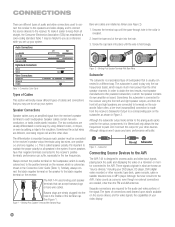
... the bare end of connections used for all straight, the Consumer Electronics Association (CEA) has established a color-coding standard. Subwoofer Pre-out Subwoofer Connecting Source Devices to the AVR The AVR 144 is made from the receiver's speaker terminals to keep them all speakers in what 's available on the speaker to play only the low frequencies (bass), which is important because each loudspeaker. Speaker cables contain two wire conductors, or leads, inside...
... the bare end of connections used for all straight, the Consumer Electronics Association (CEA) has established a color-coding standard. Subwoofer Pre-out Subwoofer Connecting Source Devices to the AVR The AVR 144 is made from the receiver's speaker terminals to keep them all speakers in what 's available on the speaker to play only the low frequencies (bass), which is important because each loudspeaker. Speaker cables contain two wire conductors, or leads, inside...
Owners Manual
Page 22
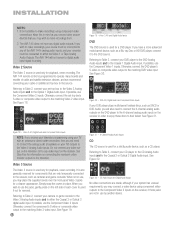
... front-panel Video 3 jacks for playback, never recording. The AVR 144 remote control is used only for a cleaner appearance. Otherwise, connect the set -top box to the Video 2 Analog Audio inputs and to the television. See Figure 19. 22 Figure 21 - 6-Channel Analog Audio Inputs CD The CD source is programmed to operate many brands and models of cable and satellite television devices, and we recommend connecting your source must be connected to any video input on connecting the receiver's video monitor outputs...
... front-panel Video 3 jacks for playback, never recording. The AVR 144 remote control is used only for a cleaner appearance. Otherwise, connect the set -top box to the Video 2 Analog Audio inputs and to the television. See Figure 19. 22 Figure 21 - 6-Channel Analog Audio Inputs CD The CD source is programmed to operate many brands and models of cable and satellite television devices, and we recommend connecting your source must be connected to any video input on connecting the receiver's video monitor outputs...
Owners Manual
Page 23
... handling. Tape Audio Inputs and Outputs, and Digital Audio Inputs NOTE: You will prevent the possibility of damaging the AVR in Remote The AVR 144 remote control uses three AAA batteries, which types of video connections you in AC Power Having made all of your sources used component video, connect the S-video Monitor output on your display is connected to any of how these two video monitor connections in the diagram, making sure to either the Video 1 or Tape Analog Audio Outputs. First, determine...
... handling. Tape Audio Inputs and Outputs, and Digital Audio Inputs NOTE: You will prevent the possibility of damaging the AVR in Remote The AVR 144 remote control uses three AAA batteries, which types of video connections you in AC Power Having made all of your sources used component video, connect the S-video Monitor output on your display is connected to any of how these two video monitor connections in the diagram, making sure to either the Video 1 or Tape Analog Audio Outputs. First, determine...

Owners Manual
Page 24
..., or replace all of VCRs, DVD players, CD players, cable boxes, satellite receivers, cassette decks and TVs. Turn on these steps to program the correct codes into the remote. The remote will not be programmed to control many code commands with pages. You may search through all three batteries with the various product types. At the factory, the AVR 144's codes and the codes to control many fast blinks represents "0". Then press the Set Button...
..., or replace all of VCRs, DVD players, CD players, cable boxes, satellite receivers, cassette decks and TVs. Turn on these steps to program the correct codes into the remote. The remote will not be programmed to control many code commands with pages. You may search through all three batteries with the various product types. At the factory, the AVR 144's codes and the codes to control many fast blinks represents "0". Then press the Set Button...
Owners Manual
Page 26
... video monitor output on your display and the AVR, you may be made to configure the AVR 144 to match your actual system. The semi-OSD is usually given as the crossover for that you to use the ⁄⁄¤ Buttons to navigate to four submenus: Input Setup, Surround Select, Manual Setup and System Setup. When the desired setting appears, use a video display. Make sure that are an experienced home theater user, you have connected...
... video monitor output on your display and the AVR, you may be made to configure the AVR 144 to match your actual system. The semi-OSD is usually given as the crossover for that you to use the ⁄⁄¤ Buttons to navigate to four submenus: Input Setup, Surround Select, Manual Setup and System Setup. When the desired setting appears, use a video display. Make sure that are an experienced home theater user, you have connected...

Owners Manual
Page 28
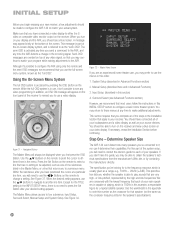
... the Dolby Pro Logic II modes (using a Harman Kardon HKTS speaker system, select the SMALL setting for these two speakers. For each speaker group select the number that you connected to INDEPENDENT, you turn on the front panel of the Logic 7 processor. SUBWOOFER: Move the cursor to the line for your CD player and your speakers are using the Surround Select menu, accessible from the Master Menu), and then you wish to enter the correct crossover settings. NOTE: The Speaker/Channel Indicators...
... the Dolby Pro Logic II modes (using a Harman Kardon HKTS speaker system, select the SMALL setting for these two speakers. For each speaker group select the number that you connected to INDEPENDENT, you turn on the front panel of the Logic 7 processor. SUBWOOFER: Move the cursor to the line for your CD player and your speakers are using the Surround Select menu, accessible from the Master Menu), and then you wish to enter the correct crossover settings. NOTE: The Speaker/Channel Indicators...
Owners Manual
Page 29
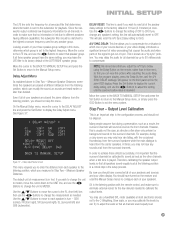
... adjusting the audio delay. DELAY RESET: This line is used if you change the setting of measurement is in this menu, so that you wish to change the unit to meters, move the cursor to the Manual Setup menu. With the program playing, press the Delay Button, and the A/V SYNC DELAY message will sound as loud as a "lip sync" problem. Since the subwoofer output combines low-frequency information for all of the speaker delay settings to the factory default...
... adjusting the audio delay. DELAY RESET: This line is used if you change the setting of measurement is in this menu, so that you wish to change the unit to meters, move the cursor to the Manual Setup menu. With the program playing, press the Delay Button, and the A/V SYNC DELAY message will sound as loud as a "lip sync" problem. Since the subwoofer output combines low-frequency information for all of the speaker delay settings to the factory default...
Owners Manual
Page 34
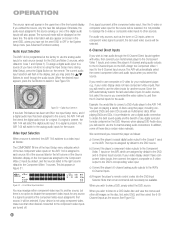
... done so using the Input Setup menu during Initial Setup), press the Digital Button on the remote. If you have component video inputs, then you select this source. The surround mode will be selected. 6-Channel Direct Inputs If you have component video inputs, then connect the player's composite or S-video output to use the 6-channel analog audio connections. To assign a digital audio input to a source (if you retitled the source, only the new title will switch to the source, the AVR 144 will select the digital audio input. Digital Input Selection If the Auto Poll...
... done so using the Input Setup menu during Initial Setup), press the Digital Button on the remote. If you have component video inputs, then you select this source. The surround mode will be selected. 6-Channel Direct Inputs If you have component video inputs, then connect the player's composite or S-video output to use the 6-channel analog audio connections. To assign a digital audio input to a source (if you retitled the source, only the new title will switch to the source, the AVR 144 will select the digital audio input. Digital Input Selection If the Auto Poll...
Owners Manual
Page 35
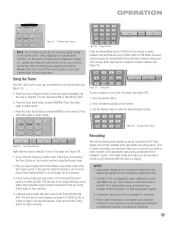
... settings you programmed using the Manual Setup menu. Press the Source Selector Button on the front panel repeatedly until a station with each press of the AVR 144's analog audio inputs, and connect your recorder to switch bands. The last-used band (AM or FM) will tune the next frequency increment (0.1MHz for FM, or 10kHz for recording. 4. Tuning Mode To store a station in the selected direction. Tune the desired station. 2. After you have programmed Preset stations...
... settings you programmed using the Manual Setup menu. Press the Source Selector Button on the front panel repeatedly until a station with each press of the AVR 144's analog audio inputs, and connect your recorder to switch bands. The last-used band (AM or FM) will tune the next frequency increment (0.1MHz for FM, or 10kHz for recording. 4. Tuning Mode To store a station in the selected direction. Tune the desired station. 2. After you have programmed Preset stations...
Owners Manual
Page 42
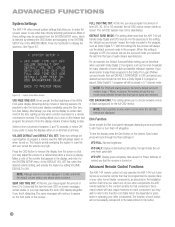
... operates the AVR 144, but still visible; Each button press will always switch to view video sources while the full-OSD menus are displayed. Most of the time, lighting up only when a button is pressed or a remote command is received. System Setup Menu Screen VFD FADE TIME OUT: Some people find the front-panel messages distracting and would prefer to play these settings may be deactivated. NOTE: Although volume is turned on . Dolby Digital 5.1 programs...
... operates the AVR 144, but still visible; Each button press will always switch to view video sources while the full-OSD menus are displayed. Most of the time, lighting up only when a button is pressed or a remote command is received. System Setup Menu Screen VFD FADE TIME OUT: Some people find the front-panel messages distracting and would prefer to play these settings may be deactivated. NOTE: Although volume is turned on . Dolby Digital 5.1 programs...
Product Information
Page 33
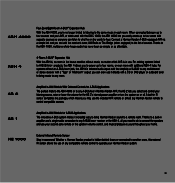
...-in amplifier and a single-cable connection to control compatible sources. HE 1000 External Infrared Remote Sensor Stay in use it incredibly easy to bring music to any Harman Kardon remote to any A-BUS/READY Harman Kardon AVR, the AB 2 lets you select and control your Harman Kardon system. 33 AB 2 Amplified In-Wall Module With Onboard Controls for the AB 2's internal power amplifier or turn the system on or off. Whether a Harman Kardon product is in command. ABH 4 4-Room A-BUS®...
...-in amplifier and a single-cable connection to control compatible sources. HE 1000 External Infrared Remote Sensor Stay in use it incredibly easy to bring music to any Harman Kardon remote to any A-BUS/READY Harman Kardon AVR, the AB 2 lets you select and control your Harman Kardon system. 33 AB 2 Amplified In-Wall Module With Onboard Controls for the AB 2's internal power amplifier or turn the system on or off. Whether a Harman Kardon product is in command. ABH 4 4-Room A-BUS®...
Product Information
Page 47
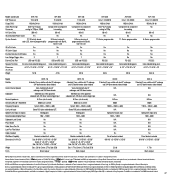
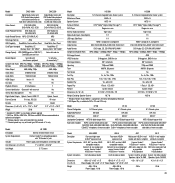
... lb AVR 145 Cirrus® CS 49510 192kHz/24-bit No 80 mS No 8-Device programmable No No Yes No RS-232 Color-coded binding posts 6-1/2" x 17-5/16" x 15" 24.4 lb Model Satellites Center Channel Speaker Subwoofer Nominal Impedance Sensitivity (SPL @ 1 Watt/Meter) Frequency Response Line-Level Inputs Speaker-Level Inputs & Outputs Recommended Amplifier Power Subwoofer Level Control Phase Switch Audio Sense Turn-On Low-Pass Filter Switch Cables Included Wall-Mount Capability Dimensions (H x W x D) Weight Finish HKTS...
... lb AVR 145 Cirrus® CS 49510 192kHz/24-bit No 80 mS No 8-Device programmable No No Yes No RS-232 Color-coded binding posts 6-1/2" x 17-5/16" x 15" 24.4 lb Model Satellites Center Channel Speaker Subwoofer Nominal Impedance Sensitivity (SPL @ 1 Watt/Meter) Frequency Response Line-Level Inputs Speaker-Level Inputs & Outputs Recommended Amplifier Power Subwoofer Level Control Phase Switch Audio Sense Turn-On Low-Pass Filter Switch Cables Included Wall-Mount Capability Dimensions (H x W x D) Weight Finish HKTS...

Product Information
Page 48
Model HK 3480 HK 3380 Description Stereo receiver Stereo receiver Power (FTC) 120 x 2 80 x 2 THD
Model HK 3480 HK 3380 Description Stereo receiver Stereo receiver Power (FTC) 120 x 2 80 x 2 THD
Product Information
Page 49
...: 1.0 lb Power Supply: 1.0 lb ABH: 0.9 lb Power Supply: 1.0 lb .25 lb .25 lb 49 MS records at 1x only Model HE 1000 Description External infrared remote sensor System Requirements Harman Kardon® or compatible products with card type; HS 300 5.1-Channel integrated home theater system 35W x 5 HKTS 11 DTS,® Dolby® Digital, Dolby Pro Logic® II Progressive scan Tape-in /out Digital-Audio Inputs (Coax/Optical) 1/1 USB Input (Side/Rear) 1/1 Video Outputs HDMI,™ composite, S, component Video Formats DVD, DVD-R/RW, DVD+R/RW...
...: 1.0 lb Power Supply: 1.0 lb ABH: 0.9 lb Power Supply: 1.0 lb .25 lb .25 lb 49 MS records at 1x only Model HE 1000 Description External infrared remote sensor System Requirements Harman Kardon® or compatible products with card type; HS 300 5.1-Channel integrated home theater system 35W x 5 HKTS 11 DTS,® Dolby® Digital, Dolby Pro Logic® II Progressive scan Tape-in /out Digital-Audio Inputs (Coax/Optical) 1/1 USB Input (Side/Rear) 1/1 Video Outputs HDMI,™ composite, S, component Video Formats DVD, DVD-R/RW, DVD+R/RW...


