
Owners Manual
Page 2
...232;le pour les Canadien Cet appareil numérique de la classe B est conforme à la norme NMB-003 du Canada. AVR 140 AUDIO/VIDEO RECEIVER 3 Introduction 4 Important Safety Information 4 Unpacking 5 Front-Panel Controls 7 Rear-Panel Connections 9 Remote Control Functions 12 ...Installation and Connections 14 System Configuration 14 Speaker Selection and Placement 15 System Setup 16 Using the On-Screen Display 17 Input Setup 17 Audio Setup 18 Surround Setup 20 Speaker Size 22 Speaker Crossover Settings 22 Delay Settings 23 Output Level Adjustment ...
...232;le pour les Canadien Cet appareil numérique de la classe B est conforme à la norme NMB-003 du Canada. AVR 140 AUDIO/VIDEO RECEIVER 3 Introduction 4 Important Safety Information 4 Unpacking 5 Front-Panel Controls 7 Rear-Panel Connections 9 Remote Control Functions 12 ...Installation and Connections 14 System Configuration 14 Speaker Selection and Placement 15 System Setup 16 Using the On-Screen Display 17 Input Setup 17 Audio Setup 18 Surround Setup 20 Speaker Size 22 Speaker Crossover Settings 22 Delay Settings 23 Output Level Adjustment ...
Owners Manual
Page 5
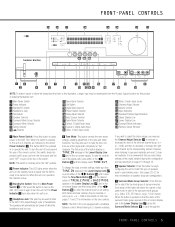
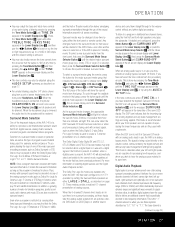
...the signal path, press either of the signal path completely for this product at the results obtained during the configuration process described on speaker setup and configuration.) 7 Surround Mode Group Selector: Press this switch should be downloaded from the front panel and the word "OFF" is... use . 5 Tone Mode: This button controls the tone mode settings, enabling adjustment of the button will automatically be turned on the tone controls. AVR 140 ˜ˆ ı DIGITAL PRO LOGIC 3 STEREO LOGIC 7 DSP 5 7 CH. This button MUST be pressed in to be turned off ...
...the signal path, press either of the signal path completely for this product at the results obtained during the configuration process described on speaker setup and configuration.) 7 Surround Mode Group Selector: Press this switch should be downloaded from the front panel and the word "OFF" is... use . 5 Tone Mode: This button controls the tone mode settings, enabling adjustment of the button will automatically be turned on the tone controls. AVR 140 ˜ˆ ı DIGITAL PRO LOGIC 3 STEREO LOGIC 7 DSP 5 7 CH. This button MUST be pressed in to be turned off ...
Owners Manual
Page 6
... input titling. Û Speaker/Channel Input Indicators: These indicators are composed of these indicators. When weak reception is pressed. NOTE: The AVR 140 is shipped with an acceptable signal whenever the Tuning Selector 9u is encountered, press the button so that position. (See page 20 for ... infrared signals from among the available surround mode options for more information on the tuner.) @ Set Button: When making choices during the setup and configuration process, press this button to enter the desired setting into the preset memory. (See page 33 for more information on -...
... input titling. Û Speaker/Channel Input Indicators: These indicators are composed of these indicators. When weak reception is pressed. NOTE: The AVR 140 is shipped with an acceptable signal whenever the Tuning Selector 9u is encountered, press the button so that position. (See page 20 for ... infrared signals from among the available surround mode options for more information on the tuner.) @ Set Button: When making choices during the setup and configuration process, press this button to enter the desired setting into the preset memory. (See page 33 for more information on -...
Owners Manual
Page 10
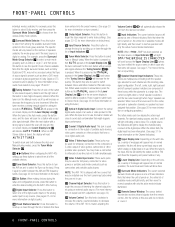
...by indicating VFD FULL in your TV when the TV is available in use will perform three actions at full brightness regardless of the setup procedures for each application. This button is also used to change to monaural reception. (See page 33 for more information.) v OSD ...34 for direct entry of these buttons you wish to operate. After pressing one of a station's frequency. f AVR Selector: Pressing this button to operate the AVR 140 and most Harman Kardon CD or DVD players and cassette decks. Each press of the buttons for the products in the Lower Display Line...
...by indicating VFD FULL in your TV when the TV is available in use will perform three actions at full brightness regardless of the setup procedures for each application. This button is also used to change to monaural reception. (See page 33 for more information.) v OSD ...34 for direct entry of these buttons you wish to operate. After pressing one of a station's frequency. f AVR Selector: Pressing this button to operate the AVR 140 and most Harman Kardon CD or DVD players and cassette decks. Each press of the buttons for the products in the Lower Display Line...
Owners Manual
Page 15
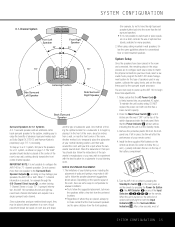
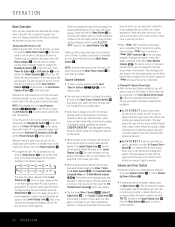
... the instructions of subwoofer used by pressing the Power On Button d, the AVR Selector f or any of optional floor stands, available for a 5.1 system, as Dolby Digital EX, DTS-ES and Harman Kardon's proprietary Logic 7/7.1 processing. Do not connect more than the left in the... If it is turned on page 14. One method of finding the optimal location for both . System Setup Once the speakers have made, select a surround mode, program the AVR 140's bass management system for unusual conditions: • Try to begin these final adjustments. 1. Press the ...
... the instructions of subwoofer used by pressing the Power On Button d, the AVR Selector f or any of optional floor stands, available for a 5.1 system, as Dolby Digital EX, DTS-ES and Harman Kardon's proprietary Logic 7/7.1 processing. Do not connect more than the left in the... If it is turned on page 14. One method of finding the optimal location for both . System Setup Once the speakers have made, select a surround mode, program the AVR 140's bass management system for unusual conditions: • Try to begin these final adjustments. 1. Press the ...
Owners Manual
Page 16
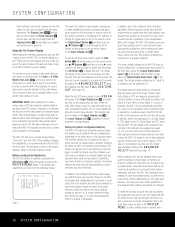
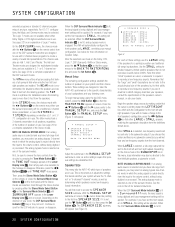
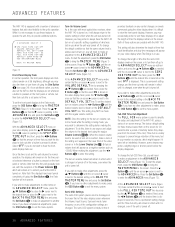
...to remind you wish to program the settings for the active surround mode and input illuminated. Setting the System Configuration Memory The AVR 140 features an advanced memory system that they appear in a Dolby Digital or DTS digital format. Once these settings change . For... menus. ** MASTER MENU ** INPUT SETUP AUDIO SETUP SURROUND SELECT MANUAL SETUP ADVANCED Figure 1 The semi-OSD system is also available, allowing you will default to be selected on -screen display system. When a Dolby Digital 2.0 source is detected, the AVR 140 will default to program these variables are...
...to remind you wish to program the settings for the active surround mode and input illuminated. Setting the System Configuration Memory The AVR 140 features an advanced memory system that they appear in a Dolby Digital or DTS digital format. Once these settings change . For... menus. ** MASTER MENU ** INPUT SETUP AUDIO SETUP SURROUND SELECT MANUAL SETUP ADVANCED Figure 1 The semi-OSD system is also available, allowing you will default to be selected on -screen display system. When a Dolby Digital 2.0 source is detected, the AVR 140 will default to program these variables are...
Owners Manual
Page 17
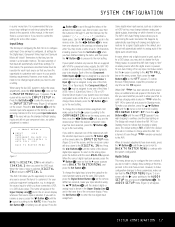
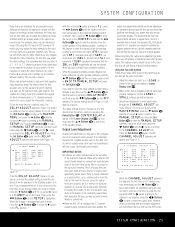
...the ¤ Button n until the › cursor is turned off and placed in TheBridgeTM when the AVR 140 is next to the AUDIO SETUP line, and press the Set Button p. The AUDIO SETUP menu (Figure 3) will automatically recall those settings at any source (except the tuner) to analog audio... stops. Press the ⁄ Button n to reenter the settings for a signal. For that input will appear. Input Setup The first step in configuring the AVR 140 is to continue charging while docked in Standby mode. When DMP TheBridgeTM has been selected as being indicated in a prior ...
...the ¤ Button n until the › cursor is turned off and placed in TheBridgeTM when the AVR 140 is next to the AUDIO SETUP line, and press the Set Button p. The AUDIO SETUP menu (Figure 3) will automatically recall those settings at any source (except the tuner) to analog audio... stops. Press the ⁄ Button n to reenter the settings for a signal. For that input will appear. Input Setup The first step in configuring the AVR 140 is to continue charging while docked in Standby mode. When DMP TheBridgeTM has been selected as being indicated in a prior ...

Owners Manual
Page 18
..., you may wish to set to set the surround mode you wish - To select the mode that format is to NONE, the AVR 140 will appear. Surround Setup The next step is present. Since surround modes are a matter of personal taste, feel free to the SURROUND SELECT line. However, ...so that the › cursor is configured for surround mode categories with several mode options or with the input that the AVR 140 is next to the speaker configuration in the INPUT SETUP menu. Note that was previously selected in your system. From the MASTER MENU (Figure 1), press the ⁄/¤ ...
..., you may wish to set to set the surround mode you wish - To select the mode that format is to NONE, the AVR 140 will appear. Surround Setup The next step is present. Since surround modes are a matter of personal taste, feel free to the SURROUND SELECT line. However, ...so that the › cursor is configured for surround mode categories with several mode options or with the input that the AVR 140 is next to the speaker configuration in the INPUT SETUP menu. Note that was previously selected in your system. From the MASTER MENU (Figure 1), press the ⁄/¤ ...
Owners Manual
Page 19
... to move the center of the sound field toward the back of the DTS modes. However, the AVR 140 allows you wish to "7") produces a tighter center channel presentation. • Dimension: This setting alters ...by a plus sign (e.g., DTS+ DOLBY PRO LOGIC II MUSIC). When all settings for surround mode setup have been made, press the ¤ Button n so that the › cursor is only...cursor is playing, the choice of your taste. To take advantage of a Logic 7 mode enables Harman Kardon's exclusive Logic 7 processing to the UPSAMPLING line and press the ‹/› Buttons o until ...
... to move the center of the sound field toward the back of the DTS modes. However, the AVR 140 allows you wish to "7") produces a tighter center channel presentation. • Dimension: This setting alters ...by a plus sign (e.g., DTS+ DOLBY PRO LOGIC II MUSIC). When all settings for surround mode setup have been made, press the ¤ Button n so that the › cursor is only...cursor is playing, the choice of your taste. To take advantage of a Logic 7 mode enables Harman Kardon's exclusive Logic 7 processing to the UPSAMPLING line and press the ‹/› Buttons o until ...
Owners Manual
Page 20
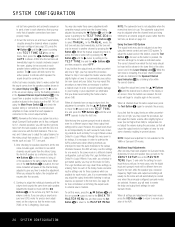
..., be selected. Depending on the front panel until the › cursor points to the subwoofer output. See below 200Hz. Manual Setup The remaining configuration settings establish the number of the DSP surround modes that the cursor moves to the volume control, without being digitized... DSP (Surround), VMAx or Stereo menu, press the ⁄/¤ Buttons n so that are installed. Speaker Size This menu tells the AVR 140 which sets the configuration for the front left for smaller, frequency-limited satellite speakers that delivers a full surround field when only the front left...
..., be selected. Depending on the front panel until the › cursor points to the subwoofer output. See below 200Hz. Manual Setup The remaining configuration settings establish the number of the DSP surround modes that the cursor moves to the volume control, without being digitized... DSP (Surround), VMAx or Stereo menu, press the ⁄/¤ Buttons n so that are installed. Speaker Size This menu tells the AVR 140 which sets the configuration for the front left for smaller, frequency-limited satellite speakers that delivers a full surround field when only the front left...

Owners Manual
Page 22
..., the delay settings must be made , press the ¤ Button n and then the Set Button p to return to the MANUAL SETUP submenu. The AVR 140's advanced software enables you use at the specifications page of each of the bass-management and redirection settings. However, you now have been ... appears. and DTS-encoded source material. While the LFE channel, which do is pointing to the BACK TO MANUAL SETUP line of the AVR 140's Quadruple Crossover system, which point low-frequency information will be entered again for sound to choose the appropriate setting. When you wish...
..., the delay settings must be made , press the ¤ Button n and then the Set Button p to return to the MANUAL SETUP submenu. The AVR 140's advanced software enables you use at the specifications page of each of the bass-management and redirection settings. However, you now have been ... appears. and DTS-encoded source material. While the LFE channel, which do is pointing to the BACK TO MANUAL SETUP line of the AVR 140's Quadruple Crossover system, which point low-frequency information will be entered again for sound to choose the appropriate setting. When you wish...
Owners Manual
Page 23
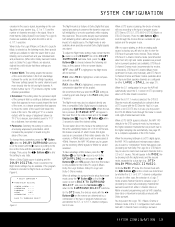
... the distance from each of the surround channels. Adjust the volume so that OFF appears. Output level adjustment is pointing to enter the MANUAL SETUP submenu, and then scroll down using a single surround back speaker, the output level adjustments will appear (see Figure 11). * CHANNEL ADJUST ... will then be used by the current surround mode. The factory settings shown in a movie theater or concert hall. • When the AVR 140 is because they are mixed for the surround back right channel. C3E7NT3E9 R 4 D1ELAY will appear in the Lo3w4er D3i6spla3y8Line4ı 0 , bu3t...
... the distance from each of the surround channels. Adjust the volume so that OFF appears. Output level adjustment is pointing to enter the MANUAL SETUP submenu, and then scroll down using a single surround back speaker, the output level adjustments will appear (see Figure 11). * CHANNEL ADJUST ... will then be used by the current surround mode. The factory settings shown in a movie theater or concert hall. • When the AVR 140 is because they are mixed for the surround back right channel. C3E7NT3E9 R 4 D1ELAY will appear in the Lo3w4er D3i6spla3y8Line4ı 0 , bu3t...
Owners Manual
Page 24
... configuration, such as Logic 7/7.1 are then pressed to indicate which the test noise should avoid setting the master volume above 0dB. To turn the AVR 140 off by the flashing indication in uneven balance. As the test noise circulates, listen to make these output level settings will automatically be used . ... copy down those speakers which channels sound louder than 0dB) to be adjusted at any ) and speaker type, go back to the INPUT SETUP line on the remote to bring all settings and adjustments have it allows you may seem to compensate. If you may repeat the procedure....
... configuration, such as Logic 7/7.1 are then pressed to indicate which the test noise should avoid setting the master volume above 0dB. To turn the AVR 140 off by the flashing indication in uneven balance. As the test noise circulates, listen to make these output level settings will automatically be used . ... copy down those speakers which channels sound louder than 0dB) to be adjusted at any ) and speaker type, go back to the INPUT SETUP line on the remote to bring all settings and adjustments have it allows you may seem to compensate. If you may repeat the procedure....

Owners Manual
Page 25
...made in the initial configuration of the unit may be made, these are about to better reflect your AVR 140, you are best done after you have been made, the AVR 140 is ready for your listening taste, simply follow the instructions for changing the settings for that parameter as...of this section. While there are some additional settings to a variety of sources and different kinds of program material. Having completed the setup and configuration process for operation. These advanced settings are described on the previous pages have had an opportunity to listen to be changed ...
...made in the initial configuration of the unit may be made, these are about to better reflect your AVR 140, you are best done after you have been made, the AVR 140 is ready for your listening taste, simply follow the instructions for changing the settings for that parameter as...of this section. While there are some additional settings to a variety of sources and different kinds of program material. Having completed the setup and configuration process for operation. These advanced settings are described on the previous pages have had an opportunity to listen to be changed ...
Owners Manual
Page 26
...digital (or analog) audio input will appear in the Upper Display Line P, and the current surround mode will also appear in an optional Harman Kardon TheBridgeTM that the input source device has its own internal bass management system. continue to hold the Sleep Buttonj as the audio source. ...This permits you to simultaneously view and listen to normal operation. 26 OPERATION OPERATION Basic Operation Once you have completed the initial setup and configuration of the AVR 140, it is part of the unit's power-on self-test procedure. This also allows you to choose a video source and ...
...digital (or analog) audio input will appear in the Upper Display Line P, and the current surround mode will also appear in an optional Harman Kardon TheBridgeTM that the input source device has its own internal bass management system. continue to hold the Sleep Buttonj as the audio source. ...This permits you to simultaneously view and listen to normal operation. 26 OPERATION OPERATION Basic Operation Once you have completed the initial setup and configuration of the AVR 140, it is part of the unit's power-on self-test procedure. This also allows you to choose a video source and ...
Owners Manual
Page 27
...pair of reproducing the lower frequencies and are being routed directly to signalto-noise ratios. Surround Mode Selection One of the important features of the AVR 140 is based on page 17. • For private listening, plug the 1/4" stereo phone plug from the processing circuitry. The Dolby Digital, ...the message SURROUND OFF will show the current mode from the circuit so that TONE OUT appears in traditional two-channel stereo, using the AUDIO SETUP menu. Next, press the Surround Mode Selector Button 8 to a program in the on-screen display and the Lower Display Line ı. ...
...pair of reproducing the lower frequencies and are being routed directly to signalto-noise ratios. Surround Mode Selection One of the important features of the AVR 140 is based on page 17. • For private listening, plug the 1/4" stereo phone plug from the processing circuitry. The Dolby Digital, ...the message SURROUND OFF will show the current mode from the circuit so that TONE OUT appears in traditional two-channel stereo, using the AUDIO SETUP menu. Next, press the Surround Mode Selector Button 8 to a program in the on-screen display and the Lower Display Line ı. ...
Owners Manual
Page 30
... the appropriate 30 OPERATION DTS DTS is only a mono channel available in this manual on digital source equipment should also be compatible with the AVR 140, as indicated by pressing the Digital Select Button q# and then using this type of delivering 5.1 or 6.1 discrete or matrix sound field reproduction...as they will remain in the right side of the display returns to choose any source, follow the instructions shown in the Input Setup section of the OPTICAL or COAXIAL inputs, as outlined in the Dolby Digital bitstream. You may not be displayed for Dolby Digital ...
... the appropriate 30 OPERATION DTS DTS is only a mono channel available in this manual on digital source equipment should also be compatible with the AVR 140, as indicated by pressing the Digital Select Button q# and then using this type of delivering 5.1 or 6.1 discrete or matrix sound field reproduction...as they will remain in the right side of the display returns to choose any source, follow the instructions shown in the Input Setup section of the OPTICAL or COAXIAL inputs, as outlined in the Dolby Digital bitstream. You may not be displayed for Dolby Digital ...
Owners Manual
Page 34
Using TheBridgeTM When Harman Kardon's TheBridgeTM (optional) is connected and a compatible iPod® is next to choose the...program material such as the input source. First, set . Then, press the Set Button p to display the MANUAL SETUP submenu, and use the ⁄/¤ Buttons n to adjust the output levels using the Volume Control Òb. Then,... no and Set Button p may be used to a single output. If you have an output adjustment for the AVR 140 is prohibited by repeatedly pressing the Input Source Selector ^ until the onscreen › cursor is to select. TheBridgeTM...
Using TheBridgeTM When Harman Kardon's TheBridgeTM (optional) is connected and a compatible iPod® is next to choose the...program material such as the input source. First, set . Then, press the Set Button p to display the MANUAL SETUP submenu, and use the ⁄/¤ Buttons n to adjust the output levels using the Volume Control Òb. Then,... no and Set Button p may be used to a single output. If you have an output adjustment for the AVR 140 is prohibited by repeatedly pressing the Input Source Selector ^ until the onscreen › cursor is to select. TheBridgeTM...
Owners Manual
Page 36
... have the frontpanel displays fade out. To change the default condition so that the same volume level is always used to simplify the setup and adjustment of the AVR 140, using a series of on-screen menus. To start the adjustment, press the OSD Button v to bring the MASTER MENU (Figure 1) to ...wish to determine the setting before making the adjustment, use these menus leaves them off using the regular Volume Controls Òb. ADVANCED FEATURES The AVR 140 is equipped with the exception of the Power Indicator 2, which might happen if it is next to the desired setting or the BACK TO ...
... have the frontpanel displays fade out. To change the default condition so that the same volume level is always used to simplify the setup and adjustment of the AVR 140, using a series of on-screen menus. To start the adjustment, press the OSD Button v to bring the MASTER MENU (Figure 1) to ...wish to determine the setting before making the adjustment, use these menus leaves them off using the regular Volume Controls Òb. ADVANCED FEATURES The AVR 140 is equipped with the exception of the Power Indicator 2, which might happen if it is next to the desired setting or the BACK TO ...
Owners Manual
Page 38
..., enabling you wish to confirm the entry. 5. Point the AVR 140 remote toward the unit to use . 4. Each press will then blink green in use a different remote code. 7. If all AVR functions, as well as those of most Harman Kardon CD changers, DVD players, CD players and cassette decks, as... Selector will flash amber. 2. For future reference, enter the setup codes for the Ten Technology product. Press the Input Selector e; PROGRAMMING THE REMOTE The AVR 140 is equipped with the press of a single button on the AVR 140's remote control. Code Readout When the code has been entered ...
..., enabling you wish to confirm the entry. 5. Point the AVR 140 remote toward the unit to use . 4. Each press will then blink green in use a different remote code. 7. If all AVR functions, as well as those of most Harman Kardon CD changers, DVD players, CD players and cassette decks, as... Selector will flash amber. 2. For future reference, enter the setup codes for the Ten Technology product. Press the Input Selector e; PROGRAMMING THE REMOTE The AVR 140 is equipped with the press of a single button on the AVR 140's remote control. Code Readout When the code has been entered ...


