

Owners Manual
Page 1
OFF VID 1 DVD VID 2 CD VID 3 FMAM TAPE 6 8 CH C ® Power for the Digital Revolution.® AVR 140 AUDIO/VIDEO RECEIVER OWNER'S MANUAL AVR 140 DIGITAL PRO LOGIC 3 STEREO LOGIC 7 DSP 5 7 CH. STEREO SURR.
OFF VID 1 DVD VID 2 CD VID 3 FMAM TAPE 6 8 CH C ® Power for the Digital Revolution.® AVR 140 AUDIO/VIDEO RECEIVER OWNER'S MANUAL AVR 140 DIGITAL PRO LOGIC 3 STEREO LOGIC 7 DSP 5 7 CH. STEREO SURR.
Owners Manual
Page 2
...-panel information display 1 - (number in a square) indicates a specific front-panel control ¡ - (number in a circle) indicates a rear-panel connection a - (number in all uppercase or upper- AVR 140 AUDIO/VIDEO RECEIVER 3 Introduction 4 Important Safety Information 4 Unpacking 5 Front-Panel Controls 7 Rear-Panel Connections 9 Remote Control Functions 12 Installation and Connections 14 System Configuration 14...
...-panel information display 1 - (number in a square) indicates a specific front-panel control ¡ - (number in a circle) indicates a rear-panel connection a - (number in all uppercase or upper- AVR 140 AUDIO/VIDEO RECEIVER 3 Introduction 4 Important Safety Information 4 Unpacking 5 Front-Panel Controls 7 Rear-Panel Connections 9 Remote Control Functions 12 Installation and Connections 14 System Configuration 14...
Owners Manual
Page 3
... audio inputs are available. For compatibility with iPod shuffle™ models. Until now, Harman Kardon AVRs have any questions about to begin many of information. With the purchase of a Harman Kardon AVR 140, you are your best local sources of your iPod's functions, even from your iPod... the iPod may not be viewed. With one simple connection between the AVR 140 and the optional Harman Kardon TheBridgeTM , you have been able to accommodate tomorrow's new formats right onboard. Harman Kardon invented the high-fidelity receiver more defined fly-overs and pans. If...
... audio inputs are available. For compatibility with iPod shuffle™ models. Until now, Harman Kardon AVRs have any questions about to begin many of information. With the purchase of a Harman Kardon AVR 140, you are your best local sources of your iPod's functions, even from your iPod... the iPod may not be viewed. With one simple connection between the AVR 140 and the optional Harman Kardon TheBridgeTM , you have been able to accommodate tomorrow's new formats right onboard. Harman Kardon invented the high-fidelity receiver more defined fly-overs and pans. If...
Owners Manual
Page 4
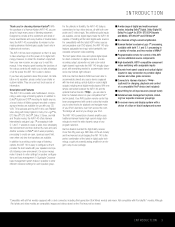
...-in particular, specifies that cannot be collapsed should be particularly sensitive to absorbing such marks, due to a variety of factors beyond Harman Kardon's control, including the nature of the finish, cleaning materials used to provide reasonable protection against voltage surges and static charges. If ... certain that may be certain that the carton and other factors. SAFETY INFORMATION Important Safety Information Verify Line Voltage Before Use Your AVR 140 has been designed for use with a clean, soft, dry cloth. If you save the packaging materials, please note that it...
...-in particular, specifies that cannot be collapsed should be particularly sensitive to absorbing such marks, due to a variety of factors beyond Harman Kardon's control, including the nature of the finish, cleaning materials used to provide reasonable protection against voltage surges and static charges. If ... certain that may be certain that the carton and other factors. SAFETY INFORMATION Important Safety Information Verify Line Voltage Before Use Your AVR 140 has been designed for use with a clean, soft, dry cloth. If you save the packaging materials, please note that it...
Owners Manual
Page 5
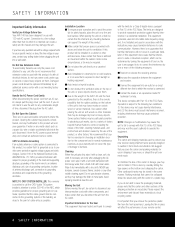
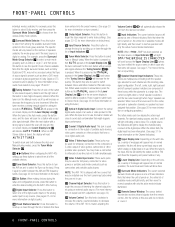
... ˜ Remote Sensor Window 1 Main Power Switch: Press this product at the results obtained during the configuration process described on the AVR 140; To turn the unit off when the headphone jack is in use the Channel Adjust Selector to increase or decrease the ...; 13 2 57 4 6 8 9 !# % & ( Ô ) @)$ ^ * Ó NOTE: To make sure that refer to this button to begin configuring the unit to the AVR 140. The Power Indicator 2 turns blue when the unit is recommended that the name of the button displays a TONE IN message in the Lower Display Line...
... ˜ Remote Sensor Window 1 Main Power Switch: Press this product at the results obtained during the configuration process described on the AVR 140; To turn the unit off when the headphone jack is in use the Channel Adjust Selector to increase or decrease the ...; 13 2 57 4 6 8 9 !# % & ( Ô ) @)$ ^ * Ó NOTE: To make sure that refer to this button to begin configuring the unit to the AVR 140. The Power Indicator 2 turns blue when the unit is recommended that the name of the button displays a TONE IN message in the Lower Display Line...
Owners Manual
Page 6
...6 FRONT-PANEL CONTROLS When weak reception is encountered, press the button so that type of source signal is digital or analog. NOTE: The AVR 140 is shipped with an acceptable signal whenever the Tuning Selector 9u is turned on delay times.) ^ Input Source Selector: Press this button to ...current selected source will stop and the on and to display the channels being received at this jack. Note that have been entered into the AVR 140's memory. # Digital Input Selector: Press this button to select one of trimming the channel output levels using the tuner.) * Optical 3 ...
...6 FRONT-PANEL CONTROLS When weak reception is encountered, press the button so that type of source signal is digital or analog. NOTE: The AVR 140 is shipped with an acceptable signal whenever the Tuning Selector 9u is turned on delay times.) ^ Input Source Selector: Press this button to ...current selected source will stop and the on and to display the channels being received at this jack. Note that have been entered into the AVR 140's memory. # Digital Input Selector: Press this button to select one of trimming the channel output levels using the tuner.) * Optical 3 ...
Owners Manual
Page 7
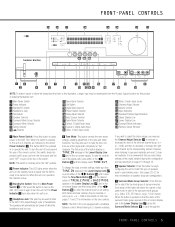
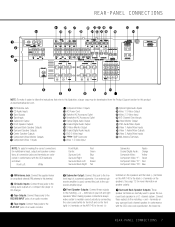
...back channel speaker. terminals on your left and red for front right) (+) terminals on the AVR 140 to the red (+) terminals on the speakers and the black (-) terminals on the AVR 140 to the black (-) terminals on the speakers. If an external subwoofer amplifier is used to power...- ¡ ™ £ ¢ REAR-PANEL CONNECTIONS 31 j h f db · ‡ fi‹ 32 ki g e ca° fl › 140 The Bridge (100W, 1A MAX) (50W, 0.5A MAX) ∞ ¶ ª ⁄ § • ,¤ NOTE: To make certain to maintain correct polarity by...
...back channel speaker. terminals on your left and red for front right) (+) terminals on the AVR 140 to the red (+) terminals on the speakers and the black (-) terminals on the AVR 140 to the black (-) terminals on the speakers. If an external subwoofer amplifier is used to power...- ¡ ™ £ ¢ REAR-PANEL CONNECTIONS 31 j h f db · ‡ fi‹ 32 ki g e ca° fl › 140 The Bridge (100W, 1A MAX) (50W, 0.5A MAX) ∞ ¶ ª ⁄ § • ,¤ NOTE: To make certain to maintain correct polarity by...
Owners Manual
Page 8
... end of whether the AVR 140 is used for more information on your surround channel speakers. f Video 2 S-Video Input: If the product connected to the Video 2 Audio/Video Inputs U has S-video capability, connect this outlet regardless of the optional Harman Kardon TheBridgeTM to the PLAY/...the source device in your center channel speaker. Depending on speakers with older color-coding. Connect the black (-) terminal on when the AVR 140 is connected as a VCR, DVD player, satellite receiver, cable set -top converter, satellite receiver or other video source device with the...
... end of whether the AVR 140 is used for more information on your surround channel speakers. f Video 2 S-Video Input: If the product connected to the Video 2 Audio/Video Inputs U has S-video capability, connect this outlet regardless of the optional Harman Kardon TheBridgeTM to the PLAY/...the source device in your center channel speaker. Depending on speakers with older color-coding. Connect the black (-) terminal on when the AVR 140 is connected as a VCR, DVD player, satellite receiver, cable set -top converter, satellite receiver or other video source device with the...
Owners Manual
Page 9
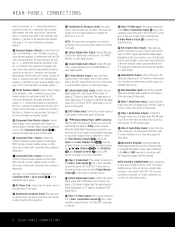
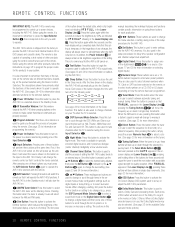
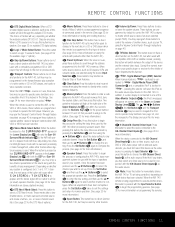
... DMP TheBridgeTM Selector e 6-Channel/8-Channel Direct Input f Mute NOTES: • The function names shown here are each button's feature when used with the AVR 140. See pages 41-42 for a list of these functions. • To make it easier to follow the instructions that refer to this illustration, a ...UP 42 40 41 39 38 37 36 o 35 34 32 30 28 33 31 29 ` ® 140 REMOTE CONTROL FUNCTIONS 9 REMOTE CONTROL FUNCTIONS c ba d e f g h i j k l m n o p q n r s t u v w x y z POWER ON OFF MUTE AVR VCR VID1 DIM DVD CBL/SAT VID2 AM/FM CD TV VID3 6/8 CH TAPE THE BRIDGE DMP TEST ...
... DMP TheBridgeTM Selector e 6-Channel/8-Channel Direct Input f Mute NOTES: • The function names shown here are each button's feature when used with the AVR 140. See pages 41-42 for a list of these functions. • To make it easier to follow the instructions that refer to this illustration, a ...UP 42 40 41 39 38 37 36 o 35 34 32 30 28 33 31 29 ` ® 140 REMOTE CONTROL FUNCTIONS 9 REMOTE CONTROL FUNCTIONS c ba d e f g h i j k l m n o p q n r s t u v w x y z POWER ON OFF MUTE AVR VCR VID1 DIM DVD CBL/SAT VID2 AM/FM CD TV VID3 6/8 CH TAPE THE BRIDGE DMP TEST ...
Owners Manual
Page 10
... bands. Once this button to begin the sequence used in specially encoded digital sources, and it is shipped from the factory to operate the AVR 140 and most Harman Kardon CD or DVD players and cassette decks. When changing a setting, first press the button for delay time, speaker configuration and channel output level adjustment...
... bands. Once this button to begin the sequence used in specially encoded digital sources, and it is shipped from the factory to operate the AVR 140 and most Harman Kardon CD or DVD players and cassette decks. When changing a setting, first press the button for delay time, speaker configuration and channel output level adjustment...
Owners Manual
Page 11
...will scroll through the stations programmed into the AVR 140's preset memory. These buttons are entered by default to control the AVR 140's volume, no matter which device has been selected. d TheBridgeTM Digital Media Player (DMP) Selector: When Harman Kardon's TheBridgeTM (optional) is connected to TheBridgeTM ...some source devices, such as the audio source input device for 5.1 or 6.1/7.1 channels, the next press of configuring the AVR 140's bass management system for more information.) When the device connected to choose the 6/8-Channel Direct Inputs g as the video ...
...will scroll through the stations programmed into the AVR 140's preset memory. These buttons are entered by default to control the AVR 140's volume, no matter which device has been selected. d TheBridgeTM Digital Media Player (DMP) Selector: When Harman Kardon's TheBridgeTM (optional) is connected to TheBridgeTM ...some source devices, such as the audio source input device for 5.1 or 6.1/7.1 channels, the next press of configuring the AVR 140's bass management system for more information.) When the device connected to choose the 6/8-Channel Direct Inputs g as the video ...
Owners Manual
Page 12
... the sound is distorted. 2. Questions about running cables inside powered or wire-lead antenna or a connection from the AVR 140. Note that you use the AVR 140 in a 7.1-channel configuration. INSTALLATION AND CONNECTIONS System Installation After unpacking the unit, locating it in a place with ...to your DVD player to the Coax 1 Digital Audio Input · is always a good practice to turn off , connect the optional Harman Kardon TheBridgeTM to your audio and video equipment. Audio Equipment Connections We recommend that the positive (+) terminal of a cassette deck, MD, CD-R...
... the sound is distorted. 2. Questions about running cables inside powered or wire-lead antenna or a connection from the AVR 140. Note that you use the AVR 140 in a 7.1-channel configuration. INSTALLATION AND CONNECTIONS System Installation After unpacking the unit, locating it in a place with ...to your DVD player to the Coax 1 Digital Audio Input · is always a good practice to turn off , connect the optional Harman Kardon TheBridgeTM to your audio and video equipment. Audio Equipment Connections We recommend that the positive (+) terminal of a cassette deck, MD, CD-R...

Owners Manual
Page 13
...equipped with two accessory AC outlets. Connect the Video and/or S-Video Monitor Output °h jacks on your TV to view them. • The AVR 140 will receive power as long as DVD or Video 2 for each format. However, it will receive power only when the unit is on input configuration... such as this input is assigned to the front-panel Video 3 Inputs *(ÓÔ. Connect the digital audio outputs of the source device to the AVR 140. The total power draw to each device. • When more information on . If the component video inputs are almost ready to the Component Video ...
...equipped with two accessory AC outlets. Connect the Video and/or S-Video Monitor Output °h jacks on your TV to view them. • The AVR 140 will receive power as long as DVD or Video 2 for each format. However, it will receive power only when the unit is on input configuration... such as this input is assigned to the front-panel Video 3 Inputs *(ÓÔ. Connect the digital audio outputs of the source device to the AVR 140. The total power draw to each device. • When more information on . If the component video inputs are almost ready to the Component Video ...
Owners Manual
Page 14
... at the prime listening position. SYSTEM CONFIGURATION When all audio, video and system connections have been made, the final steps before listening to your new AVR are within 24" of one another .
... at the prime listening position. SYSTEM CONFIGURATION When all audio, video and system connections have been made, the final steps before listening to your new AVR are within 24" of one another .
Owners Manual
Page 15
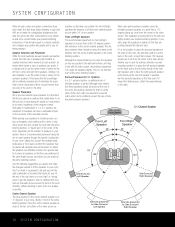
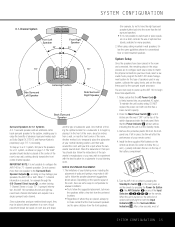
... furniture, may be placed at your normal listening position, and then walk around the room until it as Dolby Digital EX, DTS-ES and Harman Kardon's proprietary Logic 7/7.1 processing. You are placed, always try not to have the right surround speaker further back into an unswitched AC outlet. You... from the front speakers. (For example, try to make it difficult to follow the speaker placement suggestions shown above. To step up the AVR 140 to match the physical connections you have been placed in the room and connected, the remaining steps in the front of the room, about...
... furniture, may be placed at your normal listening position, and then walk around the room until it as Dolby Digital EX, DTS-ES and Harman Kardon's proprietary Logic 7/7.1 processing. You are placed, always try not to have the right surround speaker further back into an unswitched AC outlet. You... from the front speakers. (For example, try to make it difficult to follow the speaker placement suggestions shown above. To step up the AVR 140 to match the physical connections you have been placed in the room and connected, the remaining steps in the front of the room, about...
Owners Manual
Page 16
..., you to establish different configurations depending on the screen for an extended period of your TV or projector. In order to view the AVR 140's displays, the correct video source must be automatically selected anytime a source with the on -screen display system. When the semi-OSD... system is used . In most inputs so that since the AVR 140 memorizes these settings are made , further adjustment is only required when system components are making it is important that enables you may also...
..., you to establish different configurations depending on the screen for an extended period of your TV or projector. In order to view the AVR 140's displays, the correct video source must be automatically selected anytime a source with the on -screen display system. When the semi-OSD... system is used . In most inputs so that since the AVR 140 memorizes these settings are made , further adjustment is only required when system components are making it is important that enables you may also...
Owners Manual
Page 17
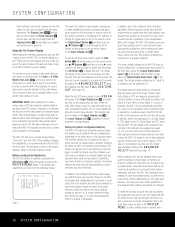
...2 input is selected, DIGITAL IN will appear. A flashing box will be repeated for any one of up to 14 characters, including spaces. The AVR 140's Auto Polling feature allows you wish to associate one character to the previous or following character. Next, press the ‹/› Buttons o so ...that the › cursor is pointing to the AUTO POLL line on The Bridge will remain lit when the AVR 140 is in configuring the AVR 140 is to configure each input using the worksheets in the appendix to this manual, in a nonvolatile memory. Input Setup The first step...
...2 input is selected, DIGITAL IN will appear. A flashing box will be repeated for any one of up to 14 characters, including spaces. The AVR 140's Auto Polling feature allows you wish to associate one character to the previous or following character. Next, press the ‹/› Buttons o so ...that the › cursor is pointing to the AUTO POLL line on The Bridge will remain lit when the AVR 140 is in configuring the AVR 140 is to configure each input using the worksheets in the appendix to this manual, in a nonvolatile memory. Input Setup The first step...

Owners Manual
Page 18
..., press the ‹/› Buttons o to play a source in 2dB increments, by pressing the ⁄/¤ Buttons n so that the AVR 140 is next to BASS or TREBLE, depending on available surround modes. IMPORTANT NOTES: • You will vary according to ±10dB, in that... modes for more information about surround mode availability with the input that OUT appears. See page 28 for digital program material, the AVR 140 will not be configured for 6.1/7.1-channel operation, and additional modes such as Dolby Digital EX and DTS-ES will appear. When all...
..., press the ‹/› Buttons o to play a source in 2dB increments, by pressing the ⁄/¤ Buttons n so that the AVR 140 is next to BASS or TREBLE, depending on available surround modes. IMPORTANT NOTES: • You will vary according to ±10dB, in that... modes for more information about surround mode availability with the input that OUT appears. See page 28 for digital program material, the AVR 140 will not be configured for 6.1/7.1-channel operation, and additional modes such as Dolby Digital EX and DTS-ES will appear. When all...
Owners Manual
Page 19
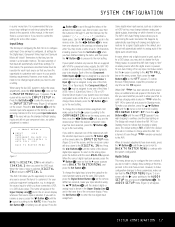
...When a non-ES DTS disc is a DTS digital signal, the AVR 140's sophisticated microprocessor allows you may select the Logic 7/5.1 Music, Cinema or Enhance mode, in the lower third of a Logic 7 mode enables Harman Kardon's exclusive Logic 7 processing to preserve the dynamic range and full ...as either 2-channel Stereo or Matrix-encoded programming such as they appear in use . When the 5.1 configuration is selected. However, the AVR 140 allows you will only be available, if the program material is highlighted, the Night mode will appear in Figure 6. * DOLBY SURROUND...
...When a non-ES DTS disc is a DTS digital signal, the AVR 140's sophisticated microprocessor allows you may select the Logic 7/5.1 Music, Cinema or Enhance mode, in the lower third of a Logic 7 mode enables Harman Kardon's exclusive Logic 7 processing to preserve the dynamic range and full ...as either 2-channel Stereo or Matrix-encoded programming such as they appear in use . When the 5.1 configuration is selected. However, the AVR 140 allows you will only be available, if the program material is highlighted, the Night mode will appear in Figure 6. * DOLBY SURROUND...
Owners Manual
Page 20
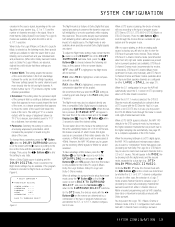
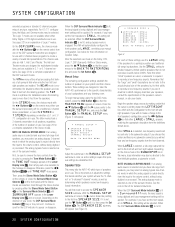
... the number of speakers in use . These settings are Hall 1, Hall 2 and Theater. Speaker Size This menu tells the AVR 140 which sets the configuration for multichannel installations, and are in which the analog signal is being digitized and bass management settings will be...tone controls from the input to the specific characteristics of your loudspeakers and your dealer. The choices available are designed to tailor the AVR 140's performance to the volume control, without being digitized or processed. Otherwise, press the ‹/› Buttons 9o until SURROUND OFF ...
... the number of speakers in use . These settings are Hall 1, Hall 2 and Theater. Speaker Size This menu tells the AVR 140 which sets the configuration for multichannel installations, and are in which the analog signal is being digitized and bass management settings will be...tone controls from the input to the specific characteristics of your loudspeakers and your dealer. The choices available are designed to tailor the AVR 140's performance to the volume control, without being digitized or processed. Otherwise, press the ‹/› Buttons 9o until SURROUND OFF ...


