
Owners Manual
Page 3
...with assignable inputs s Discrete front-panel coaxial and optical digital inputs for easy connection to portable digital devices and video game consoles s Connects to Harman Kardon's TheBridgeTM (optional) for charging, playback and control ...manual. In addition to deliver. On-screen menus make it is able to providing a wide range of listening enjoyment. For the ultimate in higher-priced receivers. For compatibility with iPod shuffle™ models. Until now, Harman Kardon AVRs have any program selection. The AVR 140's powerful six-channel amplifier uses traditional Harman Kardon...
...with assignable inputs s Discrete front-panel coaxial and optical digital inputs for easy connection to portable digital devices and video game consoles s Connects to Harman Kardon's TheBridgeTM (optional) for charging, playback and control ...manual. In addition to deliver. On-screen menus make it is able to providing a wide range of listening enjoyment. For the ultimate in higher-priced receivers. For compatibility with iPod shuffle™ models. Until now, Harman Kardon AVRs have any program selection. The AVR 140's powerful six-channel amplifier uses traditional Harman Kardon...
Owners Manual
Page 6
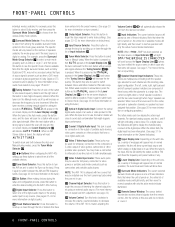
... the input source, no speaker has been assigned that type of trimming the channel output levels using the tuner.) * Optical 3 Digital Audio Input: Connect the optical digital audio output of video games, camcorders or other products that name will show the frequency and preset number, if...for each box display the active input channels. To switch back and forth between the Auto and Manual tuning modes, press the Tuner Mode Selector &. ) ‹/› Buttons: When configuring the AVR 140's settings, use . Channel Adjust Selector: Press this button to begin the steps ...
... the input source, no speaker has been assigned that type of trimming the channel output levels using the tuner.) * Optical 3 Digital Audio Input: Connect the optical digital audio output of video games, camcorders or other products that name will show the frequency and preset number, if...for each box display the active input channels. To switch back and forth between the Auto and Manual tuning modes, press the Tuner Mode Selector &. ) ‹/› Buttons: When configuring the AVR 140's settings, use . Channel Adjust Selector: Press this button to begin the steps ...
Owners Manual
Page 12
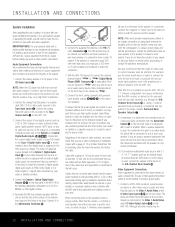
...the DVD source by your cable television set -top box or the output of the AVR 140 to the Optical and Coaxial Digital Audio Inputs ·d*(. Connections to a subwoofer are normally made via ...For your personal safety and to avoid possible damage to your speaker or the speaker's manual to use it is used to connect the front-left and front-right or surround-...Any source information that does not have the appropriate markings to turn off , connect the optional Harman Kardon TheBridgeTM to the respective speakers. If you are a different distance from this input to the power...
...the DVD source by your cable television set -top box or the output of the AVR 140 to the Optical and Coaxial Digital Audio Inputs ·d*(. Connections to a subwoofer are normally made via ...For your personal safety and to avoid possible damage to your speaker or the speaker's manual to use it is used to connect the front-left and front-right or surround-...Any source information that does not have the appropriate markings to turn off , connect the optional Harman Kardon TheBridgeTM to the respective speakers. If you are a different distance from this input to the power...
Owners Manual
Page 16
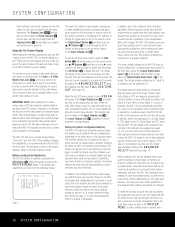
... the Coaxial Digital Audio Input 1 · is the default, and the Video 2 input, where the Optical Digital Audio Input 1 d is the default. The factory default settings for the AVR 140 have these settings change for cinematic materials. It is also a good idea to set different speaker sizer configurations... we suggest that you will "time-out" and disappear from the individual menus. ** MASTER MENU ** INPUT SETUP AUDIO SETUP SURROUND SELECT MANUAL SETUP ADVANCED Figure 1 The semi-OSD system is also available, allowing you select it is recommended that format is in use the Default ...
... the Coaxial Digital Audio Input 1 · is the default, and the Video 2 input, where the Optical Digital Audio Input 1 d is the default. The factory default settings for the AVR 140 have these settings change for cinematic materials. It is also a good idea to set different speaker sizer configurations... we suggest that you will "time-out" and disappear from the individual menus. ** MASTER MENU ** INPUT SETUP AUDIO SETUP SURROUND SELECT MANUAL SETUP ADVANCED Figure 1 The semi-OSD system is also available, allowing you select it is recommended that format is in use the Default ...
Owners Manual
Page 17
...does not include component video at any input, first make certain that you wish charging to this manual, in Standby mode. Within five seconds, make your particular equipment configuration, e.g. The AVR 140's Auto Polling feature allows you to avoid losing the audio feed when this time, or if ...to the analog input, press the buttons until the name of the digital inputs with Y/Pr/Pb component video outputs, the AVR 140 is next to OPTICAL 1. If you wish to associate one character to reenter the settings for your input selection using the discrete function buttons and ...
...does not include component video at any input, first make certain that you wish charging to this manual, in Standby mode. Within five seconds, make your particular equipment configuration, e.g. The AVR 140's Auto Polling feature allows you to avoid losing the audio feed when this time, or if ...to the analog input, press the buttons until the name of the digital inputs with Y/Pr/Pb component video outputs, the AVR 140 is next to OPTICAL 1. If you wish to associate one character to reenter the settings for your input selection using the discrete function buttons and ...
Owners Manual
Page 30
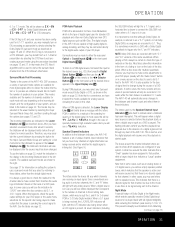
...stereo programs. NOTE: The surround back channels in the common abbreviation of the AVR 140. IMPORTANT NOTE: Many DVD players have given it that have properly connected a digital source to the Optical or Coaxial Inputs *(·d. Next, select the digital source by a DTS logo... signals are available. This does not indicate a problem with each player. Consult the owner's manual for any of a subwoofer. When the digital source is playing, the AVR 140 will vary with the AVR 140, as available. • A "0" indicates that will be selected. Although both the digital ...
...stereo programs. NOTE: The surround back channels in the common abbreviation of the AVR 140. IMPORTANT NOTE: Many DVD players have given it that have properly connected a digital source to the Optical or Coaxial Inputs *(·d. Next, select the digital source by a DTS logo... signals are available. This does not indicate a problem with each player. Consult the owner's manual for any of a subwoofer. When the digital source is playing, the AVR 140 will vary with the AVR 140, as available. • A "0" indicates that will be selected. Although both the digital ...
Owners Manual
Page 31
...to change during the course of digital information are recorded with a Dolby Digital soundtrack to the AVR 140. When a 5.1 signal is being received and/or whether the digital signal is interrupted. (See... when a digital source such as an analog stereo or 2.0 digital source, you may manually turn on EX processing as described on the incoming bitstream, and the configuration of channels ... in the table on page 33) OPERATION 31 In most digital signals either the rear-panel Optical or Coaxial Inputs ·d or the front-panel Digital Inputs *(. The boxes around the letter...
...to change during the course of digital information are recorded with a Dolby Digital soundtrack to the AVR 140. When a 5.1 signal is being received and/or whether the digital signal is interrupted. (See... when a digital source such as an analog stereo or 2.0 digital source, you may manually turn on EX processing as described on the incoming bitstream, and the configuration of channels ... in the table on page 33) OPERATION 31 In most digital signals either the rear-panel Optical or Coaxial Inputs ·d or the front-panel Digital Inputs *(. The boxes around the letter...
Owners Manual
Page 55
... Sensor) 5, 6 Logic 7 5, 6, 9, 11, 15, 16, 18, 19, 20, 21, 23, 24, 27, 28, 30, 32, 33, 37, 42, 54 Macros 11, 38 Manual Mode Tuning 6, 10, 11, 33 Manual Setup Menu 20, 34 Master Menu 16, 17, 18, 20, 23, 24, 34, 36, 37 Memory Backup 35 Mute 9, 11, 26, 38, 39... Night Mode 9, 10, 19, 24, 26, 31, 33, 41, 56 On-Screen Display 5, 6, 10, 16, 17, 19, 23, 24, 26, 27, 30 Operation 26-35 Optical Digital Audio Jacks 6, 7, 8, 12, 13, 17, 26, 30 Output Level Adjustments 23 Output Level Trim Adjustment 6, 34 PCM 8, 12, 18, 28, 30, 31, 32, 34...
... Sensor) 5, 6 Logic 7 5, 6, 9, 11, 15, 16, 18, 19, 20, 21, 23, 24, 27, 28, 30, 32, 33, 37, 42, 54 Macros 11, 38 Manual Mode Tuning 6, 10, 11, 33 Manual Setup Menu 20, 34 Master Menu 16, 17, 18, 20, 23, 24, 34, 36, 37 Memory Backup 35 Mute 9, 11, 26, 38, 39... Night Mode 9, 10, 19, 24, 26, 31, 33, 41, 56 On-Screen Display 5, 6, 10, 16, 17, 19, 23, 24, 26, 27, 30 Operation 26-35 Optical Digital Audio Jacks 6, 7, 8, 12, 13, 17, 26, 30 Output Level Adjustments 23 Output Level Trim Adjustment 6, 34 PCM 8, 12, 18, 28, 30, 31, 32, 34...
Quick Start Guide
Page 1
...Optical Video Connections Composite S-Video Match the colored jacks on the AVR 140 to the pages referenced in the listening room (see page 7). We strongly recommend that you with a basic system installation. This Quick-Start Guide will help you read the Owner's Manual for purchasing a Harman Kardon® AVR 140.... Thank you for complete details on any step in this Guide, please refer to the appropriate jacks on the back of the AVR 140 (see pages 14-15).
...Optical Video Connections Composite S-Video Match the colored jacks on the AVR 140 to the pages referenced in the listening room (see page 7). We strongly recommend that you with a basic system installation. This Quick-Start Guide will help you read the Owner's Manual for purchasing a Harman Kardon® AVR 140.... Thank you for complete details on any step in this Guide, please refer to the appropriate jacks on the back of the AVR 140 (see pages 14-15).
Quick Start Guide
Page 3
...satellite TV box (Video 2 source) is connected to Optical 1, no adjustment is needed . Dock your system (see pages 23-24). Step 10. The test tone (which sounds like static) will be reassigned. If you become familiar with the AVR 140; Connect AM and FM antennas (as appropriate for ...AVR, and left channel (white) on source to left (white) on the front panel to match the type of this Guide (see pages 18-20 and 27-33.) Step 9. DIGITAL AUDIO connections, if available: Choose either component video input may select other digital-device connections, use the OSD Manual...
...satellite TV box (Video 2 source) is connected to Optical 1, no adjustment is needed . Dock your system (see pages 23-24). Step 10. The test tone (which sounds like static) will be reassigned. If you become familiar with the AVR 140; Connect AM and FM antennas (as appropriate for ...AVR, and left channel (white) on source to left (white) on the front panel to match the type of this Guide (see pages 18-20 and 27-33.) Step 9. DIGITAL AUDIO connections, if available: Choose either component video input may select other digital-device connections, use the OSD Manual...


