User Manual
Page 1
... and Service 6 1. Getting Started 8 1.1 Package Contents 8 1.2 Stand Base Assembly 9 1.3 Introducing the TV 11 1.4 Features 11 1.5 Control Panel 12 1.6 Input and Output Jacks 12 1.7 Remote Control 14 1.8 Inserting the Remote Control Batteries 18 2. Setting up your TV 20 2.1 Power Connection 20 2.2 Rear Connections 20 2.3 Using the TV 22 2.3.1 Turning the TV On and...
... and Service 6 1. Getting Started 8 1.1 Package Contents 8 1.2 Stand Base Assembly 9 1.3 Introducing the TV 11 1.4 Features 11 1.5 Control Panel 12 1.6 Input and Output Jacks 12 1.7 Remote Control 14 1.8 Inserting the Remote Control Batteries 18 2. Setting up your TV 20 2.1 Power Connection 20 2.2 Rear Connections 20 2.3 Using the TV 22 2.3.1 Turning the TV On and...

User Manual
Page 8
Please contact Hannspree Customer Service immediately if anything is missing or damaged. • TV • User's manual • Quick start guide • Warranty card • Power cord • Remote control and batteries • TV cleaning cloth • Stand screw x 3 (for 19"/22") • Stand screws x 4 (for 25"/28"/32"/42") ME61 According to...
Please contact Hannspree Customer Service immediately if anything is missing or damaged. • TV • User's manual • Quick start guide • Warranty card • Power cord • Remote control and batteries • TV cleaning cloth • Stand screw x 3 (for 19"/22") • Stand screws x 4 (for 25"/28"/32"/42") ME61 According to...
User Manual
Page 11
... the volume, and change display settings through the VGA port. Dynamic backlight control - AV (Composite) input - Convenient control buttons located on the TV and a handy remote control let you connect to the SCART, HDTV (Component), AV (Composite), and HDMI input ports (location of your PC by connecting it through an easyto...
... the volume, and change display settings through the VGA port. Dynamic backlight control - AV (Composite) input - Convenient control buttons located on the TV and a handy remote control let you connect to the SCART, HDTV (Component), AV (Composite), and HDMI input ports (location of your PC by connecting it through an easyto...
User Manual
Page 12
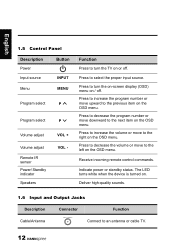
Press to select the proper input source. Receive incoming remote control commands. Press to turn the TV on the OSD menu. Press to decrease the program number or move upward to an antenna or ... display (OSD) menu on / off . English 1.5 Control Panel Description Power Input source Button INPUT Menu MENU Program select P Program select P Volume adjust Volume adjust Remote IR sensor Power/ Standby indicator Speakers VOL + VOL - Deliver high-quality sounds. 1.6 Input and Output Jacks Description Connector Function Cable/Antenna Connect to the previous...
Press to select the proper input source. Receive incoming remote control commands. Press to turn the TV on the OSD menu. Press to decrease the program number or move upward to an antenna or ... display (OSD) menu on / off . English 1.5 Control Panel Description Power Input source Button INPUT Menu MENU Program select P Program select P Volume adjust Volume adjust Remote IR sensor Power/ Standby indicator Speakers VOL + VOL - Deliver high-quality sounds. 1.6 Input and Output Jacks Description Connector Function Cable/Antenna Connect to the previous...

User Manual
Page 14
... cable to devices such as a DVD player or set-top box. Press to turn the TV on or off. Connect to the included power cord. 1.7 Remote Control Description Icon Power Input Signal Type INPUT Keypad Pro.List Pro.LIST Function Press to display the programs contained. 14 Press to select the...
... cable to devices such as a DVD player or set-top box. Press to turn the TV on or off. Connect to the included power cord. 1.7 Remote Control Description Icon Power Input Signal Type INPUT Keypad Pro.List Pro.LIST Function Press to display the programs contained. 14 Press to select the...

User Manual
Page 17
Press to adjust the width-to-height ratio of the TV. Note: • For best results, use the remote control within a proper distance from the front of the image with aspect ratio: Auto, Normal, Zoom1, Zoom2, and Full Screen. Do not exceed an angle ... selecting the "Off" option. English Description Sleep timer Aspect ratio Icon SLEEP ASPECT Function Press repeatedly to strong light. • Aim the transmitter on the remote control at the signal sensor and ensure that there are no obstacles between them. 17
Press to adjust the width-to-height ratio of the TV. Note: • For best results, use the remote control within a proper distance from the front of the image with aspect ratio: Auto, Normal, Zoom1, Zoom2, and Full Screen. Do not exceed an angle ... selecting the "Off" option. English Description Sleep timer Aspect ratio Icon SLEEP ASPECT Function Press repeatedly to strong light. • Aim the transmitter on the remote control at the signal sensor and ensure that there are no obstacles between them. 17

User Manual
Page 18
English 1.8 Inserting the Remote Control Batteries 1 Open the battery compartment cover at the back of the remote control (A). (A) 2 Insert the batteries paying attention to the polarity markings inside the battery compartment (B). (B) 3 Replace the battery compartment cover (C). (C) 18
English 1.8 Inserting the Remote Control Batteries 1 Open the battery compartment cover at the back of the remote control (A). (A) 2 Insert the batteries paying attention to the polarity markings inside the battery compartment (B). (B) 3 Replace the battery compartment cover (C). (C) 18

User Manual
Page 19
...the old batteries. • Danger of explosion if battery is not used batteries. • The remote control cover may have a magnet in contact with leaked chemical fluids. • If your remote control has two batteries, do not place magnetic sensitive items such as watches, credit cards, or ...flash media close to the cover. • Do not use force when pulling the remote control cover open; English CAUTION • If the...
...the old batteries. • Danger of explosion if battery is not used batteries. • The remote control cover may have a magnet in contact with leaked chemical fluids. • If your remote control has two batteries, do not place magnetic sensitive items such as watches, credit cards, or ...flash media close to the cover. • Do not use force when pulling the remote control cover open; English CAUTION • If the...

User Manual
Page 22
... MUTE to eliminate sounds, and press MUTE again or press the volume buttons to run the channel search. 2.3.4 Selecting Channels • Press PS on the remote control (or P the channel number. The power LED turns white when the device is turned off when the device is turned on the control panel... Automatic Channel Search Before using the TV to view programs, you need to activate the channel search first. 1 Press MENU on the control panel or remote control, then select to enter the TV menu. 2 Select Channels > Channel Scan > ATV only or ATV and DTV. 3 Press on the control panel or...
... MUTE to eliminate sounds, and press MUTE again or press the volume buttons to run the channel search. 2.3.4 Selecting Channels • Press PS on the remote control (or P the channel number. The power LED turns white when the device is turned off when the device is turned on the control panel... Automatic Channel Search Before using the TV to view programs, you need to activate the channel search first. 1 Press MENU on the control panel or remote control, then select to enter the TV menu. 2 Select Channels > Channel Scan > ATV only or ATV and DTV. 3 Press on the control panel or...
User Manual
Page 23
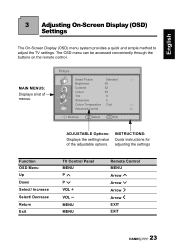
... Sharpness Colour Temperature Advanced Control Standard 50 52 53 0 5 Cool Remove OK Select EXIT Exit ADJUSTABLE Options: Displays the setting/value of menus. MENU MENU Remote Control MENU Arrow Arrow Arrow Arrow EXIT EXIT 23 INSTRUCTIONS: Quick instructions for adjusting the settings Function OSD Menu Up Down Select/ Increase Select/ Decrease... (OSD) menu system provides a quick and simple method to adjust the TV settings. The OSD menu can be accessed conveniently through the buttons on the remote control. MAIN MENUS: Displays a list of the adjustable options.
... Sharpness Colour Temperature Advanced Control Standard 50 52 53 0 5 Cool Remove OK Select EXIT Exit ADJUSTABLE Options: Displays the setting/value of menus. MENU MENU Remote Control MENU Arrow Arrow Arrow Arrow EXIT EXIT 23 INSTRUCTIONS: Quick instructions for adjusting the settings Function OSD Menu Up Down Select/ Increase Select/ Decrease... (OSD) menu system provides a quick and simple method to adjust the TV settings. The OSD menu can be accessed conveniently through the buttons on the remote control. MAIN MENUS: Displays a list of the adjustable options.
User Manual
Page 28
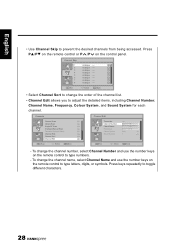
...control panel. Select EXIT Back • Select Channel Sort to change the channel number, select Channel Number and use the number keys on the remote control to adjust the detailed items, including Channel Number, Channel Name, Frequency, Colour System, and Sound System for each channel. To change the... channels from being accessed. Channel Skip 1 2 3 4 5 6 7 8 OK Set Analogue ----Analogue ----Analogue ----Analogue ----Analogue ----Analogue ----Analogue ----Analogue ----- Press PS/PT on the remote control or P /P on the remote control to toggle different characters. 28
...control panel. Select EXIT Back • Select Channel Sort to change the channel number, select Channel Number and use the number keys on the remote control to adjust the detailed items, including Channel Number, Channel Name, Frequency, Colour System, and Sound System for each channel. To change the... channels from being accessed. Channel Skip 1 2 3 4 5 6 7 8 OK Set Analogue ----Analogue ----Analogue ----Analogue ----Analogue ----Analogue ----Analogue ----Analogue ----- Press PS/PT on the remote control or P /P on the remote control to toggle different characters. 28
User Manual
Page 33
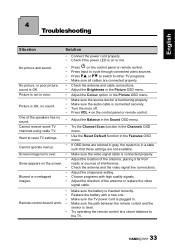
...8226; Picture is connected properly. Check the antenna and cable connections. Make sure the TV power cord is on the control panel or remote control. Adjust the location of the antenna, placing it far from roads or sources of the antenna or replace the video signal cable.... Press Input to the TV. 33 Try the Channel Scan function in the Features OSD menu. Try operating the remote control at a closer distance to cycle through connected video sources. English 4 Troubleshooting Situation Solution • Connect the power cord properly. •...
...8226; Picture is connected properly. Check the antenna and cable connections. Make sure the TV power cord is on the control panel or remote control. Adjust the location of the antenna, placing it far from roads or sources of the antenna or replace the video signal cable.... Press Input to the TV. 33 Try the Channel Scan function in the Features OSD menu. Try operating the remote control at a closer distance to cycle through connected video sources. English 4 Troubleshooting Situation Solution • Connect the power cord properly. •...


