
User Manual
Page 1
... 6 Getting Started 8 Package Contents 8 Introducing the TV 9 Features 9 Control Panel 10 Input and Output Jacks 10 Remote Control 12 Inserting the Remote Control Batteries 16 Setting up your TV 18 Basic Connections 18 Power Connection 18 Connecting an Antenna or Cable TV 18 Connecting External Devices 19 Connecting External Earphones 19...
... 6 Getting Started 8 Package Contents 8 Introducing the TV 9 Features 9 Control Panel 10 Input and Output Jacks 10 Remote Control 12 Inserting the Remote Control Batteries 16 Setting up your TV 18 Basic Connections 18 Power Connection 18 Connecting an Antenna or Cable TV 18 Connecting External Devices 19 Connecting External Earphones 19...

User Manual
Page 2
English Table of Contents Adjusting the Volume 25 Adjusting On-Screen Display (OSD) Settings 26 OSD Setting Menus 27 Adjusting Picture Settings 27 Adjusting Sound Settings 28 Adjusting Channel Settings 28 Adjusting DTV Settings 30 Adjusting PC Settings 33 Adjusting Setup Settings 34 Troubleshooting 36 Support Timing 37 Specifications 38 Dissembling the stand base 39 Using the Cable Organizer 40 2
English Table of Contents Adjusting the Volume 25 Adjusting On-Screen Display (OSD) Settings 26 OSD Setting Menus 27 Adjusting Picture Settings 27 Adjusting Sound Settings 28 Adjusting Channel Settings 28 Adjusting DTV Settings 30 Adjusting PC Settings 33 Adjusting Setup Settings 34 Troubleshooting 36 Support Timing 37 Specifications 38 Dissembling the stand base 39 Using the Cable Organizer 40 2

User Manual
Page 6
... and using or operating your TV. This instruction manual is designed to assist you in setting up , using the TV. however, no guarantee is given to the correctness of such damages in advance. Your new TV will allow you to enjoy ... or consequential damages arising from any defect or omission in this manual is subject to change without notice. To the extent allowed by applicable law, Hannspree, Inc. ("Hannspree") shall not be liable for purchasing a Hannspree Liquid Crystal Display Television (LCD TV).
... and using or operating your TV. This instruction manual is designed to assist you in setting up , using the TV. however, no guarantee is given to the correctness of such damages in advance. Your new TV will allow you to enjoy ... or consequential damages arising from any defect or omission in this manual is subject to change without notice. To the extent allowed by applicable law, Hannspree, Inc. ("Hannspree") shall not be liable for purchasing a Hannspree Liquid Crystal Display Television (LCD TV).

User Manual
Page 9
... model. 9 The built-in stereo speakers provide full rich sound and a convenient audio output port lets you change channels, adjust the volume, and change display settings through the VGA port. For more information, please refer to the manufacturer's user manual or the Quick Start Guide of these ports depends on model...
... model. 9 The built-in stereo speakers provide full rich sound and a convenient audio output port lets you change channels, adjust the volume, and change display settings through the VGA port. For more information, please refer to the manufacturer's user manual or the Quick Start Guide of these ports depends on model...
User Manual
Page 11
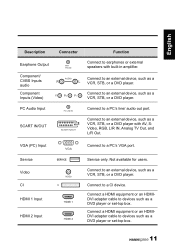
... Input SCART IN/OUT PC LINE IN SCART IN/OUT Connect to a PC's VGA port. Connect to an external device, such as a DVD player or set -top box. Connect a HDMI equipment or an HDMIDVI adapter cable to an external device, such as a DVD player or... set -top box. 11 Connect to devices such as a VCR, STB, or a DVD player. Service only. Connect to devices such as a VCR, STB, or a DVD player ...
... Input SCART IN/OUT PC LINE IN SCART IN/OUT Connect to a PC's VGA port. Connect to an external device, such as a DVD player or set -top box. Connect a HDMI equipment or an HDMIDVI adapter cable to an external device, such as a DVD player or... set -top box. 11 Connect to devices such as a VCR, STB, or a DVD player. Service only. Connect to devices such as a VCR, STB, or a DVD player ...

User Manual
Page 14
...-height ratio of the image with aspect ratio: AUTO, Full, Normal, Panorama, Zoom, Subtitle and Wide. 14 Press to adjust the width-to set the sleep timer (15, 30, 45, 60, 90 or 120 minutes). Favorite channel FAV. Freeze Sleep timer Aspect ratio FREEZE SLEEP ASPECT Press to... pause a video frame on-screen. (Programmable in the teletext mode only) Press continuously to toggle through all the picture setting: Vivid, Soft, User, Standard. Cancel the timer by selecting the Sleep Off option. With a DTV source, press to select channels. Press to...
...-height ratio of the image with aspect ratio: AUTO, Full, Normal, Panorama, Zoom, Subtitle and Wide. 14 Press to adjust the width-to set the sleep timer (15, 30, 45, 60, 90 or 120 minutes). Favorite channel FAV. Freeze Sleep timer Aspect ratio FREEZE SLEEP ASPECT Press to... pause a video frame on-screen. (Programmable in the teletext mode only) Press continuously to toggle through all the picture setting: Vivid, Soft, User, Standard. Cancel the timer by selecting the Sleep Off option. With a DTV source, press to select channels. Press to...

User Manual
Page 18
... may vary by model or region. • If you cannot receive channels after connecting to TV/DTV jack on the rear of the TV. English 2 Setting up your TV 2.1 Basic Connections 2.1.1 Power Connection 1 Connect the power cord to the AC IN input jack on the rear of the TV. 2 Insert the...
... may vary by model or region. • If you cannot receive channels after connecting to TV/DTV jack on the rear of the TV. English 2 Setting up your TV 2.1 Basic Connections 2.1.1 Power Connection 1 Connect the power cord to the AC IN input jack on the rear of the TV. 2 Insert the...

User Manual
Page 20
Only a set of the audio ports can be selected when connecting AV devices. 20 English 2.2.2 Connecting to AV Devices The following diagram illustrates how to connect the ...
Only a set of the audio ports can be selected when connecting AV devices. 20 English 2.2.2 Connecting to AV Devices The following diagram illustrates how to connect the ...

User Manual
Page 26
... West AUTO AUTO Full HDMI Off 60 Secs Menu Return Function OSD Menu Up Down Select/ Increase Select/ Decrease Return 26 ADJUSTABLE Options: Displays the setting/value of the adjustable options. MENU Remote Control MENU Arrow Arrow Arrow Arrow MENU 3 Adjusting On-Screen Display (OSD...
... West AUTO AUTO Full HDMI Off 60 Secs Menu Return Function OSD Menu Up Down Select/ Increase Select/ Decrease Return 26 ADJUSTABLE Options: Displays the setting/value of the adjustable options. MENU Remote Control MENU Arrow Arrow Arrow Arrow MENU 3 Adjusting On-Screen Display (OSD...

User Manual
Page 27
.... The Picture menu can be used to adjust the Picture Mode, Brightness, Contrast, Sharpness, Colour, Hue, Backlight, and Colour Temp settings. • The Picture Mode can be set to Standard, Vivid, Soft, or User. • The Brightness, Contrast, Colour, and Hue (NTSC only) can be adjusted by... exit the OSD menu. Press / to adjust the scales from 0-9. • The Backlight helps to Standard, Warm, or Cool. English 3.1 OSD Setting Menus Follow the instructions indicated on the down the backlight in dark scenes, generating a deeper black color. Press PS/PTon the control panel or / arrow...
.... The Picture menu can be used to adjust the Picture Mode, Brightness, Contrast, Sharpness, Colour, Hue, Backlight, and Colour Temp settings. • The Picture Mode can be set to Standard, Vivid, Soft, or User. • The Brightness, Contrast, Colour, and Hue (NTSC only) can be adjusted by... exit the OSD menu. Press / to adjust the scales from 0-9. • The Backlight helps to Standard, Warm, or Cool. English 3.1 OSD Setting Menus Follow the instructions indicated on the down the backlight in dark scenes, generating a deeper black color. Press PS/PTon the control panel or / arrow...

User Manual
Page 28
...be used to move the scales from 0-100. Note: The options available on the OSD may vary depending on the input signal source. 3.4 Adjusting Channel Settings 1 Press MENU to enter the OSD Main Menu screen. 2 Press to select the Channel menu. 3 Press to enter the Channel menu. 4 Press .../ to select an item. 5 Press / adjust the scales or options settings. English 3.3 Adjusting Sound Settings 1 Press MENU to enter the OSD Main Menu screen. 2 Press to select the Audio menu. 3 Press to enter the Audio menu. 4 Press / ...
...be used to move the scales from 0-100. Note: The options available on the OSD may vary depending on the input signal source. 3.4 Adjusting Channel Settings 1 Press MENU to enter the OSD Main Menu screen. 2 Press to select the Channel menu. 3 Press to enter the Channel menu. 4 Press .../ to select an item. 5 Press / adjust the scales or options settings. English 3.3 Adjusting Sound Settings 1 Press MENU to enter the OSD Main Menu screen. 2 Press to select the Audio menu. 3 Press to enter the Audio menu. 4 Press / ...

User Manual
Page 29
....55 MHz 144.95 MHz Menu Exit Menu Exit • Press / to adjust the channel frequency in Fine Tune. • The AFC Lock can be set to AUTO, BG, DK, I, L, and L'. • Select Auto Search to activate the automatic TV channel search. English • The Area can be..., Netherlands, and Other. • Channel can be used to select channels by pressing / . • The Colour System can be set to AUTO, PAL, and SECAM. • The Sound System can be set to On or Off. • Press to enter the Channel Edit menu, the Channel Editor allows you to edit the...
....55 MHz 144.95 MHz Menu Exit Menu Exit • Press / to adjust the channel frequency in Fine Tune. • The AFC Lock can be set to AUTO, BG, DK, I, L, and L'. • Select Auto Search to activate the automatic TV channel search. English • The Area can be..., Netherlands, and Other. • Channel can be used to select channels by pressing / . • The Colour System can be set to AUTO, PAL, and SECAM. • The Sound System can be set to On or Off. • Press to enter the Channel Edit menu, the Channel Editor allows you to edit the...

User Manual
Page 30
... control to move the channels. - Press the Blue button on the remote control to lock the channels. - Note: The Channel Settings are only available in TV mode. 3.5 Adjusting DTV Settings 1 Press MENU to enter the OSD Main Menu screen. 2 Press to select the DTV menu entry. 3 Press to enter the...name you to open Channel Editor. The DTV menu can be used to exit the OSD menu. - English - To change the scales or options settings. Fav. Press the Green button on the remote control to delete the channels. - Press the Yellow button on the remote control to swap the ...
... control to move the channels. - Press the Blue button on the remote control to lock the channels. - Note: The Channel Settings are only available in TV mode. 3.5 Adjusting DTV Settings 1 Press MENU to enter the OSD Main Menu screen. 2 Press to select the DTV menu entry. 3 Press to enter the...name you to open Channel Editor. The DTV menu can be used to exit the OSD menu. - English - To change the scales or options settings. Fav. Press the Green button on the remote control to delete the channels. - Press the Yellow button on the remote control to swap the ...

User Manual
Page 31
.... 31 Parental Lock Enter Old Password Enter New Password Confirm New Password 0 9 Press 0 to 9 Menu Cancel Note: The original password is set to Off, English, France, Germany, Italy, Spain, Portugal, Denmark, and Czech. • The Channel Organizer supports channel swap function. To select...; The Channel Management selections include Channel Organizer, Channel Sorting, Channel Grouping, and Delete All TV Channels. • The Area can be set to Germany, UK, Italy, Spain, Portugal, France, Hungary, Poland, Netherlands and Other. • Select Auto Search to activate the automatic TV...
.... 31 Parental Lock Enter Old Password Enter New Password Confirm New Password 0 9 Press 0 to 9 Menu Cancel Note: The original password is set to Off, English, France, Germany, Italy, Spain, Portugal, Denmark, and Czech. • The Channel Organizer supports channel swap function. To select...; The Channel Management selections include Channel Organizer, Channel Sorting, Channel Grouping, and Delete All TV Channels. • The Area can be set to Germany, UK, Italy, Spain, Portugal, France, Hungary, Poland, Netherlands and Other. • Select Auto Search to activate the automatic TV...

User Manual
Page 32
... Parental Rating from 4 to Normal or Hearing Impaired. • The Time selection includes GMT Offset and Summer Time. - English • The Subtitle Type can be set to 18 or Off. 32 DTV Time CI Parental Rating Move Select Menu Return - Press / to adjust the GMT Offset to On or Off. System...
... Parental Rating from 4 to Normal or Hearing Impaired. • The Time selection includes GMT Offset and Summer Time. - English • The Subtitle Type can be set to 18 or Off. 32 DTV Time CI Parental Rating Move Select Menu Return - Press / to adjust the GMT Offset to On or Off. System...

User Manual
Page 33
The PC menu can be used to adjust the Auto Adjust, H Position, V Position, Phase and Clock settings. • The Auto Adjust can be set to On or Off. • The H Position and V Position can be adjusted by pressing / to move the scales from -16 to 16. • The Clock ... H Position V Position Phase Clock Off 0 0 0 0 Move Select Menu Return 7 Press MENU to return to the PC menu. 8 Press MENU to 31. 33 English 3.6 Adjusting PC Settings 1 Press INPUT and select PC as the signal type. 2 Press MENU to enter the OSD Main Menu screen. 3 Press to select the PC menu. 4 Press...
The PC menu can be used to adjust the Auto Adjust, H Position, V Position, Phase and Clock settings. • The Auto Adjust can be set to On or Off. • The H Position and V Position can be adjusted by pressing / to move the scales from -16 to 16. • The Clock ... H Position V Position Phase Clock Off 0 0 0 0 Move Select Menu Return 7 Press MENU to return to the PC menu. 8 Press MENU to 31. 33 English 3.6 Adjusting PC Settings 1 Press INPUT and select PC as the signal type. 2 Press MENU to enter the OSD Main Menu screen. 3 Press to select the PC menu. 4 Press...

User Manual
Page 34
... Time Move Select English West AUTO AUTO Full HDMI Off 60 Secs Menu Return 6 Press MENU to return to the Setting menu entry. 7 Press MENU to do Channel auto search. 34 The Setting menu can be used to adjust the Language, TT Language, SCART, HDMI Scan Info, Aspect, HDMI Audio, X-Contrast, OSD... provided via a HDMI connection) • The X-Contrast can be set to On or Off. • OSD Time can be set to 10 Secs, 20 Secs, 30 Secs, and 60 Secs. • Select Reset Setting to reset settings to the defaults. • Background can be set to Blue or Off. • Select Initial Setup to exit...
... Time Move Select English West AUTO AUTO Full HDMI Off 60 Secs Menu Return 6 Press MENU to return to the Setting menu entry. 7 Press MENU to do Channel auto search. 34 The Setting menu can be used to adjust the Language, TT Language, SCART, HDMI Scan Info, Aspect, HDMI Audio, X-Contrast, OSD... provided via a HDMI connection) • The X-Contrast can be set to On or Off. • OSD Time can be set to 10 Secs, 20 Secs, 30 Secs, and 60 Secs. • Select Reset Setting to reset settings to the defaults. • Background can be set to Blue or Off. • Select Initial Setup to exit...

User Manual
Page 35
The following pictures are settings for HDMI/1080P, please see below for details. English • The Aspect mode selections include Auto, Full, Wide, Normal, Subtitle, Zoom, and Panorama. Type 4:3 16:9 Content AUTO Full Wide Nomal Subtitle Zoom Panorama Note: The options available on the OSD may vary depending on the input signal source. 35
The following pictures are settings for HDMI/1080P, please see below for details. English • The Aspect mode selections include Auto, Full, Wide, Normal, Subtitle, Zoom, and Panorama. Type 4:3 16:9 Content AUTO Full Wide Nomal Subtitle Zoom Panorama Note: The options available on the OSD may vary depending on the input signal source. 35

User Manual
Page 36
...functioning properly. Check the antenna and cable connections. Make sure the audio cable is inserted correctly. Turn the mute off. Adjust the sharpness setting. Make sure the battery is connected securely. Want to cycle through connected video sources. Press Input to reset TV... settings. • Cannot operate menus. • Screen image turns over. • • Snow appears on the screen. • • Blurred or overlapped • images. • ...
...functioning properly. Check the antenna and cable connections. Make sure the audio cable is inserted correctly. Turn the mute off. Adjust the sharpness setting. Make sure the battery is connected securely. Want to cycle through connected video sources. Press Input to reset TV... settings. • Cannot operate menus. • Screen image turns over. • • Snow appears on the screen. • • Blurred or overlapped • images. • ...


