

User Manual
Page 1
... 23 2.2.7 Connecting USB 23 2.2.8 Connecting a VCR/ STB/ DVD Player using SCART . 24 2.3 Using the TV 25 2.3.1 Turning the TV On and Off 25 2.3.2 Switching Source Signals 25 2.3.3 Performing an Automatic Channel Search 25 2.3.4 Selecting Channels 25 2.3.5 Adjusting the Volume 25 3. Adjusting On-Screen Display (OSD) Settings 26 3.1 OSD Setting Menus 27 3.2 Adjusting Picture Settings 27 1 English...
... 23 2.2.7 Connecting USB 23 2.2.8 Connecting a VCR/ STB/ DVD Player using SCART . 24 2.3 Using the TV 25 2.3.1 Turning the TV On and Off 25 2.3.2 Switching Source Signals 25 2.3.3 Performing an Automatic Channel Search 25 2.3.4 Selecting Channels 25 2.3.5 Adjusting the Volume 25 3. Adjusting On-Screen Display (OSD) Settings 26 3.1 OSD Setting Menus 27 3.2 Adjusting Picture Settings 27 1 English...

User Manual
Page 25
... remote control to decrease the volume. 3 Press MUTE to eliminate sounds, and press MUTE again or press the volume buttons to restore the original volume. 25
... remote control to decrease the volume. 3 Press MUTE to eliminate sounds, and press MUTE again or press the volume buttons to restore the original volume. 25
User Manual
Page 28
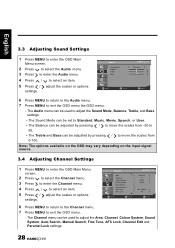
Channel Area Channel Colour System Sound System Auto Search Manual Search Fine Tune AFC Lock Move Select Germany 15 AUTO AUTO 241.25 MHz Off Menu Return 6 Press MENU to return to the Channel menu. 7 Press MENU to select an item. 5 Press / adjust the scales or options settings. ...
Channel Area Channel Colour System Sound System Auto Search Manual Search Fine Tune AFC Lock Move Select Germany 15 AUTO AUTO 241.25 MHz Off Menu Return 6 Press MENU to return to the Channel menu. 7 Press MENU to select an item. 5 Press / adjust the scales or options settings. ...

User Manual
Page 30
... Menu Return - Press the Left / Right button on the remote control to rename the channels. - Channel Editor Channel Frequency 1 223.25 2 223.25 3 235.30 4 241.30 5 259.25 6 271.25 7 277.25 8 283.25 9 289.30 10 301.30 Name Skip Fav. English - To change the scales or options settings. 6 Press MENU to return to...
... Menu Return - Press the Left / Right button on the remote control to rename the channels. - Channel Editor Channel Frequency 1 223.25 2 223.25 3 235.30 4 241.30 5 259.25 6 271.25 7 277.25 8 283.25 9 289.30 10 301.30 Name Skip Fav. English - To change the scales or options settings. 6 Press MENU to return to...

User Manual
Page 39
... on the back and center of the stand base. *Installing the LCD TV requires special skill that should not attempt to do the work themselves. Hannspree bears no responsibility for improper mounting or mounting that results in accident or injury. English 7 Dissembling the stand base 1 Disconnect all the cables and cords.... • The pitch of the mounting holes is 100mm horizontally and 100mm vertically. • The screws type required is metric: M4, 8 mm length. • The 25" TV stand base can be screwed on a table or a hard surface using the hole on the back of the TV.
... on the back and center of the stand base. *Installing the LCD TV requires special skill that should not attempt to do the work themselves. Hannspree bears no responsibility for improper mounting or mounting that results in accident or injury. English 7 Dissembling the stand base 1 Disconnect all the cables and cords.... • The pitch of the mounting holes is 100mm horizontally and 100mm vertically. • The screws type required is metric: M4, 8 mm length. • The 25" TV stand base can be screwed on a table or a hard surface using the hole on the back of the TV.
