

User Manual
Page 2
... by the manufacturer. 14) Use only with the cart, stand, tripod, bracket, or table specified by the manufacturer, or sold with the LCD TV. Servicing may be sufficient level to constitute a risk of electric shock to persons. English Explanation of WARNING Symbols Dangerous Voltage: The lightning flash with ... the safety purpose of the product that produce heat. 9) Do not remove the back cover. The third prong is used, use this LCD TV during lightening storms or when unused for replacement of the obsolete outlet. 11) Protect the power cord from moisture, excessive dust and any heat ...
... by the manufacturer. 14) Use only with the cart, stand, tripod, bracket, or table specified by the manufacturer, or sold with the LCD TV. Servicing may be sufficient level to constitute a risk of electric shock to persons. English Explanation of WARNING Symbols Dangerous Voltage: The lightning flash with ... the safety purpose of the product that produce heat. 9) Do not remove the back cover. The third prong is used, use this LCD TV during lightening storms or when unused for replacement of the obsolete outlet. 11) Protect the power cord from moisture, excessive dust and any heat ...
User Manual
Page 3
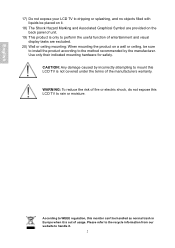
According to WEEE regulation, this monitor can't be sure to install the product according to the method recommended by incorrectly attempting to mount this LCD TV to handle it. 2 Use only their indicated mounting hardware for safety. Please refer to the recycle information from our website to rain or moisture.... WARNING: To reduce the risk of fire or electric shock, do not expose this LCD TV is not covered under the terms of the manufacturers warranty. English 17) Do not expose your LCD TV to dripping or splashing, and no objects filled with liquids be placed on it. 18) ...
According to WEEE regulation, this monitor can't be sure to install the product according to the method recommended by incorrectly attempting to mount this LCD TV to handle it. 2 Use only their indicated mounting hardware for safety. Please refer to the recycle information from our website to rain or moisture.... WARNING: To reduce the risk of fire or electric shock, do not expose this LCD TV is not covered under the terms of the manufacturers warranty. English 17) Do not expose your LCD TV to dripping or splashing, and no objects filled with liquids be placed on it. 18) ...

User Manual
Page 4
...PANEL CONTROL 2 BACK PANEL CONTROL ...3 REMOTE CONTROL ...4 Function of remote control button 5 Teletext function control button 6 INSTALLATION...8 Connecting RF antenna, Cable TV Wire or DTV cable 8 Connecting to DVD/ Set Top Box 8 Connecting to the Headphone 10 Connecting to a Computer 11 Connecting with the Power Cord...Channel Select ...12 Sleep Time Setting...12 Sound Mode Select ...13 Picture Mode Select...13 Aspect Ratio ...13 TV AUDIO...13 Subtitle Select...13 DTV/RADIO ...14 TV/DTV ...14 INFO ...14 Electronic Program Guide (EPG 15 Channel List...15 Favorite List ...16 Using the ...
...PANEL CONTROL 2 BACK PANEL CONTROL ...3 REMOTE CONTROL ...4 Function of remote control button 5 Teletext function control button 6 INSTALLATION...8 Connecting RF antenna, Cable TV Wire or DTV cable 8 Connecting to DVD/ Set Top Box 8 Connecting to the Headphone 10 Connecting to a Computer 11 Connecting with the Power Cord...Channel Select ...12 Sleep Time Setting...12 Sound Mode Select ...13 Picture Mode Select...13 Aspect Ratio ...13 TV AUDIO...13 Subtitle Select...13 DTV/RADIO ...14 TV/DTV ...14 INFO ...14 Electronic Program Guide (EPG 15 Channel List...15 Favorite List ...16 Using the ...

User Manual
Page 5
English ACCESSORIES Thank you for purchasing this LCD-TV of high performance! This LCD-TV package comes with: LCD TV User's Manual Quick Start Guide Warranty Card Remote Control Battery AAA x 2 Power Cord 1
English ACCESSORIES Thank you for purchasing this LCD-TV of high performance! This LCD-TV package comes with: LCD TV User's Manual Quick Start Guide Warranty Card Remote Control Battery AAA x 2 Power Cord 1
User Manual
Page 9
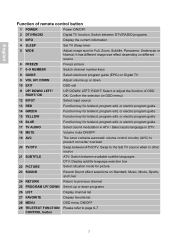
... key for teletext, program edit, or electric program guide 16 BLUE Function key for teletext, program edit, or electric program guide 17 TV AUDIO Select sound modulation in ATV / Select audio language in other source 21 SUBTITLE ATV: Switch between available subtitle languages DTV: Display ...subtitle language selection box 22 PICTURE Select situation mode for picture 23 SOUND Reverb Sound effect selections on Digital TV 9 VOL UP/ DOWN Adjust volume up or down programs 26 LIST Display channel list 27 FAVORITE Display favorite list 28 MENU OSD...
... key for teletext, program edit, or electric program guide 16 BLUE Function key for teletext, program edit, or electric program guide 17 TV AUDIO Select sound modulation in ATV / Select audio language in other source 21 SUBTITLE ATV: Switch between available subtitle languages DTV: Display ...subtitle language selection box 22 PICTURE Select situation mode for picture 23 SOUND Reverb Sound effect selections on Digital TV 9 VOL UP/ DOWN Adjust volume up or down programs 26 LIST Display channel list 27 FAVORITE Display favorite list 28 MENU OSD...

User Manual
Page 10
...it means the page is displayed at the left corner. on the screen below the time. When the update symbol changes to the normal TV Screen (current program). Press this button again to remove the information from the display and stop symbol is complete downloaded. In TELETEXT Mode: ... onto the screen of riddles or puzzles. REVEAL button Press this button again to display concealed information, such as solutions of current TV program (mixed Mode). Press this button to open the teletext page. English Teletext function control button TEXT/ MIX/ PICTURE button In...
...it means the page is displayed at the left corner. on the screen below the time. When the update symbol changes to the normal TV Screen (current program). Press this button again to remove the information from the display and stop symbol is complete downloaded. In TELETEXT Mode: ... onto the screen of riddles or puzzles. REVEAL button Press this button again to display concealed information, such as solutions of current TV program (mixed Mode). Press this button to open the teletext page. English Teletext function control button TEXT/ MIX/ PICTURE button In...

User Manual
Page 12
... the CAM card into memory with 75-ohm coaxial cable. English INSTALLATION Connecting RF antenna, Cable TV Wire or DTV cable Make sure the power is OFF before installing your LCD TV. 1) ATV: Connect the LCD TV to DVD/ Set Top Box Connect Video/ Audio cables from compatible devices into the back panel... of LCD TV. 1) With RCA A/V cable: RCA A/V Cable (not supplied) VCD or DVD Player 8 RF Cable or ...
... the CAM card into memory with 75-ohm coaxial cable. English INSTALLATION Connecting RF antenna, Cable TV Wire or DTV cable Make sure the power is OFF before installing your LCD TV. 1) ATV: Connect the LCD TV to DVD/ Set Top Box Connect Video/ Audio cables from compatible devices into the back panel... of LCD TV. 1) With RCA A/V cable: RCA A/V Cable (not supplied) VCD or DVD Player 8 RF Cable or ...

User Manual
Page 14
English 5) With HDMI cable: HDMI Cable (not supplied) 6) With HDMI to DVI cable: VCD or DVD Player Audio Cable (not supplied) HDMI-DVI Cable (not supplied) VCD or DVD Player Connecting to the Headphone Connect the headphone to the headphone output terminal of the LCD TV. (Headphone sold separately) Headphone (not supplied) 10
English 5) With HDMI cable: HDMI Cable (not supplied) 6) With HDMI to DVI cable: VCD or DVD Player Audio Cable (not supplied) HDMI-DVI Cable (not supplied) VCD or DVD Player Connecting to the Headphone Connect the headphone to the headphone output terminal of the LCD TV. (Headphone sold separately) Headphone (not supplied) 10

User Manual
Page 15
... (green) from the audio output of your computer to the audio input terminal (green) of the LCD TV. Also, connect the green end of the Audio In cable from the audio output of your LCD TV. PC Audio In Cable (not supplied) HDMI to DVI Cable (not supplied) Connecting with the Power... Cord Connect the power cord to the power cord connector on the back of your LCD TV, and plug the other end of your computer to the audio input terminal (green) of the LCD TV. AC power socket Power cable 11 English Connecting to a Computer 1) VGA (15pin D-Sub): Connect the VGA...
... (green) from the audio output of your computer to the audio input terminal (green) of the LCD TV. Also, connect the green end of the Audio In cable from the audio output of your LCD TV. PC Audio In Cable (not supplied) HDMI to DVI Cable (not supplied) Connecting with the Power... Cord Connect the power cord to the power cord connector on the back of your LCD TV, and plug the other end of your computer to the audio input terminal (green) of the LCD TV. AC power socket Power cable 11 English Connecting to a Computer 1) VGA (15pin D-Sub): Connect the VGA...

User Manual
Page 16
...no signal in the PC mode, the power LED indicator lights red after a preset period of LCD TV or press POWER button on /off the TV. Power On/Off To turn the LCD TV on your LCD TV, you may use ▲▼ to select the required input source between DTV, ATV, SCART, ... indicator is used to automatically shut off the volume, press MUTE. Volume Adjust Press VOL+/- To operate your remote control to turn off the LCD TV after a few seconds' idleness. 2. There are several times for ON. To cancel Sleep Time function, choose Off. 12 to select the desired channels. directly. ...
...no signal in the PC mode, the power LED indicator lights red after a preset period of LCD TV or press POWER button on /off the TV. Power On/Off To turn the LCD TV on your LCD TV, you may use ▲▼ to select the required input source between DTV, ATV, SCART, ... indicator is used to automatically shut off the volume, press MUTE. Volume Adjust Press VOL+/- To operate your remote control to turn off the LCD TV after a few seconds' idleness. 2. There are several times for ON. To cancel Sleep Time function, choose Off. 12 to select the desired channels. directly. ...
User Manual
Page 17
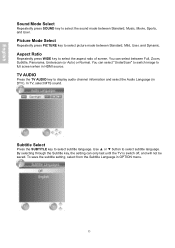
Picture Mode Select Repeatedly press PICTURE key to select subtitle language. You can only last until the TV is switch off, and will not be saved. Subtitle Select Press the SUBTITLE key to select picture mode between Standard, Mild, User, and Dynamic. You ... Standard, Music, Movie, Sports, and User. Aspect Ratio Repeatedly press WIDE key to display audio channel information and select the Audio Language (in DTV). In TV, select MTS sound. To save the subtitle setting, select from the Subtitle Language in HDMI source...
Picture Mode Select Repeatedly press PICTURE key to select subtitle language. You can only last until the TV is switch off, and will not be saved. Subtitle Select Press the SUBTITLE key to select picture mode between Standard, Mild, User, and Dynamic. You ... Standard, Music, Movie, Sports, and User. Aspect Ratio Repeatedly press WIDE key to display audio channel information and select the Audio Language (in DTV). In TV, select MTS sound. To save the subtitle setting, select from the Subtitle Language in HDMI source...

User Manual
Page 18
English DTV/RADIO Press the DTV/RADIO key to switch between TV/DTV. When in the channel banner. 14 Note: The favorite channel icon will automatically direct to switch between DTV and RADIO programs. TV/DTV Repeatedly press the TV/DTV key to TV source. INFO To display the current information of the LCD TV: Press INFO, and the banner displays the program No., current time, program name, teletext info, etc. When pressed in other input source, it will not be displayed in ATV mode, the displayed items may be different.
English DTV/RADIO Press the DTV/RADIO key to switch between TV/DTV. When in the channel banner. 14 Note: The favorite channel icon will automatically direct to switch between DTV and RADIO programs. TV/DTV Repeatedly press the TV/DTV key to TV source. INFO To display the current information of the LCD TV: Press INFO, and the banner displays the program No., current time, program name, teletext info, etc. When pressed in other input source, it will not be displayed in ATV mode, the displayed items may be different.

User Manual
Page 20
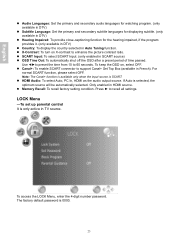
You can use OSD menus to adjust various settings by using your remote control or menu button on the bottom of the LCD TV. The basic operation is marked with ►, press ► to display the sub-menu or enable the function. • Press MENU again to exit current ...
You can use OSD menus to adjust various settings by using your remote control or menu button on the bottom of the LCD TV. The basic operation is marked with ►, press ► to display the sub-menu or enable the function. • Press MENU again to exit current ...

User Manual
Page 21
Picture Menu -To adjust the picture quality In ATV, DTV, AV, S-Video, SCART, YPbPr, HDMI source: Note: The LOCK and CHANNEL menu icons are only enabled in ATV and DTV source. 17 English ADVANCED OPERATION-OSD MENU You can use ▲▼ to adjust various settings for your LCD TV. Press the MENU button to display the OSD Menu, and use the OSD menu to select the desired OSD menu.
Picture Menu -To adjust the picture quality In ATV, DTV, AV, S-Video, SCART, YPbPr, HDMI source: Note: The LOCK and CHANNEL menu icons are only enabled in ATV and DTV source. 17 English ADVANCED OPERATION-OSD MENU You can use ▲▼ to adjust various settings for your LCD TV. Press the MENU button to display the OSD Menu, and use the OSD menu to select the desired OSD menu.

User Manual
Page 23
... selected, you can adjust the level of picture. 19 Auto Adjust: Auto adjust to optimize the display position and phase of the picture when the TV connected to reduce the noise of Contrast, Brightness, Colour, Tint, and Sharpness separately. Phase: To adjust delay time of Red, Green, and Blue separately. Contrast...
... selected, you can adjust the level of picture. 19 Auto Adjust: Auto adjust to optimize the display position and phase of the picture when the TV connected to reduce the noise of Contrast, Brightness, Colour, Tint, and Sharpness separately. Phase: To adjust delay time of Red, Green, and Blue separately. Contrast...

User Manual
Page 25
...: To set up time zone Note: The LOCK and CHANNEL menu icons are only enabled in ATV and DTV source. Auto Sleep: If enabled, the TV will automatically turn into sleep mode after 10 minutes if there is no remote action and no signal received. (OSD menu must be turned on...
...: To set up time zone Note: The LOCK and CHANNEL menu icons are only enabled in ATV and DTV source. Auto Sleep: If enabled, the TV will automatically turn into sleep mode after 10 minutes if there is no remote action and no signal received. (OSD menu must be turned on...
User Manual
Page 27
... DTV) Country: To display the country selected in HDMI source. Memory Recall: To recall factory setting condition. The factory default password is only active in TV source.
... DTV) Country: To display the country selected in HDMI source. Memory Recall: To recall factory setting condition. The factory default password is only active in TV source.
User Manual
Page 29
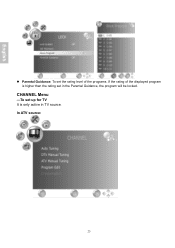
CHANNEL Menu -To set up for TV It is higher than the rating set the rating level of the programs. If the rating of the displayed program is only active in the Parental Guidance, the program will be locked. English Parental Guidance: To set in TV source. In ATV source: 25
CHANNEL Menu -To set up for TV It is higher than the rating set the rating level of the programs. If the rating of the displayed program is only active in the Parental Guidance, the program will be locked. English Parental Guidance: To set in TV source. In ATV source: 25

User Manual
Page 30
Note: After auto scanning all the channels, you auto scan all the channels before watching your TV next time. 26 English In DTV source: Auto Tuning: To automatically preset the channels into TV's memory. Kindly suggest you need not to perform Auto Tuning. Select the country of your area with ◄►, select Start, and then press OK to do it again when turning on your TV for the first time.
Note: After auto scanning all the channels, you auto scan all the channels before watching your TV next time. 26 English In DTV source: Auto Tuning: To automatically preset the channels into TV's memory. Kindly suggest you need not to perform Auto Tuning. Select the country of your area with ◄►, select Start, and then press OK to do it again when turning on your TV for the first time.

User Manual
Page 31
... channel is possible to adjust. Note: It is weak. ♦ Skip: Press ◄► to save to. ♦ System: Press ◄► to select the TV sound system. ♦ Current CH: Press ◄► to select the current channel. ♦ Search: Press ◄► to start scan. ATV Manual Tuning: Press...
... channel is possible to adjust. Note: It is weak. ♦ Skip: Press ◄► to save to. ♦ System: Press ◄► to select the TV sound system. ♦ Current CH: Press ◄► to select the current channel. ♦ Search: Press ◄► to start scan. ATV Manual Tuning: Press...


