User Manual
Page 1
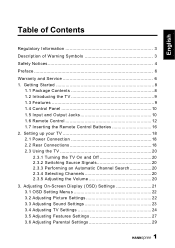
...Input and Output Jacks 10 1.6 Remote Control 12 1.7 Inserting the Remote Control Batteries 16 2. Setting up your TV 18 2.1 Power Connection 18 2.2 Rear Connections 18 2.3 Using the TV 20 2.3.1 Turning the TV On and Off 20 2.3.2 Switching Source Signals 20 2.3.3 Performing an Automatic Channel Search 20 2.3.4 Selecting Channels 20... 6 1. Adjusting On-Screen Display (OSD) Settings 21 3.1 OSD Setting Menus 22 3.2 Adjusting Picture Settings 22 3.3 Adjusting Sound Settings 23 3.4 Adjusting TV Settings 24 3.5 Adjusting Features Settings 27 3.6 Adjusting Parental Settings 29 1
...Input and Output Jacks 10 1.6 Remote Control 12 1.7 Inserting the Remote Control Batteries 16 2. Setting up your TV 18 2.1 Power Connection 18 2.2 Rear Connections 18 2.3 Using the TV 20 2.3.1 Turning the TV On and Off 20 2.3.2 Switching Source Signals 20 2.3.3 Performing an Automatic Channel Search 20 2.3.4 Selecting Channels 20... 6 1. Adjusting On-Screen Display (OSD) Settings 21 3.1 OSD Setting Menus 22 3.2 Adjusting Picture Settings 22 3.3 Adjusting Sound Settings 23 3.4 Adjusting TV Settings 24 3.5 Adjusting Features Settings 27 3.6 Adjusting Parental Settings 29 1
User Manual
Page 3
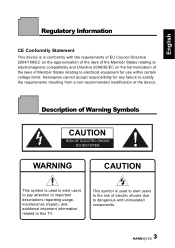
... on the harmonization of the laws of Member States relating to satisfy the requirements resulting from a non-recommended modification of electric shocks due to this TV. Hannspree cannot accept responsibility for any failure to electrical equipment for use within certain voltage limits.
... on the harmonization of the laws of Member States relating to satisfy the requirements resulting from a non-recommended modification of electric shocks due to this TV. Hannspree cannot accept responsibility for any failure to electrical equipment for use within certain voltage limits.

User Manual
Page 4
... the risk of fire or electric shock, do not expose this product at all times. 4 English Safety Notices Installation Safety Notes Location Avoid allowing the TV to get prolonged exposure to do so. CAUTION These servicing instructions are qualified to sunlight or other strong sources of heat. To reduce the risk...
... the risk of fire or electric shock, do not expose this product at all times. 4 English Safety Notices Installation Safety Notes Location Avoid allowing the TV to get prolonged exposure to do so. CAUTION These servicing instructions are qualified to sunlight or other strong sources of heat. To reduce the risk...
User Manual
Page 5
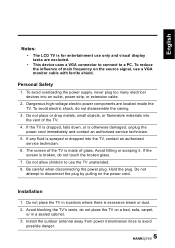
...metals, small objects, or flammable materials into an outlet, power strip, or extension cable. 2. Hold the plug. Do not place the TV in a sealed cabinet. 3. Avoid hitting or scraping it. To avoid overloading the power supply, never plug too many electrical devices into... the vent of main frequency on the source signal, use the TV unattended. 8. Installation 1. Be careful when disconnecting the power plug. Dangerous high-voltage electric power components are excluded. • This device...
...metals, small objects, or flammable materials into an outlet, power strip, or extension cable. 2. Hold the plug. Do not place the TV in a sealed cabinet. 3. Avoid hitting or scraping it. To avoid overloading the power supply, never plug too many electrical devices into... the vent of main frequency on the source signal, use the TV unattended. 8. Installation 1. Be careful when disconnecting the power plug. Dangerous high-voltage electric power components are excluded. • This device...
User Manual
Page 6
..., no guarantee is subject to enjoy superior audio and video while enriching your lifestyle with your TV. To the extent allowed by applicable law, Hannspree, Inc. ("Hannspree") shall not be liable for purchasing a Hannspree Liquid Crystal Display Television (LCD TV). Please carefully read this manual, even if advised of the possibility of the contents. The...
..., no guarantee is subject to enjoy superior audio and video while enriching your lifestyle with your TV. To the extent allowed by applicable law, Hannspree, Inc. ("Hannspree") shall not be liable for purchasing a Hannspree Liquid Crystal Display Television (LCD TV). Please carefully read this manual, even if advised of the possibility of the contents. The...
User Manual
Page 7
...HDMI™) technology. This manual is protected by copyright and distributed under the copyrights, patents, patent applications or trademarks of Hannspree. The TV described in any copyrighted software contained in the product described herein shall not be distributed, modified, reverse engineered, or reproduced... used for copyrighted software, such as the right to the extent allowed by any means without the prior written authorization of Hannspree (or of a product. All other third parties) preserves the exclusive rights for identification purpose only, and may be the...
...HDMI™) technology. This manual is protected by copyright and distributed under the copyrights, patents, patent applications or trademarks of Hannspree. The TV described in any copyrighted software contained in the product described herein shall not be distributed, modified, reverse engineered, or reproduced... used for copyrighted software, such as the right to the extent allowed by any means without the prior written authorization of Hannspree (or of a product. All other third parties) preserves the exclusive rights for identification purpose only, and may be the...
User Manual
Page 8
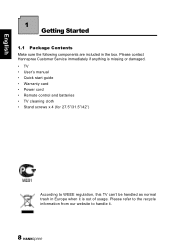
Please refer to the recycle information from our website to handle it is missing or damaged. • TV • User's manual • Quick start guide • Warranty card • Power cord • Remote control and batteries • TV cleaning cloth • Stand screws x 4 (for 27.5"/31.5"/42") According to WEEE regulation, this TV can't be handled as normal trash in the box. English 1 Getting Started 1.1 Package Contents Make sure the following components are included in Europe when it . 8 Please contact Hannspree Customer Service immediately if anything is out of usage.
Please refer to the recycle information from our website to handle it is missing or damaged. • TV • User's manual • Quick start guide • Warranty card • Power cord • Remote control and batteries • TV cleaning cloth • Stand screws x 4 (for 27.5"/31.5"/42") According to WEEE regulation, this TV can't be handled as normal trash in the box. English 1 Getting Started 1.1 Package Contents Make sure the following components are included in Europe when it . 8 Please contact Hannspree Customer Service immediately if anything is out of usage.
User Manual
Page 9
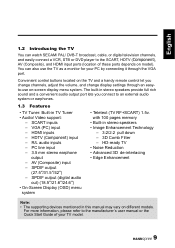
... audio out) (18.5"/21.6"/24.6") • On-Screen Display (OSD) menu system • Teletext (TV RF+SCART) 1.5v. AV (Composite) input - Convenient control buttons located on the TV and a handy remote control let you connect to the manufacturer's user manual or the Quick Start Guide of... the SCART, HDTV (Component), AV (Composite), and HDMI input ports (location of your PC by connecting it through an easyto-use the TV as a monitor for your TV model. 9 PC line input - 3.5 mm stereo earphone output - The built-in stereo speakers • Image Enhancement Technology - 3:2/2:2 pull...
... audio out) (18.5"/21.6"/24.6") • On-Screen Display (OSD) menu system • Teletext (TV RF+SCART) 1.5v. AV (Composite) input - Convenient control buttons located on the TV and a handy remote control let you connect to the manufacturer's user manual or the Quick Start Guide of... the SCART, HDTV (Component), AV (Composite), and HDMI input ports (location of your PC by connecting it through an easyto-use the TV as a monitor for your TV model. 9 PC line input - 3.5 mm stereo earphone output - The built-in stereo speakers • Image Enhancement Technology - 3:2/2:2 pull...
User Manual
Page 10
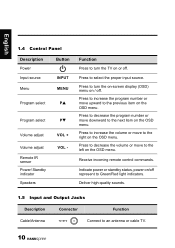
...left on or off. Press to decrease the program number or move to turn the TV on the OSD menu. Deliver high-quality sounds. 1.5 Input and Output Jacks Description Connector Function Cable/Antenna TV / DTV Connect to select the proper input source. Receive incoming remote control commands. Function... Program select PT Volume adjust Volume adjust Remote IR sensor Power/ Standby indicator Speakers VOL + VOL - Press to an antenna or cable TV. 10 Indicate power or standby status, power on the OSD menu. Press to increase the volume or move upward to the right on /off...
...left on or off. Press to decrease the program number or move to turn the TV on the OSD menu. Deliver high-quality sounds. 1.5 Input and Output Jacks Description Connector Function Cable/Antenna TV / DTV Connect to select the proper input source. Receive incoming remote control commands. Function... Program select PT Volume adjust Volume adjust Remote IR sensor Power/ Standby indicator Speakers VOL + VOL - Press to an antenna or cable TV. 10 Indicate power or standby status, power on the OSD menu. Press to increase the volume or move upward to the right on /off...

User Manual
Page 11
Not available for users. L -AUDIO- Connect to an external device, such as a VCR, STB, or a DVD player. Video, RGB, L/R IN, Analog TV Out, and L/R Out. Connect to an external device, such as a VCR, STB, or a DVD player. R Y PB PR AUDIO IN Connect to an external ...device, such as a VCR, STB, or a DVD player with built-in amplifier. Service Video SERVICE SERVICE Service only. Video, RGB, L/R IN, Analog TV Out, and SCART 2 L/R Out. VIDEO Connect to a PC's line / audio port. Connect to an external device, such as a VCR, STB, or a DVD player...
Not available for users. L -AUDIO- Connect to an external device, such as a VCR, STB, or a DVD player. Video, RGB, L/R IN, Analog TV Out, and L/R Out. Connect to an external device, such as a VCR, STB, or a DVD player. R Y PB PR AUDIO IN Connect to an external ...device, such as a VCR, STB, or a DVD player with built-in amplifier. Service Video SERVICE SERVICE Service only. Video, RGB, L/R IN, Analog TV Out, and SCART 2 L/R Out. VIDEO Connect to a PC's line / audio port. Connect to an external device, such as a VCR, STB, or a DVD player...

User Manual
Page 12
English Description CI HDMI 1 Input HDMI 2 Input HDMI 3 Input SPDIF Connector CI SLOT Function Connect to select the input signal type selections: TV, DTV, SCART, AV, HDMI 1, HDMI 2, HDTV, and PC. 12 Connect a HDMI equipment or an HDMIDVI adapter cable to devices such as a DVD player or set-... to devices such as a DVD player or set -top box. HDMI 1 HDMI 2 HDMI 3 SPDIF Connect a HDMI equipment or an HDMIDVI adapter cable to turn the TV on or off.
English Description CI HDMI 1 Input HDMI 2 Input HDMI 3 Input SPDIF Connector CI SLOT Function Connect to select the input signal type selections: TV, DTV, SCART, AV, HDMI 1, HDMI 2, HDTV, and PC. 12 Connect a HDMI equipment or an HDMIDVI adapter cable to devices such as a DVD player or set-... to devices such as a DVD player or set -top box. HDMI 1 HDMI 2 HDMI 3 SPDIF Connect a HDMI equipment or an HDMIDVI adapter cable to turn the TV on or off.
User Manual
Page 14
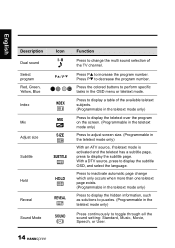
Press to display a table of the TV channel. Press PS to display the subtitle page. With a DTV source, press to decrease the program number. Press PT to display the subtitle OSD, and ...
Press to display a table of the TV channel. Press PS to display the subtitle page. With a DTV source, press to decrease the program number. Press PT to display the subtitle OSD, and ...

User Manual
Page 15
...of the image with aspect ratio: AUTO, Full, Normal, Panorama, Zoom, Subtitle and Wide. Press to pause a video frame on the remote control at TV. • The operational distance may be shortened when the signal sensor is directly exposed to strong light. • Aim the transmitter on -screen. (Programmable... in the TV source only) Press repeatedly to set the sleep timer (15, 30, 45, 60, 90 or 120 minutes). Press OK to go to -height ...
...of the image with aspect ratio: AUTO, Full, Normal, Panorama, Zoom, Subtitle and Wide. Press to pause a video frame on the remote control at TV. • The operational distance may be shortened when the signal sensor is directly exposed to strong light. • Aim the transmitter on -screen. (Programmable... in the TV source only) Press repeatedly to set the sleep timer (15, 30, 45, 60, 90 or 120 minutes). Press OK to go to -height ...
User Manual
Page 18
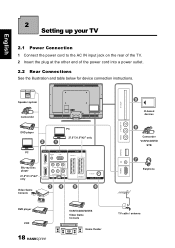
... SCART SCART 1 Blu-ray Disc player 27.5"/31.5"/42" only Video Game Console HDMI 1 Y PB PR HDMI 2 L AUDIO R COMPONENT SPDIF SSERVIICCEE 34 SCART 2 TV/DTV CABLE ANTENNA 5 6 DVD player VCR 18 VCR/VCD/DVD/STB Video Game Console Home theater HDMI 3 SERVICE VIDEO L AUDIO R CI SLOT 9 CI-based devices... 8 Camcorder VCR/VCD/DVD STB 7 Earphone TV cable / antenna English 2 Setting up your TV 2.1 Power Connection 1 Connect the power cord to the AC IN input jack on the rear of the...
... SCART SCART 1 Blu-ray Disc player 27.5"/31.5"/42" only Video Game Console HDMI 1 Y PB PR HDMI 2 L AUDIO R COMPONENT SPDIF SSERVIICCEE 34 SCART 2 TV/DTV CABLE ANTENNA 5 6 DVD player VCR 18 VCR/VCD/DVD/STB Video Game Console Home theater HDMI 3 SERVICE VIDEO L AUDIO R CI SLOT 9 CI-based devices... 8 Camcorder VCR/VCD/DVD STB 7 Earphone TV cable / antenna English 2 Setting up your TV 2.1 Power Connection 1 Connect the power cord to the AC IN input jack on the rear of the...
User Manual
Page 19
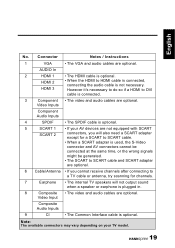
... Component Audio Inputs 4 SPDIF • The SPDIF cable is optional. 5 SCART 1 • If your TV model. 19 However it's necessary to do so if a HDMI to a TV cable or antenna, try scanning for channels. 7 Earphone • The internal TV speakers will not output sound when a speaker or earphone is optional. Connector Notes / Instructions...
... Component Audio Inputs 4 SPDIF • The SPDIF cable is optional. 5 SCART 1 • If your TV model. 19 However it's necessary to do so if a HDMI to a TV cable or antenna, try scanning for channels. 7 Earphone • The internal TV speakers will not output sound when a speaker or earphone is optional. Connector Notes / Instructions...
User Manual
Page 20
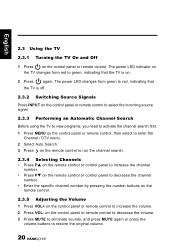
... and press MUTE again or press the volume buttons to restore the original volume. 20 The power LED indicator on the TV changes from green to red, indicating that the TV is off. 2.3.2 Switching Source Signals Press INPUT on the control panel or remote control to select the incoming source signal.... 2.3.3 Performing an Automatic Channel Search Before using the TV to view programs, you need to activate the channel search first. 1 Press MENU on the control panel or remote control, then select to ...
... and press MUTE again or press the volume buttons to restore the original volume. 20 The power LED indicator on the TV changes from green to red, indicating that the TV is off. 2.3.2 Switching Source Signals Press INPUT on the control panel or remote control to select the incoming source signal.... 2.3.3 Performing an Automatic Channel Search Before using the TV to view programs, you need to activate the channel search first. 1 Press MENU on the control panel or remote control, then select to ...
User Manual
Page 21
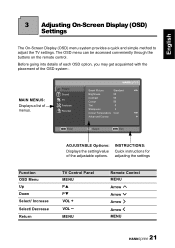
...a list of the adjustable options. INSTRUCTIONS: Quick instructions for adjusting the settings Function OSD Menu Up Down Select/ Increase Select/ Decrease Return TV Control Panel MENU PS PT VOL + VOL - English 3 Adjusting On-Screen Display (OSD) Settings The On-Screen Display (OSD) menu... system provides a quick and simple method to adjust the TV settings. Picture Sound TV Features Parental OK Enter Smart Picture Brightness Contrast Colour Tint Sharpness Colour Temperature Advanced Control Standard 50 50 50 0 3 Cool ...
...a list of the adjustable options. INSTRUCTIONS: Quick instructions for adjusting the settings Function OSD Menu Up Down Select/ Increase Select/ Decrease Return TV Control Panel MENU PS PT VOL + VOL - English 3 Adjusting On-Screen Display (OSD) Settings The On-Screen Display (OSD) menu... system provides a quick and simple method to adjust the TV settings. Picture Sound TV Features Parental OK Enter Smart Picture Brightness Contrast Colour Tint Sharpness Colour Temperature Advanced Control Standard 50 50 50 0 3 Cool ...

User Manual
Page 22
The following menus can be set to On or Off. 22 Picture Sound TV Features Parental OK Enter Smart Picture Brightness Contrast Colour Tint Sharpness Colour Temperature Advanced Control Standard 50 50 50 0 3 Cool Select Menu Exit 5 Press MENU ...
The following menus can be set to On or Off. 22 Picture Sound TV Features Parental OK Enter Smart Picture Brightness Contrast Colour Tint Sharpness Colour Temperature Advanced Control Standard 50 50 50 0 3 Cool Select Menu Exit 5 Press MENU ...

User Manual
Page 23
The Sound menu can be used to adjust the Auto Config, Horizontal, Vertical, Phase, Clock, and Resolution settings for PC mode. Picture Sound TV Features Parental OK Enter Sound Mode Equalizer 120Hz Equalizer 500Hz Equalizer 1.5KHz Equalizer 5KHz Equalizer 10KHz Balance Virtual Surround Digital Audio Out Personal 0 0 0 0 0 0 Off PCM ...
The Sound menu can be used to adjust the Auto Config, Horizontal, Vertical, Phase, Clock, and Resolution settings for PC mode. Picture Sound TV Features Parental OK Enter Sound Mode Equalizer 120Hz Equalizer 500Hz Equalizer 1.5KHz Equalizer 5KHz Equalizer 10KHz Balance Virtual Surround Digital Audio Out Personal 0 0 0 0 0 0 Off PCM ...
User Manual
Page 24
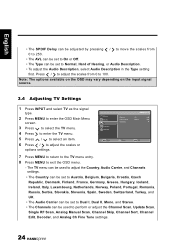
...used to Normal, Hard of Hearing, or Audio Description. • To adjust the Audio Description, select Audio Description in the Type setting first. The TV menu can be used to adjust the Country, Audio Carrier, and Channels settings. • The Country can be set to Austria, Belgium, Bulgaria, ... 2 Press MENU to enter the OSD Main Menu screen. 3 Press to select the TV menu. 4 Press to enter the TV menu. 5 Press / to select an item. 6 Press / to exit the OSD menu. - Picture Sound TV Features Parental Country Audio Carrier Channels UK Stereo OK Enter Select Menu Exit 7 Press MENU...
...used to Normal, Hard of Hearing, or Audio Description. • To adjust the Audio Description, select Audio Description in the Type setting first. The TV menu can be used to adjust the Country, Audio Carrier, and Channels settings. • The Country can be set to Austria, Belgium, Bulgaria, ... 2 Press MENU to enter the OSD Main Menu screen. 3 Press to select the TV menu. 4 Press to enter the TV menu. 5 Press / to select an item. 6 Press / to exit the OSD menu. - Picture Sound TV Features Parental Country Audio Carrier Channels UK Stereo OK Enter Select Menu Exit 7 Press MENU...


