
User Manual
Page 1
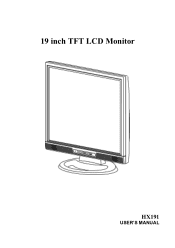
19 inch TFT LCD Monitor HX191 USER'S MANUAL
19 inch TFT LCD Monitor HX191 USER'S MANUAL

User Manual
Page 2
... radiate radio frequency energy, and if not installed and used in accordance with Parts 15 of the Canadian Interference-Causing Equipment Regulation. CANADA This Class B digital apparatus meets all requirements of the FCC Rule. This equipment generates, uses and can be determined by one or more of the FCC Rules. The device complies with the instructions, may...
... radiate radio frequency energy, and if not installed and used in accordance with Parts 15 of the Canadian Interference-Causing Equipment Regulation. CANADA This Class B digital apparatus meets all requirements of the FCC Rule. This equipment generates, uses and can be determined by one or more of the FCC Rules. The device complies with the instructions, may...
User Manual
Page 3
... and strain problems. Important parameters are luminance, contrast, resolution, reflectance, colour rendition and image stability. Energy • Energy-saving mode after a certain time - For more user-friendly direction. User's Manual Congratulations! The requirements included in order to improve the working environment for recycling and the manufacturer must be prepared for the user and to some of the TCO'03 Display requirements: Ergonomics...
... and strain problems. Important parameters are luminance, contrast, resolution, reflectance, colour rendition and image stability. Energy • Energy-saving mode after a certain time - For more user-friendly direction. User's Manual Congratulations! The requirements included in order to improve the working environment for recycling and the manufacturer must be prepared for the user and to some of the TCO'03 Display requirements: Ergonomics...

User Manual
Page 4
User's Manual Recycling Information We, the Hanns.G care very much about our environment protection strategy and firmly believe that it helps us have healthier earth via appropriate treatment and recycling of industrial technology devices at the end-of-life. For more information, please visit www.hannsg....
User's Manual Recycling Information We, the Hanns.G care very much about our environment protection strategy and firmly believe that it helps us have healthier earth via appropriate treatment and recycling of industrial technology devices at the end-of-life. For more information, please visit www.hannsg....

User Manual
Page 5
User's Manual TABLE OF CONTENTS SAFETY NOTICE 6 PRECAUTIONS 6 SPECIAL NOTES ON LCD MONITORS 7 BEFORE YOU OPERATE THE MONITOR 8 FEATURES 8 CHECKING THE CONTENTS OF THE PACKAGE 8 INSTALLATION INSTRUCTIONS 9 POWER...9 MAKING CONNECTIONS 10 ADJUSTING THE VIEWING ANGLE 11 OPERATING INSTRUCTIONS 12 GENERAL INSTRUCTIONS 12 FRONT PANEL CONTROL 13 HOW TO ADJUST A SETTING 14 PLUG AND PLAY 17 TECHNICAL SUPPORT (FAQ 18 Q & A FOR GENERAL PROBLEMS 18 ERROR MESSAGE & POSSIBLE SOLUTIONS 19 APPENDIX 20 SPECIFICATIONS 20 5
User's Manual TABLE OF CONTENTS SAFETY NOTICE 6 PRECAUTIONS 6 SPECIAL NOTES ON LCD MONITORS 7 BEFORE YOU OPERATE THE MONITOR 8 FEATURES 8 CHECKING THE CONTENTS OF THE PACKAGE 8 INSTALLATION INSTRUCTIONS 9 POWER...9 MAKING CONNECTIONS 10 ADJUSTING THE VIEWING ANGLE 11 OPERATING INSTRUCTIONS 12 GENERAL INSTRUCTIONS 12 FRONT PANEL CONTROL 13 HOW TO ADJUST A SETTING 14 PLUG AND PLAY 17 TECHNICAL SUPPORT (FAQ 18 Q & A FOR GENERAL PROBLEMS 18 ERROR MESSAGE & POSSIBLE SOLUTIONS 19 APPENDIX 20 SPECIFICATIONS 20 5
User Manual
Page 6
.... It is provided. • The monitor should be installed near water, e.g. near or over a radiator or heat register. It could void the user's authority to power surges. • Do not overload power strips and extension cords. User's Manual SAFETY NOTICE 1. The changes or modifications not expressly approved by yourself; PRECAUTIONS • Do not use a mounting kit approved by the manufacturer or...
.... It is provided. • The monitor should be installed near water, e.g. near or over a radiator or heat register. It could void the user's authority to power surges. • Do not overload power strips and extension cords. User's Manual SAFETY NOTICE 1. The changes or modifications not expressly approved by yourself; PRECAUTIONS • Do not use a mounting kit approved by the manufacturer or...

User Manual
Page 7
SPECIAL NOTES ON LCD MONITORS User's Manual The following symptoms are normal with LCD monitor and do not indicate a problem. • Due to the nature of 99.99% or more. Turn off the Power Switch for hours. • If the screen suddenly flashes erratically or the backlighting fails, please contact your dealer or service center for hours. FOR LAMP SPECIFIC DISPOSAL INFORMATION CHECK WWW.LAMPRECYCLE.ORG. 7 It...
SPECIAL NOTES ON LCD MONITORS User's Manual The following symptoms are normal with LCD monitor and do not indicate a problem. • Due to the nature of 99.99% or more. Turn off the Power Switch for hours. • If the screen suddenly flashes erratically or the backlighting fails, please contact your dealer or service center for hours. FOR LAMP SPECIFIC DISPOSAL INFORMATION CHECK WWW.LAMPRECYCLE.ORG. 7 It...
User Manual
Page 8
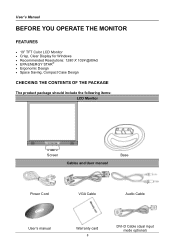
User's Manual BEFORE YOU OPERATE THE MONITOR FEATURES • 19" TFT Color LCD Monitor • Crisp, Clear Display for Windows • Recommended Resolutions: 1280 X 1024 @60Hz • EPA ENERGY STAR® • Ergonomic Design • Space Saving, Compact Case Design CHECKING THE CONTENTS OF THE PACKAGE The product package should include the following items: LCD Monitor Screen Cables and User manual Base Power Cord VGA Cable Audio Cable User's manual Warranty card 8 DVI-D Cable (dual input mode optional)
User's Manual BEFORE YOU OPERATE THE MONITOR FEATURES • 19" TFT Color LCD Monitor • Crisp, Clear Display for Windows • Recommended Resolutions: 1280 X 1024 @60Hz • EPA ENERGY STAR® • Ergonomic Design • Space Saving, Compact Case Design CHECKING THE CONTENTS OF THE PACKAGE The product package should include the following items: LCD Monitor Screen Cables and User manual Base Power Cord VGA Cable Audio Cable User's manual Warranty card 8 DVI-D Cable (dual input mode optional)
User Manual
Page 9
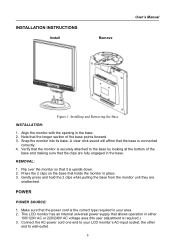
... . 9 POWER POWER SOURCE: 1. This LCD monitor has an Internal universal power supply that the base is upside down. 2. Align the monitor with the opening in either 100/120V AC or 220/240V AC voltage area (No user adjustment is the correct type required in your LCD monitor's AC-input socket, the other end to your area. 2. A clear click sound will affirm that allows operation in the base. 2. INSTALLATION INSTRUCTIONS Install Remove User's Manual...
... . 9 POWER POWER SOURCE: 1. This LCD monitor has an Internal universal power supply that the base is upside down. 2. Align the monitor with the opening in either 100/120V AC or 220/240V AC voltage area (No user adjustment is the correct type required in your LCD monitor's AC-input socket, the other end to your area. 2. A clear click sound will affirm that allows operation in the base. 2. INSTALLATION INSTRUCTIONS Install Remove User's Manual...
User Manual
Page 10
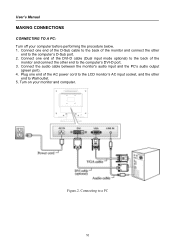
... port. 2. Connecting to Wall outlet. 5. Connect the audio cable between the monitor's audio input and the PC's audio output (green port). 4. Turn on your computer before performing the procedure below. 1. Connect one end of the D-Sub cable to the back of the monitor and connect the other end to a PC 10 Connect one end of the DVI-D cable (Dual input mode optional) to the back of the AC power cord to the LCD monitor's AC input socket...
... port. 2. Connecting to Wall outlet. 5. Connect the audio cable between the monitor's audio input and the PC's audio output (green port). 4. Turn on your computer before performing the procedure below. 1. Connect one end of the D-Sub cable to the back of the monitor and connect the other end to a PC 10 Connect one end of the DVI-D cable (Dual input mode optional) to the back of the AC power cord to the LCD monitor's AC input socket...
User Manual
Page 11
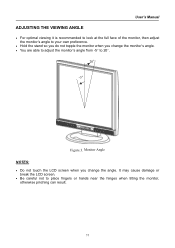
...; Do not touch the LCD screen when you change the angle. User's Manual ADJUSTING THE VIEWING ANGLE • For optimal viewing it is recommended to look at the full face of the monitor, then adjust the monitor's angle to your own preference. • Hold the stand so you do not topple the monitor when you change the monitor's angle. • You are able to adjust the monitor's angle from...
...; Do not touch the LCD screen when you change the angle. User's Manual ADJUSTING THE VIEWING ANGLE • For optimal viewing it is recommended to look at the full face of the monitor, then adjust the monitor's angle to your own preference. • Hold the stand so you do not topple the monitor when you change the monitor's angle. • You are able to adjust the monitor's angle from...

User Manual
Page 12
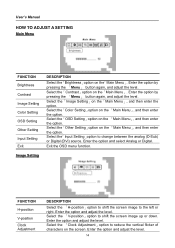
Figure.4. By changing these settings, the picture can be adjusted to your personal preferences. • The power cord should be connected. • Connect the Signal cable from the monitor to the VGA card. • Press the power button to turn on or off. The power indicator will light up. Control Panel Buttons 12 User's Manual OPERATING INSTRUCTIONS GENERAL INSTRUCTIONS Press the power button to turn the monitor on the monitor. The other control buttons are located on the front panel of the monitor (See Figure.4).
Figure.4. By changing these settings, the picture can be adjusted to your personal preferences. • The power cord should be connected. • Connect the Signal cable from the monitor to the VGA card. • Press the power button to turn on or off. The power indicator will light up. Control Panel Buttons 12 User's Manual OPERATING INSTRUCTIONS GENERAL INSTRUCTIONS Press the power button to turn the monitor on the monitor. The other control buttons are located on the front panel of the monitor (See Figure.4).

User Manual
Page 13
... factory. • To keep the monitor looking new, periodically clean it . • Function Key Lock: Press the 「Volume +」 and the 「Menu」 buttons simultaneously to enable the Function Key Lock. Activates the volume control when the OSD is active. Power Saving mode. • MENU / ENTER: 1. Stubborn stains may be removed with a cloth lightly dampened with a soft cloth. Power On mode. As a safety precaution, always unplug the monitor before cleaning...
... factory. • To keep the monitor looking new, periodically clean it . • Function Key Lock: Press the 「Volume +」 and the 「Menu」 buttons simultaneously to enable the Function Key Lock. Activates the volume control when the OSD is active. Power Saving mode. • MENU / ENTER: 1. Stubborn stains may be removed with a cloth lightly dampened with a soft cloth. Power On mode. As a safety precaution, always unplug the monitor before cleaning...
User Manual
Page 14
... and select Analog or Digital. User's Manual HOW TO ADJUST A SETTING Main Menu FUNCTION Brightness Contrast Image Setting Color Setting OSD Setting Other Setting Input Setting Exit DESCRIPTION Select the「Brightness」option on the「Main Menu」, and then enter the option. Enter the option by pressing the 「Menu」 button again, and adjust the level. Select the 「Clock Adjustment」option to change between the analog (D-Sub) or Digital (DVI) source. Select the...
... and select Analog or Digital. User's Manual HOW TO ADJUST A SETTING Main Menu FUNCTION Brightness Contrast Image Setting Color Setting OSD Setting Other Setting Input Setting Exit DESCRIPTION Select the「Brightness」option on the「Main Menu」, and then enter the option. Enter the option by pressing the 「Menu」 button again, and adjust the level. Select the 「Clock Adjustment」option to change between the analog (D-Sub) or Digital (DVI) source. Select the...
User Manual
Page 15
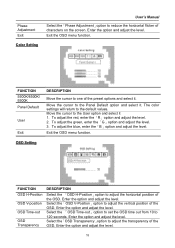
.... 15 Move the cursor to the default values. OSD Setting FUNCTION OSD H-Position OSD V-position OSD Time-out OSD Transparency DESCRIPTION Select the 「OSD H-Position」option to adjust the horizontal position of characters on the screen. Phase Adjustment Exit Color Setting User's Manual Select the「Phase Adjustment」option to reduce the horizontal flicker of the OSD. Enter the option and adjust the level. To adjust the red, enter the「R」option and...
.... 15 Move the cursor to the default values. OSD Setting FUNCTION OSD H-Position OSD V-position OSD Time-out OSD Transparency DESCRIPTION Select the 「OSD H-Position」option to adjust the horizontal position of characters on the screen. Phase Adjustment Exit Color Setting User's Manual Select the「Phase Adjustment」option to reduce the horizontal flicker of the OSD. Enter the option and adjust the level. To adjust the red, enter the「R」option and...
User Manual
Page 16
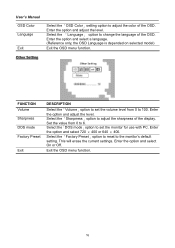
User's Manual OSD Color Language Exit Select the「OSD Color」setting option to adjust the color of the OSD. Other Setting FUNCTION Volume Sharpness DOS mode Factory Preset Exit DESCRIPTION Select the「Volume」option to 100. Set the value from 0 to set the monitor for use with PC. Select the「DOS mode」option to set the volume level from 0 to adjust the sharpness of the display. Select the 「Language」...
User's Manual OSD Color Language Exit Select the「OSD Color」setting option to adjust the color of the OSD. Other Setting FUNCTION Volume Sharpness DOS mode Factory Preset Exit DESCRIPTION Select the「Volume」option to 100. Set the value from 0 to set the monitor for use with PC. Select the「DOS mode」option to set the volume level from 0 to adjust the sharpness of the display. Select the 「Language」...
User Manual
Page 17
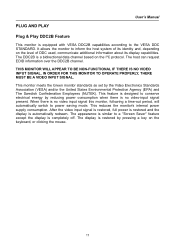
... mouse. 17 PLUG AND PLAY User's Manual Plug & Play DDC2B Feature This monitor is equipped with VESA DDC2B capabilities according to inform the host system of its identity and, depending on the level of DDC used, communicate additional information about its display capabilities. This monitor meets the Green monitor standards as set by reducing power consumption when there is no video input signal this monitor, following a time...
... mouse. 17 PLUG AND PLAY User's Manual Plug & Play DDC2B Feature This monitor is equipped with VESA DDC2B capabilities according to inform the host system of its identity and, depending on the level of DDC used, communicate additional information about its display capabilities. This monitor meets the Green monitor standards as set by reducing power consumption when there is no video input signal this monitor, following a time...

User Manual
Page 18
... D-Sub or DVI-D connector are bent *Adjust the Contrast and Brightness Controls. *Move electrical devices that none of the primary colors (RED, GREEN, or BLUE) Screen image is ON (orange) but there's no video or no picture. The LED should be snugly seated in its slot *Make sure monitor's video cable is properly connected to the computer. *Inspect monitor's video cable and make sure that may cause electrical interference. *Computer Power Switch should be connected *Check if the...
... D-Sub or DVI-D connector are bent *Adjust the Contrast and Brightness Controls. *Move electrical devices that none of the primary colors (RED, GREEN, or BLUE) Screen image is ON (orange) but there's no video or no picture. The LED should be snugly seated in its slot *Make sure monitor's video cable is properly connected to the computer. *Inspect monitor's video cable and make sure that may cause electrical interference. *Computer Power Switch should be connected *Check if the...

User Manual
Page 19
Check that the signal-cable is properly connected, If the connector is loose, tighten the connector's screws. 2. FACTORY PRESET TIMING TABLE: MODE RESOLUTION 1 640×350 @70Hz 2 640×400 @...215;960 @60Hz 25 1280×1024 @60Hz 26 1280×1024 @75Hz HORIZONTAL FREQUENCY (KHz) 31.469 24.827 31.469 31.469 35.000 37.861 ....025 19 User's Manual ERROR MESSAGE & POSSIBLE SOLUTIONS CABLE NOT CONNECTED : 1. Check the signal-cable's connection pins for damage. INPUT NOT SUPPORT : Your computer has been set to unsuitable display mode, set the computer to display mode given in the following...
Check that the signal-cable is properly connected, If the connector is loose, tighten the connector's screws. 2. FACTORY PRESET TIMING TABLE: MODE RESOLUTION 1 640×350 @70Hz 2 640×400 @...215;960 @60Hz 25 1280×1024 @60Hz 26 1280×1024 @75Hz HORIZONTAL FREQUENCY (KHz) 31.469 24.827 31.469 31.469 35.000 37.861 ....025 19 User's Manual ERROR MESSAGE & POSSIBLE SOLUTIONS CABLE NOT CONNECTED : 1. Check the signal-cable's connection pins for damage. INPUT NOT SUPPORT : Your computer has been set to unsuitable display mode, set the computer to display mode given in the following...
User Manual
Page 20
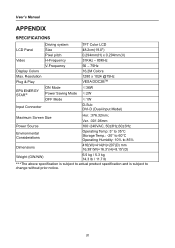
User's Manual APPENDIX SPECIFICATIONS LCD Panel Video Display Colors Max. Ver. :301.06mm Power Source 100~240VAC, 50±3Hz,...specification is subject to actual product specification and is subject to change without prior notice. 20 Resolution Plug & Play EPA ENERGY STAR® Driving system Size Pixel pitch H-Frequency V-Frequency ON Mode Power Saving Mode OFF Mode Input Connector TFT Color LCD 48.2cm(19.0") 0.294mm(H) x 0.294mm(V) 31KHz - 80KHz 56 - 75Hz 16.2M Colors 1280 x 1024 @75Hz VESA DDC2BTM ≤36W ≤2W ≤1W D-Sub DVI-D (Dual-Input Model) Maximum Screen Size...
User's Manual APPENDIX SPECIFICATIONS LCD Panel Video Display Colors Max. Ver. :301.06mm Power Source 100~240VAC, 50±3Hz,...specification is subject to actual product specification and is subject to change without prior notice. 20 Resolution Plug & Play EPA ENERGY STAR® Driving system Size Pixel pitch H-Frequency V-Frequency ON Mode Power Saving Mode OFF Mode Input Connector TFT Color LCD 48.2cm(19.0") 0.294mm(H) x 0.294mm(V) 31KHz - 80KHz 56 - 75Hz 16.2M Colors 1280 x 1024 @75Hz VESA DDC2BTM ≤36W ≤2W ≤1W D-Sub DVI-D (Dual-Input Model) Maximum Screen Size...


