
Product Manual
Page 2
... low-power TV stations still broadcasting in analog, watching pre-recorded movies, or playing video games). For information on the TV Converter program, and on June 12 2009. Danger of one, see www.DTV.gov. Some older television receivers, if they rely on a TV antenna, will need a TV Converter to receive over the air TV programming, with the same or equivalent type. Replace only...
... low-power TV stations still broadcasting in analog, watching pre-recorded movies, or playing video games). For information on the TV Converter program, and on June 12 2009. Danger of one, see www.DTV.gov. Some older television receivers, if they rely on a TV antenna, will need a TV Converter to receive over the air TV programming, with the same or equivalent type. Replace only...

Product Manual
Page 3
... against harmful interference in a residential installation.This equipment generates, uses and can be retained for future reference. Do not open the cabinet. If this equipment does cause harmful interference to radio or television reception, which the receiver is connected. 4. Reorient or relocate the receiving antenna. 2. Connect the equipment into an outlet on , the user is encouraged to try to...
... against harmful interference in a residential installation.This equipment generates, uses and can be retained for future reference. Do not open the cabinet. If this equipment does cause harmful interference to radio or television reception, which the receiver is connected. 4. Reorient or relocate the receiving antenna. 2. Connect the equipment into an outlet on , the user is encouraged to try to...

Product Manual
Page 5
... near any way, such as power-supply cord or plug is used , use only with UL Listed Wall Mount Bracket with cable and satellite TV services, gaming consoles,VCRs, DVD players, and similar products, For more 5 Servicing is required when the apparatus has been damaged in the operating instructions unless you are provided for long periods of power source indicated on or pinched particularly at plugs, convenience receptacles, and the point...
... near any way, such as power-supply cord or plug is used , use only with UL Listed Wall Mount Bracket with cable and satellite TV services, gaming consoles,VCRs, DVD players, and similar products, For more 5 Servicing is required when the apparatus has been damaged in the operating instructions unless you are provided for long periods of power source indicated on or pinched particularly at plugs, convenience receptacles, and the point...

Product Manual
Page 6
... digital broadcasting. Outdoor Antenna Grounding - See Figure below. Please, make sure to connect the power plug to the wall outlet socket after June 12 2009, a television receiver with respect to proper grounding of the mats and supporting structure grounding of the lead-in particular, specifies that the cable ground shall be connected to the 6 English grounding system of the building, as close...
... digital broadcasting. Outdoor Antenna Grounding - See Figure below. Please, make sure to connect the power plug to the wall outlet socket after June 12 2009, a television receiver with respect to proper grounding of the mats and supporting structure grounding of the lead-in particular, specifies that the cable ground shall be connected to the 6 English grounding system of the building, as close...
Product Manual
Page 8
TABLE OF CONTENT DIGITAL TELEVISION TRANSITION NOTICE 2 FOR YOUR SAFETY 3 PRECAUTIONS AND REMINDERS 4 IMPORTANT SAFETY INSTRUCTIONS 5 PREPARATION 9 ATTACHING THE BASE...9 PREPARING YOUR LCD HDTV FOR WALL MOUNTING 9 PERIPHERAL CONNECTION GUIDE 11 OPERATING INSTRUCTIONS 13 USING THE SIDE PANEL CONTROL 13 USING THE MENUS ...15 CHANNEL MENU ...15 VIDEO MENU ...15 AUDIO MENU ...16 FEATURE MENU...16 VGA MENU...19 TIPS ...19 PRODUCT SPECIFICATION 21 TROUBLESHOOTING 23 GLOSSARY ...24 WARRANTY 25 8
TABLE OF CONTENT DIGITAL TELEVISION TRANSITION NOTICE 2 FOR YOUR SAFETY 3 PRECAUTIONS AND REMINDERS 4 IMPORTANT SAFETY INSTRUCTIONS 5 PREPARATION 9 ATTACHING THE BASE...9 PREPARING YOUR LCD HDTV FOR WALL MOUNTING 9 PERIPHERAL CONNECTION GUIDE 11 OPERATING INSTRUCTIONS 13 USING THE SIDE PANEL CONTROL 13 USING THE MENUS ...15 CHANNEL MENU ...15 VIDEO MENU ...15 AUDIO MENU ...16 FEATURE MENU...16 VGA MENU...19 TIPS ...19 PRODUCT SPECIFICATION 21 TROUBLESHOOTING 23 GLOSSARY ...24 WARRANTY 25 8

Product Manual
Page 9
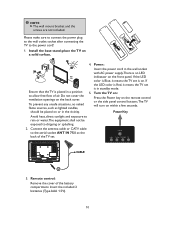
... use only with UL listed wall mount bracket with minimum weight of your TV to the stand. 2. Secure the wall mount bracket to the back of the display.The manufacturer's warranty does not cover user abuse or improper installations. ATTACHING THE BASE IMPORTANT: The base of the base and tighten the base to the stand. Remove the base stand from the wall to prevent cable interference. PREPARATION IMPORTANT: Do not apply pressure to the screen display...
... use only with UL listed wall mount bracket with minimum weight of your TV to the stand. 2. Secure the wall mount bracket to the back of the display.The manufacturer's warranty does not cover user abuse or improper installations. ATTACHING THE BASE IMPORTANT: The base of the base and tighten the base to the stand. Remove the base stand from the wall to prevent cable interference. PREPARATION IMPORTANT: Do not apply pressure to the screen display...
Product Manual
Page 10
... Power key on the remote control or the side panel control buttons.The TV will turn on a solid surface. 4. place the TV on within a few seconds. Insert the power cord in the wall socket with AC power supply.There is on or in standby mode. 5. If the LED color is Red, it means the TV set . NOTE f The wall mount bracket and the screws are not included. Please make sure to connect the power plug...
... Power key on the remote control or the side panel control buttons.The TV will turn on a solid surface. 4. place the TV on within a few seconds. Insert the power cord in the wall socket with AC power supply.There is on or in standby mode. 5. If the LED color is Red, it means the TV set . NOTE f The wall mount bracket and the screws are not included. Please make sure to connect the power plug...
Product Manual
Page 11
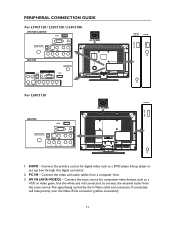
... POWER L26C1120 USB 1. Connect the input source for digital video such as a VCR or video game. Connect the primary source for composite video devices, such as a DVD player, bluray player or set top box through this digital connector. 2. Connect the video and audio cables from the same source.The signal being carried by the S-Video cable and connector, if connected, will take priority over the Video RCA connector (yellow connector). 11 AV IN (AV/S-VIDEO) - Use the white and red connectors to connect the external audio...
... POWER L26C1120 USB 1. Connect the input source for digital video such as a VCR or video game. Connect the primary source for composite video devices, such as a DVD player, bluray player or set top box through this digital connector. 2. Connect the video and audio cables from the same source.The signal being carried by the S-Video cable and connector, if connected, will take priority over the Video RCA connector (yellow connector). 11 AV IN (AV/S-VIDEO) - Use the white and red connectors to connect the external audio...

Product Manual
Page 12
...-wall, not from Cable Box) for component video devices such as a DVD Player or set top box here. Insert a USB storage device to the USB port to view photos or listen to the Component socket.) 12 ANTENNA/CABLE DIGITAL/ANALOG - When a digital audio signal is inserted to the plug, the speakers will be muted. Earphone Output - 4. SPDIF (Optical Digital Audio Out) - Use red for Pr, blue for Pb, green for Y, red for right audio (R) and white for viewing, the digital audio will be available on the remote control...
...-wall, not from Cable Box) for component video devices such as a DVD Player or set top box here. Insert a USB storage device to the USB port to view photos or listen to the Component socket.) 12 ANTENNA/CABLE DIGITAL/ANALOG - When a digital audio signal is inserted to the plug, the speakers will be muted. Earphone Output - 4. SPDIF (Optical Digital Audio Out) - Use red for Pr, blue for Pb, green for Y, red for right audio (R) and white for viewing, the digital audio will be available on the remote control...
Product Manual
Page 13
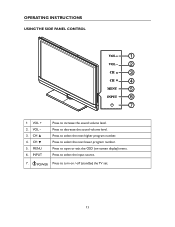
MENU 6. Press to increase the sound volume level. INPUT Press to decrease the sound volume level. Press to select the input source. 7. VOL 3. Press to open or exit the OSD (on / off (standby) the TV set. 13 Press to select the next lower program number. CH Ÿ 4. CH ź 5. i POWER Press to select the next higher program number. OPERATING INSTRUCTIONS USING THE SIDE PANEL CONTROL 1 2 3 4 5 6 7 1 VOL + 2. Press to turn on -screen display) menu.
MENU 6. Press to increase the sound volume level. INPUT Press to decrease the sound volume level. Press to select the input source. 7. VOL 3. Press to open or exit the OSD (on / off (standby) the TV set. 13 Press to select the next lower program number. CH Ÿ 4. CH ź 5. i POWER Press to select the next higher program number. OPERATING INSTRUCTIONS USING THE SIDE PANEL CONTROL 1 2 3 4 5 6 7 1 VOL + 2. Press to turn on -screen display) menu.

Product Manual
Page 14
... C.C. > < Source Press "Source" to open the Source List. EPG Press to display the previous channel. Info Press to freeze the displayed picture. Freeze Press to show the information about the input source,TV channel, display resolution and current time. to adjust the volume. to browse through the TV channels. V-Chip Press to lock Parental Control temporarily. (After setting the restricted table of DTV. Press repeatedly to switch the video mode: Standard, Eco, Movie, Personal, Vivid. Sleep...
... C.C. > < Source Press "Source" to open the Source List. EPG Press to display the previous channel. Info Press to freeze the displayed picture. Freeze Press to show the information about the input source,TV channel, display resolution and current time. to adjust the volume. to browse through the TV channels. V-Chip Press to lock Parental Control temporarily. (After setting the restricted table of DTV. Press repeatedly to switch the video mode: Standard, Eco, Movie, Personal, Vivid. Sleep...
Product Manual
Page 15
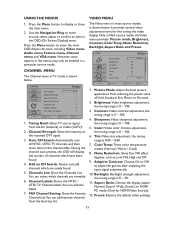
... received DTV signal. 3. Color: Video color chroma adjustment, the tuning range is 0 ~ 100. 5. Adjust the items including Video menu, Audio menu, Feature menu, Channel menu, and VGA menu. Sharpness: Video sharpness adjustment, the tuning range is 0 ~ 100. 6. Preset: Restore the default video settings. 15 Press the Menu button to adjust the gamma after analyzing the input signal automatically. 10. During the channel scan process, the OSD will display the number of channels which channels are newly found . 4. VIDEO Move Picture Mode Brightness Contrast Sharpness Color...
... received DTV signal. 3. Color: Video color chroma adjustment, the tuning range is 0 ~ 100. 5. Adjust the items including Video menu, Audio menu, Feature menu, Channel menu, and VGA menu. Sharpness: Video sharpness adjustment, the tuning range is 0 ~ 100. 6. Preset: Restore the default video settings. 15 Press the Menu button to adjust the gamma after analyzing the input signal automatically. 10. During the channel scan process, the OSD will display the number of channels which channels are newly found . 4. VIDEO Move Picture Mode Brightness Contrast Sharpness Color...

Product Manual
Page 16
... TV programs.The number of the supported audio languages depends on the mode. Time: Set current time.The sub-menu includes Time Mode,Time Zone, and Daylight Savings. [Time Mode] - Sound Mode: Choose the audio mode: Personal, Music, or Speech. 2. AVL: Choose On or Off to adjust volume to On or Off. FEATURE Menu Language Time Password Setting Parental Control Closed Captions Analog Captions Digital Captions English Off CC1 SERVICE1 Move ENTER Select Menu Return Exit Exit 1. Select from Auto or Manual. [Time Zone] - FEATURE Time Time Mode Time Zone...
... TV programs.The number of the supported audio languages depends on the mode. Time: Set current time.The sub-menu includes Time Mode,Time Zone, and Daylight Savings. [Time Mode] - Sound Mode: Choose the audio mode: Personal, Music, or Speech. 2. AVL: Choose On or Off to adjust volume to On or Off. FEATURE Menu Language Time Password Setting Parental Control Closed Captions Analog Captions Digital Captions English Off CC1 SERVICE1 Move ENTER Select Menu Return Exit Exit 1. Select from Auto or Manual. [Time Zone] - FEATURE Time Time Mode Time Zone...

Product Manual
Page 17
... set to lock or unlock the control buttons on the side panel of the submenu OSD. [Size] - If Customer mode is only available in Digital TV (ATSC) mode. [Style] - Digital closed caption font size, which can only be controlled by the remote control. [Block Unrated TV] - Automatic / Solid / Flashing / Transparent / Translucent. [Edge Effect] - Before entering the Parental Control sub-menu, enter the password first.Then the user can be set to restrict viewing of certain programs...
... set to lock or unlock the control buttons on the side panel of the submenu OSD. [Size] - If Customer mode is only available in Digital TV (ATSC) mode. [Style] - Digital closed caption font size, which can only be controlled by the remote control. [Block Unrated TV] - Automatic / Solid / Flashing / Transparent / Translucent. [Edge Effect] - Before entering the Parental Control sub-menu, enter the password first.Then the user can be set to restrict viewing of certain programs...

Product Manual
Page 18
... folder. Automatic / Red / Green / Blue / Yellow / Magenta / Cyan / Black / White. 9. Restore the default component setting values. 11. v PlayList (on a USB storage device. Component Setting: This option only shows and is from 0 to 1000 files. v Image Delay: Set the display time for non-TV sources.You can edit the input labels. 10. v Music On Slide Show: Enable background Music during the slide show mode. Press Menu to enlarge...
... folder. Automatic / Red / Green / Blue / Yellow / Magenta / Cyan / Black / White. 9. Restore the default component setting values. 11. v PlayList (on a USB storage device. Component Setting: This option only shows and is from 0 to 1000 files. v Image Delay: Set the display time for non-TV sources.You can edit the input labels. 10. v Music On Slide Show: Enable background Music during the slide show mode. Press Menu to enlarge...
Product Manual
Page 19
... MP3 media player interface only. Please ensure you dispose of . Preset: Resets all the default settings. Reset to Default: Restore all MP3 settings to safely recycling electronic products and product materials. Dolby License Notice and Trademark Acknowledgement Manufactured under license from the TV. Auto Adjust: Adjust the settings automatically. 6. Exit MP3MusicBox: Exit the MP3MusicBox interface. 12. Unplug the power cord before cleaning the screen. After setting...
... MP3 media player interface only. Please ensure you dispose of . Preset: Resets all the default settings. Reset to Default: Restore all MP3 settings to safely recycling electronic products and product materials. Dolby License Notice and Trademark Acknowledgement Manufactured under license from the TV. Auto Adjust: Adjust the settings automatically. 6. Exit MP3MusicBox: Exit the MP3MusicBox interface. 12. Unplug the power cord before cleaning the screen. After setting...

Product Manual
Page 21
.../S-Video input SPDIF HDMI Earphone Output USB PORT 21 For L19C1120 / L22C1120 / L26C1120 : 1360x768@60Hz. Note: 1360x768@60Hz : For L19C1120 / L22C1120 / L26C1120 only. 1280x1024@60Hz, 1440x900@60Hz, 1680x1050@60Hz,1920x1080@60Hz : For L24C1180 only. PRODUCT SPECIFICATION NOTE v This model complies with features and/or specifications that may be compatible with the specifications listed below. v Designs and specifications are subject to change without notice. L19C1120 L22C1120 L24C1180 L26C1120 DISPLAY...
.../S-Video input SPDIF HDMI Earphone Output USB PORT 21 For L19C1120 / L22C1120 / L26C1120 : 1360x768@60Hz. Note: 1360x768@60Hz : For L19C1120 / L22C1120 / L26C1120 only. 1280x1024@60Hz, 1440x900@60Hz, 1680x1050@60Hz,1920x1080@60Hz : For L24C1180 only. PRODUCT SPECIFICATION NOTE v This model complies with features and/or specifications that may be compatible with the specifications listed below. v Designs and specifications are subject to change without notice. L19C1120 L22C1120 L24C1180 L26C1120 DISPLAY...

Product Manual
Page 22
Model No. L19C1120 L22C1120 L24C1180 Dimensions with Stand (W x H x D) Dimensions without Stand (W x H x D) Weight with Stand Weight without Stand and Base VESA-compatible wall bracket (W x H) Screw type WEIGHT & DIMENSIOIN 18.00x12.79x6.74 20.78x15.03x6.96 22.53x16.05x6.96 (inch) (inch) (inch) 18.00x12.13x2.64 20.78x13.67x2.57 22.53x14.68x2.57 (inch) (inch) (inch) 9.31 lbs 10.71 lbs 12.65 lbs 8.6 lbs 9.99 lbs 11.88 lbs WALL MOUNTING 100x100 mm 100x100 mm 100x100 mm Metric 4x10 mm Metric 4x10 mm Metric 4x10 mm Power Consumption Standby 45W
Model No. L19C1120 L22C1120 L24C1180 Dimensions with Stand (W x H x D) Dimensions without Stand (W x H x D) Weight with Stand Weight without Stand and Base VESA-compatible wall bracket (W x H) Screw type WEIGHT & DIMENSIOIN 18.00x12.79x6.74 20.78x15.03x6.96 22.53x16.05x6.96 (inch) (inch) (inch) 18.00x12.13x2.64 20.78x13.67x2.57 22.53x14.68x2.57 (inch) (inch) (inch) 9.31 lbs 10.71 lbs 12.65 lbs 8.6 lbs 9.99 lbs 11.88 lbs WALL MOUNTING 100x100 mm 100x100 mm 100x100 mm Metric 4x10 mm Metric 4x10 mm Metric 4x10 mm Power Consumption Standby 45W

Product Manual
Page 23
... mode. 23 Using a highly directional antenna may improve the picture. hair dryer, nearby neon lights, etc.) v Turn off one of customer controls are working. Replace if necessary. No power v Check if the TV's AC power cord is muted; v Unplug the TV, wait for receiver installation and adjustments of the peripherals. No picture v Check antenna connections at the same time. Try another channel. v Check the Closed Captions control. press the MUTE button on the TV. Switch...
... mode. 23 Using a highly directional antenna may improve the picture. hair dryer, nearby neon lights, etc.) v Turn off one of customer controls are working. Replace if necessary. No power v Check if the TV's AC power cord is muted; v Unplug the TV, wait for receiver installation and adjustments of the peripherals. No picture v Check antenna connections at the same time. Try another channel. v Check the Closed Captions control. press the MUTE button on the TV. Switch...

Product Manual
Page 24
... 720p or 1080i active scan lines. Designed for use with the TV picture. Sleep Timer You can connect your TV set a time period for user adjustments. Audio / Video Inputs Located on the TV screen is made available for which allows stereo sounds to provide maximum consumer viewing satisfaction. 24 MPAA Motion Picture Association of features shown on the rear of the receiver, these connectors (RCA phono type plug) are technically defined as...
... 720p or 1080i active scan lines. Designed for use with the TV picture. Sleep Timer You can connect your TV set a time period for user adjustments. Audio / Video Inputs Located on the TV screen is made available for which allows stereo sounds to provide maximum consumer viewing satisfaction. 24 MPAA Motion Picture Association of features shown on the rear of the receiver, these connectors (RCA phono type plug) are technically defined as...


