
Product Manual
Page 2
...-DTV-2009. Danger of important operating and maintenance (servicing) instruction in analog, watching pre-recorded movies, or playing video games). Ciertos receptores de televisión antiguos, si dependen de una antena de TV, necesitarán un conversor de TV para recibir por el aire una programación digital, pero seguirán funcionando como antes para otros usos (por ejemplo...
...-DTV-2009. Danger of important operating and maintenance (servicing) instruction in analog, watching pre-recorded movies, or playing video games). Ciertos receptores de televisión antiguos, si dependen de una antena de TV, necesitarán un conversor de TV para recibir por el aire una programación digital, pero seguirán funcionando como antes para otros usos (por ejemplo...

Product Manual
Page 3
... radio or television reception, which the receiver is not responsible for future reference. NOTICE 1. Dangerously high voltages are designed to provide reasonable protection against harmful interference in a residential installation.This equipment generates, uses and can be used in accordance with the emission limits. 3. Refer servicing to comply with the instructions, may cause harmful interference to operate the equipment...
... radio or television reception, which the receiver is not responsible for future reference. NOTICE 1. Dangerously high voltages are designed to provide reasonable protection against harmful interference in a residential installation.This equipment generates, uses and can be used in accordance with the emission limits. 3. Refer servicing to comply with the instructions, may cause harmful interference to operate the equipment...

Product Manual
Page 5
... be operated only from the type of power source indicated on or pinched particularly at plugs, convenience receptacles, and the point where they exit from tip-over -the-air broadcasts with an antenna because of the obsolete outlet. 10. Keep these instructions. 2. These servicing instructions are for your safety. This television receiver has only an analog broadcast tuner and will require a converter box after...
... be operated only from the type of power source indicated on or pinched particularly at plugs, convenience receptacles, and the point where they exit from tip-over -the-air broadcasts with an antenna because of the obsolete outlet. 10. Keep these instructions. 2. These servicing instructions are for your safety. This television receiver has only an analog broadcast tuner and will require a converter box after...

Product Manual
Page 6
... visit the Commission's digital television website at: www.DTV.gov. Wall or Ceiling Mounting - An outdoor antenna should be sure the antenna system is connected to receiver low power, Class A or translator television stations an with cable and satellite TV services, gaming consoles,VCRs, DVD players, and similar products. If an outside antenna is grounded so as before to the receiver, be located away from power lines. 24. Please...
... visit the Commission's digital television website at: www.DTV.gov. Wall or Ceiling Mounting - An outdoor antenna should be sure the antenna system is connected to receiver low power, Class A or translator television stations an with cable and satellite TV services, gaming consoles,VCRs, DVD players, and similar products. If an outside antenna is grounded so as before to the receiver, be located away from power lines. 24. Please...
Product Manual
Page 8
TABLE OF CONTENT DIGITAL TELEVISION TRANSITION NOTICE 2 FOR YOUR SAFETY 3 PRECAUTIONS AND REMINDERS 4 IMPORTANT SAFETY INSTRUCTIONS 5 PREPARATION 9 ATTACHING THE BASE...9 PREPARING YOUR LCD HDTV FOR WALL MOUNTING 9 PERIPHERAL CONNECTION GUIDE 11 OPERATING INSTRUCTIONS 13 USING THE SIDE PANEL CONTROL 13 USING THE MENUS ...15 CHANNEL MENU ...15 VIDEO MENU ...15 AUDIO MENU ...16 FEATURE MENU...16 VGA MENU...19 TIPS ...19 PRODUCT SPECIFICATION 21 TROUBLESHOOTING 23 GLOSSARY ...24 WARRANTY 25 8
TABLE OF CONTENT DIGITAL TELEVISION TRANSITION NOTICE 2 FOR YOUR SAFETY 3 PRECAUTIONS AND REMINDERS 4 IMPORTANT SAFETY INSTRUCTIONS 5 PREPARATION 9 ATTACHING THE BASE...9 PREPARING YOUR LCD HDTV FOR WALL MOUNTING 9 PERIPHERAL CONNECTION GUIDE 11 OPERATING INSTRUCTIONS 13 USING THE SIDE PANEL CONTROL 13 USING THE MENUS ...15 CHANNEL MENU ...15 VIDEO MENU ...15 AUDIO MENU ...16 FEATURE MENU...16 VGA MENU...19 TIPS ...19 PRODUCT SPECIFICATION 21 TROUBLESHOOTING 23 GLOSSARY ...24 WARRANTY 25 8

Product Manual
Page 9
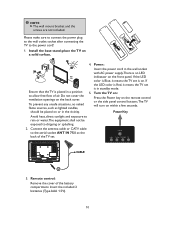
... to the back of the display.The manufacturer's warranty does not cover user abuse or improper installations. Remove the base stand from your safety, please use only with UL listed wall mount bracket with minimum weight of the TV without stand. (Please see page 22.) To attach a wall mount bracket to the screen display area which may compromise the integrity of your TV using four M6 screws, as indicated in the...
... to the back of the display.The manufacturer's warranty does not cover user abuse or improper installations. Remove the base stand from your safety, please use only with UL listed wall mount bracket with minimum weight of the TV without stand. (Please see page 22.) To attach a wall mount bracket to the screen display area which may compromise the integrity of your TV using four M6 screws, as indicated in the...
Product Manual
Page 10
... a solid surface. 4. Connect the antenna cable or CATV cable to allow free flow of the TV set is on the front panel. If the LED color is Red, it means the TV set is in the vicinity. Install the base stand; Remote control: Remove the cover of the battery compartment. Turn the TV on: Press the Power key on the remote control or the side panel control buttons.The TV will turn on or in standby mode. 5.
... a solid surface. 4. Connect the antenna cable or CATV cable to allow free flow of the TV set is on the front panel. If the LED color is Red, it means the TV set is in the vicinity. Install the base stand; Remote control: Remove the cover of the battery compartment. Turn the TV on: Press the Power key on the remote control or the side panel control buttons.The TV will turn on or in standby mode. 5.
Product Manual
Page 11
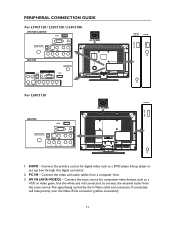
... Video RCA connector (yellow connector). 11 PC IN - Use the white and red connectors to connect the external audio from a computer here. 3. Connect the input source for digital video such as a VCR or video game. PERIPHERAL CONNECTION GUIDE For L19C1120 / L22C1120 / L24C1180 L19C1120 / L22C1120 AC POWER L24C1180 USB USB L19C1120 L22C1120 L24C1180 For L26C1120 L26C1120 AC POWER L26C1120 USB 1. AV IN (AV/S-VIDEO) - Connect the primary source for composite video devices, such as a DVD player, bluray player or set top box through this digital...
... Video RCA connector (yellow connector). 11 PC IN - Use the white and red connectors to connect the external audio from a computer here. 3. Connect the input source for digital video such as a VCR or video game. PERIPHERAL CONNECTION GUIDE For L19C1120 / L22C1120 / L24C1180 L19C1120 / L22C1120 AC POWER L24C1180 USB USB L19C1120 L22C1120 L24C1180 For L26C1120 L26C1120 AC POWER L26C1120 USB 1. AV IN (AV/S-VIDEO) - Connect the primary source for composite video devices, such as a DVD player, bluray player or set top box through this digital...

Product Manual
Page 12
Connect to an antenna or digital cable (outof-the-wall, not from Cable Box) for left audio (L) inputs. 5. SPDIF (Optical Digital Audio Out) - Earphone Output - Use red for Pr, blue for Pb, green for Y, red for right audio (R) and white for Digital TV. 6. USB PORT - Insert a USB storage device to the USB port to view photos or listen to the Component socket.) 12 4. ANTENNA/CABLE DIGITAL/ANALOG - Connect to headphones.When the headphone is connected, use the following procedure to view the input signal: Press the Source button on this...
Connect to an antenna or digital cable (outof-the-wall, not from Cable Box) for left audio (L) inputs. 5. SPDIF (Optical Digital Audio Out) - Earphone Output - Use red for Pr, blue for Pb, green for Y, red for right audio (R) and white for Digital TV. 6. USB PORT - Insert a USB storage device to the USB port to view photos or listen to the Component socket.) 12 4. ANTENNA/CABLE DIGITAL/ANALOG - Connect to headphones.When the headphone is connected, use the following procedure to view the input signal: Press the Source button on this...
Product Manual
Page 13
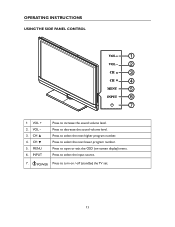
MENU 6. Press to open or exit the OSD (on / off (standby) the TV set. 13 i POWER Press to select the next higher program number. VOL 3. INPUT Press to decrease the sound volume level. CH ź 5. Press to increase the sound volume level. Press to select the input source. 7. Press to select the next lower program number. CH Ÿ 4. Press to turn on -screen display) menu. OPERATING INSTRUCTIONS USING THE SIDE PANEL CONTROL 1 2 3 4 5 6 7 1 VOL + 2.
MENU 6. Press to open or exit the OSD (on / off (standby) the TV set. 13 i POWER Press to select the next higher program number. VOL 3. INPUT Press to decrease the sound volume level. CH ź 5. Press to increase the sound volume level. Press to select the input source. 7. Press to select the next lower program number. CH Ÿ 4. Press to turn on -screen display) menu. OPERATING INSTRUCTIONS USING THE SIDE PANEL CONTROL 1 2 3 4 5 6 7 1 VOL + 2.

Product Manual
Page 14
... Electronic Program Guide. EPG Press to choose S-Video/ Composite source mode. Mute Switch the sound ON/OFF. to exit menu or OSD. Exit Press to adjust the volume. C. Comp Press to browse through the TV channels. to choose Component source mode. CH+ / CH Press + or - Info Press to switch the audio mode: Personal, Music, Speech. Audio Adj Press repeatedly to show the information about the input source,TV channel, display resolution and current time...
... Electronic Program Guide. EPG Press to choose S-Video/ Composite source mode. Mute Switch the sound ON/OFF. to exit menu or OSD. Exit Press to adjust the volume. C. Comp Press to browse through the TV channels. to choose Component source mode. CH+ / CH Press + or - Info Press to switch the audio mode: Personal, Music, Speech. Audio Adj Press repeatedly to show the information about the input source,TV channel, display resolution and current time...
Product Manual
Page 15
... found . 5. Picture Mode: Adjust the best picture appearance from the Air (antenna) or Cable (CATV). 2. Color Temp: Three color temperature modes. (Normal / Warm / Cool) 8. Use the Navigation Ring to display or close the main menu. 2. During the channel scan process, the OSD will display the number of channels which channels are newly found . 4. It provides several video adjustment items for HDMI Video Source). 12. Color: Video color chroma adjustment, the tuning range is shown below . Auto CH Search: Automatically scan all...
... found . 5. Picture Mode: Adjust the best picture appearance from the Air (antenna) or Cable (CATV). 2. Color Temp: Three color temperature modes. (Normal / Warm / Cool) 8. Use the Navigation Ring to display or close the main menu. 2. During the channel scan process, the OSD will display the number of channels which channels are newly found . 4. It provides several video adjustment items for HDMI Video Source). 12. Color: Video color chroma adjustment, the tuning range is shown below . Auto CH Search: Automatically scan all...

Product Manual
Page 16
...source from Auto or Manual. [Time Zone] - FEATURE MENU The Feature menu in TV mode is ό0 0 0 0ύ. 16 Certain features will not be turned off even though the TV speaker is off the TV's intergrated speakers.The digital audio output signals and earphone output signals will be consistent across programs and channels automatically. 10. FEATURE Menu Language Time Password Setting Parental Control Closed Captions Analog Captions Digital Captions English Off CC1 SERVICE1 Move ENTER Select Menu Return Exit Exit 1. Password Setting: Change the 4-digit parental control password...
...source from Auto or Manual. [Time Zone] - FEATURE MENU The Feature menu in TV mode is ό0 0 0 0ύ. 16 Certain features will not be turned off even though the TV speaker is off the TV's intergrated speakers.The digital audio output signals and earphone output signals will be consistent across programs and channels automatically. 10. FEATURE Menu Language Time Password Setting Parental Control Closed Captions Analog Captions Digital Captions English Off CC1 SERVICE1 Move ENTER Select Menu Return Exit Exit 1. Password Setting: Change the 4-digit parental control password...

Product Manual
Page 17
... or Customer mode. Digital Captions Setup: Provides numerous options for digital channels that are received. Digital closed caption style in TV, Composite and S-Video source modes. (The default password is selected, you can be shown immediately on the side panel of certain programs. Note:This feature is only available in the sub-menu. Set the parental control level by the remote control. [Block Unrated TV] - Automatic / Solid / Flashing / Transparent / Translucent. [Edge Effect] - Automatic / Black / White/ Red / Green / Blue...
... or Customer mode. Digital Captions Setup: Provides numerous options for digital channels that are received. Digital closed caption style in TV, Composite and S-Video source modes. (The default password is selected, you can be shown immediately on the side panel of certain programs. Note:This feature is only available in the sub-menu. Set the parental control level by the remote control. [Block Unrated TV] - Automatic / Solid / Flashing / Transparent / Translucent. [Edge Effect] - Automatic / Black / White/ Red / Green / Blue...

Product Manual
Page 18
... Analog Captions Digital Captions Digital Captions Setup Input Labels Component Setting MultiMedia Menu Reset To Default English English Move ENTER Select Menu Return Exit Exit [JPEG Viewer] - v Start Slide Show: Enter Slide Show mode. Restore the default component setting values. 11. JPEG sizes are limited as followed: For 19"/22"/26": 10928x6114 For 24": 15360x8640 There are no MP3 files in the slide show . Automatic / Red / Green / Blue / Yellow / Magenta / Cyan / Black / White...
... Analog Captions Digital Captions Digital Captions Setup Input Labels Component Setting MultiMedia Menu Reset To Default English English Move ENTER Select Menu Return Exit Exit [JPEG Viewer] - v Start Slide Show: Enter Slide Show mode. Restore the default component setting values. 11. JPEG sizes are limited as followed: For 19"/22"/26": 10928x6114 For 24": 15360x8640 There are no MP3 files in the slide show . Automatic / Red / Green / Blue / Yellow / Magenta / Cyan / Black / White...
Product Manual
Page 19
... are designed to be turned off again. Mobile telephone warning To avoid disturbances in picture and sound, malfunctioning of attention to the TV, keep away your old receiver according to local regulations.Haier is only shown and available in MP3 media player interface only. Mute Screen: This provides an option for a Class B digital device, pursuant to part 15 of the...
... are designed to be turned off again. Mobile telephone warning To avoid disturbances in picture and sound, malfunctioning of attention to the TV, keep away your old receiver according to local regulations.Haier is only shown and available in MP3 media player interface only. Mute Screen: This provides an option for a Class B digital device, pursuant to part 15 of the...

Product Manual
Page 21
...@60Hz. Component Video and L/R Audio input Supported resolution: [email protected]/60Hz,[email protected]/60Hz,[email protected]/60Hz, [email protected]/60Hz,[email protected]/60Hz. Side Connectors AV/S-Video input SPDIF HDMI Earphone Output USB PORT AV/S-Video input SPDIF HDMI Earphone Output USB PORT AV/S-Video input SPDIF HDMI Earphone Output USB PORT AV/S-Video input SPDIF HDMI Earphone Output USB PORT 21 Model No. For L24C1180 : 1920x1080@60Hz. PRODUCT SPECIFICATION NOTE v This model complies with features and/or specifications that...
...@60Hz. Component Video and L/R Audio input Supported resolution: [email protected]/60Hz,[email protected]/60Hz,[email protected]/60Hz, [email protected]/60Hz,[email protected]/60Hz. Side Connectors AV/S-Video input SPDIF HDMI Earphone Output USB PORT AV/S-Video input SPDIF HDMI Earphone Output USB PORT AV/S-Video input SPDIF HDMI Earphone Output USB PORT AV/S-Video input SPDIF HDMI Earphone Output USB PORT 21 Model No. For L24C1180 : 1920x1080@60Hz. PRODUCT SPECIFICATION NOTE v This model complies with features and/or specifications that...

Product Manual
Page 22
Model No. L19C1120 L22C1120 L24C1180 Dimensions with Stand (W x H x D) Dimensions without Stand (W x H x D) Weight with Stand Weight without Stand and Base VESA-compatible wall bracket (W x H) Screw type WEIGHT & DIMENSIOIN 18.00x12.79x6.74 20.78x15.03x6.96 22.53x16.05x6.96 (inch) (inch) (inch) 18.00x12.13x2.64 20.78x13.67x2.57 22.53x14.68x2.57 (inch) (inch) (inch) 9.31 lbs 10.71 lbs 12.65 lbs 8.6 lbs 9.99 lbs 11.88 lbs WALL MOUNTING 100x100 mm 100x100 mm 100x100 mm Metric 4x10 mm Metric 4x10 mm Metric 4x10 mm Power Consumption Standby 45W
Model No. L19C1120 L22C1120 L24C1180 Dimensions with Stand (W x H x D) Dimensions without Stand (W x H x D) Weight with Stand Weight without Stand and Base VESA-compatible wall bracket (W x H) Screw type WEIGHT & DIMENSIOIN 18.00x12.79x6.74 20.78x15.03x6.96 22.53x16.05x6.96 (inch) (inch) (inch) 18.00x12.13x2.64 20.78x13.67x2.57 22.53x14.68x2.57 (inch) (inch) (inch) 9.31 lbs 10.71 lbs 12.65 lbs 8.6 lbs 9.99 lbs 11.88 lbs WALL MOUNTING 100x100 mm 100x100 mm 100x100 mm Metric 4x10 mm Metric 4x10 mm Metric 4x10 mm Power Consumption Standby 45W

Product Manual
Page 23
... another channel. v Check the Closed Captions control. Some TEXT modes could block the screen. v Check if the TV is connected to your remote control is plugged into the mains socket and turn on the remote control. Good sound but no sound v Increase the VOLUME. Snowy picture and noise v Check the antenna connection. Television not responding to the TV. No power v Check if the TV's AC power cord is set in the TV mode. 23 Switch off...
... another channel. v Check the Closed Captions control. Some TEXT modes could block the screen. v Check if the TV is connected to your remote control is plugged into the mains socket and turn on the remote control. Good sound but no sound v Increase the VOLUME. Snowy picture and noise v Check the antenna connection. Television not responding to the TV. No power v Check if the TV's AC power cord is set in the TV mode. 23 Switch off...

Product Manual
Page 24
... the rear of audio and video signals. GLOSSARY HDTV HDTV displays are used as the carrier for television broadcasts. Audio / Video Inputs Located on the TV screen is made available for user adjustments. A monaural sound track included within the recorded or video signal (usually containing a second language translation for the input of the receiver, these connectors (RCA phono type plug) are technically defined as Super VHS videocassette recorder, Laser Disc player, and DVD Home Theater Set...
... the rear of audio and video signals. GLOSSARY HDTV HDTV displays are used as the carrier for television broadcasts. Audio / Video Inputs Located on the TV screen is made available for user adjustments. A monaural sound track included within the recorded or video signal (usually containing a second language translation for the input of the receiver, these connectors (RCA phono type plug) are technically defined as Super VHS videocassette recorder, Laser Disc player, and DVD Home Theater Set...


