
User Manual
Page 87
MODELS: HLC26R HLC32R R TFT-LCD TV/DVD Combo USER MANUAL Please READ this manual carefully before operating your TV, and retain it for future reference.
MODELS: HLC26R HLC32R R TFT-LCD TV/DVD Combo USER MANUAL Please READ this manual carefully before operating your TV, and retain it for future reference.

User Manual
Page 89
...interference will not occur in a residential installation. However there is connected. *Consult the dealer or an experienced radio/TV technician for a Class B digital device, pursuant to Part 15 of the FCC Rule. This equipment generates, use...and on a circuit different from that may be used in accordance with the limits for help. Owner s Manual 3 and maintain at least 40cm spacing to video equipment; FCC CAUTION: To assure continued compliance and possible undesirable... this device must be not cause harmful interference. (2) this LCD display to other peripheral device.
...interference will not occur in a residential installation. However there is connected. *Consult the dealer or an experienced radio/TV technician for a Class B digital device, pursuant to Part 15 of the FCC Rule. This equipment generates, use...and on a circuit different from that may be used in accordance with the limits for help. Owner s Manual 3 and maintain at least 40cm spacing to video equipment; FCC CAUTION: To assure continued compliance and possible undesirable... this device must be not cause harmful interference. (2) this LCD display to other peripheral device.

User Manual
Page 90
This easy-to-use of your manual. They are on label in getting the best use manual will need it to obtain warranty service. 4 TV LCD-TFT Model number serial number Date of purchase Staple your receipt to your product. You will guide you for purchasing the Haier product. Safety Instructions SAVE THESE INSTRUCTIONS Thank you in back of the unit. Remember to record the model and serial number.
This easy-to-use of your manual. They are on label in getting the best use manual will need it to obtain warranty service. 4 TV LCD-TFT Model number serial number Date of purchase Staple your receipt to your product. You will guide you for purchasing the Haier product. Safety Instructions SAVE THESE INSTRUCTIONS Thank you in back of the unit. Remember to record the model and serial number.

User Manual
Page 91
...ti ng a V CR 10 External A/V Source Setup 11 Co nn ec ti ng a D VD p la ye r 11 Connecting a DTV(digital TV 12 Connecting digital audio output 12 Co nn ec ti ng a c om pu te r 13 Monitor Out Setup 14 HD MI a nd D VI... 16 Power source 16 Removing the table stand and installing a wall mount bracket 17 Operation Switching On/Off the TV set 18 Choose the Menu Language 18 Choose the input source 18 Channel Menu Channel Scan 19 Ch an ne ...Setup Playable Discs Discs Protection and DVD Characteristics Maintenance Product Specification Troubleshooting Warranty Owner s Manual 5
...ti ng a V CR 10 External A/V Source Setup 11 Co nn ec ti ng a D VD p la ye r 11 Connecting a DTV(digital TV 12 Connecting digital audio output 12 Co nn ec ti ng a c om pu te r 13 Monitor Out Setup 14 HD MI a nd D VI... 16 Power source 16 Removing the table stand and installing a wall mount bracket 17 Operation Switching On/Off the TV set 18 Choose the Menu Language 18 Choose the input source 18 Channel Menu Channel Scan 19 Ch an ne ...Setup Playable Discs Discs Protection and DVD Characteristics Maintenance Product Specification Troubleshooting Warranty Owner s Manual 5
User Manual
Page 93
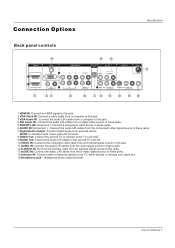
.... NOTE: In standby mode, these ports will not work. 8.VIDEO Out: Connect the second TV or monitor to the TV`s AV OUT. 9.AUDIO Out: Connect the audio L/R cables to the second TV`s AV IN. 10.VIDEO IN: Connects the composite video cable from an external signal source to...these jacks. 6.AUDIO IN(Component ): Connect the audio L/R cables from the S-Video signal source to these jacks. 7.Digital Audio Output: Connect digital audio to the TV, either directly or through your cable box. 15.Headphone jack : Headphone audio output terminal. R 1 VIDEO L-AUDIO- R VIDEO L-AUDIO-R VIDEO IN ANT IN...
.... NOTE: In standby mode, these ports will not work. 8.VIDEO Out: Connect the second TV or monitor to the TV`s AV OUT. 9.AUDIO Out: Connect the audio L/R cables to the second TV`s AV IN. 10.VIDEO IN: Connects the composite video cable from an external signal source to...these jacks. 6.AUDIO IN(Component ): Connect the audio L/R cables from the S-Video signal source to these jacks. 7.Digital Audio Output: Connect digital audio to the TV, either directly or through your cable box. 15.Headphone jack : Headphone audio output terminal. R 1 VIDEO L-AUDIO- R VIDEO L-AUDIO-R VIDEO IN ANT IN...

User Manual
Page 95
... D.MENU REPEAT A-B PLAY/ENTER SLOW ANGLE TITLE/PBC SEARCH AUDIO PROGRAM ZOOM D.CALL 10+ EXIT ARC GUIDE CH.LIST FAV.LIST TFT-LCD TV/DVD Combo OWNER'S MANUAL Please READ this manual carefully before operating your area. ANT IN To improve the picture quality in the connections. R S-VIDEO L-AUDIO- R VHF Antenna UHF Antenna Turn...
... D.MENU REPEAT A-B PLAY/ENTER SLOW ANGLE TITLE/PBC SEARCH AUDIO PROGRAM ZOOM D.CALL 10+ EXIT ARC GUIDE CH.LIST FAV.LIST TFT-LCD TV/DVD Combo OWNER'S MANUAL Please READ this manual carefully before operating your area. ANT IN To improve the picture quality in the connections. R S-VIDEO L-AUDIO- R VHF Antenna UHF Antenna Turn...

User Manual
Page 96
...the TV to the VCR owner`s manual.) 3. R 10 TV LCD-TFT Insert a video tape into the VCR and press PLAY on the VCR. (Refer to VCR, match the jack colors (Video = yellow, Audio Left = white, and Audio Right = red). Choose Your Connection There are several ways to connect your TV ... to the S-VIDEO input, the picture quality is improved; Connection Option 1 Set VCR output switch to channel 3 or 4 and then tune the TV to the Video input. 2. R S-VIDEO L-AUDIO- External Equipment Connections Installation NOTE: All cables shown are not included with using the INPUT button...
...the TV to the VCR owner`s manual.) 3. R 10 TV LCD-TFT Insert a video tape into the VCR and press PLAY on the VCR. (Refer to VCR, match the jack colors (Video = yellow, Audio Left = white, and Audio Right = red). Choose Your Connection There are several ways to connect your TV ... to the S-VIDEO input, the picture quality is improved; Connection Option 1 Set VCR output switch to channel 3 or 4 and then tune the TV to the Video input. 2. R S-VIDEO L-AUDIO- External Equipment Connections Installation NOTE: All cables shown are not included with using the INPUT button...
User Manual
Page 97
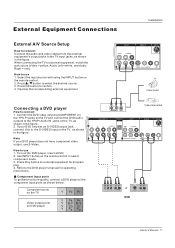
... Equipment Connections Installation External A/V Source Setup How to connect Connect the audio and video cables from the external equipment's output jacks to the TV input jacks, as shown below. Select the input source with using the INPUT button on the remote control to select component mode. 3. If... quality, connect a DVD player to the YPbPr Audio IN jacks on DVD player Y Pb Pr Y B-Y R-Y Y Cb Cr Y PB PR Owner s Manual 11 as shown in the figure. Video Game Set COMPONENT IN OPTICAL OUT AV OUT Pb Pr L-AUDIO- Connect the DVD video outputs (COMPONENT) to...
... Equipment Connections Installation External A/V Source Setup How to connect Connect the audio and video cables from the external equipment's output jacks to the TV input jacks, as shown below. Select the input source with using the INPUT button on the remote control to select component mode. 3. If... quality, connect a DVD player to the YPbPr Audio IN jacks on DVD player Y Pb Pr Y B-Y R-Y Y Cb Cr Y PB PR Owner s Manual 11 as shown in the figure. Video Game Set COMPONENT IN OPTICAL OUT AV OUT Pb Pr L-AUDIO- Connect the DVD video outputs (COMPONENT) to...

User Manual
Page 98
...TV... Connections Installation Connecting a DTV(digital TV) This TV can receive Digital Over-the-air/...TV`s audio to the TV Digital Audio(Optical) Output port. 2. Connect the other digital external device, refer to the owner`s manual... for video connections, depending on the audio equipment. R How to connect 1. Looking at the laser beam may damage your set -top box. (Refer to the figure as amplifers or speakers, please turn the TV... speakers off. ! Digital Set-top Box OPTICAL OUT L-AUDIO- This TV supports...manual for Digital Contents (480p,720p,1080i). Caution: Do not ...
...TV... Connections Installation Connecting a DTV(digital TV) This TV can receive Digital Over-the-air/...TV`s audio to the TV Digital Audio(Optical) Output port. 2. Connect the other digital external device, refer to the owner`s manual... for video connections, depending on the audio equipment. R How to connect 1. Looking at the laser beam may damage your set -top box. (Refer to the figure as amplifers or speakers, please turn the TV... speakers off. ! Digital Set-top Box OPTICAL OUT L-AUDIO- This TV supports...manual for Digital Contents (480p,720p,1080i). Caution: Do not ...

User Manual
Page 99
...Horizontal andVertical frequenciesis separate. R 1 Y Pb Pr L-AUDIO- Use theTV`s VGAor DVI (DigitalVisual Interface)AudioIN port foraudio connections, dependingon your TV. If the graphic card on your computer connector. UseINPUT onthe remotecontrol toselect VGAor HDMIsource. 3. If the refresh rate of either VGAor HDMI ... 60Hz 60Hz 75Hz 60Hz 75Hz HDMIIN 2 1 VGA IN VGA AUDIO VGA 2 Y COMPONENT IN Pb Pr L-AUDIO- R Owner s Manual 13 If the graphic card onthe computer doesoutput analog anddigital RGB simultaneously, set theTV to either VGAIN or HDMI IN todisplay the VGAon theTV...
...Horizontal andVertical frequenciesis separate. R 1 Y Pb Pr L-AUDIO- Use theTV`s VGAor DVI (DigitalVisual Interface)AudioIN port foraudio connections, dependingon your TV. If the graphic card on your computer connector. UseINPUT onthe remotecontrol toselect VGAor HDMIsource. 3. If the refresh rate of either VGAor HDMI ... 60Hz 60Hz 75Hz 60Hz 75Hz HDMIIN 2 1 VGA IN VGA AUDIO VGA 2 Y COMPONENT IN Pb Pr L-AUDIO- R Owner s Manual 13 If the graphic card onthe computer doesoutput analog anddigital RGB simultaneously, set theTV to either VGAIN or HDMI IN todisplay the VGAon theTV...

User Manual
Page 100
...Auto HDMI function, the output resolution of the source device to select HDMI input source in input source option of Select Main source menu. 14 TV LCD-TFT When the source device(DVD player or Set Top Box) supports DVI How To Connect 1. Press the INPUT button to 1280x720p. When ... source device will be automatically set to -DVI cable(not supplied with external audio equipments, such as amplifiers or speakers, please turn the TV speakers off. See the Operating Manual of HDMI port. How To Use If the source device supports Auto DVI function, the output resolution of this...
...Auto HDMI function, the output resolution of the source device to select HDMI input source in input source option of Select Main source menu. 14 TV LCD-TFT When the source device(DVD player or Set Top Box) supports DVI How To Connect 1. Press the INPUT button to 1280x720p. When ... source device will be automatically set to -DVI cable(not supplied with external audio equipments, such as amplifiers or speakers, please turn the TV speakers off. See the Operating Manual of HDMI port. How To Use If the source device supports Auto DVI function, the output resolution of this...

User Manual
Page 101
Cable sample Installation HDMI Cable (not supplied with the product) HDMI to DVI Cable (not supplied with the product) Analog Audio Cable (Stereo to RCA type) (not supplied with the product) Owner s Manual 15
Cable sample Installation HDMI Cable (not supplied with the product) HDMI to DVI Cable (not supplied with the product) Analog Audio Cable (Stereo to RCA type) (not supplied with the product) Owner s Manual 15

User Manual
Page 103
Owner s Manual 17 Removing the table stand and installing a wall mount bracket HLC26R Installation Remove 4X M4 screws securing the stand to the back of your TV. Use 4X M6 screws to secure the wall bracket (not supplied) to the TV, then remove the stand. Remove 6X M4 screws securing the stand to the back of your TV. HLC32R Use 4X M6 screws to secure the wall bracket (not supplied) to the TV, then remove the stand.
Owner s Manual 17 Removing the table stand and installing a wall mount bracket HLC26R Installation Remove 4X M4 screws securing the stand to the back of your TV. Use 4X M6 screws to secure the wall bracket (not supplied) to the TV, then remove the stand. Remove 6X M4 screws securing the stand to the back of your TV. HLC32R Use 4X M6 screws to secure the wall bracket (not supplied) to the TV, then remove the stand.

User Manual
Page 104
... Initial Setup: Set according to select Language. 4. If you intend to help you with some models, please see the object. 18 TV LCD-TFT Select Source TV Video1 Video2 S-Video Component1 Component2 VGA HDMI1 HDMI2 HDMI3 If there is just an example to be away on vacation, disconnect the power plug... the language which will disappear. Choose the Menu Language When you start using TV/AV button on the screen. Operation In the manual, the OSD (on screen display) may be different from the wall power outlet. The TV reverts to select language. Press VOL+ or OK button and then use CH...
... Initial Setup: Set according to select Language. 4. If you intend to help you with some models, please see the object. 18 TV LCD-TFT Select Source TV Video1 Video2 S-Video Component1 Component2 VGA HDMI1 HDMI2 HDMI3 If there is just an example to be away on vacation, disconnect the power plug... the language which will disappear. Choose the Menu Language When you start using TV/AV button on the screen. Operation In the manual, the OSD (on screen display) may be different from the wall power outlet. The TV reverts to select language. Press VOL+ or OK button and then use CH...
User Manual
Page 105
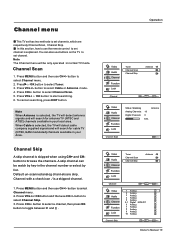
..., press EXIT button. Press MENU button and then use CH+/- button to select a channel, then press OK button to start searching. 6. Select EXIT Back Owner s Manual 19 Channel menu This TV set has two methods to set channel is explained. Note When Antenna is selected, the... OK Enter CH+/VOL+/- In this section, how to use the remote control to set channel. Press MENU button and then use buttons on the TV to set channels, which are skip. Press VOL+ or OK button to toggle between and . Press or OK button to select Channel menu. 2. Default un...
..., press EXIT button. Press MENU button and then use CH+/- button to select a channel, then press OK button to start searching. 6. Select EXIT Back Owner s Manual 19 Channel menu This TV set has two methods to set channel is explained. Note When Antenna is selected, the... OK Enter CH+/VOL+/- In this section, how to use the remote control to set channel. Press MENU button and then use buttons on the TV to set channels, which are skip. Press VOL+ or OK button to toggle between and . Press or OK button to select Channel menu. 2. Default un...

User Manual
Page 107
... you can also press P.MODE button on the input signal, one or more menu items may not be set by program . Operation Video menu The TV menu gives you an overview of the menus you to select the color mix (Tint) of picture(Standard/ Vivid/ Custom/ Mild). Press MENU button ... to adjust the setting. Note Only when the item of bright parts in the picture. Contrast This will adjust the sharpness of the picture. Owner s Manual 21 button to select Video menu. 2. Advanced Video To adjust the picture in advanced: DNR, Black Level Extender, White Peak Limiter, CTI, Flech Tone, ...
... you can also press P.MODE button on the input signal, one or more menu items may not be set by program . Operation Video menu The TV menu gives you an overview of the menus you to select the color mix (Tint) of picture(Standard/ Vivid/ Custom/ Mild). Press MENU button ... to adjust the setting. Note Only when the item of bright parts in the picture. Contrast This will adjust the sharpness of the picture. Owner s Manual 21 button to select Video menu. 2. Advanced Video To adjust the picture in advanced: DNR, Black Level Extender, White Peak Limiter, CTI, Flech Tone, ...

User Manual
Page 109
..., Bathroom, Cave, Arena and Church. AVL(Automatic Volume Control) This will be received in Mono; When having selected SAP button on the remote control, this TV can receive MTS stereo programs and SAP (Secondary Audio Program) that accompanies the stereo program; button to mono sound during stereo/SAP broadcasting. Press VOL... select language. Stereo or SAP can be used for the first time, you press SAP button, Mono, Stereo or SAP appear. Select EXIT Back Owner s Manual 23 Press VOL+/- button to increase or decrease higher-pitched sounds.
..., Bathroom, Cave, Arena and Church. AVL(Automatic Volume Control) This will be received in Mono; When having selected SAP button on the remote control, this TV can receive MTS stereo programs and SAP (Secondary Audio Program) that accompanies the stereo program; button to mono sound during stereo/SAP broadcasting. Press VOL... select language. Stereo or SAP can be used for the first time, you press SAP button, Mono, Stereo or SAP appear. Select EXIT Back Owner s Manual 23 Press VOL+/- button to increase or decrease higher-pitched sounds.

User Manual
Page 111
...OK button and then use CH+/- Sleep Timer setting The sleep timer automatically shuts off the TV after a preset time (from the number of minutes selected. 5. button to select the number of the TV. Date /Time setting Setting the clock is necessary in order to use the various timer... of minutes. Press VOL+ or OK button and then use CH+/- Press VOL+/- You can check the time while watching the TV. 1. Select EXIT Back Owner s Manual 25 The time begins to count down from 5 to 240 minutes). 1. Function menu Time zone setting This function allows you can...
...OK button and then use CH+/- Sleep Timer setting The sleep timer automatically shuts off the TV after a preset time (from the number of minutes selected. 5. button to select the number of the TV. Date /Time setting Setting the clock is necessary in order to use the various timer... of minutes. Press VOL+ or OK button and then use CH+/- Press VOL+/- You can check the time while watching the TV. 1. Select EXIT Back Owner s Manual 25 The time begins to count down from 5 to 240 minutes). 1. Function menu Time zone setting This function allows you can...

User Manual
Page 113
...TV-Y7) Owner s Manual 27 Viewing can be blocked by TV Rating or Individual Categories. sexual dialogue) L (Language - Ratings for Television programs : Parental Guide TV-Y (All children) TV-Y7 (Children 7 years older) TV-G (General audience) TV-PG (Parental guidance suggested) TV-14 (Parents strongly cautioned) TV...) V (Violence) FV (Fantasy Violence) (applies to TV-Y, TV-Y7,TV-G,TV-PG,TV-14, TV-MA) (applies to TV-PG, TV-14) (applies to TV-PG, TV-14, TV-MA) (applies to TV-PG, TV-14, TV-MA) (applies to TV-PG, TV-14, TV-MA) (applies to -video movies use the Movie Rating...
...TV-Y7) Owner s Manual 27 Viewing can be blocked by TV Rating or Individual Categories. sexual dialogue) L (Language - Ratings for Television programs : Parental Guide TV-Y (All children) TV-Y7 (Children 7 years older) TV-G (General audience) TV-PG (Parental guidance suggested) TV-14 (Parents strongly cautioned) TV...) V (Violence) FV (Fantasy Violence) (applies to TV-Y, TV-Y7,TV-G,TV-PG,TV-14, TV-MA) (applies to TV-PG, TV-14) (applies to TV-PG, TV-14, TV-MA) (applies to TV-PG, TV-14, TV-MA) (applies to TV-PG, TV-14, TV-MA) (applies to -video movies use the Movie Rating...

User Manual
Page 115
... to select the rating. 3. CA Fren Rating Canadian French Language Rating 1. button to select the rating. 3. Select EXIT Back Owner s Manual 29 You can set block or unblock. Press OK button to confirm. Press VOL+ or OK button and then use CH+/- buttons and then... displayed for each sub-rating. Press OK button to movies shown on TV, not TV programs, such as soap operas. 1. button to a sub rating. Operation Video Audio Channel Function Lock A D L S V FV TV-Y TV-Y7 TV-G TV-PG TV-14 TV-MA Allowed Rating Blocked Rating Parental Guide OK Set CH+/VOL+/- Select...
... to select the rating. 3. CA Fren Rating Canadian French Language Rating 1. button to select the rating. 3. Select EXIT Back Owner s Manual 29 You can set block or unblock. Press OK button to confirm. Press VOL+ or OK button and then use CH+/- buttons and then... displayed for each sub-rating. Press OK button to movies shown on TV, not TV programs, such as soap operas. 1. button to a sub rating. Operation Video Audio Channel Function Lock A D L S V FV TV-Y TV-Y7 TV-G TV-PG TV-14 TV-MA Allowed Rating Blocked Rating Parental Guide OK Set CH+/VOL+/- Select...


