
User Manual
Page 1
TFT-LCD TV OWNER'S MANUAL Please READ this manual carefully before operating your TV, and retain it for future reference. MODELS: HL37E HL42E HL47E HL52E
TFT-LCD TV OWNER'S MANUAL Please READ this manual carefully before operating your TV, and retain it for future reference. MODELS: HL37E HL42E HL47E HL52E

User Manual
Page 2
...is no guarantee that to video equipment; Operation is subject to the following symbols to comply with Canadian ICES-003. 2 TV LCD-TFT THIS SYMBOL INDICATES THAT THERE ARE IMPORTANT OPERATING AND MAINTENANCE INSTRUCTIONS IN THE LITERATURE ACCOMPANYING THE APPLIANCE. These limits are designed...to other peripheral device. and maintain at the design and manufacture phase, but inappropriate operation may cause undesired operation. The User Manual uses the following two conditions: (1) This device may cause harmful interference to radio communications. Safety of electric shock do not ...
...is no guarantee that to video equipment; Operation is subject to the following symbols to comply with Canadian ICES-003. 2 TV LCD-TFT THIS SYMBOL INDICATES THAT THERE ARE IMPORTANT OPERATING AND MAINTENANCE INSTRUCTIONS IN THE LITERATURE ACCOMPANYING THE APPLIANCE. These limits are designed...to other peripheral device. and maintain at the design and manufacture phase, but inappropriate operation may cause undesired operation. The User Manual uses the following two conditions: (1) This device may cause harmful interference to radio communications. Safety of electric shock do not ...

User Manual
Page 3
... time. 14) Refer all instructions. 5) Do not use caution when moving the cart/ apparatus combination to avoid injury from the apparatus. 11) Only use . Owner s Manual 3 Apparatus shall not be placed on the apparatus. Servicing is used , use this apparatus near water. 6) Clean only with the manufacturer`s instructions. 8) Do not install...
... time. 14) Refer all instructions. 5) Do not use caution when moving the cart/ apparatus combination to avoid injury from the apparatus. 11) Only use . Owner s Manual 3 Apparatus shall not be placed on the apparatus. Servicing is used , use this apparatus near water. 6) Clean only with the manufacturer`s instructions. 8) Do not install...

User Manual
Page 4
They are on label in getting the best use manual will need it to obtain warranty service. 4 TV LCD-TFT Model number serial number Date of the unit. SAVE THESE INSTRUCTIONS Thank you in back of purchase Staple your receipt to your product. You will guide you for using our Haier product. This easy-to record the model and serial number. Remember to -use of your manual.
They are on label in getting the best use manual will need it to obtain warranty service. 4 TV LCD-TFT Model number serial number Date of the unit. SAVE THESE INSTRUCTIONS Thank you in back of purchase Staple your receipt to your product. You will guide you for using our Haier product. This easy-to record the model and serial number. Remember to -use of your manual.

User Manual
Page 5
... Connection DTV Connection Digital Audio Output PC Connection Monitor Out Setup HDM I Cable Sample Connecting Headphones Pow er so urc e Operation Switching On/Off the TV set Choose the Menu Language Choose the input Source Channel Menu Automatic Scan Man ual S can Fine Tune Edi t Pro gra m Rename Select the desired... rating and categories Others Functions Bri ef In fo Quick program view Setting up your remote control USB system Maintenance Product Specifications Troubleshooting Warranty Owner s Manual 5
... Connection DTV Connection Digital Audio Output PC Connection Monitor Out Setup HDM I Cable Sample Connecting Headphones Pow er so urc e Operation Switching On/Off the TV set Choose the Menu Language Choose the input Source Channel Menu Automatic Scan Man ual S can Fine Tune Edi t Pro gra m Rename Select the desired... rating and categories Others Functions Bri ef In fo Quick program view Setting up your remote control USB system Maintenance Product Specifications Troubleshooting Warranty Owner s Manual 5
User Manual
Page 9
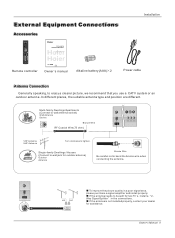
.... To improve the picture quality in the connections. If the antenna needs to tighten. Owner s Manual 9 External Equipment Connections Accessories T V MODE MO D E C H L I S T FAV.LI ST A U D I O LI S T TV ZOOM HOTKEY RETURN TTIIMMEE TFT-LCD TV OWNER'S MANUAL Please READ this manual carefully before operating your dealer for assistance. Multi-family Dwellings/Apartments (Connect to wall antenna socket...
.... To improve the picture quality in the connections. If the antenna needs to tighten. Owner s Manual 9 External Equipment Connections Accessories T V MODE MO D E C H L I S T FAV.LI ST A U D I O LI S T TV ZOOM HOTKEY RETURN TTIIMMEE TFT-LCD TV OWNER'S MANUAL Please READ this manual carefully before operating your dealer for assistance. Multi-family Dwellings/Apartments (Connect to wall antenna socket...

User Manual
Page 10
... VIDEO L R 10 TV LCD-TFT Choose Your Connection There are several ways to connect your TV. To avoid picture noise (interference), leave an adequate distance between the VCR and TV Connection Option 1 Set VCR output switch to channel 3 or 4 and then tune the TV to the VCR owner`s manual.) 3. Connection Option 2... = yellow, Audio Left = white, and Audio Right = red). The following are examples of the signal you . When connecting the TV to the Video input. 2. Installation External Equipment Connections NOTE: All cables shown are not included with using the INPUT button on the remote...
... VIDEO L R 10 TV LCD-TFT Choose Your Connection There are several ways to connect your TV. To avoid picture noise (interference), leave an adequate distance between the VCR and TV Connection Option 1 Set VCR output switch to channel 3 or 4 and then tune the TV to the VCR owner`s manual.) 3. Connection Option 2... = yellow, Audio Left = white, and Audio Right = red). The following are examples of the signal you . When connecting the TV to the Video input. 2. Installation External Equipment Connections NOTE: All cables shown are not included with using the INPUT button on the remote...

User Manual
Page 11
...Y Cb Cr Y PB PR Video Game Set Y2 Pb2 Pr2 L R AV OUT L R Y1 Pb1 Pr1 L R S-VIDEO VIDEO L R Owner s Manual 11 Operate the corresponding external equipment. Y2 Pb2 Pr2 L R AV OUT L R Y1 Pb1 Pr1 L R S-VIDEO VIDEO L R Camcorder DVD connection How ...to use 1. Connect the DVD video outputs (Y, Pb/Cb, Pr/Cr) to the Y, Pb, Pr jacks on the TV, as shown in the figure. 2. NOTE: If your DVD only has an S-VIDEO output jack, connect this to ... Right = red). Turn on external equipment for operating instructions. When connecting the TV to the DVD player's manual for program play. 4.
...Y Cb Cr Y PB PR Video Game Set Y2 Pb2 Pr2 L R AV OUT L R Y1 Pb1 Pr1 L R S-VIDEO VIDEO L R Owner s Manual 11 Operate the corresponding external equipment. Y2 Pb2 Pr2 L R AV OUT L R Y1 Pb1 Pr1 L R S-VIDEO VIDEO L R Camcorder DVD connection How ...to use 1. Connect the DVD video outputs (Y, Pb/Cb, Pr/Cr) to the Y, Pb, Pr jacks on the TV, as shown in the figure. 2. NOTE: If your DVD only has an S-VIDEO output jack, connect this to ... Right = red). Turn on external equipment for operating instructions. When connecting the TV to the DVD player's manual for program play. 4.

User Manual
Page 12
...(optical) input on the remote control to select YPbPr, PC,or HDMI source. See the external audio equipment instruction manual for Digital Contents (480p,720p,1080i). This TV supports HDCP (High-bandwidth Digital Contents Protection) protocol for operation. PC/DVI OPTICAL AUDIO IN Signal 480i 480p 720p ...below. - Connect the other digital external device, refer to the owner`s manual for the digital set -top box connector. Turn on your vision. 12 TV LCD-TFT PC/DVI OPTICAL AUDIO IN AC IN How to connect Use the TV`s (Y, PB, PR) , PC or HDMI jack for video connections, ...
...(optical) input on the remote control to select YPbPr, PC,or HDMI source. See the external audio equipment instruction manual for Digital Contents (480p,720p,1080i). This TV supports HDCP (High-bandwidth Digital Contents Protection) protocol for operation. PC/DVI OPTICAL AUDIO IN Signal 480i 480p 720p ...below. - Connect the other digital external device, refer to the owner`s manual for the digital set -top box connector. Turn on your vision. 12 TV LCD-TFT PC/DVI OPTICAL AUDIO IN AC IN How to connect Use the TV`s (Y, PB, PR) , PC or HDMI jack for video connections, ...

User Manual
Page 13
...*768 Frame frequency (Hz) 60Hz 60Hz/75Hz 60Hz 75Hz ANT IN HDMI2 PC HDMI1 PC/DVI OPTICAL AUDIO IN Owner s Manual 13 External Equipment Connections Installation PC connection How toconnect 1. Ifthe refresh rateof the PCgraphic card cannot be noise associated with the ..., vertical pattern, contrast or brightness in PC mode. Use theTV`s PCor DVI (DigitalVisual Interface)AudioIN port forvideo connections, dependingon your TV. Ifusing a soundcard, adjust thePC sound asrequired. If noiseis present, changethe PC modeto another resolution,change the PCgraphic card or consultthe manufacturer...
...*768 Frame frequency (Hz) 60Hz 60Hz/75Hz 60Hz 75Hz ANT IN HDMI2 PC HDMI1 PC/DVI OPTICAL AUDIO IN Owner s Manual 13 External Equipment Connections Installation PC connection How toconnect 1. Ifthe refresh rateof the PCgraphic card cannot be noise associated with the ..., vertical pattern, contrast or brightness in PC mode. Use theTV`s PCor DVI (DigitalVisual Interface)AudioIN port forvideo connections, dependingon your TV. Ifusing a soundcard, adjust thePC sound asrequired. If noiseis present, changethe PC modeto another resolution,change the PCgraphic card or consultthe manufacturer...

User Manual
Page 14
... to 1280x720p. - External Equipment Connections Installation Monitor Out Setup The TV has a special signal output capability which allows you need to the TV`s AV OUT. See the Operating Manual of the source device to HDMI port of this TV with an HDMI cable(not supplied with this product). 2. Y2 ... device to -DVI cable(not supplied with this product). 2. Connect the second TV or monitor to set to select HDMI input source in input source option of Select Main source menu. 14 TV LCD-TFT Aseparated audio connection is necessary. Connect the source device to HDMI port of...
... to 1280x720p. - External Equipment Connections Installation Monitor Out Setup The TV has a special signal output capability which allows you need to the TV`s AV OUT. See the Operating Manual of the source device to HDMI port of this TV with an HDMI cable(not supplied with this product). 2. Y2 ... device to -DVI cable(not supplied with this product). 2. Connect the second TV or monitor to set to select HDMI input source in input source option of Select Main source menu. 14 TV LCD-TFT Aseparated audio connection is necessary. Connect the source device to HDMI port of...

User Manual
Page 15
Cable sample Installation HDMI Cable (not supplied with the product) HDMI to DVI Cable (not supplied with the product) Analog Audio Cable (Stereo to RCA type) (not supplied with the product) Owner s Manual 15
Cable sample Installation HDMI Cable (not supplied with the product) HDMI to DVI Cable (not supplied with the product) Analog Audio Cable (Stereo to RCA type) (not supplied with the product) Owner s Manual 15

User Manual
Page 17
... available language. Press INPUT button to return to TV viewing or press EXIT button to return to standby mode. 4. Operation Operation -In the manual, the OSD (on screen display) may be used for your TV to your connection device, you can watch your TV, cable TV, VCR, DVD, or any other devices that... follow. Switching On/Off the TV set ting as Air or Cable, the source menu ...
... available language. Press INPUT button to return to TV viewing or press EXIT button to return to standby mode. 4. Operation Operation -In the manual, the OSD (on screen display) may be used for your TV to your connection device, you can watch your TV, cable TV, VCR, DVD, or any other devices that... follow. Switching On/Off the TV set ting as Air or Cable, the source menu ...

User Manual
Page 18
...to gain access to set channel is explained. When Cable is selected, the TV will detect cable company supplied signals and will search for cable TV (NTSC,ATSC, QAM modulated) channels available in your area. 18 TV LCD-TFT In this section, how to use the remote control to Channel menu if... Cable or Air mode. 4 Press the OK button 5 When you are respectively Auto Scan, manual Scan fine tune. Note : Channel menu only available after selecting Air TV or Cable TV in memory on the TV set channel. Automatically finds all channels available through antenna or cable inputs, and stores them in ...
...to gain access to set channel is explained. When Cable is selected, the TV will detect cable company supplied signals and will search for cable TV (NTSC,ATSC, QAM modulated) channels available in your area. 18 TV LCD-TFT In this section, how to use the remote control to Channel menu if... Cable or Air mode. 4 Press the OK button 5 When you are respectively Auto Scan, manual Scan fine tune. Note : Channel menu only available after selecting Air TV or Cable TV in memory on the TV set channel. Automatically finds all channels available through antenna or cable inputs, and stores them in ...

User Manual
Page 19
... and press OK button to add for the channel number. 9 Press EXIT button to return to TV viewing or press MENU button to return to the previous menu. Fine Tune (only in local area, manual search function is recommended. 1 Press the MENU button and then use / button to select the ...OK button 4 Press the / button to tune. 5 Press EXIT button to return to TV viewing or press MENU button to return to the previous menu. Video Audio Time A B C Channel Function Lock Tuner Air Auto Scan Manual Scan Fine Tune Edit Program Rename For the tune of unwanted programs are satisfied with...
... and press OK button to add for the channel number. 9 Press EXIT button to return to TV viewing or press MENU button to return to the previous menu. Fine Tune (only in local area, manual search function is recommended. 1 Press the MENU button and then use / button to select the ...OK button 4 Press the / button to tune. 5 Press EXIT button to return to TV viewing or press MENU button to return to the previous menu. Video Audio Time A B C Channel Function Lock Tuner Air Auto Scan Manual Scan Fine Tune Edit Program Rename For the tune of unwanted programs are satisfied with...

User Manual
Page 20
... List. Video Audio Time A B C Channel Function 1 Press the MENU button and then use / button to select the Lock Tuner Air Auto Scan Manual Scan Fine Tune Edit Program Rename Music Ch No Name Fav Lock Skip Page 1/1 Channel menu. 2 Press the button and then use the OK button...) Press the FAV.LiST button open the favorite channel list, press / channel and press OK button to upper menu, EXIT: Exit main menu 20 TV LCD-TFT Skip After the programs are presetting, you are satisfied with your favorite channels only. button to select the Rename (only in anolog signal ) 1...
... List. Video Audio Time A B C Channel Function 1 Press the MENU button and then use / button to select the Lock Tuner Air Auto Scan Manual Scan Fine Tune Edit Program Rename Music Ch No Name Fav Lock Skip Page 1/1 Channel menu. 2 Press the button and then use the OK button...) Press the FAV.LiST button open the favorite channel list, press / channel and press OK button to upper menu, EXIT: Exit main menu 20 TV LCD-TFT Skip After the programs are presetting, you are satisfied with your favorite channels only. button to select the Rename (only in anolog signal ) 1...

User Manual
Page 21
...not appear.) Operation Select the desired sound Press the VOL-/+ or / buttons on the screen. Owner s Manual 21 button, the channel will display on the remote or the front of the TV set to recover the sound, press the MUTE button again or directly press VOL+ button. When the volume... buttons are some guests visiting you want to adjust the volume level. At this time, the sound of the TV set is displayed automatically on one channel, press CH+/- buttons. Press the CH+ button to select a channel number in number decreasing direction. (Note...
...not appear.) Operation Select the desired sound Press the VOL-/+ or / buttons on the screen. Owner s Manual 21 button, the channel will display on the remote or the front of the TV set to recover the sound, press the MUTE button again or directly press VOL+ button. When the volume... buttons are some guests visiting you want to adjust the volume level. At this time, the sound of the TV set is displayed automatically on one channel, press CH+/- buttons. Press the CH+ button to select a channel number in number decreasing direction. (Note...

User Manual
Page 23
... and no alteration , at both vertically extended and cropped. Panorama . In DTV mode, only 16:9 Mode, 4:3 mode can be selected. Owner s Manual 23 Notes In TV, VIDEO1, VIDEO2,SVIDEO modes, all screen modes can be selected. (16:9 Mode . Note: If a fixed image is displayed on the screen. 2... time, it image may become imprinted on the screen and remain visible. 1 Press the ARC button the Aspect Ratio menu appearance on your TV with gray bars appearing at bottom side. Note: When enlarging or reducing the picture size, the image may become distorted. However, the top...
... and no alteration , at both vertically extended and cropped. Panorama . In DTV mode, only 16:9 Mode, 4:3 mode can be selected. Owner s Manual 23 Notes In TV, VIDEO1, VIDEO2,SVIDEO modes, all screen modes can be selected. (16:9 Mode . Note: If a fixed image is displayed on the screen. 2... time, it image may become imprinted on the screen and remain visible. 1 Press the ARC button the Aspect Ratio menu appearance on your TV with gray bars appearing at bottom side. Note: When enlarging or reducing the picture size, the image may become distorted. However, the top...

User Manual
Page 25
...Mono if you press the SAP button, Mono,Stereo, or SAP appear. Operation Owner s Manual 25 Use the SAP button to mono sound during stereo/SAP broadcasting. - Press EXIT button to save and return to TV viewing. even though Stereo or SAP has been selected. - Audio menu SAP Broadcasts Setup ... received if the broadcast is only in a Analog channel. 1. If other languages are available on the remote control, this TV can only receive the signal when the TV station transmits the proper signals. - When having selected SAP button on the digital signal, select them with the SAP button....
...Mono if you press the SAP button, Mono,Stereo, or SAP appear. Operation Owner s Manual 25 Use the SAP button to mono sound during stereo/SAP broadcasting. - Press EXIT button to save and return to TV viewing. even though Stereo or SAP has been selected. - Audio menu SAP Broadcasts Setup ... received if the broadcast is only in a Analog channel. 1. If other languages are available on the remote control, this TV can only receive the signal when the TV station transmits the proper signals. - When having selected SAP button on the digital signal, select them with the SAP button....

User Manual
Page 26
...press the EXIT button to return to TV viewing. Video Audio Time A B C... then use the various timer features of the TV. Time menu Operation Date /Time setting Setting ...press the EXIT button to return to TV viewing. When selecting Once or Daily... you can check the time while watching the TV. 1 Press the MENU button and then use...or Daily. 4 Press the OK button to TV viewing. Video Audio Time A B C ...0 min Time Zone Newfoundland Daylight Saving On Mode Manual Auto Date 2004.12.31 Time 08 38 PM...and then use / button to select the Mode: Manual or Auto. 4 When you presetting. 1 Press the...
...press the EXIT button to return to TV viewing. Video Audio Time A B C... then use the various timer features of the TV. Time menu Operation Date /Time setting Setting ...press the EXIT button to return to TV viewing. When selecting Once or Daily... you can check the time while watching the TV. 1 Press the MENU button and then use...or Daily. 4 Press the OK button to TV viewing. Video Audio Time A B C ...0 min Time Zone Newfoundland Daylight Saving On Mode Manual Auto Date 2004.12.31 Time 08 38 PM...and then use / button to select the Mode: Manual or Auto. 4 When you presetting. 1 Press the...


