
User Manual
Page 3
... by the manufacturer. 12) Use only with the cart, stand, tripod, bracket, or table specified by the manufacturer, or sold with the apparatus. The mains plug is used as vases, shall be exposed to dripping or splashing and that produce heat. 9) Do not defeat the safety purpose of the instructions before using this appliance. Owner s Manual 3 Apparatus shall not be...
... by the manufacturer. 12) Use only with the cart, stand, tripod, bracket, or table specified by the manufacturer, or sold with the apparatus. The mains plug is used as vases, shall be exposed to dripping or splashing and that produce heat. 9) Do not defeat the safety purpose of the instructions before using this appliance. Owner s Manual 3 Apparatus shall not be...
User Manual
Page 5
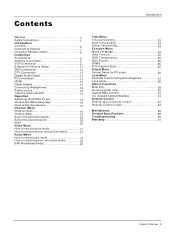
... How to customize your own audio status 22 SAP Broadcasts Setup 23 Time Menu Time zone setting Date /Time setting Sleep Timer setting Function Menu Menu Language OSD Timeout OSD Transparency Blue Screen DPMS DTV Caption Style Adjust Menu Sc re en S et up f or P C mo de Lock Menu Parental Control rating and categories Lock setup Others Functions Br ie f In fo Quick program view Aspect Ratio Control CC (Closed Caption Display Remote Control Setting up your remote control Remote Control Codes Maintenance Product Specifications Troubleshooting Warranty Owner s Manual 5
... How to customize your own audio status 22 SAP Broadcasts Setup 23 Time Menu Time zone setting Date /Time setting Sleep Timer setting Function Menu Menu Language OSD Timeout OSD Transparency Blue Screen DPMS DTV Caption Style Adjust Menu Sc re en S et up f or P C mo de Lock Menu Parental Control rating and categories Lock setup Others Functions Br ie f In fo Quick program view Aspect Ratio Control CC (Closed Caption Display Remote Control Setting up your remote control Remote Control Codes Maintenance Product Specifications Troubleshooting Warranty Owner s Manual 5

User Manual
Page 6
... AUDIO Input connect to turn on and off the TV. 6.Power indicator: In red when standby mode, in blue when display. 7.Remote control signal receive window. 6 TV LCD-TFT Here shown may be somewhat different from an external device. AV3 VIDEO Input Connects the video signal from an external device. In the MENU screen, these buttons serve as left /right buttons. 4.MENU: Menu display. 5.POWER: Press to hear stereo sound from your TV. Earphone jack Earphone audio output terminal. INPUT CH- In the MENU/INPUT screen...
... AUDIO Input connect to turn on and off the TV. 6.Power indicator: In red when standby mode, in blue when display. 7.Remote control signal receive window. 6 TV LCD-TFT Here shown may be somewhat different from an external device. AV3 VIDEO Input Connects the video signal from an external device. In the MENU screen, these buttons serve as left /right buttons. 4.MENU: Menu display. 5.POWER: Press to hear stereo sound from your TV. Earphone jack Earphone audio output terminal. INPUT CH- In the MENU/INPUT screen...

User Manual
Page 7
... HL42BG B VIDEO Input Digital Audio Output Connects the video AUDIO Output PC VIDEO Input Connect the monitor Connect digital audio from signal from a connect audio from an Power Cord Socket connector. from (Component ) the external device, used signal to operate the TV on the Specifications page. COMPONENT AUDIO Input connect to these ports will not work. S-Video Input various types of equipment.video device. video device to hear The voltage is on AC power. This TV operates on the left.) Owner s Manual 7 or using a DVI to HDMI Connect cable or antenna signals to...
... HL42BG B VIDEO Input Digital Audio Output Connects the video AUDIO Output PC VIDEO Input Connect the monitor Connect digital audio from signal from a connect audio from an Power Cord Socket connector. from (Component ) the external device, used signal to operate the TV on the Specifications page. COMPONENT AUDIO Input connect to these ports will not work. S-Video Input various types of equipment.video device. video device to hear The voltage is on AC power. This TV operates on the left.) Owner s Manual 7 or using a DVI to HDMI Connect cable or antenna signals to...

User Manual
Page 8
... -screen displays and returns toTV viewing from any menu. When the desired device is selected, the corresponding LED lights on the TV. LIGHT Press the light button, white LED will be ON, release this key, white LED will be OFF. When using the remote control, aim it at the remote control sensor on 5seconds. S.MODE Selects the sound appropriate for the program's character. P.MODE Selects the picture appropriate for the program's character. Change the audio language in Analog mode.
... -screen displays and returns toTV viewing from any menu. When the desired device is selected, the corresponding LED lights on the TV. LIGHT Press the light button, white LED will be ON, release this key, white LED will be OFF. When using the remote control, aim it at the remote control sensor on 5seconds. S.MODE Selects the sound appropriate for the program's character. P.MODE Selects the picture appropriate for the program's character. Change the audio language in Analog mode.
User Manual
Page 9
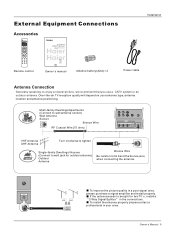
... picture quality in the connections. Owner s Manual 9 CH- To install the antenna properly please contact a professional in your antenna type, antenna location and antenna positioning. External Equipment Connections Installation Accessories TV DVD VCR SETBOX CABLE AUDIO SELECT CH.LIST FAV.LIST ADD/ERASE PRE-DAY NEXT DAY PAGE- MODELS: HL37S B HL37B B HL42B B HL37BG B HL40BG B HL42BG B Remote control Owner`s manual Alkaline battery(AAA) 2 Power cable Antenna Connection Generally speaking, to be split for two TV`s, install a 2-Way Signal Splitter in a poor signal...
... picture quality in the connections. Owner s Manual 9 CH- To install the antenna properly please contact a professional in your antenna type, antenna location and antenna positioning. External Equipment Connections Installation Accessories TV DVD VCR SETBOX CABLE AUDIO SELECT CH.LIST FAV.LIST ADD/ERASE PRE-DAY NEXT DAY PAGE- MODELS: HL37S B HL37B B HL42B B HL37BG B HL40BG B HL42BG B Remote control Owner`s manual Alkaline battery(AAA) 2 Power cable Antenna Connection Generally speaking, to be split for two TV`s, install a 2-Way Signal Splitter in a poor signal...
User Manual
Page 10
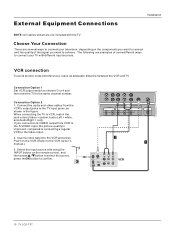
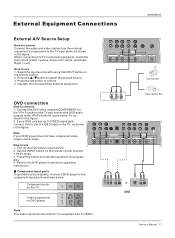
Connect the audio and video cables from VCR to the same channel number. Select the input source with using the INPUT button on the components you want to the Video input. 2. The following are examples of the signal you connect an S-VIDEO output from the VCR's output jacks to confirm. Insert a video tape into the VCR and press PLAY on the VCR. (Refer to connect your television, depending on the remote control, and then press / button to...
Connect the audio and video cables from VCR to the same channel number. Select the input source with using the INPUT button on the components you want to the Video input. 2. The following are examples of the signal you connect an S-VIDEO output from the VCR's output jacks to confirm. Insert a video tape into the VCR and press PLAY on the VCR. (Refer to connect your television, depending on the remote control, and then press / button to...
User Manual
Page 11
... and connect the DVD audio outputs to select Y Pb Pr mode. 3. How to confirm. 2. Note If your DVD only has an S-VIDEO output jack, connect this to the DVD player's manual for program play. 4. Component ports on the TV Y Pb Pr COMPONENT IN VIDEO Y Pb Pr PC/DVI Audio In Optical AUDIO L R Video AV IN L R S-Video Video output ports on the TV, as shown in the figure. 2. Refer to the S-VIDEO input on the remote control. 2. Press Play button on external equipment for operating instructions.
... and connect the DVD audio outputs to select Y Pb Pr mode. 3. How to confirm. 2. Note If your DVD only has an S-VIDEO output jack, connect this to the DVD player's manual for program play. 4. Component ports on the TV Y Pb Pr COMPONENT IN VIDEO Y Pb Pr PC/DVI Audio In Optical AUDIO L R Video AV IN L R S-Video Video output ports on the TV, as shown in the figure. 2. Refer to the S-VIDEO input on the remote control. 2. Press Play button on external equipment for operating instructions.
User Manual
Page 12
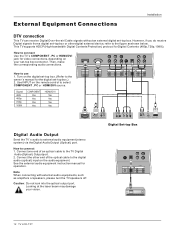
...the optical cable to the digital audio (optical) input on the digital set-top box. (Refer to connect Use the TV`s COMPONENT , PC or HDMI/DVI jack for operation. External Equipment Connections Installation DTV connection This TV can receive Digital Over-the-air/Cable signals without an external digital set -top box connector. How to the owner`s manual for Digital Contents (480p,720p,1080i). How to select COMPONENT , PC or HDMI/DVI source. See the external audio equipment instruction manual for video connections, depending on the remote control to connect 1. Digital Set-top Box...
...the optical cable to the digital audio (optical) input on the digital set-top box. (Refer to connect Use the TV`s COMPONENT , PC or HDMI/DVI jack for operation. External Equipment Connections Installation DTV connection This TV can receive Digital Over-the-air/Cable signals without an external digital set -top box connector. How to the owner`s manual for Digital Contents (480p,720p,1080i). How to select COMPONENT , PC or HDMI/DVI source. See the external audio equipment instruction manual for video connections, depending on the remote control to connect 1. Digital Set-top Box...

User Manual
Page 13
... time.The fixed image may be noise associated with the resolution, vertical pattern, contrast or brightness in PC mode. Use the TV`s PC or DVI (Digital Visual Interface)Audio IN port for video connections, depending on the menu until the picture is present, change the PC mode to 1024 x768 . 2. Ifusing asound card,adjust thePC soundas required. Turn on thedisplay by pressingthe POWER button on the PC does output analog and digital...
... time.The fixed image may be noise associated with the resolution, vertical pattern, contrast or brightness in PC mode. Use the TV`s PC or DVI (Digital Visual Interface)Audio IN port for video connections, depending on the menu until the picture is present, change the PC mode to 1024 x768 . 2. Ifusing asound card,adjust thePC soundas required. Turn on thedisplay by pressingthe POWER button on the PC does output analog and digital...

User Manual
Page 14
... need to select HDMI input source in input source option of HDMI port. Press the INPUT button to set to DVI Audio In port located on the left side of Select Main source menu. If the source device does not support Auto HDMI, you need to 1280x720p. To get the best picture quality, adjust the output resolution of the source device will be automatically set the output resolution appropriately. HDMI Installation When the source device(DVD player or Set Top Box) supports HDM How To Connect 1. No separated audio connection is...
... need to select HDMI input source in input source option of HDMI port. Press the INPUT button to set to DVI Audio In port located on the left side of Select Main source menu. If the source device does not support Auto HDMI, you need to 1280x720p. To get the best picture quality, adjust the output resolution of the source device will be automatically set the output resolution appropriately. HDMI Installation When the source device(DVD player or Set Top Box) supports HDM How To Connect 1. No separated audio connection is...
User Manual
Page 18
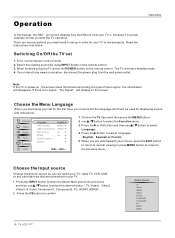
... no signal , No Signal will be different from the wall power outlet. Read the instructions that are satisfied with the TV operation. First, connect power cord correctly. 2. Press the INPUT button to enter the Select Main picture Source menu and then use / button to select Language. 4 Press the button to work properly. Choose the Menu Language When you start using your set 1. Select the viewing source by using the TV, press the POWER button on the remote control...
... no signal , No Signal will be different from the wall power outlet. Read the instructions that are satisfied with the TV operation. First, connect power cord correctly. 2. Press the INPUT button to enter the Select Main picture Source menu and then use / button to select Language. 4 Press the button to work properly. Choose the Menu Language When you start using your set 1. Select the viewing source by using the TV, press the POWER button on the remote control...

User Manual
Page 21
..., Black Level Extender, White Peak Limiter, CTI, Flech Tone, Adaptive Luma Control. Advanced Video To adjust the picture in the picture but keep the dark parts unchanged. Color This will increase or decrease Warm (red) and Cold (blue) colors to TV viewing. Operation Video menu The TV menu gives you an overview of the menus you are satisfied with your personal preference. Brightness This will adjust the light output of...
..., Black Level Extender, White Peak Limiter, CTI, Flech Tone, Adaptive Luma Control. Advanced Video To adjust the picture in the picture but keep the dark parts unchanged. Color This will increase or decrease Warm (red) and Cold (blue) colors to TV viewing. Operation Video menu The TV menu gives you an overview of the menus you are satisfied with your personal preference. Brightness This will adjust the light output of...

User Manual
Page 23
... sound is automatically received if the broadcast is used. Use the SAP button to select your desired MTS mode in a Analog channel. 1. Channel Video Audio Time Function Lock Time Zone Date/Time Sleep Timer Pacific Off / Select /MENU Back Owner s Manual 23 Select Mono if you to select your local time zone. SPDIF Type To Adjust the SPDIF output: Off, Dolby Digital and PCM. Each time you are available on the remote control, this TV can only receive the signal...
... sound is automatically received if the broadcast is used. Use the SAP button to select your desired MTS mode in a Analog channel. 1. Channel Video Audio Time Function Lock Time Zone Date/Time Sleep Timer Pacific Off / Select /MENU Back Owner s Manual 23 Select Mono if you to select your local time zone. SPDIF Type To Adjust the SPDIF output: Off, Dolby Digital and PCM. Each time you are available on the remote control, this TV can only receive the signal...

User Manual
Page 26
... of caption display according to TV viewing. 26 TV LCD-TFT Operation Channel Video Audio Time Function Lock NTSC Caption Off DTV Caption On DTV Caption Style OK Enter / Select /MENU Back Channel Video Audio Time Function Lock Style Custom Size Normal Text Color Black Text Opacity Solid BG Color Black BG Opacity Flashing Window Color White Window Opacity Solid / Select /MENU Back Adjust Auto Sync Video H Position 59 V Position 59 Audio Phase 59 Clock 59 Time Function Lock Press the / button to select Default or...
... of caption display according to TV viewing. 26 TV LCD-TFT Operation Channel Video Audio Time Function Lock NTSC Caption Off DTV Caption On DTV Caption Style OK Enter / Select /MENU Back Channel Video Audio Time Function Lock Style Custom Size Normal Text Color Black Text Opacity Solid BG Color Black BG Opacity Flashing Window Color White Window Opacity Solid / Select /MENU Back Adjust Auto Sync Video H Position 59 V Position 59 Audio Phase 59 Clock 59 Time Function Lock Press the / button to select Default or...
User Manual
Page 27
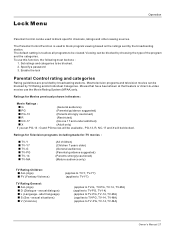
... - Viewing can be used to block program viewing based on the ratings sent by broadcasting stations. adult language) S (Sex - The default setting is used to -video movies use this function, the following must be blocked by TV Rating and/or Individual Categories. Ratings for Television programs including made-for Movies previously shown in theaters: Movie Ratings : G (General audience) PG (Parental guidance suggested ) (Parents strongly...
... - Viewing can be used to block program viewing based on the ratings sent by broadcasting stations. adult language) S (Sex - The default setting is used to -video movies use this function, the following must be blocked by TV Rating and/or Individual Categories. Ratings for Television programs including made-for Movies previously shown in theaters: Movie Ratings : G (General audience) PG (Parental guidance suggested ) (Parents strongly...

User Manual
Page 28
... press the button to select the LOCK menu. Password Change the password by inputting a new password twice. Parental Lock 1. Similarly, if you block the TV-G category, then all the categories in TV-14 and TV-MA will be blocked. 28 TV LCD-TFT Operation Channel Video Audio Time Function Lock Enter Password OK Enter / Select /MENU Exit Channel Video Audio Time Function Lock Channel Block Program Block Password Clean All OK Enter / Select /MENU Back Channel Video Audio Time Function Lock Parental lock On Parental Guide MPAA...
... press the button to select the LOCK menu. Password Change the password by inputting a new password twice. Parental Lock 1. Similarly, if you block the TV-G category, then all the categories in TV-14 and TV-MA will be blocked. 28 TV LCD-TFT Operation Channel Video Audio Time Function Lock Enter Password OK Enter / Select /MENU Exit Channel Video Audio Time Function Lock Channel Block Program Block Password Clean All OK Enter / Select /MENU Back Channel Video Audio Time Function Lock Parental lock On Parental Guide MPAA...
User Manual
Page 32
... press SELECT key for manually scan mode. (TV, DVD, VCR, STB, cable box or audio equipment). 2. Press SELECT key to choose the device you choose. Press and release the CH+/CH- TV. Press the POWER button to turn OFF the device for 5 seconds, default Haier code set (001) will be compatible with your device. Default init status: TV/Haier 001 code. 7. If 3 digits are programmed successfully, device LED will be ON...
... press SELECT key for manually scan mode. (TV, DVD, VCR, STB, cable box or audio equipment). 2. Press SELECT key to choose the device you choose. Press and release the CH+/CH- TV. Press the POWER button to turn OFF the device for 5 seconds, default Haier code set (001) will be compatible with your device. Default init status: TV/Haier 001 code. 7. If 3 digits are programmed successfully, device LED will be ON...

User Manual
Page 33
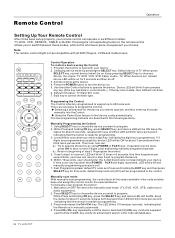
... will start from current code set . 6. Input three digit password 8 8 8 , LED turns off . Owner s Manual 33 Remote Control Operation TV DVD VCR SETBOX CABLE AUDIO SELECT CH.LIST FAV.LIST ADD/ERASE PRE-DAY NEXT DAY PAGE- After searching the entire data base, this mode, all devices and brands that the Control is ready for other purposes. PAGE+ P.MODE CC GUIDE ENU S.MODE FREEZE NPUT INFO OK MUTE EXIT ARC SAP SLEEP VOL+ CH+ VOL...
... will start from current code set . 6. Input three digit password 8 8 8 , LED turns off . Owner s Manual 33 Remote Control Operation TV DVD VCR SETBOX CABLE AUDIO SELECT CH.LIST FAV.LIST ADD/ERASE PRE-DAY NEXT DAY PAGE- After searching the entire data base, this mode, all devices and brands that the Control is ready for other purposes. PAGE+ P.MODE CC GUIDE ENU S.MODE FREEZE NPUT INFO OK MUTE EXIT ARC SAP SLEEP VOL+ CH+ VOL...
User Manual
Page 40
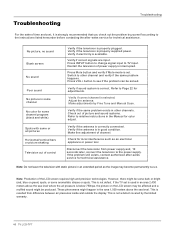
... (red, blue or green) spots, or some or all pictures Horizontal/vertical bars or picture shaking Television out of control Verify if the television is properly plugged. This is resulted from power supply and, 10 seconds later, connect the television to the power supply. Verify if the television is selected. Press INPUT button to change signal input to see if the problem can be produced. Adjust the antenna. Make adjustments by the limited warranty. 40...
... (red, blue or green) spots, or some or all pictures Horizontal/vertical bars or picture shaking Television out of control Verify if the television is properly plugged. This is resulted from power supply and, 10 seconds later, connect the television to the power supply. Verify if the television is selected. Press INPUT button to change signal input to see if the problem can be produced. Adjust the antenna. Make adjustments by the limited warranty. 40...


