
User Manual
Page 1
MODELS: HL26R HL37T HL32R HL42T HL40R HL47T HL42R HL52T TFT-LCD TV OWNER'S MANUAL Please READ this manual carefully before operating your TV, and retain it for future reference.
MODELS: HL26R HL37T HL32R HL42T HL40R HL47T HL42R HL52T TFT-LCD TV OWNER'S MANUAL Please READ this manual carefully before operating your TV, and retain it for future reference.
User Manual
Page 2
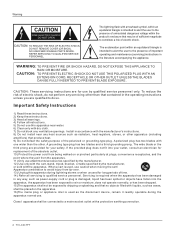
..., do so. CAUTION: These servicing instructions are for replacement of sufficient magnitude to dripping or splashing and that no objects filled with a protective earthing connection. 2 TV LCD-TFT A polarized plug has two blades with the apparatus. If the provided plug does not fit into the apparatus, the apparatus has been exposed to...
..., do so. CAUTION: These servicing instructions are for replacement of sufficient magnitude to dripping or splashing and that no objects filled with a protective earthing connection. 2 TV LCD-TFT A polarized plug has two blades with the apparatus. If the provided plug does not fit into the apparatus, the apparatus has been exposed to...
User Manual
Page 3
...equipment; If this equipment does cause harmful interference to radio or television reception, which the receiver is connected. *Consult the dealer or an experienced radio/TV technician for a Class B digital device, pursuant to Part 15 of the FCC Rule. Operation is subject to the following two conditions: (1) This ...used in accordance with the instructions, may cause undesired operation. This equipment generates, use and can be not cause harmful interference. (2) this LCD display to other peripheral device. Owner s Manual 3 This device compiles with Canadian ICES-003.
...equipment; If this equipment does cause harmful interference to radio or television reception, which the receiver is connected. *Consult the dealer or an experienced radio/TV technician for a Class B digital device, pursuant to Part 15 of the FCC Rule. Operation is subject to the following two conditions: (1) This ...used in accordance with the instructions, may cause undesired operation. This equipment generates, use and can be not cause harmful interference. (2) this LCD display to other peripheral device. Owner s Manual 3 This device compiles with Canadian ICES-003.
User Manual
Page 4
They are on label in getting the best use manual will need it to record the model and serial number. Model number serial number Date of purchase Staple your receipt to your product. This easy-to-use of your manual. You will guide you for purchasing the Haier product. Safety Instructions SAVE THESE INSTRUCTIONS Thank you in back of the unit. Remember to obtain warranty service. 4 TV LCD-TFT
They are on label in getting the best use manual will need it to record the model and serial number. Model number serial number Date of purchase Staple your receipt to your product. This easy-to-use of your manual. You will guide you for purchasing the Haier product. Safety Instructions SAVE THESE INSTRUCTIONS Thank you in back of the unit. Remember to obtain warranty service. 4 TV LCD-TFT
User Manual
Page 5
... s 9 Antenna Connection 9 Co nn ec ti ng a V CR 10 External A/V Source Setup 11 Co nn ec ti ng a D VD p la ye r 11 Connecting a DTV(digital TV 12 Connecting digital audio output 12 Co nn ec ti ng a c om pu te r 13 Monitor Out Setup 14 HD MI a nd D VI i np ut... 14 Cable sample 15 Connecting Headphones 16 Power source 16 Removing the table stand and installing a wall mount bracket 17 Operation Switching On/Off the TV set 18 Choose the Menu Language 18 Choose the input source 18 Channel Menu Channel Scan 19 Ch an ne l Sk ip 19 Se le...
... s 9 Antenna Connection 9 Co nn ec ti ng a V CR 10 External A/V Source Setup 11 Co nn ec ti ng a D VD p la ye r 11 Connecting a DTV(digital TV 12 Connecting digital audio output 12 Co nn ec ti ng a c om pu te r 13 Monitor Out Setup 14 HD MI a nd D VI i np ut... 14 Cable sample 15 Connecting Headphones 16 Power source 16 Removing the table stand and installing a wall mount bracket 17 Operation Switching On/Off the TV set 18 Choose the Menu Language 18 Choose the input source 18 Channel Menu Channel Scan 19 Ch an ne l Sk ip 19 Se le...
User Manual
Page 6
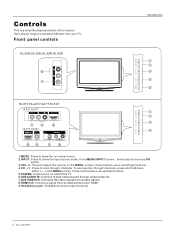
... VIDEO IN: Connects the video signal from a video device. 8.HDMI3 IN: Connect a signal from your TV. In the MENU screen, these buttons serve as up/down either +/- . HL37T,HL52T HDMI3 IN VIDEO2... IN VIDEO L - Controls This is a simplified representation of front panel. Front panel controls HL26R,HL32R,HL40R,HL42R Introduction MENU INPUT VOL+ VOL- CH+ CH- To scan quickly through channels...Here shown may be somewhat different from an external device to show the on and off the TV. 6.AV2 AUDIO IN: Connect to scan through channels, press and hold down buttons. 5.POWER...
... VIDEO IN: Connects the video signal from a video device. 8.HDMI3 IN: Connect a signal from your TV. In the MENU screen, these buttons serve as up/down either +/- . HL37T,HL52T HDMI3 IN VIDEO2... IN VIDEO L - Controls This is a simplified representation of front panel. Front panel controls HL26R,HL32R,HL40R,HL42R Introduction MENU INPUT VOL+ VOL- CH+ CH- To scan quickly through channels...Here shown may be somewhat different from an external device to show the on and off the TV. 6.AV2 AUDIO IN: Connect to scan through channels, press and hold down buttons. 5.POWER...
User Manual
Page 7
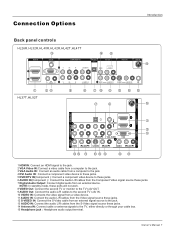
... to the jack. 4 DVI Audio IN: Connect a component video device to these jacks. 5 DVD/DTV IN(Component ): Connect a component video device to the TV, either directly or through your cable box. 15 Headphone jack : Headphone audio output terminal. R VIDEO L-AUDIO-R VIDEO IN ANT IN L- DVI - R 1 ...Y Pb Pr AUDIO L-AUDIO- Connection Options Introduction Back panel controls HL26R,HL32R,HL40R,HL42R,HL42T,HL47T HDMI IN 2 1 VGA IN VGA AUDIO COMPONENT IN OPTICAL OUT AV OUT VGA 2 Y Pb Pr L-AUDIO-
... to the jack. 4 DVI Audio IN: Connect a component video device to these jacks. 5 DVD/DTV IN(Component ): Connect a component video device to the TV, either directly or through your cable box. 15 Headphone jack : Headphone audio output terminal. R VIDEO L-AUDIO-R VIDEO IN ANT IN L- DVI - R 1 ...Y Pb Pr AUDIO L-AUDIO- Connection Options Introduction Back panel controls HL26R,HL32R,HL40R,HL42R,HL42T,HL47T HDMI IN 2 1 VGA IN VGA AUDIO COMPONENT IN OPTICAL OUT AV OUT VGA 2 Y Pb Pr L-AUDIO-
User Manual
Page 8
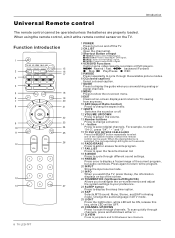
... audio language in DTV mode. 25 LIGHT Press the light button, white LED will be ON, release this key, white LED will be OFF. 26 CHANNEL UP/DOWN Press to enter PAGE- PAGE-: Press to scan through the available picture modes. 6 CC(closed caption) Select a closed caption. 7 ... Input TODAY: Press to enter TODAY signal; When the desired device is selected, the corresponding LED lights on the TV. NEXT DAY: Press to jump back and forth between two channels. 8 TV LCD-TFT PAGE+: Press to enter PAGE+ signal. 4 VCR/DVD Functions Control some video cassette recorders or DVD players....
... audio language in DTV mode. 25 LIGHT Press the light button, white LED will be ON, release this key, white LED will be OFF. 26 CHANNEL UP/DOWN Press to enter PAGE- PAGE-: Press to scan through the available picture modes. 6 CC(closed caption) Select a closed caption. 7 ... Input TODAY: Press to enter TODAY signal; When the desired device is selected, the corresponding LED lights on the TV. NEXT DAY: Press to jump back and forth between two channels. 8 TV LCD-TFT PAGE+: Press to enter PAGE+ signal. 4 VCR/DVD Functions Control some video cassette recorders or DVD players....
User Manual
Page 9
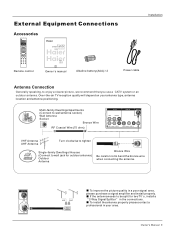
...picture, we recommend that you use a CATV system or an outdoor antenna .Over-the-air TV reception quality will depend on your antenna type, antenna location and antenna positioning. MODELS: HL26R HL37T HL32R HL42T HL40R HL47T HL42R HL52T Owner`s manual Alkaline battery(AAA) 2 Power cable ... please purchase a signal amplifier and install properly. ANT IN To improve the picture quality in the connections. Q.VIEW Remote control TFT-LCD TV OWNER'S MANUAL Please READ this manual carefully before operating your area. If the antenna needs to bend the bronze wire when connecting the...
...picture, we recommend that you use a CATV system or an outdoor antenna .Over-the-air TV reception quality will depend on your antenna type, antenna location and antenna positioning. MODELS: HL26R HL37T HL32R HL42T HL40R HL47T HL42R HL52T Owner`s manual Alkaline battery(AAA) 2 Power cable ... please purchase a signal amplifier and install properly. ANT IN To improve the picture quality in the connections. Q.VIEW Remote control TFT-LCD TV OWNER'S MANUAL Please READ this manual carefully before operating your area. If the antenna needs to bend the bronze wire when connecting the...
User Manual
Page 10
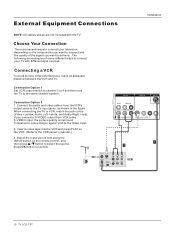
... Left = white, and Audio Right = red). Connecting a VCR To avoid picture noise (interference), leave an adequate distance between the VCR and TV. When connecting the TV to the Video input. 2. Insert a video tape into the VCR and press PLAY on the components you want to the VCR owner`s manual...The following are several ways to connect your TV with different input sources. Connection Option 1 Set VCR output switch to channel 3 or 4 and then tune the TV to the S-VIDEO input, the picture quality is improved; R S-VIDEO L-AUDIO- R 10 TV LCD-TFT Connect the audio and video cables from...
... Left = white, and Audio Right = red). Connecting a VCR To avoid picture noise (interference), leave an adequate distance between the VCR and TV. When connecting the TV to the Video input. 2. Insert a video tape into the VCR and press PLAY on the components you want to the VCR owner`s manual...The following are several ways to connect your TV with different input sources. Connection Option 1 Set VCR output switch to channel 3 or 4 and then tune the TV to the S-VIDEO input, the picture quality is improved; R S-VIDEO L-AUDIO- R 10 TV LCD-TFT Connect the audio and video cables from...
User Manual
Page 11
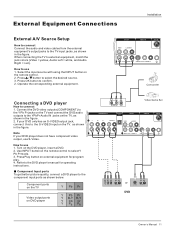
...Manual 11 Press / button to select Y Pb Pr mode. 3. Connect the DVD video outputs (COMPONENT) to the Y Pb Pr jacks on the TV and connect the DVD audio outputs to the YPbPr Audio IN jacks on external equipment for operating instructions. R 1 VIDEO L-AUDIO- Component ports on the... (Video = yellow, Audio Left = white, and Audio Right = red). Select the input source with using the INPUT button on the TV. External Equipment Connections Installation External A/V Source Setup How to connect Connect the audio and video cables from the external equipment's output jacks to the...
...Manual 11 Press / button to select Y Pb Pr mode. 3. Connect the DVD video outputs (COMPONENT) to the Y Pb Pr jacks on the TV and connect the DVD audio outputs to the YPbPr Audio IN jacks on external equipment for operating instructions. R 1 VIDEO L-AUDIO- Component ports on the... (Video = yellow, Audio Left = white, and Audio Right = red). Select the input source with using the INPUT button on the TV. External Equipment Connections Installation External A/V Source Setup How to connect Connect the audio and video cables from the external equipment's output jacks to the...
User Manual
Page 12
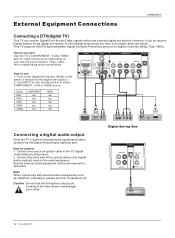
...the TV`s ...to the figure as amplifers or speakers, please turn the TV speakers off. Connect the other digital external device, refer ... digital audio output Send the TV`s audio to use 1 1. R VIDEO OUT L-AUDIO- Connect one end of the optical cable to the TV Digital Audio(Optical) Output port...) port. External Equipment Connections Installation Connecting a DTV(digital TV) This TV can receive Digital Over-the-air/Cable signals without an ... audio (optical) input on your vision. This TV supports HDCP (High-bandwidth Digital Contents Protection) protocol for video connections, ...
...the TV`s ...to the figure as amplifers or speakers, please turn the TV speakers off. Connect the other digital external device, refer ... digital audio output Send the TV`s audio to use 1 1. R VIDEO OUT L-AUDIO- Connect one end of the optical cable to the TV Digital Audio(Optical) Output port...) port. External Equipment Connections Installation Connecting a DTV(digital TV) This TV can receive Digital Over-the-air/Cable signals without an ... audio (optical) input on your vision. This TV supports HDCP (High-bandwidth Digital Contents Protection) protocol for video connections, ...

User Manual
Page 13
... to either VGAIN or HDMI IN todisplay the VGAon theTV. R L- R Owner s Manual 13 Use theTV`s VGAor DVI (DigitalVisual Interface)AudioIN port foraudio connections, dependingon your TV. R 1 Y Pb Pr AUDIO L-AUDIO- UseINPUT onthe remotecontrol toselect VGAor HDMIsource. 3. There may becomepermanently imprinted onthe screen. 3. If the refresh rate of either VGAor HDMI ; (theother...
... to either VGAIN or HDMI IN todisplay the VGAon theTV. R L- R Owner s Manual 13 Use theTV`s VGAor DVI (DigitalVisual Interface)AudioIN port foraudio connections, dependingon your TV. R 1 Y Pb Pr AUDIO L-AUDIO- UseINPUT onthe remotecontrol toselect VGAor HDMIsource. 3. There may becomepermanently imprinted onthe screen. 3. If the refresh rate of either VGAor HDMI ; (theother...
User Manual
Page 14
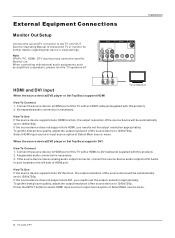
... source option of the source device to 1280x720p. To get the best picture quality, adjust the output resolution of Select Main source menu. 14 TV LCD-TFT AV OUT VIDEO L-AUDIO-R VIDEO IN ANT IN 1 VIDEO L-AUDIO- If the source device does not support Auto HDMI, you need... 2. A separated audio connection is necessary. R Installation HDMI and DVI input When the source device(DVD player or Set Top Box) supports HDMI TV or Monitor How To Connect 1. When the source device(DVD player or Set Top Box) supports DVI How To Connect 1. External Equipment Connections Monitor...
... source option of the source device to 1280x720p. To get the best picture quality, adjust the output resolution of Select Main source menu. 14 TV LCD-TFT AV OUT VIDEO L-AUDIO-R VIDEO IN ANT IN 1 VIDEO L-AUDIO- If the source device does not support Auto HDMI, you need... 2. A separated audio connection is necessary. R Installation HDMI and DVI input When the source device(DVD player or Set Top Box) supports HDMI TV or Monitor How To Connect 1. When the source device(DVD player or Set Top Box) supports DVI How To Connect 1. External Equipment Connections Monitor...
User Manual
Page 16
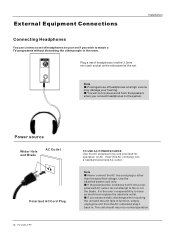
... the polarized AC cord does not fit into a standard polarized AC outlet. Power source Wider Hole and Blade AC Outlet Polarized AC Cord Plug 16 TV LCD-TFT TO USE AC POWER SOURCE Use the AC polarized line cord provided for operation on the side panel of the set. Insert the AC... cause a static discharge when touching the unit and the unit fails to function, simply unplug the unit from the speakers when you wish to watch a TV programme without disturbing the other than the specified voltage. You will not receive sound from the AC outlet and plug it back in the room...
... the polarized AC cord does not fit into a standard polarized AC outlet. Power source Wider Hole and Blade AC Outlet Polarized AC Cord Plug 16 TV LCD-TFT TO USE AC POWER SOURCE Use the AC polarized line cord provided for operation on the side panel of the set. Insert the AC... cause a static discharge when touching the unit and the unit fails to function, simply unplug the unit from the speakers when you wish to watch a TV programme without disturbing the other than the specified voltage. You will not receive sound from the AC outlet and plug it back in the room...
User Manual
Page 17
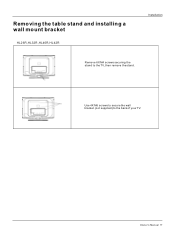
Use 4X M6 screws to secure the wall bracket (not supplied) to the TV, then remove the stand. Removing the table stand and installing a wall mount bracket HL26R,HL32R,HL40R,HL42R Installation Remove 6X M4 screws securing the stand to the back of your TV. Owner s Manual 17
Use 4X M6 screws to secure the wall bracket (not supplied) to the TV, then remove the stand. Removing the table stand and installing a wall mount bracket HL26R,HL32R,HL40R,HL42R Installation Remove 6X M4 screws securing the stand to the back of your TV. Owner s Manual 17
User Manual
Page 18
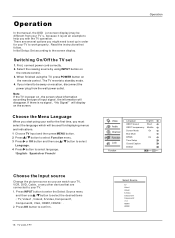
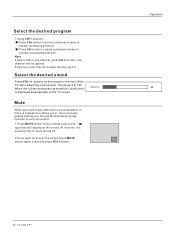
... for displaying menus and indications. 1 Choose TV Input and then press MENU button. 2 Press / button to select Function menu. 3 Press or OK button and then use / button to confirm . 18 TV LCD-TFT Select Source TV Video1 Video2 S-Video Component1 Component2 VGA HDMI1 HDMI2 ...Initial Setup: Set according to standby mode. 4. Press OK button to select the desired items TV, Video1, Video2, S-Video,Component1, Component2, VGA, HDMI1,HDMI2...
... for displaying menus and indications. 1 Choose TV Input and then press MENU button. 2 Press / button to select Function menu. 3 Press or OK button and then use / button to confirm . 18 TV LCD-TFT Select Source TV Video1 Video2 S-Video Component1 Component2 VGA HDMI1 HDMI2 ...Initial Setup: Set according to standby mode. 4. Press OK button to select the desired items TV, Video1, Video2, S-Video,Component1, Component2, VGA, HDMI1,HDMI2...

User Manual
Page 19
... OK Set / Select EXIT Back Owner s Manual 19 A skip channel can also use the remote control to set channels, which are skip. Channel menu This TV set has two methods to set channel is explained. You can be only operated in the channel number or select by key-in normal... TV mode. Note When Antenna is selected, the TV will detect antenna signals and will search for antenna TV (NTSC and ATSC) channels available in your local area. When Cable is skipped when using CH+ and...
... OK Set / Select EXIT Back Owner s Manual 19 A skip channel can also use the remote control to set channels, which are skip. Channel menu This TV set has two methods to set channel is explained. You can be only operated in the channel number or select by key-in normal... TV mode. Note When Antenna is selected, the TV will detect antenna signals and will search for antenna TV (NTSC and ATSC) channels available in your local area. When Cable is skipped when using CH+ and...
User Manual
Page 20
... to select a channel number in number decreasing direction. Select the desired sound Press VOL-/+ buttons on the remote or the front of the TV set to a conversation, or there is a telephone calling you want to recover the sound, press MUTE button again or directly press VOL+... can enter channel number directly,eg:2-0. Press CH- button, the channel will display on the screen. Note If skip is 0~100. Operation 20 TV LCD-TFT Press CH+ button to select a channel number in number increasing direction. Volume Mute When you , the sound elimination (mute) function is ...
... to select a channel number in number decreasing direction. Select the desired sound Press VOL-/+ buttons on the remote or the front of the TV set to a conversation, or there is a telephone calling you want to recover the sound, press MUTE button again or directly press VOL+... can enter channel number directly,eg:2-0. Press CH- button, the channel will display on the screen. Note If skip is 0~100. Operation 20 TV LCD-TFT Press CH+ button to select a channel number in number increasing direction. Volume Mute When you , the sound elimination (mute) function is ...
User Manual
Page 21
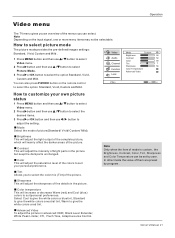
...) of the picture. You can select. Advanced Video To adjust the picture in the picture but keep the dark parts unchanged. Operation Video menu The TV menu gives you an overview of the menus you to adjust the setting. Contrast This will increase or decrease Warm (red) and Cool (blue) colors...
...) of the picture. You can select. Advanced Video To adjust the picture in the picture but keep the dark parts unchanged. Operation Video menu The TV menu gives you an overview of the menus you to adjust the setting. Contrast This will increase or decrease Warm (red) and Cool (blue) colors...


