
User Manual
Page 2
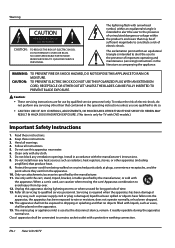
...OR SHOCK HAZARD, DO NOT EXPOSE THIS APPLIANCE TO RAIN OR MOISTURE. EN-1 Haier LCD HDTV The lightning flash with a protective earthing connection. Follow all servicing to constitute a risk of time. 13. The apparatus shall not be exposed to dripping or splashing and that... power-supply cord or plug is intended to alert the user to the presence of important operating and maintenance (servicing) instructions in any heat sources such as the disconnect device, remain it readily operable during lightning storms or when unused for TV with the cart, stand, tripod, bracket, or table ...
...OR SHOCK HAZARD, DO NOT EXPOSE THIS APPLIANCE TO RAIN OR MOISTURE. EN-1 Haier LCD HDTV The lightning flash with a protective earthing connection. Follow all servicing to constitute a risk of time. 13. The apparatus shall not be exposed to dripping or splashing and that... power-supply cord or plug is intended to alert the user to the presence of important operating and maintenance (servicing) instructions in any heat sources such as the disconnect device, remain it readily operable during lightning storms or when unused for TV with the cart, stand, tripod, bracket, or table ...
User Manual
Page 4
... 8 External A/V Source Setup 8 Conmponent Setup 8 Connecting a computer 9 Cable TV Setup 9 HDMI input 10 Operation 10 Switching On/Off the TV set 10 Choose the Menu Language 10 Choose the Input source 10 Video Menu Options 11 Function 11 Audio Menu Options 11 Function 12 Channel Menu Options 12 Function 13 Function Menu Options 14 Function 14 Lock Menu 16 Function 16 PC Menu 18 USB Input 18 To play pictures 19 To play music 19 To play video 20 Maintenance 21 Specification 21 Troubleshooting...
... 8 External A/V Source Setup 8 Conmponent Setup 8 Connecting a computer 9 Cable TV Setup 9 HDMI input 10 Operation 10 Switching On/Off the TV set 10 Choose the Menu Language 10 Choose the Input source 10 Video Menu Options 11 Function 11 Audio Menu Options 11 Function 12 Channel Menu Options 12 Function 13 Function Menu Options 14 Function 14 Lock Menu 16 Function 16 PC Menu 18 USB Input 18 To play pictures 19 To play music 19 To play video 20 Maintenance 21 Specification 21 Troubleshooting...
User Manual
Page 5
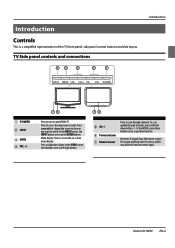
TV Side panel controls and connections Introduction INPUT MENU VOL- Press to scan through channels, press and hold down buttons. Press to access the input source mode. To scan quickly through channels. Receivers IR signals from the remote control. Press to adjust the volume. Press repeatedly to change the source to the one you want to access the on and off the TV. In the MENU screen, these buttons serve as up/down either+/-. Menu display. Haier LCD HDTV EN-4 CH+ POWER 1 POWER 2 INPUT 3 MENU 4 VOL +/- Introduction...
TV Side panel controls and connections Introduction INPUT MENU VOL- Press to scan through channels, press and hold down buttons. Press to access the input source mode. To scan quickly through channels. Receivers IR signals from the remote control. Press to adjust the volume. Press repeatedly to change the source to the one you want to access the on and off the TV. In the MENU screen, these buttons serve as up/down either+/-. Menu display. Haier LCD HDTV EN-4 CH+ POWER 1 POWER 2 INPUT 3 MENU 4 VOL +/- Introduction...
User Manual
Page 6
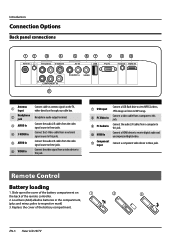
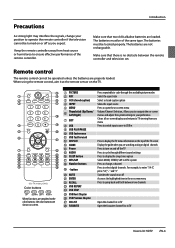
Connect the audio L/R cables from the video signal source to these jacks. Headphone audio output terminal. Connect the audio L/R cables from a computer to receive digital audio and uncompressed digital video. Connect a HDMI device to this jack. Remote Control Battery loading 1. Replace the cover of the remote controller. 2. Connect the video signal from an external signal source to MP3 songs. Connect the S-Video cable from a video device to this jack. 7 USB input 8 PC Video In 9 PC Audio In 0 HDMI In A Component Input Connect a USB flash drive to view MPEG2 videos,...
Connect the audio L/R cables from the video signal source to these jacks. Headphone audio output terminal. Connect the audio L/R cables from a computer to receive digital audio and uncompressed digital video. Connect a HDMI device to this jack. Remote Control Battery loading 1. Replace the cover of the remote controller. 2. Connect the video signal from an external signal source to MP3 songs. Connect the S-Video cable from a video device to this jack. 7 USB input 8 PC Video In 9 PC Audio In 0 HDMI In A Component Input Connect a USB flash drive to view MPEG2 videos,...
User Manual
Page 7
... television set. ENTER VOL+ 21 EXIT CH- The batteries are watching analog or digital channels Press to turn on -screen menus and adjust the system settings to your position to operate the remote controller if the television cannot be of the remote controller. RECALL 7 22 8 USB PLAY/PAUSE STOP REPEAT 23 9 REV PREV NEXT 24 10 25 11 DISPLAY GUIDE FAVORITE CH.LIST 26 12 27 13 28 (For TV without DVD) Color buttons Red Green...
... television set. ENTER VOL+ 21 EXIT CH- The batteries are watching analog or digital channels Press to turn on -screen menus and adjust the system settings to your position to operate the remote controller if the television cannot be of the remote controller. RECALL 7 22 8 USB PLAY/PAUSE STOP REPEAT 23 9 REV PREV NEXT 24 10 25 11 DISPLAY GUIDE FAVORITE CH.LIST 26 12 27 13 28 (For TV without DVD) Color buttons Red Green...
User Manual
Page 8
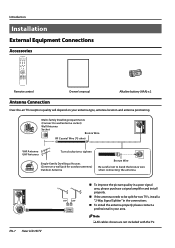
.... ANT IN ANT IN EN-7 Haier LCD HDTV „„ To improve the picture quality in your antenna type, antenna location and antenna positioning. Introduction Installation External Equipment Connections Accessories TV DVD STB CABLE VCR AUD PICTURE AUDIO PC HDMI INPUT MUTE RECALL VOL MENU CH EXIT ENTER SLEEP DISPLAY USB PLAY/PAUSE STOP REC REV PREV NEXT REPEAT MTS/SAP FREEZE CH.LIST GUIDE CCD ARC FAVORITE Remote control Owner's manual Alkaline battery (AAA) x2 Antenna Connection Over-the-air TV reception...
.... ANT IN ANT IN EN-7 Haier LCD HDTV „„ To improve the picture quality in your antenna type, antenna location and antenna positioning. Introduction Installation External Equipment Connections Accessories TV DVD STB CABLE VCR AUD PICTURE AUDIO PC HDMI INPUT MUTE RECALL VOL MENU CH EXIT ENTER SLEEP DISPLAY USB PLAY/PAUSE STOP REC REV PREV NEXT REPEAT MTS/SAP FREEZE CH.LIST GUIDE CCD ARC FAVORITE Remote control Owner's manual Alkaline battery (AAA) x2 Antenna Connection Over-the-air TV reception...
User Manual
Page 9
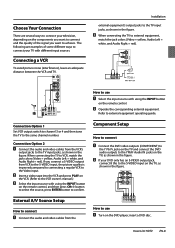
... audio and video cables from the How to use A Select the input source with using the INPUT button on the remote control, and then press CH+/- Haier LCD HDTV EN-8 Choose Your Connection There are examples of the signal you connect a S-VIDEO output from VCR to the S-VIDEO input, the picture quality is improved;compared to connecting a regular VCR to the Video input. B When connecting the TV to VCR, match the jack colors (Video = yellow, Audio Left = white, and Audio Right = red). button...
... audio and video cables from the How to use A Select the input source with using the INPUT button on the remote control, and then press CH+/- Haier LCD HDTV EN-8 Choose Your Connection There are examples of the signal you connect a S-VIDEO output from VCR to the S-VIDEO input, the picture quality is improved;compared to connecting a regular VCR to the Video input. B When connecting the TV to VCR, match the jack colors (Video = yellow, Audio Left = white, and Audio Right = red). button...
User Manual
Page 10
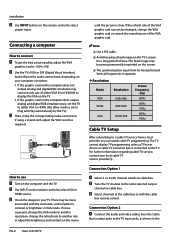
... menu EN-9 Haier LCD HDTV until the picture is present, change the VGA mode to Plug and Play automatically by the TV.) C Then, make the corresponding audio connection. Connection Option 2 A Connect the audio and video cables from a local provider you can not be noise associated with the cable box remote control. C Check the image on the screen. Connecting a computer How to connect A To get the best picture quality, adjust the VGA graphics card to the TV input...
... menu EN-9 Haier LCD HDTV until the picture is present, change the VGA mode to Plug and Play automatically by the TV.) C Then, make the corresponding audio connection. Connection Option 2 A Connect the audio and video cables from a local provider you can not be noise associated with the cable box remote control. C Check the image on the screen. Connecting a computer How to connect A To get the best picture quality, adjust the VGA graphics card to the TV input...

User Manual
Page 11
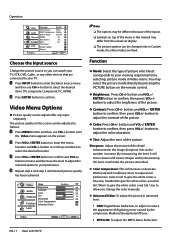
...+/- button to external equipment operating guide. HDMI input How To Connect Connect the cables from your set A First, connect power cord correctly. Read the instructions that follow. If there is just an example to the TV input jacks, as shown in power on , the screen show information according the type of input signal, the information will display on the TV. Operation Operation In the manual, the OSD (on the remote control. button to a Cable Box, match the jack colors (Video = yellow, Audio...
...+/- button to external equipment operating guide. HDMI input How To Connect Connect the cables from your set A First, connect power cord correctly. Read the instructions that follow. If there is just an example to the TV input jacks, as shown in power on , the screen show information according the type of input signal, the information will display on the TV. Operation Operation In the manual, the OSD (on the remote control. button to a Cable Box, match the jack colors (Video = yellow, Audio...
User Manual
Page 12
... 3 until the Video menu appears on top of the picture. A Press INPUT button to your preference. Video Mode Custom Brightness 50 Audio Contrast 50 Color 50 Channel Tint Sharpness 0 50 Function Color Temperature Advanced Video Lock Video ENTER Adjust CH+/VOL+/- Operation Video Audio Channel Function Lock Language OSD Timeout OSD Transparency Screen Mode DPMS Blue Screen DCR Time Setup Closed Caption English Short Middle Normal On On On Default Function CH+/VOL+/- button and VOL+/ ENTER button to confirm...
... 3 until the Video menu appears on top of the picture. A Press INPUT button to your preference. Video Mode Custom Brightness 50 Audio Contrast 50 Color 50 Channel Tint Sharpness 0 50 Function Color Temperature Advanced Video Lock Video ENTER Adjust CH+/VOL+/- Operation Video Audio Channel Function Lock Language OSD Timeout OSD Transparency Screen Mode DPMS Blue Screen DCR Time Setup Closed Caption English Short Middle Normal On On On Default Function CH+/VOL+/- button and VOL+/ ENTER button to confirm...
User Manual
Page 13
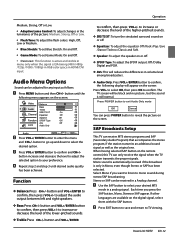
... color space in HDMI/DVI input. button until desired audio quality has been achieved. button and VOL+/ENTER button to TV viewing. B Press EXIT button to save and return to confirm, then press VOL+/- Audio Menu Options Sound can receive MTS stereo programs and SAP (Secondary Audio Program) that accompanies the stereo program; Medium, Strong, Off or Low. •• Adaptive Luma Control: To adjust changes in the luminance of the picture...
... color space in HDMI/DVI input. button until desired audio quality has been achieved. button and VOL+/ENTER button to TV viewing. B Press EXIT button to save and return to confirm, then press VOL+/- Audio Menu Options Sound can receive MTS stereo programs and SAP (Secondary Audio Program) that accompanies the stereo program; Medium, Strong, Off or Low. •• Adaptive Luma Control: To adjust changes in the luminance of the picture...
User Manual
Page 14
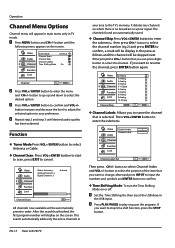
... of the item that is no broadcast or a poor signal. button to stop time shift function, press the STOP button. EN-13 Haier LCD HDTV Video Audio Channel Tuner Mode Channel Scan Channel Skip Channel Labels Time Shifting Mode Antenna On Function Lock Channel CH+/VOL+/- button to select the channel number (eg.2) and press ENTER to resume the channel, press ENTER button again. Press VOL+/ENTER button to enter the submenu, then press CH+/- If you...
... of the item that is no broadcast or a poor signal. button to stop time shift function, press the STOP button. EN-13 Haier LCD HDTV Video Audio Channel Tuner Mode Channel Scan Channel Skip Channel Labels Time Shifting Mode Antenna On Function Lock Channel CH+/VOL+/- button to select the channel number (eg.2) and press ENTER to resume the channel, press ENTER button again. Press VOL+/ENTER button to enter the submenu, then press CH+/- If you...

User Manual
Page 15
... screen will store the video, audio and data service. button to change thetime of the OSD. Note RR Time Shift function is determined by using your preference. RR Time shift supports more than 4GB recording by the memory size of the OSD. Video Audio Channel Function Lock Language OSD Timeout OSD Transparency Screen Mode DPMS Blue Screen DCR Time Setup Closed Caption English Short Middle Normal On On On Default Function CH+/VOL+/- button...
... screen will store the video, audio and data service. button to change thetime of the OSD. Note RR Time Shift function is determined by using your preference. RR Time shift supports more than 4GB recording by the memory size of the OSD. Video Audio Channel Function Lock Language OSD Timeout OSD Transparency Screen Mode DPMS Blue Screen DCR Time Setup Closed Caption English Short Middle Normal On On On Default Function CH+/VOL+/- button...

User Manual
Page 16
... Size :To adjust the font size: Large, Small or Medium. button to enter the submenu. Text1: For program guide and other language that may be adjusted. Caption Style: To display the digital closed captioning might not always be adjusted. Operation YY DCR: Dynamic Contrast Ratio. CC1: When CC1is displayed on TV means CC mode is selected. IMPORTANT:Closed captioning availability entirely depends on your screen). Video Time Zone Date/Time Audio Sleep Timer Off Channel Function Lock Time Setup...
... Size :To adjust the font size: Large, Small or Medium. button to enter the submenu. Text1: For program guide and other language that may be adjusted. Caption Style: To display the digital closed captioning might not always be adjusted. Operation YY DCR: Dynamic Contrast Ratio. CC1: When CC1is displayed on TV means CC mode is selected. IMPORTANT:Closed captioning availability entirely depends on your screen). Video Time Zone Date/Time Audio Sleep Timer Off Channel Function Lock Time Setup...
User Manual
Page 17
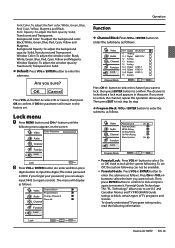
...: Video Audio Channel Channel Block Program Block Change Password Clean All Function Lock Lock ENTER Enter CH+/VOL+/- If you want to confirm. PressCH+/-/VOL+/buttonto select the item you want to use U.S. Parental Guide Technology: The "P.L. Technology" allows you sure? To clearly understand TV program rating codes, read the following menu appears on the screen. Font Color: To adjust the font color: White, Green, Blue, Red, Cyan, Yellow, Magenta and Black. Window Color...
...: Video Audio Channel Channel Block Program Block Change Password Clean All Function Lock Lock ENTER Enter CH+/VOL+/- If you want to confirm. PressCH+/-/VOL+/buttonto select the item you want to use U.S. Parental Guide Technology: The "P.L. Technology" allows you sure? To clearly understand TV program rating codes, read the following menu appears on the screen. Font Color: To adjust the font color: White, Green, Blue, Red, Cyan, Yellow, Magenta and Black. Window Color...
User Manual
Page 19
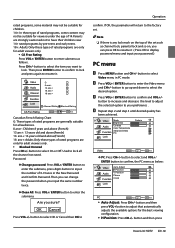
... down to confirm, the PC menu as channel lock, parental lock and so on, you input the same number twice. button to select and VOL+/ ENTER button to select the desired option . button and then press Haier LCD HDTV EN-18 Note RR If there is any lock mark on the top of the set . button and then press VOL+ button to display password menu and input your preference . D Repeat step...
... down to confirm, the PC menu as channel lock, parental lock and so on, you input the same number twice. button to select and VOL+/ ENTER button to select the desired option . button and then press Haier LCD HDTV EN-18 Note RR If there is any lock mark on the top of the set . button and then press VOL+ button to display password menu and input your preference . D Repeat step...
User Manual
Page 20
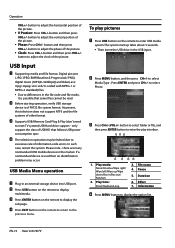
...-19 Haier LCD HDTV mpg/.mpeg/.vro/.vob/.ts coded with MPEG-1 or MPEG-2 standard) files. •• Due to enter the play pictures A Press USB button on the remote to adjust the clock of the picture. B Before starting operation, verify USB storage device is possible that follows USB power consumption spec. In such case, restart the system. B Press MENU button, and the press CH+/- C Press CH+/-/VOL+/- Play mode...
...-19 Haier LCD HDTV mpg/.mpeg/.vro/.vob/.ts coded with MPEG-1 or MPEG-2 standard) files. •• Due to enter the play pictures A Press USB button on the remote to adjust the clock of the picture. B Before starting operation, verify USB storage device is possible that follows USB power consumption spec. In such case, restart the system. B Press MENU button, and the press CH+/- C Press CH+/-/VOL+/- Play mode...

User Manual
Page 21
Repeat 5. Play next picture Operation 1. Repeat 6. F Press EXIT button to return to select Media Type , Press ENTER and press CH+/- to the previous menu. Show Spectrum 6. to display the option list. 1. Information D Press MENU button to select Media Type , Press ENTER and press CH+/- To play music A Press USB button on the remote control to select the adjusted item, press ENTER button to select Haier LCD HDTV EN-20 to enter stream media system. Repeat...
Repeat 5. Play next picture Operation 1. Repeat 6. F Press EXIT button to return to select Media Type , Press ENTER and press CH+/- to the previous menu. Show Spectrum 6. to display the option list. 1. Information D Press MENU button to select Media Type , Press ENTER and press CH+/- To play music A Press USB button on the remote control to select the adjusted item, press ENTER button to select Haier LCD HDTV EN-20 to enter stream media system. Repeat...
User Manual
Page 22
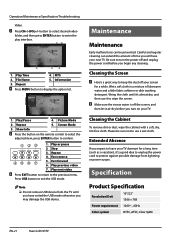
... select desired video folder, and then press ENTER button to exit the USB mode. Information 3. Repeat 5. Play or pause 2 Stop 3. B Make sure the excess water is off and unplug the power cord before you begin any cleaning. File Name 5. Picture Mode 2. Press USB button to enter the play interface. 1. Be sure to turn on the remote control to select the adjusted item, press ENTER button to protect...
... select desired video folder, and then press ENTER button to exit the USB mode. Information 3. Repeat 5. Play or pause 2 Stop 3. B Make sure the excess water is off and unplug the power cord before you begin any cleaning. File Name 5. Picture Mode 2. Press USB button to enter the play interface. 1. Be sure to turn on the remote control to select the adjusted item, press ENTER button to protect...
User Manual
Page 23
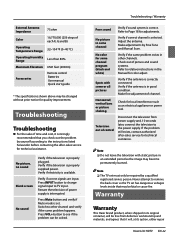
Troubleshooting Troubleshooting „„ For the sake of time and cost, it will be free from power supply and, 10 seconds later, connect the television to relative instructions in its original container, will , at its option, either repair Haier LCD HDTV EN-22 Verify if electricity is properly supplied power. Press INPUT button to change signal input to see if the problem can be solved. Check out of picture and sound systems. Refer to...
Troubleshooting Troubleshooting „„ For the sake of time and cost, it will be free from power supply and, 10 seconds later, connect the television to relative instructions in its original container, will , at its option, either repair Haier LCD HDTV EN-22 Verify if electricity is properly supplied power. Press INPUT button to change signal input to see if the problem can be solved. Check out of picture and sound systems. Refer to...


