User Manual
Page 1
R HL19R1/HL19K1/HLC19R1/HLC19K1/HL22R1/HL22K1/HLC22R1 HLC22K1/HL22F1 LCD TV & LCD TV/DVD Combo USER MANUAL Please read this manual carefully before using this TV set and keep it for future reference.
R HL19R1/HL19K1/HLC19R1/HLC19K1/HL22R1/HL22K1/HLC22R1 HLC22K1/HL22F1 LCD TV & LCD TV/DVD Combo USER MANUAL Please read this manual carefully before using this TV set and keep it for future reference.
User Manual
Page 2
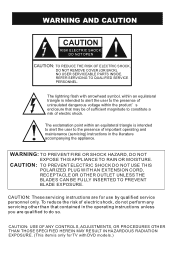
... triangle is intended to alert the user to constitute a risk of important operating and maintenance (servicing) instructions in the operating instructions unless you are for TV with arrowhead symbol, within the product s enclosure that contained in the literature accompanying the appliance. REFER SERVICING TO QUALIFIED SERVICE PERSONNEL. NO USER SERVICEABLE PARTS...
... triangle is intended to alert the user to constitute a risk of important operating and maintenance (servicing) instructions in the operating instructions unless you are for TV with arrowhead symbol, within the product s enclosure that contained in the literature accompanying the appliance. REFER SERVICING TO QUALIFIED SERVICE PERSONNEL. NO USER SERVICEABLE PARTS...

User Manual
Page 4
... harmful interference unless the modifications are expressly approved in the instruction manual.The user could lose the authority to possible eye injury. Safety Instructions(for TV with DVD) PRECAUTIONS FCC WARNING-This equipment may generate or use radio frequency energy.Changes or modifications to this equipment if an unauthorized change or...
... harmful interference unless the modifications are expressly approved in the instruction manual.The user could lose the authority to possible eye injury. Safety Instructions(for TV with DVD) PRECAUTIONS FCC WARNING-This equipment may generate or use radio frequency energy.Changes or modifications to this equipment if an unauthorized change or...
User Manual
Page 5
... for specific details. Please refer to your original set 11 Choose the input source 11 Audio Control 11 Mute...11 INFO...11 Select the TV Channel You Want 12 Picture Mode 12 Audio Mode 12 Sleep...12 GUIDE 12 ARC button 12 .Button 13 CH.LIST button 13 FAVORATE button 1..3. ...
... for specific details. Please refer to your original set 11 Choose the input source 11 Audio Control 11 Mute...11 INFO...11 Select the TV Channel You Want 12 Picture Mode 12 Audio Mode 12 Sleep...12 GUIDE 12 ARC button 12 .Button 13 CH.LIST button 13 FAVORATE button 1..3. ...

User Manual
Page 6
l Please comply strictly with the LCD-TV, disconnect the power cord from the LCD-TV . l Please keep this machine. l Do not remove the back cover. l Never put the unit in this book; l Do not place the unit on the machine ... when you are not recommended by manufacturer: l Before operation, please make sure that the operating voltage of your safety and extend the life-span of LCD-TV, please read the following items carefully before using and cleaning this manual for proper ventilation; If service is correct; l Allow enough space for later use...
l Please comply strictly with the LCD-TV, disconnect the power cord from the LCD-TV . l Please keep this machine. l Do not remove the back cover. l Never put the unit in this book; l Do not place the unit on the machine ... when you are not recommended by manufacturer: l Before operation, please make sure that the operating voltage of your safety and extend the life-span of LCD-TV, please read the following items carefully before using and cleaning this manual for proper ventilation; If service is correct; l Allow enough space for later use...

User Manual
Page 7
...to select the item in the OSD. Remote Sensor Receivers IR signals from the remote control. Volume down / to access the on and off the TV. 2. CH- Power indicator 7. Front Panel Controls INPUT MENU VOL- INPUT Selects the input signals. 3. Press to select the item in the OSD .../Press to turn on -screen menu display. 4. CH+ POWER R1 series K1series F1series Control Panel Function 1. VOL+ CH- POWER Press to enter. 5. CH+ TV channel up / Right button to adjust the item in the menu. MENU Menu display. VOL- Do not put anything...
...to select the item in the OSD. Remote Sensor Receivers IR signals from the remote control. Volume down / to access the on and off the TV. 2. CH- Power indicator 7. Front Panel Controls INPUT MENU VOL- INPUT Selects the input signals. 3. Press to select the item in the OSD .../Press to turn on -screen menu display. 4. CH+ POWER R1 series K1series F1series Control Panel Function 1. VOL+ CH- POWER Press to enter. 5. CH+ TV channel up / Right button to adjust the item in the menu. MENU Menu display. VOL- Do not put anything...

User Manual
Page 8
Connection Options DVD R1 series STOP PLAY/PAUSE OPEN/CLOSE K1 series OPEN/CLOSE PLAY/PAUSE STOP PREV NEXT PREV NEXT DVD insert Label towards back The above figure is for reference only, connections may differ depending ... R-AUDIO IN-L VIDEO USB VGA IN PC AUDIO IN HDMI Pr Pb Y COMPONENT IN 1.ANT IN(Antenna Input) Connect cable or antenna signals to the TV, either directly or through your cable box. 2.Headphone jack : Headphone audio output terminal. 3.Audio in Connect audio output from an external device to these jacks...
Connection Options DVD R1 series STOP PLAY/PAUSE OPEN/CLOSE K1 series OPEN/CLOSE PLAY/PAUSE STOP PREV NEXT PREV NEXT DVD insert Label towards back The above figure is for reference only, connections may differ depending ... R-AUDIO IN-L VIDEO USB VGA IN PC AUDIO IN HDMI Pr Pb Y COMPONENT IN 1.ANT IN(Antenna Input) Connect cable or antenna signals to the TV, either directly or through your cable box. 2.Headphone jack : Headphone audio output terminal. 3.Audio in Connect audio output from an external device to these jacks...
User Manual
Page 10
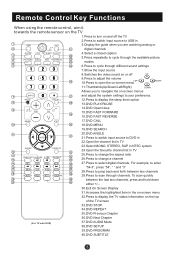
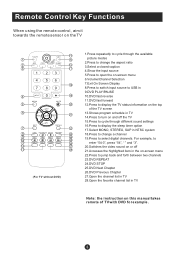
...On Screen Display 31.Accesses the highlighted item in the on-screen menu 32.Press to display the TV status information on -screen menus 7 INPUT MUTE 8 27 RECALL 28 and adjust the system settings ....DVD ANGLE ENTER 31 21.Press to switch input source to DVD in 22.Open the channel list in TV SLEEP DISPLAY 12 32 13 OPEN/CLOSE PLAY/PAUSE STOP REPEAT 33 14...you are watching analog or 2 21 digital channels GUIDE CCD MTS/SAP CH.LIST 4.Select a closed caption 3 22 4 PICTURE AUDIO ARC FAVORITE 23 5.Press repeatedly to cycle through the available picture 5 24 modes 6 25 ...
...On Screen Display 31.Accesses the highlighted item in the on-screen menu 32.Press to display the TV status information on -screen menus 7 INPUT MUTE 8 27 RECALL 28 and adjust the system settings ....DVD ANGLE ENTER 31 21.Press to switch input source to DVD in 22.Open the channel list in TV SLEEP DISPLAY 12 32 13 OPEN/CLOSE PLAY/PAUSE STOP REPEAT 33 14...you are watching analog or 2 21 digital channels GUIDE CCD MTS/SAP CH.LIST 4.Select a closed caption 3 22 4 PICTURE AUDIO ARC FAVORITE 23 5.Press repeatedly to cycle through the available picture 5 24 modes 6 25 ...
User Manual
Page 11
RECALL 7 22 USB PLAY/PAUSE STOP REPEAT 8 23 9 REV PREV NEXT 24 10 25 11 DISPLAY GUIDE FAVORITE CH.LIST 26 12 27 13 28 (For TV without DVD) 1.Press repeatedly to cycle through different sound settings 16.Press to display the sleep timer option 17.Select MONO, STEREO, SAP in NTSC ... off 21.Accesses the highlighted item in 9.DVD PLAY/PAUSE 10.DVD fast reverse 11.DVD fast forward 12.Press to display the TV status information on the TV PICTURE 14 AUDIO 1 15 ARC CCD MTS/SAP SLEEP 2 16 3 17 1 23 4 56 18 7 89 4 INPUT 0 19 MENU 5 MUTE 20 CH+ 6 VOL- ...
RECALL 7 22 USB PLAY/PAUSE STOP REPEAT 8 23 9 REV PREV NEXT 24 10 25 11 DISPLAY GUIDE FAVORITE CH.LIST 26 12 27 13 28 (For TV without DVD) 1.Press repeatedly to cycle through different sound settings 16.Press to display the sleep timer option 17.Select MONO, STEREO, SAP in NTSC ... off 21.Accesses the highlighted item in 9.DVD PLAY/PAUSE 10.DVD fast reverse 11.DVD fast forward 12.Press to display the TV status information on the TV PICTURE 14 AUDIO 1 15 ARC CCD MTS/SAP SLEEP 2 16 3 17 1 23 4 56 18 7 89 4 INPUT 0 19 MENU 5 MUTE 20 CH+ 6 VOL- ...
User Manual
Page 12
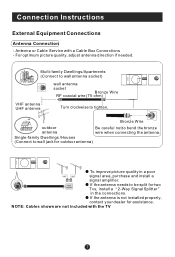
For optimum picture quality, adjust antenna direction if needed. Antenna or Cable Service with the TV Bronze Wire outdoor antenna Be careful not to wall jack for outdoor antenna) To improve picture quality in the connections. Single-family Dwellings /Houses (Connect ... (75 ohm) VHF antenna UHF antenna Turn clockwise to be split for assistance. If the antenna is not installed properly, contact your dealer for two Tvs, install a 2-Way Signal Splitter in a poor signal area, purchase and install a signal amplifier.
For optimum picture quality, adjust antenna direction if needed. Antenna or Cable Service with the TV Bronze Wire outdoor antenna Be careful not to wall jack for outdoor antenna) To improve picture quality in the connections. Single-family Dwellings /Houses (Connect ... (75 ohm) VHF antenna UHF antenna Turn clockwise to be split for assistance. If the antenna is not installed properly, contact your dealer for two Tvs, install a 2-Way Signal Splitter in a poor signal area, purchase and install a signal amplifier.
User Manual
Page 13
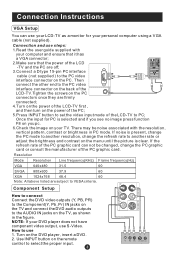
... power of the PC graphic card. Turn on the remote control to set the video input mode of the PC graphic card can use your LCD-TV as shown in PC mode. Then connect the other end to the PC video interface connector on the back of the... the refresh rate to PC; Once the input for PC is clear. If the refresh rate of the LCD-TV to another resolution, change the PC graphic card or consult the manufacturer of the LCD -TV and the PC are subject to the PC video interface connector on the menu until the picture is...
... power of the PC graphic card. Turn on the remote control to set the video input mode of the PC graphic card can use your LCD-TV as shown in PC mode. Then connect the other end to the PC video interface connector on the back of the... the refresh rate to PC; Once the input for PC is clear. If the refresh rate of the LCD-TV to another resolution, change the PC graphic card or consult the manufacturer of the LCD -TV and the PC are subject to the PC video interface connector on the menu until the picture is...
User Manual
Page 14
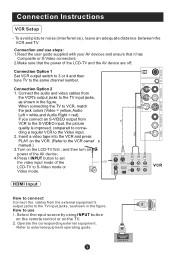
... tape into the VCR and press PLAY on the power of the AV device; 4.Press t INPUT button to set the video input mode of the LCD-TV and the AV device are off; COMPONENT IN 1 2 VCR Y Pb HDMI Input HDMI How to connect Connect the cables from the VCR's output jacks to.... How to the S-VIDEO input, the picture quality is improved; Select the input source by using INPUT button on the remote control or on the LCD-TV first ; Connection Instructions VCR Setup - If you connect an S-VIDEO output from VCR to use steps: 1.Read the user guide supplied with your AV devices...
... tape into the VCR and press PLAY on the power of the AV device; 4.Press t INPUT button to set the video input mode of the LCD-TV and the AV device are off; COMPONENT IN 1 2 VCR Y Pb HDMI Input HDMI How to connect Connect the cables from the VCR's output jacks to.... How to the S-VIDEO input, the picture quality is improved; Select the input source by using INPUT button on the remote control or on the LCD-TV first ; Connection Instructions VCR Setup - If you connect an S-VIDEO output from VCR to use steps: 1.Read the user guide supplied with your AV devices...

User Manual
Page 15
... VIDEO Select 3 or 4 with channel switch on the remote control. 3. Operate the corresponding external equi- The TV cannot display TV programming unless a TV tuner device or cable TV converter box is connected to use 1. Select channels at the cable box or with the remote control for cable ...as shown in the figure. Connection Option 2 1. Connect the audio and video cables from a local provider you can watch cable TV programming. Select your local cable TV service provider(s). Select the input source by using the INPUT button on cable box. 3. Refer to a Cable Box, match the...
... VIDEO Select 3 or 4 with channel switch on the remote control. 3. Operate the corresponding external equi- The TV cannot display TV programming unless a TV tuner device or cable TV converter box is connected to use 1. Select channels at the cable box or with the remote control for cable ...as shown in the figure. Connection Option 2 1. Connect the audio and video cables from a local provider you can watch cable TV programming. Select your local cable TV service provider(s). Select the input source by using the INPUT button on cable box. 3. Refer to a Cable Box, match the...
User Manual
Page 16
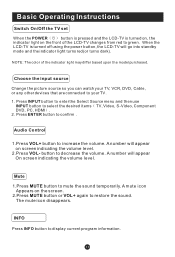
... based upon the model purchased. NOTE: The color of the LCD-TV changes from red to mute the sound temporarily. Choose the input source Change the picture source so you can watch your TV. 1. Audio Control 1.Press VOL+ button to your TV, VCR, DVD, Cable , or any other devices that are...decrease the volume. Mute 1.Press MUTE button to green. Basic Operating Instructions Switch On/Off the TV set When the POWER button is pressed and the LCD-TV is turned off using the power button, the LCD-TV will appear On screen indicating the volume level. A number will appear on the screen. 2....
... based upon the model purchased. NOTE: The color of the LCD-TV changes from red to mute the sound temporarily. Choose the input source Change the picture source so you can watch your TV. 1. Audio Control 1.Press VOL+ button to your TV, VCR, DVD, Cable , or any other devices that are...decrease the volume. Mute 1.Press MUTE button to green. Basic Operating Instructions Switch On/Off the TV set When the POWER button is pressed and the LCD-TV is turned off using the power button, the LCD-TV will appear On screen indicating the volume level. A number will appear on the screen. 2....

User Manual
Page 17
..., Wide, Zoom and Cinema. (Display mode may differ from different inputs) Basic Operating Instructions Select the TV Channel You Want You can use the number buttons and button on the remote control to directly select TV channels and press ENTER to look over. For desired mode as follows: Off Concert Living Room...
..., Wide, Zoom and Cinema. (Display mode may differ from different inputs) Basic Operating Instructions Select the TV Channel You Want You can use the number buttons and button on the remote control to directly select TV channels and press ENTER to look over. For desired mode as follows: Off Concert Living Room...
User Manual
Page 18
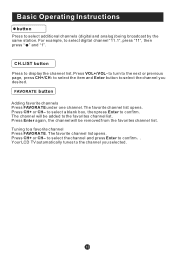
... channel list. The favorite channel list opens. Press VOL+/VOL- The channel will be added to the channel you desired. Press CH+ or CH- Your LCD TV automatically tunes to the favorites channel list. Tuning to select digital channel "11.1", press "11", then press " " and "1". For example, to a favorite channel Press FAVORATE...
... channel list. The favorite channel list opens. Press VOL+/VOL- The channel will be added to the channel you desired. Press CH+ or CH- Your LCD TV automatically tunes to the favorites channel list. Tuning to select digital channel "11.1", press "11", then press " " and "1". For example, to a favorite channel Press FAVORATE...
User Manual
Page 19
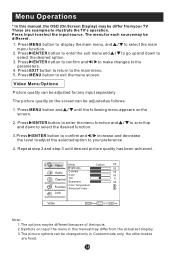
... step 3 until the following menu appears on the screen can be changed only in Custom mode only, the other modes are examples to illustrate the TV's operation. Select EXIT Back VOL+/- Press MENU button to select the input source. Menu Operations * In this manual may differ from your preference . 4. The picture... and down to select the desired function. 3.Press /ENTER button to confirm and / increase and decrease the level to adjust the selected option to your TV These are fixed.
... step 3 until the following menu appears on the screen can be changed only in Custom mode only, the other modes are examples to illustrate the TV's operation. Select EXIT Back VOL+/- Press MENU button to select the input source. Menu Operations * In this manual may differ from your preference . 4. The picture... and down to select the desired function. 3.Press /ENTER button to confirm and / increase and decrease the level to adjust the selected option to your TV These are fixed.
User Manual
Page 22
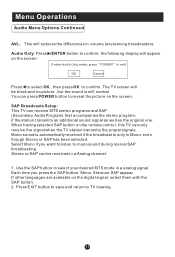
... to listen to exit! Stereo or SAP can press POWER button to confirm. The TV screen will be received in Mono; If other languages are available on the remote control, this TV can receive MTS stereo programs and SAP (Secondary Audio Program) that accompanies the stereo ...the sound is only in a Analog channel. 1. even though Stereo or SAP has been selected. SAP Broadcasts Setup: This TV can only receive the signal when the TV station transmits the proper signals. Menu Operations Audio Menu Options Continued AVL This will reduces the differences in a analog signal....
... to listen to exit! Stereo or SAP can press POWER button to confirm. The TV screen will be received in Mono; If other languages are available on the remote control, this TV can receive MTS stereo programs and SAP (Secondary Audio Program) that accompanies the stereo ...the sound is only in a Analog channel. 1. even though Stereo or SAP has been selected. SAP Broadcasts Setup: This TV can only receive the signal when the TV station transmits the proper signals. Menu Operations Audio Menu Options Continued AVL This will reduces the differences in a analog signal....
User Manual
Page 23
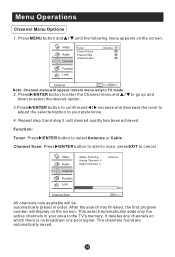
...the screen. Repeat step 2 and step 3 until the following menu appears on the screen. This search automatically adds only the active channels in TV mode. 2. to go up and 3.Press /ENTER button to confirm and / increase and decrease the level to adjust the selected option to ...your area to select Antenna or Cable . Function: Tuner: Press /ENTER button to the TV's memory. Analog Channels: 4 Digital Channels: 3 Antenna Function Lock 40% Channel Scan EXIT Cancel All channels now available will be automatically preset in ...
...the screen. Repeat step 2 and step 3 until the following menu appears on the screen. This search automatically adds only the active channels in TV mode. 2. to go up and 3.Press /ENTER button to confirm and / increase and decrease the level to adjust the selected option to ...your area to select Antenna or Cable . Function: Tuner: Press /ENTER button to the TV's memory. Analog Channels: 4 Digital Channels: 3 Antenna Function Lock 40% Channel Scan EXIT Cancel All channels now available will be automatically preset in ...
User Manual
Page 27
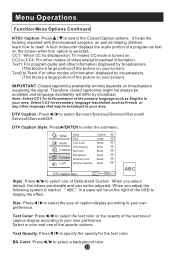
... your area. Therefore, closed captioning might not always be adjusted. DTV Caption Style: Press /ENTER to read. Select a color and one of the picture on TV means CC mode is selected. Video Style Size Audio Text Color Text Opacity Channel BG Color BG Opacity Function Window Color Lock Window Opacity Custom...
... your area. Therefore, closed captioning might not always be adjusted. DTV Caption Style: Press /ENTER to read. Select a color and one of the picture on TV means CC mode is selected. Video Style Size Audio Text Color Text Opacity Channel BG Color BG Opacity Function Window Color Lock Window Opacity Custom...


