Use and Care Manual
Page 3
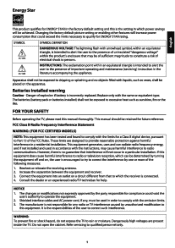
... DANGEROUS VOLTAGE: The lightning flash with the same or equivalent type. WARNING: To prevent fire or shock hazard, do not expose the TV to which power savings will increase power consumption that to rain or moisture. Increase the separation between the equipment and receiver. 3. Changing the factory default picture setting or enabling other features will be placed on , the user is connected. 4.
... DANGEROUS VOLTAGE: The lightning flash with the same or equivalent type. WARNING: To prevent fire or shock hazard, do not expose the TV to which power savings will increase power consumption that to rain or moisture. Increase the separation between the equipment and receiver. 3. Changing the factory default picture setting or enabling other features will be placed on , the user is connected. 4.
Use and Care Manual
Page 4
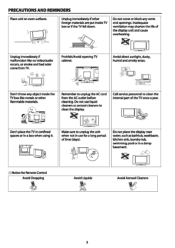
...Notice for a long period oftime (days). Do not use for Remote Control Avoid Dropping Avoid Liquids !£ Avoid Aerosol Cleaners l Make sure to unplug the unit when not in use liquid cleaners or aerosol cleaners to clean the display. 8 1~~1 Call service personnel to unplug the ACcord from TV. Avoid direct ... kitchen sink, laundry tub, swimming pool or in a box when using it. PRECAUTIONS AND REMINDERS Place unit on even surfaces. __~Q_\ Unplug Immediately Ifother foreign materials are put inside the TV box like no video/audio occurs, or smoke and bad odor come from the AC...
...Notice for a long period oftime (days). Do not use for Remote Control Avoid Dropping Avoid Liquids !£ Avoid Aerosol Cleaners l Make sure to unplug the unit when not in use liquid cleaners or aerosol cleaners to clean the display. 8 1~~1 Call service personnel to unplug the ACcord from TV. Avoid direct ... kitchen sink, laundry tub, swimming pool or in a box when using it. PRECAUTIONS AND REMINDERS Place unit on even surfaces. __~Q_\ Unplug Immediately Ifother foreign materials are put inside the TV box like no video/audio occurs, or smoke and bad odor come from the AC...

Use and Care Manual
Page 5
... prong are not sure of the type of power supplied to qualified service personnel. 3 Opening or removing the back cover may form in accordance with the apparatus. IMPORTANT SAFETY INSTRUCTIONS Read before operating equipment. • To reduce the risk of electric shock or component damage, switch offthe power before connecting other hazards. If the provided plug does not fit into the apparatus...
... prong are not sure of the type of power supplied to qualified service personnel. 3 Opening or removing the back cover may form in accordance with the apparatus. IMPORTANT SAFETY INSTRUCTIONS Read before operating equipment. • To reduce the risk of electric shock or component damage, switch offthe power before connecting other hazards. If the provided plug does not fit into the apparatus...

Use and Care Manual
Page 6
... environments with instructions. o The mains plug or appliance coupler is grounded so as vases, shall be connected to the 6 English grounding system ofthe building, as close to the receiver, be sure the antenna system is used for an extended period oftime, unplug the power cord. EXAMPLE OF ANTENNA GROUNDING AS PER NATIONAL ELECTRICAL CODE Note to the CATV system installer: This reminder...
... environments with instructions. o The mains plug or appliance coupler is grounded so as vases, shall be connected to the 6 English grounding system ofthe building, as close to the receiver, be sure the antenna system is used for an extended period oftime, unplug the power cord. EXAMPLE OF ANTENNA GROUNDING AS PER NATIONAL ELECTRICAL CODE Note to the CATV system installer: This reminder...

Use and Care Manual
Page 7
Remember to -use of your manual. They are on the label on back of purchase Staple your receipt to your product. Model number Serial number Date of the unit. SAVE THESE INSTRUCTIONS Thank you in getting the best use manual will need it to obtain warranty service 5 You will guide you for purchasing this Haier product. This easy-to record the model and serial number.
Remember to -use of your manual. They are on the label on back of purchase Staple your receipt to your product. Model number Serial number Date of the unit. SAVE THESE INSTRUCTIONS Thank you in getting the best use manual will need it to obtain warranty service 5 You will guide you for purchasing this Haier product. This easy-to record the model and serial number.

Use and Care Manual
Page 8
...; • CONNECTING TO AN ANTENNA/CABLE WALL JACK 9 CONNECTING EXTERNAL AUDIONIDEO DEVICE 9 CONNECTING HEADPHONES 9 CONNECTING DIGITAL AUDIO DEVICE 9 OPERATING INSTRUCTIONS . . . . 10 I I ••• I •• I I ••• I •• I I •• I I •• I I •• I ••• I I •• I ••• I I I I •• USING THE REMOTE CONTROL 10 INITIAL SETUP 11 INPUT SOURCE 11 NAVIGATING THE ON-SCREEN MENU 11 PICTURE 12 AUDIO 12 CHANNEL 13 SETUP 13 LOCK 14 MEDIA 16...
...; • CONNECTING TO AN ANTENNA/CABLE WALL JACK 9 CONNECTING EXTERNAL AUDIONIDEO DEVICE 9 CONNECTING HEADPHONES 9 CONNECTING DIGITAL AUDIO DEVICE 9 OPERATING INSTRUCTIONS . . . . 10 I I ••• I •• I I ••• I •• I I •• I I •• I I •• I ••• I I •• I ••• I I I I •• USING THE REMOTE CONTROL 10 INITIAL SETUP 11 INPUT SOURCE 11 NAVIGATING THE ON-SCREEN MENU 11 PICTURE 12 AUDIO 12 CHANNEL 13 SETUP 13 LOCK 14 MEDIA 16...
Use and Care Manual
Page 9
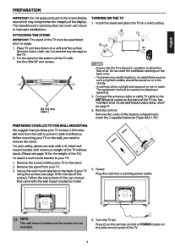
... to the screen display area which may compromise the integrity of air. The manufacturer's warranty does not cover user abuse or improper installations. Install the stand and place the TV on page9. 3. Before mounting your safety, please use only with a UL listed wall mount bracket with the four B4x16F mm screws. ~., B4x"1' 6mm (4pcs) TURNING ON THE TV 1. Remove the stand from the wall to allow free flow of...
... to the screen display area which may compromise the integrity of air. The manufacturer's warranty does not cover user abuse or improper installations. Install the stand and place the TV on page9. 3. Before mounting your safety, please use only with a UL listed wall mount bracket with the four B4x16F mm screws. ~., B4x"1' 6mm (4pcs) TURNING ON THE TV 1. Remove the stand from the wall to allow free flow of...
Use and Care Manual
Page 10
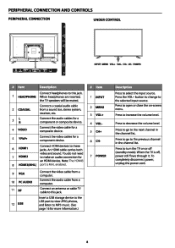
... input source. Press to go to open or close the on or off , power still flows through it. ol I f:1!I :.l..U.!laJ Connect headphones to this jack. Connect an antenna or cable TV cable to select the input source. PERIPHERAL CONNECTION AND CONTROLS PERIPHERAL CONNECTION UNDER CONTROL INPUT MENU VOL+ VOL- An HDMI cable carries both 7 HDMI2 video and sound. Note: The HDMI3 8 HDMI3(MHL) port is off {standby mode). Press to the next channel in the channel list...
... input source. Press to go to open or close the on or off , power still flows through it. ol I f:1!I :.l..U.!laJ Connect headphones to this jack. Connect an antenna or cable TV cable to select the input source. PERIPHERAL CONNECTION AND CONTROLS PERIPHERAL CONNECTION UNDER CONTROL INPUT MENU VOL+ VOL- An HDMI cable carries both 7 HDMI2 video and sound. Note: The HDMI3 8 HDMI3(MHL) port is off {standby mode). Press to the next channel in the channel list...
Use and Care Manual
Page 11
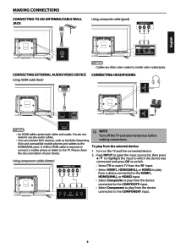
... connected to the COMPOSITE input. • Select Component to play from the device connected to the HDMI3(MHL) port. A USB to HDMI cable is required to connect a mobile phone or tablet to match color-coded jacks. MAKING CONNECTIONS CONNECTING TO AN ANTENNA/CABLE WALL JACK Using composite cable (good) @@@ L R V IDEO/Y ktll·U+ ·Cables are often color-coded to the TV. CONNECTING EXTERNAL AUDIONIDEO DEVICE CONNECTING HEADPHONES Using HOM/ cable (best) ktlt·U+ ·An HDMI cable carries both video and audio...
... connected to the COMPOSITE input. • Select Component to play from the device connected to the HDMI3(MHL) port. A USB to HDMI cable is required to connect a mobile phone or tablet to match color-coded jacks. MAKING CONNECTIONS CONNECTING TO AN ANTENNA/CABLE WALL JACK Using composite cable (good) @@@ L R V IDEO/Y ktll·U+ ·Cables are often color-coded to the TV. CONNECTING EXTERNAL AUDIONIDEO DEVICE CONNECTING HEADPHONES Using HOM/ cable (best) ktlt·U+ ·An HDMI cable carries both video and audio...

Use and Care Manual
Page 12
... previous menu. OPERATING INSTRUCTIONS USING THE REMOTE CONTROL Item Power INPUT USB cc HOME 0-9/• number RECALL Descriptions Press to pause playing.(Used for DTV. CH+/CH- Press to start playing the MEDIA, or to turn the TV on screen display (OSD). Press to last viewed channel. Press to switch to display the Channel List. SAP SLEEP WIDE AUDIO PICTURE OK CH.LIST FAVORITE J PLAY REV FWD * Press to switch sounds: SAP, Stereo, Mono for ATV, or switch audio language for models with MEDIA function...
... previous menu. OPERATING INSTRUCTIONS USING THE REMOTE CONTROL Item Power INPUT USB cc HOME 0-9/• number RECALL Descriptions Press to pause playing.(Used for DTV. CH+/CH- Press to start playing the MEDIA, or to turn the TV on screen display (OSD). Press to last viewed channel. Press to switch to display the Channel List. SAP SLEEP WIDE AUDIO PICTURE OK CH.LIST FAVORITE J PLAY REV FWD * Press to switch sounds: SAP, Stereo, Mono for ATV, or switch audio language for models with MEDIA function...
Use and Care Manual
Page 13
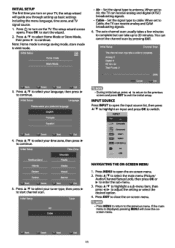
Press INITIAL SETUP The first time you turn on your TV, the setup wizard will guide you through setting up basic settings including the menu language, time zone, and TV signal source. 1.
Press INITIAL SETUP The first time you turn on your TV, the setup wizard will guide you through setting up basic settings including the menu language, time zone, and TV signal source. 1.
Use and Care Manual
Page 14
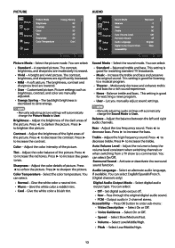
... ~ Picture ~ Audio ~ Channel * Setup e Lock Sound Mode Balance Bass Treble Auto Volume Level Surround Sound Audio Language Digital Audio Output Mode Accessibility Standard 0 50 50 Off off English Raw Picture Mode- You can select: • Standard- The contrast, brightness, and sharpness are significantly increased. • Mild -A soft picture. Adjust the brightness ofthe dark areas of the picture. i'il[·ii· • Manually adjusting picture settings will automatically change the Picture Mode to save energy. Press A standard picture. Customized picture. Picture settings...
... ~ Picture ~ Audio ~ Channel * Setup e Lock Sound Mode Balance Bass Treble Auto Volume Level Surround Sound Audio Language Digital Audio Output Mode Accessibility Standard 0 50 50 Off off English Raw Picture Mode- You can select: • Standard- The contrast, brightness, and sharpness are significantly increased. • Mild -A soft picture. Adjust the brightness ofthe dark areas of the picture. i'il[·ii· • Manually adjusting picture settings will automatically change the Picture Mode to save energy. Press A standard picture. Customized picture. Picture settings...
Use and Care Manual
Page 15
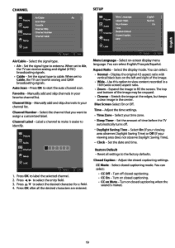
... Setup a Lock - ·n 1. CHANNEL SETUP Air/Cable - Press Ji..l "'f to start the auto channel scan. Asped Ratio- o Cinema -Stretch the image at the edges, but keeps a clear image in a 16:9 (wide-screen) aspect ratio. Closed Caption -Adjust the closed captioning. o Sleep Timer- Press OK after all settings to cable. Time- Select the signal type. o CC on closed captioning settings. Press OK to select the desired character for a field. 4. Menu Language- o CC On -Turn on Mute- Select closed captioning mode. Set...
... Setup a Lock - ·n 1. CHANNEL SETUP Air/Cable - Press Ji..l "'f to start the auto channel scan. Asped Ratio- o Cinema -Stretch the image at the edges, but keeps a clear image in a 16:9 (wide-screen) aspect ratio. Closed Caption -Adjust the closed captioning. o Sleep Timer- Press OK after all settings to cable. Time- Select the signal type. o CC on closed captioning settings. Press OK to select the desired character for a field. 4. Menu Language- o CC On -Turn on Mute- Select closed captioning mode. Set...
Use and Care Manual
Page 16
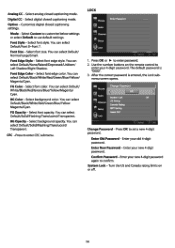
... 4-digit password again to use default settings. Enter Old Password - Turn the US and Canada rating limits on the remote control to enter password. 2. Option -Customize digital closed captioning mode. Font Edge Style- Select font color. menu screen opens. After the correct password is "0000". 3. Select analog closed captioning mode. You can select Default/ Normal/Large/Small. You can select Default/Font 0-Font 7. You can select Default/Solid/Flashing/Translucent/Transparent. BG Color- You can select Default/ White/Black/Red/Green/Blue...
... 4-digit password again to use default settings. Enter Old Password - Turn the US and Canada rating limits on the remote control to enter password. 2. Option -Customize digital closed captioning mode. Font Edge Style- Select font color. menu screen opens. After the correct password is "0000". 3. Select analog closed captioning mode. You can select Default/ Normal/Large/Small. You can select Default/Font 0-Font 7. You can select Default/Solid/Flashing/Translucent/Transparent. BG Color- You can select Default/ White/Black/Red/Green/Blue...
Use and Care Manual
Page 18
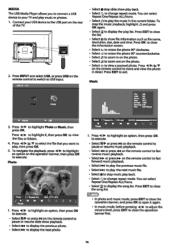
... USB port on the rear ofthelV. 2. Connect your 1Vand play the music In the current folder. Press Press INPUT and select USB, or press USB on the photo. • Select•:•toviewazoomed photo. To stop slide show file information such as file name, rlesolution, size, date and time. Press OK to close the list. • Select 6 to change repeat mode. Press EXIT to close...
... USB port on the rear ofthelV. 2. Connect your 1Vand play the music In the current folder. Press Press INPUT and select USB, or press USB on the photo. • Select•:•toviewazoomed photo. To stop slide show file information such as file name, rlesolution, size, date and time. Press OK to close the list. • Select 6 to change repeat mode. Press EXIT to close...
Use and Care Manual
Page 19
... the power cord before cleaning the screen. Please check for a local recycling location in picture and sound, malfunctioning of your TV or even damage to the TV, keep your mobile telephone away from the TV. TIPS Care of the screen Do not rub or strike the screen with anything hard as this may void the user's authority to operate the equipment...
... the power cord before cleaning the screen. Please check for a local recycling location in picture and sound, malfunctioning of your TV or even damage to the TV, keep your mobile telephone away from the TV. TIPS Care of the screen Do not rub or strike the screen with anything hard as this may void the user's authority to operate the equipment...
Use and Care Manual
Page 20
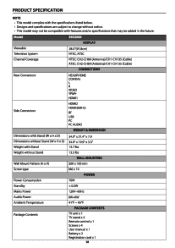
... (Cable) CONNECTIONS Rear Connectors HEADPHONE COAXIAL L R VIDEO YPbPr HDMI1 Side Connectors HDMI2 HDMI3(MHL) RF USB PC PC AUDIO WEIGHT & DIMENSION Dimensions with Stand (W x H x D) rw Dimensions without Stand X H X D) Weight with Stand 34.9" X 21.4" X 7,9 34.9" X 19.9" X 3.3R 13.7lbs Weight without notice. • This model may be compatible with the specifications listed below. • Designs and specifications are subject to change without Stand 13.Sibs WALL MOUNTING Wall Mount Pattern (H x V) 200x 100 mm Screw type M6x10 POWER Power Consumption 70W Standby PRODUCT...
... (Cable) CONNECTIONS Rear Connectors HEADPHONE COAXIAL L R VIDEO YPbPr HDMI1 Side Connectors HDMI2 HDMI3(MHL) RF USB PC PC AUDIO WEIGHT & DIMENSION Dimensions with Stand (W x H x D) rw Dimensions without Stand X H X D) Weight with Stand 34.9" X 21.4" X 7,9 34.9" X 19.9" X 3.3R 13.7lbs Weight without notice. • This model may be compatible with the specifications listed below. • Designs and specifications are subject to change without Stand 13.Sibs WALL MOUNTING Wall Mount Pattern (H x V) 200x 100 mm Screw type M6x10 POWER Power Consumption 70W Standby PRODUCT...
Use and Care Manual
Page 21
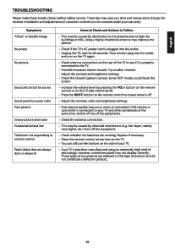
... receiver installation and adjustments of technology. However, sometimes pixels may occur when an activated S-VHS camera or camcorder is properly connected to high rise buildings or hills. Some TEXT modes could block the screen. • Increase the volume level by obstruction to the antenna due to the TV. • Possible broadcast station trouble. Switch off . • Adjust the contrast, color and brightness settings...
... receiver installation and adjustments of technology. However, sometimes pixels may occur when an activated S-VHS camera or camcorder is properly connected to high rise buildings or hills. Some TEXT modes could block the screen. • Increase the volume level by obstruction to the antenna due to the TV. • Possible broadcast station trouble. Switch off . • Adjust the contrast, color and brightness settings...
Use and Care Manual
Page 22
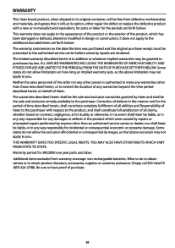
... caused by repairs or attempted repairs performed by anyone other person is in addition to whatever implied warranties may not apply to you . ALL IMPLIED WARRANTIES INCLUDING THE WARRANTIES OF MERCHANTABILITY AND FITNESS FOR USE ARE LIMITED TO THE PERIOD(s) FROM THE DATE OF PURCHASE SET FORTH BELOW. Neither the sales personnel of Haier. THIS WARRANTY GIVES YOU SPECIFIC LEGAL...
... caused by repairs or attempted repairs performed by anyone other person is in addition to whatever implied warranties may not apply to you . ALL IMPLIED WARRANTIES INCLUDING THE WARRANTIES OF MERCHANTABILITY AND FITNESS FOR USE ARE LIMITED TO THE PERIOD(s) FROM THE DATE OF PURCHASE SET FORTH BELOW. Neither the sales personnel of Haier. THIS WARRANTY GIVES YOU SPECIFIC LEGAL...

Use and Care Manual
Page 23
... Do not defea t the safety purpose of the polarized or grounding-type plug, A polarized plug has two bl ades w ith o ne w ider tha n the o ther. NE PASOOVRIR , • operating and maintenance (servicing) instructions in the operating instructions unless you are fo r use by qualified serv ic e personnel o nly. To reduce t he...equilateral triangle is intended to alert the user to the presence of important AlliS:RISOOEOECHOC ELECTRI:IUE. bracket, or table speci fi ed by the manu-factu rer, 12) Use onl y wi th the cart, stand, tripod. A g ro unding ty po plug has two blades a nd a third ...
... Do not defea t the safety purpose of the polarized or grounding-type plug, A polarized plug has two bl ades w ith o ne w ider tha n the o ther. NE PASOOVRIR , • operating and maintenance (servicing) instructions in the operating instructions unless you are fo r use by qualified serv ic e personnel o nly. To reduce t he...equilateral triangle is intended to alert the user to the presence of important AlliS:RISOOEOECHOC ELECTRI:IUE. bracket, or table speci fi ed by the manu-factu rer, 12) Use onl y wi th the cart, stand, tripod. A g ro unding ty po plug has two blades a nd a third ...


