
Manual
Page 2
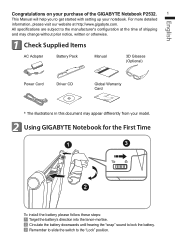
... Items AC Adapter Battery Pack Manual 3D Glasses (Optional) Power Cord Driver CD Global Warranty Card * The illustrations in this document may appear differently from your notebook. For more detailed information, please visit our website at the time of the GIGABYTE Notebook P2532. 1 This Manual will help you to get started with setting up your model. 2 Using GIGABYTE Notebook for the First Time 1 3 2 To install the battery please follow...
... Items AC Adapter Battery Pack Manual 3D Glasses (Optional) Power Cord Driver CD Global Warranty Card * The illustrations in this document may appear differently from your notebook. For more detailed information, please visit our website at the time of the GIGABYTE Notebook P2532. 1 This Manual will help you to get started with setting up your model. 2 Using GIGABYTE Notebook for the First Time 1 3 2 To install the battery please follow...
Manual
Page 3
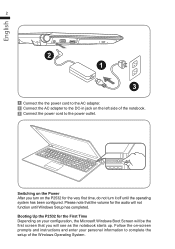
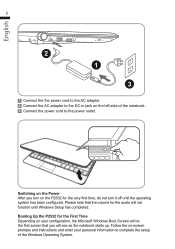
... notebook. 3 Connect the power cord to the DC-in jack on -screen prompts and instructions and enter your configuration, the Microsoft Windows Boot Screen will be the first screen that the volume for the very first time, do not turn it off until Windows Setup has completed. Switching on the P2532 for the audio will see as the notebook starts up. English 2 2 1 3 1 Connect the the power cord to the AC adapter. 2 Connect the AC adapter...
... notebook. 3 Connect the power cord to the DC-in jack on -screen prompts and instructions and enter your configuration, the Microsoft Windows Boot Screen will be the first screen that the volume for the very first time, do not turn it off until Windows Setup has completed. Switching on the P2532 for the audio will see as the notebook starts up. English 2 2 1 3 1 Connect the the power cord to the AC adapter. 2 Connect the AC adapter...
Manual
Page 4
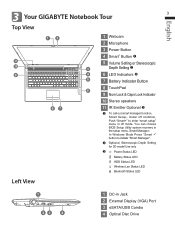
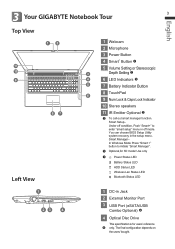
...+" button to enter "smart setup" menu in off mode. You can choose BIOS Setup Utility system recovery in Jack 2 External Display (VGA) Port 3 eSATA/USB Combo 4 Optical Disc Drive English 3 Your GIGABYTE Notebook Tour 3 Top View 12 1 Webcam 2 Microphone 3 Power Button 4 Smart+ Button 11 5 Volume Setting or Stereoscopic 10 - + 3 Depth Setting 9 4 6 LED Indicators 5 7 Battery Indicator Button 8 TouchPad 6 9 Num Lock & Caps Lock Indicator 10 Stereo speakers 87 11 IR Emitter Optional To call out smart manager function. Smart...
...+" button to enter "smart setup" menu in off mode. You can choose BIOS Setup Utility system recovery in Jack 2 External Display (VGA) Port 3 eSATA/USB Combo 4 Optical Disc Drive English 3 Your GIGABYTE Notebook Tour 3 Top View 12 1 Webcam 2 Microphone 3 Power Button 4 Smart+ Button 11 5 Volume Setting or Stereoscopic 10 - + 3 Depth Setting 9 4 6 LED Indicators 5 7 Battery Indicator Button 8 TouchPad 6 9 Num Lock & Caps Lock Indicator 10 Stereo speakers 87 11 IR Emitter Optional To call out smart manager function. Smart...
Manual
Page 6
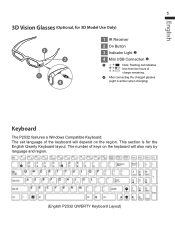
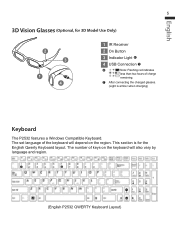
... number of keys on the region. English 5 3D Vision Glasses (Optional, for the English Qwerty Keyboard layout. This section is for 3D Model Use Only) 2 3 1 4 1 IR Receiver 2 On Button 3 Indicator Light 4 Mini USB Connection Note: Flashing red indicates less than two hours of the keyboard will depend on the keyboard will also vary by language and region. (English P2532 QWERTY Keyboard Layout) The set...
... number of keys on the region. English 5 3D Vision Glasses (Optional, for the English Qwerty Keyboard layout. This section is for 3D Model Use Only) 2 3 1 4 1 IR Receiver 2 On Button 3 Indicator Light 4 Mini USB Connection Note: Flashing red indicates less than two hours of the keyboard will depend on the keyboard will also vary by language and region. (English P2532 QWERTY Keyboard Layout) The set...
Manual
Page 7
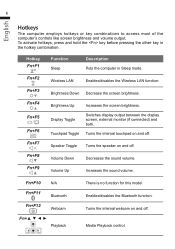
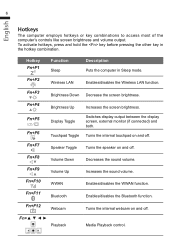
...+F7 Fn+F8 Fn+F9 Function Sleep Description Puts the computer in the hotkey combination. Display Toggle Switches display output between the display screen, external monitor (if connected) and both. Volume Down Decreases the sound volume. To activate hotkeys, press and hold the key before pressing the other key in Sleep mode. Brightness Up Increases the screen brightness. Fn+F10 N/A Fn+F11 Bluetooth Fn+F12 Webcam Fn Playback There is no function for this model Enables/disables the Bluetooth function. Media Playback control.
...+F7 Fn+F8 Fn+F9 Function Sleep Description Puts the computer in the hotkey combination. Display Toggle Switches display output between the display screen, external monitor (if connected) and both. Volume Down Decreases the sound volume. To activate hotkeys, press and hold the key before pressing the other key in Sleep mode. Brightness Up Increases the screen brightness. Fn+F10 N/A Fn+F11 Bluetooth Fn+F12 Webcam Fn Playback There is no function for this model Enables/disables the Bluetooth function. Media Playback control.
Manual
Page 9
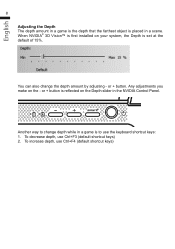
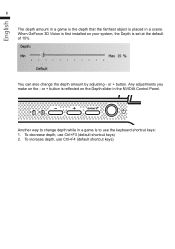
... Control Panel. - + Another way to use the keyboard shortcut keys: 1. When NVIDIA® 3D Vision™ is first installed on the - You can also change depth while in a scene. or + button. English 8 Adjusting ...the Depth The depth amount in a game is the depth that the farthest object is placed in a game is to change the depth amount by adjusting - To increase depth, use Ctrl+F3 (default shortcut keys) 2. Any adjustments you make on your system, the Depth is set...
... Control Panel. - + Another way to use the keyboard shortcut keys: 1. When NVIDIA® 3D Vision™ is first installed on the - You can also change depth while in a scene. or + button. English 8 Adjusting ...the Depth The depth amount in a game is the depth that the farthest object is placed in a game is to change the depth amount by adjusting - To increase depth, use Ctrl+F3 (default shortcut keys) 2. Any adjustments you make on your system, the Depth is set...
Manual
Page 10
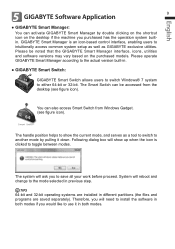
... builtin. Please operate GIGABYTE Smart Manager according to use it down. System will need to install the software in both modes if you to either 64-bit or 32-bit. Therefore, you will reboot and change to the mode selected in . ● GIGABYTE Smart Switch: GIGABYTE Smart Switch allows users to switch Windows® 7 system to save all your work before proceed. The Smart Switch can also access Smart Switch from the...
... builtin. Please operate GIGABYTE Smart Manager according to use it down. System will need to install the software in both modes if you to either 64-bit or 32-bit. Therefore, you will reboot and change to the mode selected in . ● GIGABYTE Smart Switch: GIGABYTE Smart Switch allows users to switch Windows® 7 system to save all your work before proceed. The Smart Switch can also access Smart Switch from the...
Manual
Page 12
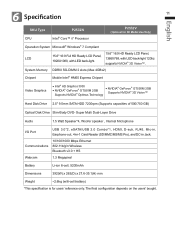
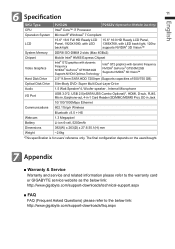
... (w/6-cell battery) *This specification is for 3D Model Use Only) Operation System Microsoft® Windows® 7 Compliant LCD System Memory 15.6" 16:9 Full HD Ready LCD Panel, 1920X1080, with LED back-light. 15.6" 16:9 HD Ready LCD Panel, 1366X768, with LED back-light 120hz supports NVIDIA® 3D Vision™. Super Multi Dual-Layer Drive Audio 1.5 Watt Speaker*4, Woofer speaker , Internal Microphone I/O Port USB 3.0*2, eSATA/USB 2.0 Combo*1, HDMI, D-sub, RJ45, Mic-in, Earphone-out, 4-in-1 Card Reader...
... (w/6-cell battery) *This specification is for 3D Model Use Only) Operation System Microsoft® Windows® 7 Compliant LCD System Memory 15.6" 16:9 Full HD Ready LCD Panel, 1920X1080, with LED back-light. 15.6" 16:9 HD Ready LCD Panel, 1366X768, with LED back-light 120hz supports NVIDIA® 3D Vision™. Super Multi Dual-Layer Drive Audio 1.5 Watt Speaker*4, Woofer speaker , Internal Microphone I/O Port USB 3.0*2, eSATA/USB 2.0 Combo*1, HDMI, D-sub, RJ45, Mic-in, Earphone-out, 4-in-1 Card Reader...
Manual
Page 2
.... ● Affix tape to work with a damaged battery in accordance with provided instructions and must not be provided with antenna installation instructions and transmitter operating conditions for satisfying RF exposure compliance. RF Exposure : This equipment must be co-located or operating in fire. ● Recharge the batteries using the Notebook's system. Immunity characteristics - Incorrect recharging may make the battery explode. ● Do not...
.... ● Affix tape to work with a damaged battery in accordance with provided instructions and must not be provided with antenna installation instructions and transmitter operating conditions for satisfying RF exposure compliance. RF Exposure : This equipment must be co-located or operating in fire. ● Recharge the batteries using the Notebook's system. Immunity characteristics - Incorrect recharging may make the battery explode. ● Do not...
Manual
Page 3
... installed and used in a residential installation. This equipment generates, uses, and can be attached to the product indicating compliance with the limits for help. ● All external cables connecting to this equipment does cause harmful interference to radio or television reception, which case users may cause harmful interference to radio communications. If this basic unit must be determined by turning...
... installed and used in a residential installation. This equipment generates, uses, and can be attached to the product indicating compliance with the limits for help. ● All external cables connecting to this equipment does cause harmful interference to radio or television reception, which case users may cause harmful interference to radio communications. If this basic unit must be determined by turning...
Manual
Page 4
... be significantly longer if your Notebook. Lithium-Ion rechargeable batteries require routine maintenance and care in their capacity to charge in use from external power. This loss of the original run time drops below instruction and your battery will gradually lose their use it with any other metallic substances to use and handling. The charge times will power the Notebook decreases. ● The run...
... be significantly longer if your Notebook. Lithium-Ion rechargeable batteries require routine maintenance and care in their capacity to charge in use from external power. This loss of the original run time drops below instruction and your battery will gradually lose their use it with any other metallic substances to use and handling. The charge times will power the Notebook decreases. ● The run...
Manual
Page 5
... power adapter has its own power output rating. Use electrical tape or other approved covering over the battery connection points to disposal and recycling regulations that was not saved. If you can press the Suspend/ Resume button to resume operation. Once you will be saved once the Notebook reaches this happens, your local battery recycling organization. Storage : ● Charge or discharge the battery...
... power adapter has its own power output rating. Use electrical tape or other approved covering over the battery connection points to disposal and recycling regulations that was not saved. If you can press the Suspend/ Resume button to resume operation. Once you will be saved once the Notebook reaches this happens, your local battery recycling organization. Storage : ● Charge or discharge the battery...

Manual
Page 6
... Items AC Adapter Battery Pack Manaual 3D Glasses (Optional) Power Cord Driver CD Global Warranty Card * The illustrations in this document may appear different from your notebook. For more detailed information, please visit our website at the time of the GIGABYTE Notebook P2532. 1 This Manual will help you to get started with setting up your model. 2 Using GIGABYTE Notebook for the First Time 1 3 2 To install the battery please...
... Items AC Adapter Battery Pack Manaual 3D Glasses (Optional) Power Cord Driver CD Global Warranty Card * The illustrations in this document may appear different from your notebook. For more detailed information, please visit our website at the time of the GIGABYTE Notebook P2532. 1 This Manual will help you to get started with setting up your model. 2 Using GIGABYTE Notebook for the First Time 1 3 2 To install the battery please...
Manual
Page 7
... function until the operating system has been configured. Booting Up the P2532 for the audio will see as the notebook starts up. Follow the on your configuration, the Microsoft Windows Boot Screen will be the first screen that the volume for the First Time Depending on -screen prompts and instructions and enter your personal information to complete the setup of the notebook. 3 Connect the power cord to the DC-in jack...
... function until the operating system has been configured. Booting Up the P2532 for the audio will see as the notebook starts up. Follow the on your configuration, the Microsoft Windows Boot Screen will be the first screen that the volume for the First Time Depending on -screen prompts and instructions and enter your personal information to complete the setup of the notebook. 3 Connect the power cord to the DC-in jack...
Manual
Page 8
... manager function. The final configuration depends on the users' bought. You can choose BIOS Setup Utility system recovery in off mode. Under off condition, Push "Smart+" to initiate "Smart Manager". Optional,for 3D model Use only Power Status LED Battery Status LED HDD Status LED Wireless Lan Status LED Bluetooth Status LED 1 23 4 1 DC-in Jack 2 External Monitor Port 3 USB Port (eSATA/USB Combo Optional) 4 Optical Disc Drive This specification is for users' reference only. In Windows Mode Press "Smart +" button to enter "smart setup" menu...
... manager function. The final configuration depends on the users' bought. You can choose BIOS Setup Utility system recovery in off mode. Under off condition, Push "Smart+" to initiate "Smart Manager". Optional,for 3D model Use only Power Status LED Battery Status LED HDD Status LED Wireless Lan Status LED Bluetooth Status LED 1 23 4 1 DC-in Jack 2 External Monitor Port 3 USB Port (eSATA/USB Combo Optional) 4 Optical Disc Drive This specification is for users' reference only. In Windows Mode Press "Smart +" button to enter "smart setup" menu...
Manual
Page 10
This section is amber when charging) Keyboard The P2532 features a Windows Compatible Keyboard. The number of keys on the region. The set language of charge remaining. After connecting the charged glasses. (Light is for 3D Model Use Only) 2 3 1 4 1 IR Receiver 2 On Button 3 Indicator Light 4 USB Connection Note: Flashing red indicates less than two hours of the keyboard will depend on the keyboard will also vary by language and region...
This section is amber when charging) Keyboard The P2532 features a Windows Compatible Keyboard. The number of keys on the region. The set language of charge remaining. After connecting the charged glasses. (Light is for 3D Model Use Only) 2 3 1 4 1 IR Receiver 2 On Button 3 Indicator Light 4 USB Connection Note: Flashing red indicates less than two hours of the keyboard will depend on the keyboard will also vary by language and region...
Manual
Page 11
... the sound volume. Fn Playback Media Playback control. Fn+F4 Brightness Up Increases the screen brightness. Touchpad Toggle Turns the internal touchpad on and off . 6 English Hotkeys The computer employs hotkeys or key combinations to access most of the computer's controls like screen brightness and volume output. Fn+F2 Wireless LAN Enables/disables the Wireless LAN function. Fn+F5 Fn+F6 Display Toggle Switches display output between the display screen, external monitor (if connected) and both. Fn+F10 WWAN Enables/disables the WWAN function. Fn+F12 Webcam Turns the...
... the sound volume. Fn Playback Media Playback control. Fn+F4 Brightness Up Increases the screen brightness. Touchpad Toggle Turns the internal touchpad on and off . 6 English Hotkeys The computer employs hotkeys or key combinations to access most of the computer's controls like screen brightness and volume output. Fn+F2 Wireless LAN Enables/disables the Wireless LAN function. Fn+F5 Fn+F6 Display Toggle Switches display output between the display screen, external monitor (if connected) and both. Fn+F10 WWAN Enables/disables the WWAN function. Fn+F12 Webcam Turns the...
Manual
Page 13
..., use Ctrl+F4 (default shortcut keys) English 8 The depth amount in a game is the depth that the farthest object is placed in the NVIDIA Control Panel. - + Another way to use the keyboard shortcut keys: 1. When GeForce 3D Vision is first installed on your system, the Depth is reflected on the - or + button. or + button is set at the default of 15%. Any adjustments you make...
..., use Ctrl+F4 (default shortcut keys) English 8 The depth amount in a game is the depth that the farthest object is placed in the NVIDIA Control Panel. - + Another way to use the keyboard shortcut keys: 1. When GeForce 3D Vision is first installed on your system, the Depth is reflected on the - or + button. or + button is set at the default of 15%. Any adjustments you make...

Manual
Page 14
... toggle between modes. Following dialog box will need to install the software in both modes if you would like to the mode selected in both modes. The system will reboot and change to use it down. System will ask you purchased has the operation system builtin. TIPS 64-bit and 32-bit operating systems are installed in . ● GIGABYTE Smart Switch: GIGABYTE Smart Switch allows users to switch Windows®...
... toggle between modes. Following dialog box will need to install the software in both modes if you would like to the mode selected in both modes. The system will reboot and change to use it down. System will ask you purchased has the operation system builtin. TIPS 64-bit and 32-bit operating systems are installed in . ● GIGABYTE Smart Switch: GIGABYTE Smart Switch allows users to switch Windows®...
Manual
Page 16
Super Multi Dual-Layer Drive Audio 1.5 Watt Speaker*4, Woofer speaker , Internal Microphone I/O Port USB 3.0*2, USB 2.0(eSATA/USB Combo Optional)*, HDMI, D-sub, RJ45, Mic-in, Earphone-out, 4-in-1 Card Reader (SD/MMC/MS/MS Pro), DC-in Jack 10/100/1000Mbps Ethernet Communications 802.11b/g/n Wireless Bluetooth v3.0 + HS Webcam 1.3 Megapixel Battery Li-ion 6-cell, 5200mAh Dimensions 392(W) x 263(D) x 27.6-35.1(H) mm Weight ~2.6kg *This specification is for 3D Model Use Only) Intel...
Super Multi Dual-Layer Drive Audio 1.5 Watt Speaker*4, Woofer speaker , Internal Microphone I/O Port USB 3.0*2, USB 2.0(eSATA/USB Combo Optional)*, HDMI, D-sub, RJ45, Mic-in, Earphone-out, 4-in-1 Card Reader (SD/MMC/MS/MS Pro), DC-in Jack 10/100/1000Mbps Ethernet Communications 802.11b/g/n Wireless Bluetooth v3.0 + HS Webcam 1.3 Megapixel Battery Li-ion 6-cell, 5200mAh Dimensions 392(W) x 263(D) x 27.6-35.1(H) mm Weight ~2.6kg *This specification is for 3D Model Use Only) Intel...


