Manual
Page 3
... 5 2.1. BOARD LAYOUT 6 2.3. Table of Contents 1.INTRODUCTION 4 1.1. PREFACE 4 1.2. UNPACKING 5 2.2. SOFTWARE INSTALLATION 9 3.1. WIN® XP DRIVER AND UTILITIES INSTALLATION 9 3.1.1. Operating system requirement 9 3.1.2. Utilities on driver CD 15 3.1.5.Taskbar Icon ...18 3.1.6. WIN® 98/98SE / WIN® 2000 / WIN® ME DRIVER INSTALLATION 31 3.3. BIOS FLASH UTILITY 31 4. Troubleshooting Tips 32 5. How to reflash the BIOS...
... 5 2.1. BOARD LAYOUT 6 2.3. Table of Contents 1.INTRODUCTION 4 1.1. PREFACE 4 1.2. UNPACKING 5 2.2. SOFTWARE INSTALLATION 9 3.1. WIN® XP DRIVER AND UTILITIES INSTALLATION 9 3.1.1. Operating system requirement 9 3.1.2. Utilities on driver CD 15 3.1.5.Taskbar Icon ...18 3.1.6. WIN® 98/98SE / WIN® 2000 / WIN® ME DRIVER INSTALLATION 31 3.3. BIOS FLASH UTILITY 31 4. Troubleshooting Tips 32 5. How to reflash the BIOS...
Manual
Page 5
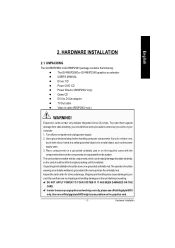
... there are separated from static electricity, you do nothave one, touch both of your computer. 1. Hardware Installation UNPACKING The GV-R80P256D or GV-R80P256V package contains the following: l The GV-R80P256Dor GV-R80P256Vgraphics accelerator l USER'S MANUAL l Driver CD l Power DVD CD l Power Director (R80P256V only) l Game CD l DVI-I to your graphics cardworking correctly,please useofficialGigabyte BIOS...
... there are separated from static electricity, you do nothave one, touch both of your computer. 1. Hardware Installation UNPACKING The GV-R80P256D or GV-R80P256V package contains the following: l The GV-R80P256Dor GV-R80P256Vgraphics accelerator l USER'S MANUAL l Driver CD l Power DVD CD l Power Director (R80P256V only) l Game CD l DVI-I to your graphics cardworking correctly,please useofficialGigabyte BIOS...

Manual
Page 8
...can connect a flat panel display to proceed with the installation of the graphics card drivers. If necessary, remove the metal coverfromthis slot; then turn on the computer and monitor. GV-R80P256D(V) Graphics Accelerator - 8 - After installation, please connect the power cable to next... chapter for detailed instructions. If your GV-R80P256D/ GV-R80P256V graphics card, or system will not boot. 6. Please ...
...can connect a flat panel display to proceed with the installation of the graphics card drivers. If necessary, remove the metal coverfromthis slot; then turn on the computer and monitor. GV-R80P256D(V) Graphics Accelerator - 8 - After installation, please connect the power cable to next... chapter for detailed instructions. If your GV-R80P256D/ GV-R80P256V graphics card, or system will not boot. 6. Please ...

Manual
Page 9
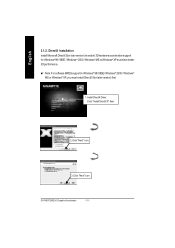
... that your motherboard nearest dealer for the system, please make sure your graphics accelerator.) 3.1. Or please contact your CD-ROM Drive letter to install the driver for your system has installed DirectX 9 or later version. • If you can see the AUTORUN window (if it does not show up, run ..."D:\setup.exe"). Software Installation When you insert the driver CD into your CD-ROM drive, you install the graphics card drivers for the motherboard, which consist of Win® 98/98SE / Win® 2000 / Win® ME / Win®...
... that your motherboard nearest dealer for the system, please make sure your graphics accelerator.) 3.1. Or please contact your CD-ROM Drive letter to install the driver for your system has installed DirectX 9 or later version. • If you can see the AUTORUN window (if it does not show up, run ..."D:\setup.exe"). Software Installation When you insert the driver CD into your CD-ROM drive, you install the graphics card drivers for the motherboard, which consist of Win® 98/98SE / Win® 2000 / Win® ME / Win®...
Manual
Page 10
Install DirectX Driver: Click "Install DirectX 9" Item. 2.Click "Next" icon. 3.Click "Next" icon. M Note: For software MPEG support in Windows® 98/ 98SE/ Windows® 2000 / Windows® ME or Windows® XP, you must install DirectX 9(or later version) first. 1. GV-R80P256D(V) Graphics Accelerator - 10 - English 3.1.2. DirectX Installation Install Microsoft DirectX9(or later version) to enable 3D hardware acceleration support for Windows® 98 / 98SE / Windows® 2000 / Windows® ME or Windows® XP to achieve better 3D performence.
Install DirectX Driver: Click "Install DirectX 9" Item. 2.Click "Next" icon. 3.Click "Next" icon. M Note: For software MPEG support in Windows® 98/ 98SE/ Windows® 2000 / Windows® ME or Windows® XP, you must install DirectX 9(or later version) first. 1. GV-R80P256D(V) Graphics Accelerator - 10 - English 3.1.2. DirectX Installation Install Microsoft DirectX9(or later version) to enable 3D hardware acceleration support for Windows® 98 / 98SE / Windows® 2000 / Windows® ME or Windows® XP to achieve better 3D performence.
Manual
Page 12
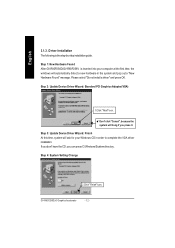
... PCI Graphics Adapter(VGA) 1.Click "Next" icon. If you don't have the CD, you press it. GV-R80P256D(V) Graphics Accelerator - 12 - Driver Installation The following is inserted into your computer at the first time, the windows will ask for your Windows CD... a new hardware in order to complete the VGA driver installation. Step 4: System Setting Change 2.Click "Finish" icon. English 3.1.3. Step 1: New Hardware Found After GV-R80P256D/GV-R80P256V is the step-by-step installation guide. Please select "Do not install a driver"and press OK. MDon't click "Cancel", because the...
... PCI Graphics Adapter(VGA) 1.Click "Next" icon. If you don't have the CD, you press it. GV-R80P256D(V) Graphics Accelerator - 12 - Driver Installation The following is inserted into your computer at the first time, the windows will ask for your Windows CD... a new hardware in order to complete the VGA driver installation. Step 4: System Setting Change 2.Click "Finish" icon. English 3.1.3. Step 1: New Hardware Found After GV-R80P256D/GV-R80P256V is the step-by-step installation guide. Please select "Do not install a driver"and press OK. MDon't click "Cancel", because the...
Manual
Page 13
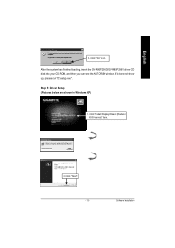
After the system has finished loading, insert the GV-R80P256D/GV-R80P256V driver CD disk into your CD-ROM, and then you can see the AUTORUN window. If it does not show up, please run "D:\setup.exe". Software Installation Click "Install Display Drivers (Radeon X800 series)" item. 2.Click "Next". - 13 - English 3..Click "No" icon. Step 5: Driver Setup (Pictures below are shown in Windows XP) 1.
After the system has finished loading, insert the GV-R80P256D/GV-R80P256V driver CD disk into your CD-ROM, and then you can see the AUTORUN window. If it does not show up, please run "D:\setup.exe". Software Installation Click "Install Display Drivers (Radeon X800 series)" item. 2.Click "Next". - 13 - English 3..Click "No" icon. Step 5: Driver Setup (Pictures below are shown in Windows XP) 1.

Manual
Page 15
Click "V-Tuner2" item. 2.Click "Next". 3. Utilities on driver CD The utilities include Display Driver and V-Tuner2 utilities. Click "Finish" to restart computer. - 15 - English 3.1.4. l Install V-Tuner2 : 1. Enter your name and company. 4. Software Installation Please follow the steps.
Click "V-Tuner2" item. 2.Click "Next". 3. Utilities on driver CD The utilities include Display Driver and V-Tuner2 utilities. Click "Finish" to restart computer. - 15 - English 3.1.4. l Install V-Tuner2 : 1. Enter your name and company. 4. Software Installation Please follow the steps.
Manual
Page 18
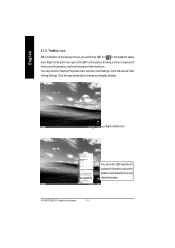
GV-R80P256D(V) Graphics Accelerator - 18 - English 3.1.5. Right-clicking this icon opens the GBT control panel, showing a menu composed of shortcute of the display drivers, you will find an GBT icon on the taskbar's status area. Click "Advanced" after clickng Settings. Right clickthe icon. Taskbar Icon After installation of the ... then click Settings. You can link to change your display settings. Click the appropriate tab to GBT website for updated information about the graphicscard,latest drivers,and other functions.
GV-R80P256D(V) Graphics Accelerator - 18 - English 3.1.5. Right-clicking this icon opens the GBT control panel, showing a menu composed of shortcute of the display drivers, you will find an GBT icon on the taskbar's status area. Click "Advanced" after clickng Settings. Right clickthe icon. Taskbar Icon After installation of the ... then click Settings. You can link to change your display settings. Click the appropriate tab to GBT website for updated information about the graphicscard,latest drivers,and other functions.
Manual
Page 21
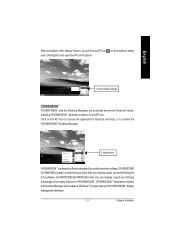
...HYDRAVISION™ installation enables the Desktop Manager and creates a Windows® programgroup for multiple monitor settings. Clicking this software. GV-R80P256D GV-R80P256Vgraphic cards that have more than one display output can benefit fully from this icon open the ATi control panel. 1....™ HYDRAVISION™ and the Desktop Manager are activated whenever Windows® starts. GV-R80P256D/GV-R80P256V with only one display output can still take advantage of the many features of the display drivers, you will find an ATI icon on the ATI icon to access the application's ...
...HYDRAVISION™ installation enables the Desktop Manager and creates a Windows® programgroup for multiple monitor settings. Clicking this software. GV-R80P256D GV-R80P256Vgraphic cards that have more than one display output can benefit fully from this icon open the ATi control panel. 1....™ HYDRAVISION™ and the Desktop Manager are activated whenever Windows® starts. GV-R80P256D/GV-R80P256V with only one display output can still take advantage of the many features of the display drivers, you will find an ATI icon on the ATI icon to access the application's ...
Manual
Page 22
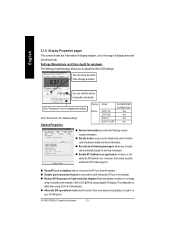
English 3.1.6. Settings (Resolutions and Color depth for adapter and setting. R80P2 56D GV- n Re-activate all warning messages allows you to adjust the Direct 3Dsettings. You can move the slider tothe change resolution. R80P2 56V Ye s Ye s... ATI taskbar icon application enables or disables the ATI taskbar icon. GV-R80P256D(V) Graphics Accelerator - 22 - Click "Advanced" icon for windows) The Setting properties page allows you to the Details tab which lists the card's hardware details and driver information. n ShowATI icon on your DVIflat panel. n Reduce DVI frequency on ...
English 3.1.6. Settings (Resolutions and Color depth for adapter and setting. R80P2 56D GV- n Re-activate all warning messages allows you to adjust the Direct 3Dsettings. You can move the slider tothe change resolution. R80P2 56V Ye s Ye s... ATI taskbar icon application enables or disables the ATI taskbar icon. GV-R80P256D(V) Graphics Accelerator - 22 - Click "Advanced" icon for windows) The Setting properties page allows you to the Details tab which lists the card's hardware details and driver information. n ShowATI icon on your DVIflat panel. n Reduce DVI frequency on ...

Manual
Page 25
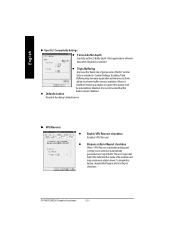
...; games which displayverticaland horizontallines around textures, or textthat appears incorrect. l Alternate pixel center Mayeliminate problems with othergames. Software Installation English n SMARTSHADER. By selecting Disabled, the driver will notsupport DXT texture formats,thus reducing thenumber oftextureformats supported. l Defaults button Restoresthe defaultsettings. Effects l SMARTSHADERTM Effects drop-down list SMARTSHADERTM applies presetpixel effects on...
...; games which displayverticaland horizontallines around textures, or textthat appears incorrect. l Alternate pixel center Mayeliminate problems with othergames. Software Installation English n SMARTSHADER. By selecting Disabled, the driver will notsupport DXT texture formats,thus reducing thenumber oftextureformats supported. l Defaults button Restoresthe defaultsettings. Effects l SMARTSHADERTM Effects drop-down list SMARTSHADERTM applies presetpixel effects on...
Manual
Page 26
... Disabled is selected l Triple Buffering Improves the frame rate of games when Wait for Vertical Sync is recommended that this feature, deselectthePrepare an ErrorReport checkbox. GV-R80P256D(V) Graphics Accelerator - 26 - Most applications will be automatically disabled. It is enabled in Custom Settings. English n OpenGL® Compatibility Settings l Force Z-buffer depth Explicitly set...
... Disabled is selected l Triple Buffering Improves the frame rate of games when Wait for Vertical Sync is recommended that this feature, deselectthePrepare an ErrorReport checkbox. GV-R80P256D(V) Graphics Accelerator - 26 - Most applications will be automatically disabled. It is enabled in Custom Settings. English n OpenGL® Compatibility Settings l Force Z-buffer depth Explicitly set...
Manual
Page 28
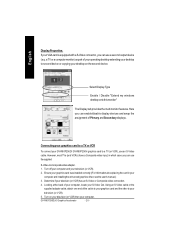
...monitor) as part of your operating desktop extending your desktop to second device or copying your graphics card to a TV or VCR To connectyour GV-R80P256D/ GV-R80P256V graphics card to a TV (or VCR), use an S-Video cable. Connecting your desktop on your television (or VCR) then your...can use a second output device (e.q. However, most TVs (and VCRs) have a Composite vide o input, in your computer and installingthe enhanced graphics driver,see the user's manual.) 3. Looking atthe back of your computer, locate your computer. Turn on the second device. Select Display Type Enable / ...
...monitor) as part of your operating desktop extending your desktop to second device or copying your graphics card to a TV or VCR To connectyour GV-R80P256D/ GV-R80P256V graphics card to a TV (or VCR), use an S-Video cable. Connecting your desktop on your television (or VCR) then your...can use a second output device (e.q. However, most TVs (and VCRs) have a Composite vide o input, in your computer and installingthe enhanced graphics driver,see the user's manual.) 3. Looking atthe back of your computer, locate your computer. Turn on the second device. Select Display Type Enable / ...
Manual
Page 31
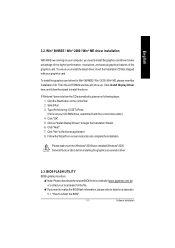
...installed Windows® 2000 Service Pack (or later) before installing the graphics accelerator driver. 3.3. BIOS FLASH UTILITY BIOS update procedure: MNote: Please download the newest BIOS fromour website (www.gigabyte.com.tw) or contact your graphics card. Software Installation Win® 98/...98SE / Win® 2000 / Win® ME driver installation With Windows running on subsection 5.1. Click "Next". 7. Select Run...
...installed Windows® 2000 Service Pack (or later) before installing the graphics accelerator driver. 3.3. BIOS FLASH UTILITY BIOS update procedure: MNote: Please download the newest BIOS fromour website (www.gigabyte.com.tw) or contact your graphics card. Software Installation Win® 98/...98SE / Win® 2000 / Win® ME driver installation With Windows running on subsection 5.1. Click "Next". 7. Select Run...
Manual
Page 32
... card is securely fastened to become the secondary display.) n Make sure you selected the appropriate display device and graphics card when you installed the graphics driver. n Ensure that the monitor and computer are only using one graphics card. Troubleshooting Tips The following troubleshooting tips may help if you experience problems. ... the Microsoft Windows® Startup Menu.) In Safe Mode, bring up the Device Manager and check for more assistance, use F8 to the monitor's manual.) GV-R80P256D(V) Graphics Accelerator - 32 - n If you are plugged in Safe Mode.
... card is securely fastened to become the secondary display.) n Make sure you selected the appropriate display device and graphics card when you installed the graphics driver. n Ensure that the monitor and computer are only using one graphics card. Troubleshooting Tips The following troubleshooting tips may help if you experience problems. ... the Microsoft Windows® Startup Menu.) In Safe Mode, bring up the Device Manager and check for more assistance, use F8 to the monitor's manual.) GV-R80P256D(V) Graphics Accelerator - 32 - n If you are plugged in Safe Mode.

