Manual
Page 2
... the expressed, written permission of GBT. Notice Due to update the information contained herein. May. 14, 2004 Taipei, Taiwan GV-R80P256D(V) Graphics Accelerator - 2 - English Chapter 1 User's Manual Copyright Copyright by GIGA-BYTE TECHNOLOGY CO., LTD. ("GBT") No part of this manual may be reproduced or transmitted in any labels on VGA card , this may appear in technology, some of the specifications might be out of their respective owners...
... the expressed, written permission of GBT. Notice Due to update the information contained herein. May. 14, 2004 Taipei, Taiwan GV-R80P256D(V) Graphics Accelerator - 2 - English Chapter 1 User's Manual Copyright Copyright by GIGA-BYTE TECHNOLOGY CO., LTD. ("GBT") No part of this manual may be reproduced or transmitted in any labels on VGA card , this may appear in technology, some of the specifications might be out of their respective owners...
Manual
Page 3
...HARDWARE INSTALLATION 7 3. WIN® XP DRIVER AND UTILITIES INSTALLATION 9 3.1.1. Troubleshooting Tips 32 5. Appendix 33 5.1. English Table of Content SOFTWARE INSTALLATION 9 3.1. Operating system requirement 9 3.1.2. DisplayProperties pages 22 3.2. HARDWARE INSTALLATION 5 2.1. BIOS FLASH UTILITY 31 4. BOARD LAYOUT 6 2.3. KEY FEATURES 4 2. Resolutions and Color Depth Table (In Windows® XP 34 - 3 - UNPACKING 5 2.2. How to reflash the BIOS 33 5.2. DirectX Installation 10 3.1.3. Table of Contents 1.INTRODUCTION 4 1.1. WIN® 98/98SE / WIN...
...HARDWARE INSTALLATION 7 3. WIN® XP DRIVER AND UTILITIES INSTALLATION 9 3.1.1. Troubleshooting Tips 32 5. Appendix 33 5.1. English Table of Content SOFTWARE INSTALLATION 9 3.1. Operating system requirement 9 3.1.2. DisplayProperties pages 22 3.2. HARDWARE INSTALLATION 5 2.1. BIOS FLASH UTILITY 31 4. BOARD LAYOUT 6 2.3. KEY FEATURES 4 2. Resolutions and Color Depth Table (In Windows® XP 34 - 3 - UNPACKING 5 2.2. How to reflash the BIOS 33 5.2. DirectX Installation 10 3.1.3. Table of Contents 1.INTRODUCTION 4 1.1. WIN® 98/98SE / WIN...
Manual
Page 5
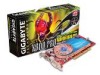
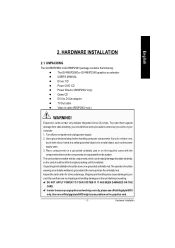
... following: l The GV-R80P256Dor GV-R80P256Vgraphics accelerator l USER'S MANUAL l Driver CD l Power DVD CD l Power Director (R80P256V only) l Game CD l DVI-I to your computer. 1. Expansion cards contain very delicate Integrated Circuit (IC) chips. Use a grounded wrist strap before proceeding. Inspect the card carton for obvious damage. M DO NOT APPLY POWER TO YOUR SYSTEM IF IT HAS BEEN DAMAGED ON THE CARD. Hardware Installation English 2. If you...
... following: l The GV-R80P256Dor GV-R80P256Vgraphics accelerator l USER'S MANUAL l Driver CD l Power DVD CD l Power Director (R80P256V only) l Game CD l DVI-I to your computer. 1. Expansion cards contain very delicate Integrated Circuit (IC) chips. Use a grounded wrist strap before proceeding. Inspect the card carton for obvious damage. M DO NOT APPLY POWER TO YOUR SYSTEM IF IT HAS BEEN DAMAGED ON THE CARD. Hardware Installation English 2. If you...
Manual
Page 7
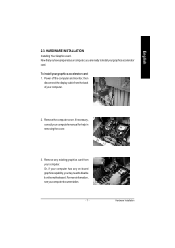
HARDWARE INSTALLATION Installing Your Graphics card. Formore information, see youcomputer documentation. - 7 - Power off the computer and monitor, then disconnect the display cable from your computer. Remove any on-board graphicscapability, youmay needto disable it onthe motherboard. Hardware Installation Now that you haveprepared yourcomputer, you are ready toinstall yourgraphicsaccelerator card. If necessary, consult your computer has any existing graphics card from the back of your graphics accelerator card: 1. Or, if your computer's manual for help...
HARDWARE INSTALLATION Installing Your Graphics card. Formore information, see youcomputer documentation. - 7 - Power off the computer and monitor, then disconnect the display cable from your computer. Remove any on-board graphicscapability, youmay needto disable it onthe motherboard. Hardware Installation Now that you haveprepared yourcomputer, you are ready toinstall yourgraphicsaccelerator card. If necessary, consult your computer has any existing graphics card from the back of your graphics accelerator card: 1. Or, if your computer's manual for help...

Manual
Page 8
... fastenthe cardinplace, and replace the computer cover. After installation, please connect the power cable to next chapter for detailed instructions. To VG A Monitor To Flat P anel Display To TV or V CR You are now ready to proceed with a DVI connector, you can connect a flat panel display to the appropriate connector, as shown below... GV-R80P256D(V) Graphics Accelerator - 8 - then turn on the computer and monitor. If your GV-R80P256D/ GV-R80P256V graphics card, or system will...
... fastenthe cardinplace, and replace the computer cover. After installation, please connect the power cable to next chapter for detailed instructions. To VG A Monitor To Flat P anel Display To TV or V CR You are now ready to proceed with a DVI connector, you can connect a flat panel display to the appropriate connector, as shown below... GV-R80P256D(V) Graphics Accelerator - 8 - then turn on the computer and monitor. If your GV-R80P256D/ GV-R80P256V graphics card, or system will...

Manual
Page 9
... the motherboard, which consist of Win® 98/98SE / Win® 2000 / Win® ME / Win® XP drivers is very simple. Operating system requirement • When loading the graphics card drivers for the system, please make sure your CD-ROM drive, you can see the AUTORUN window (if it does not show up, run "D:\setup.exe"). Software Installation SOFTWARE INSTALLATION In this manual, we assume that your graphics accelerator.) 3.1. English...
... the motherboard, which consist of Win® 98/98SE / Win® 2000 / Win® ME / Win® XP drivers is very simple. Operating system requirement • When loading the graphics card drivers for the system, please make sure your CD-ROM drive, you can see the AUTORUN window (if it does not show up, run "D:\setup.exe"). Software Installation SOFTWARE INSTALLATION In this manual, we assume that your graphics accelerator.) 3.1. English...
Manual
Page 10
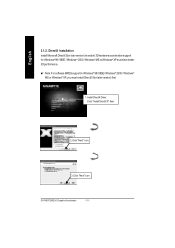
M Note: For software MPEG support in Windows® 98/ 98SE/ Windows® 2000 / Windows® ME or Windows® XP, you must install DirectX 9(or later version) first. 1. English 3.1.2. GV-R80P256D(V) Graphics Accelerator - 10 - Install DirectX Driver: Click "Install DirectX 9" Item. 2.Click "Next" icon. 3.Click "Next" icon. DirectX Installation Install Microsoft DirectX9(or later version) to enable 3D hardware acceleration support for Windows® 98 / 98SE / Windows® 2000 / Windows® ME or Windows® XP to achieve better 3D performence.
M Note: For software MPEG support in Windows® 98/ 98SE/ Windows® 2000 / Windows® ME or Windows® XP, you must install DirectX 9(or later version) first. 1. English 3.1.2. GV-R80P256D(V) Graphics Accelerator - 10 - Install DirectX Driver: Click "Install DirectX 9" Item. 2.Click "Next" icon. 3.Click "Next" icon. DirectX Installation Install Microsoft DirectX9(or later version) to enable 3D hardware acceleration support for Windows® 98 / 98SE / Windows® 2000 / Windows® ME or Windows® XP to achieve better 3D performence.
Manual
Page 12
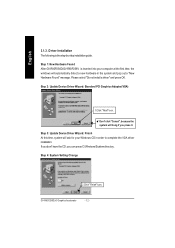
Step 1: New Hardware Found After GV-R80P256D/GV-R80P256V is the step-by-step installation guide. Step 2: Update Device Driver Wizard: Standard PCI Graphics Adapter(VGA) 1.Click "Next" icon. Please select "Do not install a driver"and press OK. Step 3: Update Device Driver Wizard: Finish At this time, system will hang if you can press C:\Windows\System directory. MDon't click "Cancel", because the system will ask for your computer at...
Step 1: New Hardware Found After GV-R80P256D/GV-R80P256V is the step-by-step installation guide. Step 2: Update Device Driver Wizard: Standard PCI Graphics Adapter(VGA) 1.Click "Next" icon. Please select "Do not install a driver"and press OK. Step 3: Update Device Driver Wizard: Finish At this time, system will hang if you can press C:\Windows\System directory. MDon't click "Cancel", because the system will ask for your computer at...
Manual
Page 13
Software Installation English 3..Click "No" icon. If it does not show up, please run "D:\setup.exe". After the system has finished loading, insert the GV-R80P256D/GV-R80P256V driver CD disk into your CD-ROM, and then you can see the AUTORUN window. Step 5: Driver Setup (Pictures below are shown in Windows XP) 1. Click "Install Display Drivers (Radeon X800 series)" item. 2.Click "Next". - 13 -
Software Installation English 3..Click "No" icon. If it does not show up, please run "D:\setup.exe". After the system has finished loading, insert the GV-R80P256D/GV-R80P256V driver CD disk into your CD-ROM, and then you can see the AUTORUN window. Step 5: Driver Setup (Pictures below are shown in Windows XP) 1. Click "Install Display Drivers (Radeon X800 series)" item. 2.Click "Next". - 13 -
Manual
Page 18
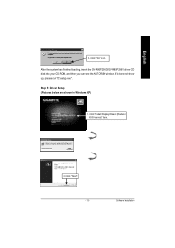
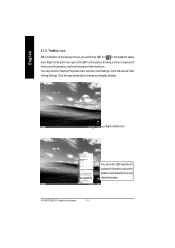
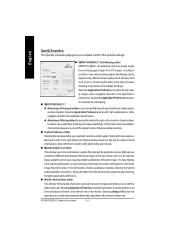
... for updated information about the graphicscard,latest drivers,and other functions. Right-clicking this icon opens the GBT control panel, showing a menu composed of shortcute of the display drivers, you will find an GBT icon on the taskbar's status area. Right clickthe icon. You may click the "Display Properties"item, and then click Settings. You can link to change your display settings. GV-R80P256D(V) Graphics Accelerator...
... for updated information about the graphicscard,latest drivers,and other functions. Right-clicking this icon opens the GBT control panel, showing a menu composed of shortcute of the display drivers, you will find an GBT icon on the taskbar's status area. Right clickthe icon. You may click the "Display Properties"item, and then click Settings. You can link to change your display settings. GV-R80P256D(V) Graphics Accelerator...
Manual
Page 21
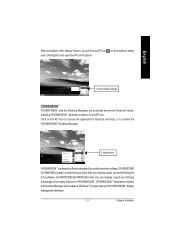
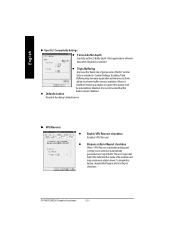
Click on the taskbar's status area. GV-R80P256D GV-R80P256Vgraphic cards that have more than one display output can benefit fully from this icon open the ATi control panel. 1.Using Single Display HYDRAVISION™ HYDRAVISION™ and the Desktop Manager are activated whenever Windows® starts. HYDRAVISION™ installation enables the Desktop Manager and creates a Windows® programgroup for multiple monitor settings. Installing HYDRAVISION™ adds menu options to unload the...
Click on the taskbar's status area. GV-R80P256D GV-R80P256Vgraphic cards that have more than one display output can benefit fully from this icon open the ATi control panel. 1.Using Single Display HYDRAVISION™ HYDRAVISION™ and the Desktop Manager are activated whenever Windows® starts. HYDRAVISION™ installation enables the Desktop Manager and creates a Windows® programgroup for multiple monitor settings. Installing HYDRAVISION™ adds menu options to unload the...
Manual
Page 22
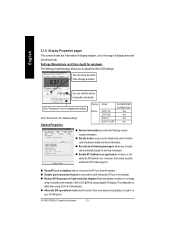
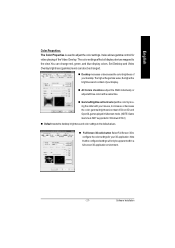
... any disabled graphics warning messages. n Enable ATI taskbar icon application enables or disables the ATI taskbar icon. n Disable quick resolution feature is p la y M atrix M odel CRT+TV C RT + DVI DVI+TV DVI+TV+CRT GV- GV-R80P256D(V) Graphics Accelerator - 22 - Display Properties pages The screen shows the information of display adapter, color, the range of display area and the refresh rate. Settings (Resolutions and Color depth for example 1280x1024 @75Hz) using a DVI-to the Details tab which lists the card's hardware details and driver information...
... any disabled graphics warning messages. n Enable ATI taskbar icon application enables or disables the ATI taskbar icon. n Disable quick resolution feature is p la y M atrix M odel CRT+TV C RT + DVI DVI+TV DVI+TV+CRT GV- GV-R80P256D(V) Graphics Accelerator - 22 - Display Properties pages The screen shows the information of display adapter, color, the range of display area and the refresh rate. Settings (Resolutions and Color depth for example 1280x1024 @75Hz) using a DVI-to the Details tab which lists the card's hardware details and driver information...
Manual
Page 23
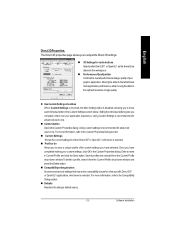
... the Custom Properties dialog. n Profiles for advanced users only. Software Installation n Performance/Quality silder Controls the overall performance/image qualityofyour graphic application. l Use Custom Settings checkbox When Custom Settings is checked, the Main Settings slider is selected. For more information, refer to adjust the Direct 3D settings. n Defaults Resets to the right will maximize image quality. Using Custom Settings is selected. Once you complete control over your...
... the Custom Properties dialog. n Profiles for advanced users only. Software Installation n Performance/Quality silder Controls the overall performance/image qualityofyour graphic application. l Use Custom Settings checkbox When Custom Settings is checked, the Main Settings slider is selected. For more information, refer to adjust the Direct 3D settings. n Defaults Resets to the right will maximize image quality. Using Custom Settings is selected. Once you complete control over your...
Manual
Page 24
...user moves closer to a 3D objectthe image qualityshould increase,requiring a higherqualitytexture ofthe same image. Selectthe Application Preference checkboxfor high-qual- Moving the slider to the right selects a higher qualitybase mipmap, delivering the highest qualityapplication experience. Anti-Aliasing can be applied using... should usehigh quality or highperformance textures. Moving the slider to run atits highestpossible frame rate,regardless ofthe monitor's refresh rate GV-R80P256D(V) Graphics Accelerator - 24 - n SMOOTHVISION 2.1 Anti-Aliasing slider SMOOTHVISION. ...
...user moves closer to a 3D objectthe image qualityshould increase,requiring a higherqualitytexture ofthe same image. Selectthe Application Preference checkboxfor high-qual- Moving the slider to the right selects a higher qualitybase mipmap, delivering the highest qualityapplication experience. Anti-Aliasing can be applied using... should usehigh quality or highperformance textures. Moving the slider to run atits highestpossible frame rate,regardless ofthe monitor's refresh rate GV-R80P256D(V) Graphics Accelerator - 24 - n SMOOTHVISION 2.1 Anti-Aliasing slider SMOOTHVISION. ...

Manual
Page 25
... incorrect. However, this setting should only be used ifyou are a few applications that can only support a limited number of texture formats. Software Installation l Alternate pixel center Mayeliminate problems with othergames. English n SMARTSHADER. Effects l SMARTSHADERTM Effects drop-down list SMARTSHADERTM applies presetpixel effects on OpenGL® orDirect3D® applications.Choose the desired effect and click OK. l Defaults button Resets to...
... incorrect. However, this setting should only be used ifyou are a few applications that can only support a limited number of texture formats. Software Installation l Alternate pixel center Mayeliminate problems with othergames. English n SMARTSHADER. Effects l SMARTSHADERTM Effects drop-down list SMARTSHADERTM applies presetpixel effects on OpenGL® orDirect3D® applications.Choose the desired effect and click OK. l Defaults button Resets to...
Manual
Page 26
... Error Report checkbox When VPU Recover is enabled in Custom Settings. To disable this l Defaults button feature remain disabled. Resets to support this feature it will be less frame-buffer memory available. GV-R80P256D(V) Graphics Accelerator - 26 - This errorreportwill help ATIto determine the cause ofthe problem and help create more stable drivers. Most applications will work best when Disabled is selected l Triple Buffering Improves the frame rate...
... Error Report checkbox When VPU Recover is enabled in Custom Settings. To disable this l Defaults button feature remain disabled. Resets to support this feature it will be less frame-buffer memory available. GV-R80P256D(V) Graphics Accelerator - 26 - This errorreportwill help ATIto determine the cause ofthe problem and help create more stable drivers. Most applications will work best when Disabled is selected l Triple Buffering Improves the frame rate...
Manual
Page 27
... control for your 3D application. n FullScreen 3D radio button SelectFullScreen 3D to adjust the color settings. English Color Properties: The Color Properties is NOT supported in Windows NT4.0) n Default resets the desktop brightness and color settings to the view.You can also be apparentwithin a fullscreen 3Dapplication environment. - 27 - n Desktop increases or decreasesthe colorbrightness of your display. Software Installation Note thatthe configured settings will only be changed. Set Desktop and Video Overlay brightness (gamma) levels can change...
... control for your 3D application. n FullScreen 3D radio button SelectFullScreen 3D to adjust the color settings. English Color Properties: The Color Properties is NOT supported in Windows NT4.0) n Default resets the desktop brightness and color settings to the view.You can also be apparentwithin a fullscreen 3Dapplication environment. - 27 - n Desktop increases or decreasesthe colorbrightness of your display. Software Installation Note thatthe configured settings will only be changed. Set Desktop and Video Overlay brightness (gamma) levels can change...
Manual
Page 28
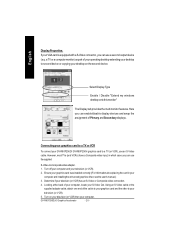
.... GV-R80P256D(V) Graphics Accelerator - 28 - Looking atthe back of Primary and Secondary displays. Ensure your computer and installingthe enhanced graphics driver,see the user's manual.) 3. However, most TVs (and VCRs) have a Composite vide o input, in your graphics card was installed correctly. (For information aboutplacing the card in which case you can use the supplied S-Video-to a TV (or VCR), use a second output device (e.q. Select Display Type Enable / Disable "Extend my windows desktop ontothis monitor" The Display...
.... GV-R80P256D(V) Graphics Accelerator - 28 - Looking atthe back of Primary and Secondary displays. Ensure your computer and installingthe enhanced graphics driver,see the user's manual.) 3. However, most TVs (and VCRs) have a Composite vide o input, in your graphics card was installed correctly. (For information aboutplacing the card in which case you can use the supplied S-Video-to a TV (or VCR), use a second output device (e.q. Select Display Type Enable / Disable "Extend my windows desktop ontothis monitor" The Display...
Manual
Page 31
... automatically, please run following : D:\SETUP.exe (If D is not your CD-ROM drive, substitute D with your local dealer for Win® 98/98SE / Win® 2000 / Win® ME, please insert the Installation CD. BIOS FLASH UTILITY BIOS update procedure: MNote: Please download the newest BIOS fromour website (www.gigabyte.com.tw) or contact your graphics card. Win® 98/98SE / Win® 2000 / Win® ME driver installation With Windows running on "Install Display Drivers" to...
... automatically, please run following : D:\SETUP.exe (If D is not your CD-ROM drive, substitute D with your local dealer for Win® 98/98SE / Win® 2000 / Win® ME, please insert the Installation CD. BIOS FLASH UTILITY BIOS update procedure: MNote: Please download the newest BIOS fromour website (www.gigabyte.com.tw) or contact your graphics card. Win® 98/98SE / Win® 2000 / Win® ME driver installation With Windows running on "Install Display Drivers" to...
Manual
Page 32
...; Windows® Startup Menu appears on your monitor's setting bymonitor's adjust panel to make the screen looks focused, crisp, and sharp. (Please refer to the card's display connector. n Ensure that the display cable is seated properly in Safe Mode. n Make sure that the card is securely fastened to the monitor's manual.) GV-R80P256D(V) Graphics Accelerator - 32 - Then select the number for Safe Mode, and press Enter. (You can also use the Troubleshooting Guide located...
...; Windows® Startup Menu appears on your monitor's setting bymonitor's adjust panel to make the screen looks focused, crisp, and sharp. (Please refer to the card's display connector. n Ensure that the display cable is seated properly in Safe Mode. n Make sure that the card is securely fastened to the monitor's manual.) GV-R80P256D(V) Graphics Accelerator - 32 - Then select the number for Safe Mode, and press Enter. (You can also use the Troubleshooting Guide located...


