Manual
Page 3
... 22 3.2. How to reflash the BIOS 33 5.2. SOFTWARE INSTALLATION 9 3.1. DirectX Installation 10 3.1.3. WIN® 98/98SE / WIN® 2000 / WIN® ME DRIVER INSTALLATION 31 3.3. BOARD LAYOUT 6 2.3. WIN® XP DRIVER AND UTILITIES INSTALLATION 9 3.1.1. Troubleshooting Tips 32 5. Resolutions and Color Depth Table (In Windows® XP 34 - 3 - HARDWARE INSTALLATION 5 2.1. English Table of...
... 22 3.2. How to reflash the BIOS 33 5.2. SOFTWARE INSTALLATION 9 3.1. DirectX Installation 10 3.1.3. WIN® 98/98SE / WIN® 2000 / WIN® ME DRIVER INSTALLATION 31 3.3. BOARD LAYOUT 6 2.3. WIN® XP DRIVER AND UTILITIES INSTALLATION 9 3.1.1. Troubleshooting Tips 32 5. Resolutions and Color Depth Table (In Windows® XP 34 - 3 - HARDWARE INSTALLATION 5 2.1. English Table of...
Manual
Page 5
... should be wearing an anti-static wristband, grounded at the same point as the power supply case. 3. UNPACKING The GV-R80P256D or GV-R80P256V package contains the following: l The GV-R80P256Dor GV-R80P256Vgraphics accelerator l USER'S MANUAL l Driver CD l Power DVD CD l Power Director (R80P256V only) l Game CD l DVI-I to a metal object, such as the anti-static...
... should be wearing an anti-static wristband, grounded at the same point as the power supply case. 3. UNPACKING The GV-R80P256D or GV-R80P256V package contains the following: l The GV-R80P256Dor GV-R80P256Vgraphics accelerator l USER'S MANUAL l Driver CD l Power DVD CD l Power Director (R80P256V only) l Game CD l DVI-I to a metal object, such as the anti-static...

Manual
Page 8
... below... Please refer to your graphics card came with the installation of the graphics card drivers. then align your card; then turn on the computer and monitor. If your GV-R80P256D/ GV-R80P256V graphics card, or system will not boot. 6. GV-R80P256D(V) Graphics Accelerator - 8 - Locate the AGP slot. After installation, please connect the power cable to...
... below... Please refer to your graphics card came with the installation of the graphics card drivers. then align your card; then turn on the computer and monitor. If your GV-R80P256D/ GV-R80P256V graphics card, or system will not boot. 6. GV-R80P256D(V) Graphics Accelerator - 8 - Locate the AGP slot. After installation, please connect the power cable to...

Manual
Page 9
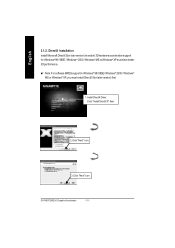
...If you install the graphics card drivers for your graphics accelerator.) 3.1. Then you can follow the subsection 3.1.3 "Driver installation"to be Drive D: The installation of SIS or VIA chipsets, please installthe appropriate driver programfor thatmotherboard. WIN® XP DRIVER AND UTILITIES INSTALLATION 3.1.1. Software Installation...174; 98/98SE / Win® 2000 / Win® ME / Win® XP drivers is very simple. When you insert the driver CD into your motherboard nearest dealer for motherboard driver. - 9 - English 3. Or please contact your CD-ROM drive, you can see ...
...If you install the graphics card drivers for your graphics accelerator.) 3.1. Then you can follow the subsection 3.1.3 "Driver installation"to be Drive D: The installation of SIS or VIA chipsets, please installthe appropriate driver programfor thatmotherboard. WIN® XP DRIVER AND UTILITIES INSTALLATION 3.1.1. Software Installation...174; 98/98SE / Win® 2000 / Win® ME / Win® XP drivers is very simple. When you insert the driver CD into your motherboard nearest dealer for motherboard driver. - 9 - English 3. Or please contact your CD-ROM drive, you can see ...
Manual
Page 10
M Note: For software MPEG support in Windows® 98/ 98SE/ Windows® 2000 / Windows® ME or Windows® XP, you must install DirectX 9(or later version) first. 1. GV-R80P256D(V) Graphics Accelerator - 10 - English 3.1.2. Install DirectX Driver: Click "Install DirectX 9" Item. 2.Click "Next" icon. 3.Click "Next" icon. DirectX Installation Install Microsoft DirectX9(or later version) to enable 3D hardware acceleration support for Windows® 98 / 98SE / Windows® 2000 / Windows® ME or Windows® XP to achieve better 3D performence.
M Note: For software MPEG support in Windows® 98/ 98SE/ Windows® 2000 / Windows® ME or Windows® XP, you must install DirectX 9(or later version) first. 1. GV-R80P256D(V) Graphics Accelerator - 10 - English 3.1.2. Install DirectX Driver: Click "Install DirectX 9" Item. 2.Click "Next" icon. 3.Click "Next" icon. DirectX Installation Install Microsoft DirectX9(or later version) to enable 3D hardware acceleration support for Windows® 98 / 98SE / Windows® 2000 / Windows® ME or Windows® XP to achieve better 3D performence.
Manual
Page 12
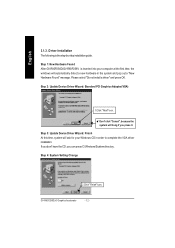
...because the system will hang if you can press C:\Windows\System directory. GV-R80P256D(V) Graphics Accelerator - 12 - Step 4: System Setting Change 2.Click "Finish" icon. Please select "Do not install a driver"and press OK. Driver Installation The following is inserted into your computer at the first time,...in the system and pop out a "New Hardware Found" message. Step 1: New Hardware Found After GV-R80P256D/GV-R80P256V is the step-by-step installation guide. Step 2: Update Device Driver Wizard: Standard PCI Graphics Adapter(VGA) 1.Click "Next" icon. If you don't have the CD...
...because the system will hang if you can press C:\Windows\System directory. GV-R80P256D(V) Graphics Accelerator - 12 - Step 4: System Setting Change 2.Click "Finish" icon. Please select "Do not install a driver"and press OK. Driver Installation The following is inserted into your computer at the first time,...in the system and pop out a "New Hardware Found" message. Step 1: New Hardware Found After GV-R80P256D/GV-R80P256V is the step-by-step installation guide. Step 2: Update Device Driver Wizard: Standard PCI Graphics Adapter(VGA) 1.Click "Next" icon. If you don't have the CD...
Manual
Page 13
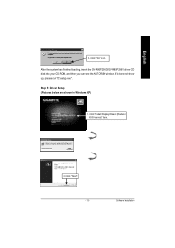
Software Installation English 3..Click "No" icon. Step 5: Driver Setup (Pictures below are shown in Windows XP) 1. Click "Install Display Drivers (Radeon X800 series)" item. 2.Click "Next". - 13 - After the system has finished loading, insert the GV-R80P256D/GV-R80P256V driver CD disk into your CD-ROM, and then you can see the AUTORUN window. If it does not show up, please run "D:\setup.exe".
Software Installation English 3..Click "No" icon. Step 5: Driver Setup (Pictures below are shown in Windows XP) 1. Click "Install Display Drivers (Radeon X800 series)" item. 2.Click "Next". - 13 - After the system has finished loading, insert the GV-R80P256D/GV-R80P256V driver CD disk into your CD-ROM, and then you can see the AUTORUN window. If it does not show up, please run "D:\setup.exe".

Manual
Page 15
Enter your name and company. 4. English 3.1.4. l Install V-Tuner2 : 1. Software Installation Utilities on driver CD The utilities include Display Driver and V-Tuner2 utilities. Please follow the steps. Click "V-Tuner2" item. 2.Click "Next". 3. Click "Finish" to restart computer. - 15 -
Enter your name and company. 4. English 3.1.4. l Install V-Tuner2 : 1. Software Installation Utilities on driver CD The utilities include Display Driver and V-Tuner2 utilities. Please follow the steps. Click "V-Tuner2" item. 2.Click "Next". 3. Click "Finish" to restart computer. - 15 -
Manual
Page 18
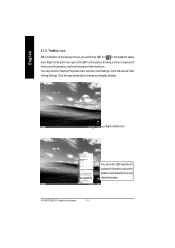
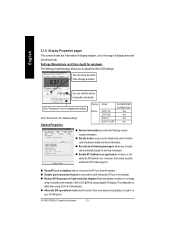
..., showing a menu composed of shortcute of the display drivers, you will find an GBT icon on the taskbar's status area. You may click the "Display Properties"item, and then click Settings. You can link to change your display settings. Click "Advanced" after clickng Settings. GV-R80P256D(V) Graphics Accelerator - 18 - Right clickthe icon. Taskbar...
..., showing a menu composed of shortcute of the display drivers, you will find an GBT icon on the taskbar's status area. You may click the "Display Properties"item, and then click Settings. You can link to change your display settings. Click "Advanced" after clickng Settings. GV-R80P256D(V) Graphics Accelerator - 18 - Right clickthe icon. Taskbar...
Manual
Page 21
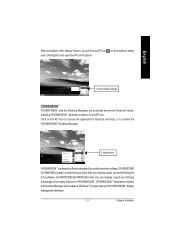
... enables the Desktop Manager and creates a Windows® programgroup for multiple monitor settings. English After installation of HYDRAVISION™ . GV-R80P256D GV-R80P256Vgraphic cards that have more than one display output can benefit fully from this icon open the ATi control panel. 1.Using Single...Manager are activated whenever Windows® starts. Software Installation Clicking this software. GV-R80P256D/GV-R80P256V with only one display output can still take advantage of the many features of the display drivers, you will find an ATI icon on the ATI icon to access ...
... enables the Desktop Manager and creates a Windows® programgroup for multiple monitor settings. English After installation of HYDRAVISION™ . GV-R80P256D GV-R80P256Vgraphic cards that have more than one display output can benefit fully from this icon open the ATi control panel. 1.Using Single...Manager are activated whenever Windows® starts. Software Installation Clicking this software. GV-R80P256D/GV-R80P256V with only one display output can still take advantage of the many features of the display drivers, you will find an ATI icon on the ATI icon to access ...
Manual
Page 22
...", into details settings: Options Properties D is accessible by left-clicking the ATIicon in the taskbar. R80P2 56D GV- n Disable quick resolution feature is p la y M atrix M odel CRT+TV C RT + DVI DVI+TV DVI+TV+CRT GV- GV-R80P256D(V) Graphics Accelerator - 22 - English 3.1.6. n Enable ATI taskbar icon application enables or disables the ATI taskbar icon... can click the item to changethe colordepth. n Re-activate all warning messages allows you to the Details tab which lists the card's hardware details and driver information.
...", into details settings: Options Properties D is accessible by left-clicking the ATIicon in the taskbar. R80P2 56D GV- n Disable quick resolution feature is p la y M atrix M odel CRT+TV C RT + DVI DVI+TV DVI+TV+CRT GV- GV-R80P256D(V) Graphics Accelerator - 22 - English 3.1.6. n Enable ATI taskbar icon application enables or disables the ATI taskbar icon... can click the item to changethe colordepth. n Re-activate all warning messages allows you to the Details tab which lists the card's hardware details and driver information.

Manual
Page 25
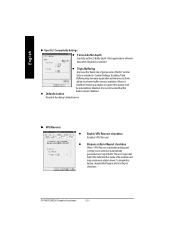
... should only be used ifyou are a few applications that can only support a limited number of texture formats. l Defaults button Restoresthe defaultsettings. By selecting Disabled, the driver will notsupport DXT texture formats,thus reducing thenumber oftextureformats supported. n Direct 3D® Compatibility Settings l SupportDXT texture formats There are experiencing the symptoms mentioned, as...
... should only be used ifyou are a few applications that can only support a limited number of texture formats. l Defaults button Restoresthe defaultsettings. By selecting Disabled, the driver will notsupport DXT texture formats,thus reducing thenumber oftextureformats supported. n Direct 3D® Compatibility Settings l SupportDXT texture formats There are experiencing the symptoms mentioned, as...
Manual
Page 26
... this feature it will prompt you to the dialog's defaultvalues. GV-R80P256D(V) Graphics Accelerator - 26 - English n OpenGL® Compatibility Settings l Force Z-buffer depth Explicitly set the Z-Buffer depth. This errorreportwill help ATIto determine the cause ofthe problem and help create more stable drivers. n VPU Recover l Enable VPU Recover checkbox Enables VPU Recover. Enabling...
... this feature it will prompt you to the dialog's defaultvalues. GV-R80P256D(V) Graphics Accelerator - 26 - English n OpenGL® Compatibility Settings l Force Z-buffer depth Explicitly set the Z-Buffer depth. This errorreportwill help ATIto determine the cause ofthe problem and help create more stable drivers. n VPU Recover l Enable VPU Recover checkbox Enables VPU Recover. Enabling...
Manual
Page 28
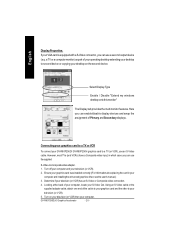
...enable/disable display devices and swap the assignment of Primary and Secondary displays. Connecting your graphics card to a TV or VCR To connectyour GV-R80P256D/ GV-R80P256V graphics card to your computer. Turn on the second device. Here you can use a second output device (e.q. a TV or a... computer monitor) as part of your computer, locate your computer and installingthe enhanced graphics driver,see the user's manual.) 3. However, most TVs (and VCRs) have a Composite vide o input, in your S-Video Out. Turn off your ...
...enable/disable display devices and swap the assignment of Primary and Secondary displays. Connecting your graphics card to a TV or VCR To connectyour GV-R80P256D/ GV-R80P256V graphics card to your computer. Turn on the second device. Here you can use a second output device (e.q. a TV or a... computer monitor) as part of your computer, locate your computer and installingthe enhanced graphics driver,see the user's manual.) 3. However, most TVs (and VCRs) have a Composite vide o input, in your S-Video Out. Turn off your ...
Manual
Page 31
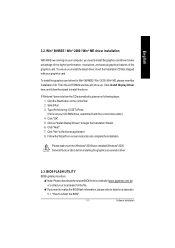
... "OK". 5. Type the following steps: 1. Click "Yes"to install the driver. "How to detail on subsection 5.1. BIOS FLASH UTILITY BIOS update procedure: MNote: Please download the newest BIOS fromour website (www.gigabyte.com.tw) or contact your computer, you need to install the graphics card... driver to complete the installation. To install the graphics card driver for the file. Follow the Wizard's on your local dealer ...
... "OK". 5. Type the following steps: 1. Click "Yes"to install the driver. "How to detail on subsection 5.1. BIOS FLASH UTILITY BIOS update procedure: MNote: Please download the newest BIOS fromour website (www.gigabyte.com.tw) or contact your computer, you need to install the graphics card... driver to complete the installation. To install the graphics card driver for the file. Follow the Wizard's on your local dealer ...
Manual
Page 32
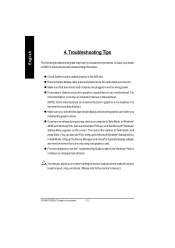
...-in the AGP slot. n If you experience problems. Contact your dealer or GBT for duplicate display adapter and monitor entries if you installed the graphics driver. n For more information, consult your monitor's setting bymonitor's adjust panel to make the screen looks focused, crisp, and sharp. (Please refer to the card's display... 4. n Check that the display cable is seated properly in graphics capabilities on the screen. n Ensure that the card is securely fastened to the monitor's manual.) GV-R80P256D(V) Graphics Accelerator - 32 -
...-in the AGP slot. n If you experience problems. Contact your dealer or GBT for duplicate display adapter and monitor entries if you installed the graphics driver. n For more information, consult your monitor's setting bymonitor's adjust panel to make the screen looks focused, crisp, and sharp. (Please refer to the card's display... 4. n Check that the display cable is seated properly in graphics capabilities on the screen. n Ensure that the card is securely fastened to the monitor's manual.) GV-R80P256D(V) Graphics Accelerator - 32 -

