Manual
Page 1
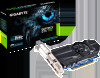
... and other intellectual property rights.Use of this graphics card. Reverse engineering or disassembly is protected by GIGA-BYTE TECHNOLOGY CO., LTD. ("GBT"). NVIDIA® Graphics Accelerator User's Manual Rev. 103 Copyright © 2012 GIGABYTE TECHNOLOGY CO., LTD Copyright by U.S. Due to rapid change in any labels on this copyright protection technology must be authorized by Rovi Corporation, and is intended for any errors or omissions that...
... and other intellectual property rights.Use of this graphics card. Reverse engineering or disassembly is protected by GIGA-BYTE TECHNOLOGY CO., LTD. ("GBT"). NVIDIA® Graphics Accelerator User's Manual Rev. 103 Copyright © 2012 GIGABYTE TECHNOLOGY CO., LTD Copyright by U.S. Due to rapid change in any labels on this copyright protection technology must be authorized by Rovi Corporation, and is intended for any errors or omissions that...
Manual
Page 2
GIGABYTE OC Guru II...9 3.2. Table of Contents 1. Driver and Utility Installation 7 3.1.1. Regulatory Statements 29 - 2 - Hardware Installation 5 2.1. Software Installation...7 3.1. Display Properties Pages 19 3.3. Appendix...29 5.1. SLI Technology...5 3. Troubleshooting Tips 28 5. Accessing NVIDIA Control Panel 20 4. Driver Installation...7 3.1.2. Minimum System Requirements 3 2. Introduction...3 1.1.
GIGABYTE OC Guru II...9 3.2. Table of Contents 1. Driver and Utility Installation 7 3.1.1. Regulatory Statements 29 - 2 - Hardware Installation 5 2.1. Software Installation...7 3.1. Display Properties Pages 19 3.3. Appendix...29 5.1. SLI Technology...5 3. Troubleshooting Tips 28 5. Accessing NVIDIA Control Panel 20 4. Driver Installation...7 3.1.2. Minimum System Requirements 3 2. Introduction...3 1.1.

Manual
Page 4
... and handling damages on the graphics card. NVIDIA Series Graphics Accelerator - 4 - To protect them against damage from the system. If you work correctly, please use official GIGABYTE BIOS only. In order to your card. Inspect the card carton for obvious damage. Use a grounded wrist strap before ... and unplug power supply. 2. Be sure there are separated from static electricity, you should be wearing an anti-static wristband, grounded at the same point as the power supply case. 3. Using non-official GIGABYTE BIOS might cause problem(s) on the card before handling ...
... and handling damages on the graphics card. NVIDIA Series Graphics Accelerator - 4 - To protect them against damage from the system. If you work correctly, please use official GIGABYTE BIOS only. In order to your card. Inspect the card carton for obvious damage. Use a grounded wrist strap before ... and unplug power supply. 2. Be sure there are separated from static electricity, you should be wearing an anti-static wristband, grounded at the same point as the power supply case. 3. Using non-official GIGABYTE BIOS might cause problem(s) on the card before handling ...
Manual
Page 5
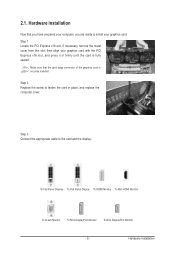
... Flat Panel Display To Flat Panel Display To HDMI Monitor To Mini HDMI Monitor To D-sub Monitor To Mini DisplayPort Monitor To Mini DisplayPort Monitor - 5 - Locate the PCI Express x16 slot. then align your graphics card. Hardware Installation Now that the gold edge connector of the graphics card is fully seated. Step 1. Connect the appropriate cable to fasten the card in firmly until the card is securely inserted. Replace the screw to the card and the display.
... Flat Panel Display To Flat Panel Display To HDMI Monitor To Mini HDMI Monitor To D-sub Monitor To Mini DisplayPort Monitor To Mini DisplayPort Monitor - 5 - Locate the PCI Express x16 slot. then align your graphics card. Hardware Installation Now that the gold edge connector of the graphics card is fully seated. Step 1. Connect the appropriate cable to fasten the card in firmly until the card is securely inserted. Replace the screw to the card and the display.
Manual
Page 6
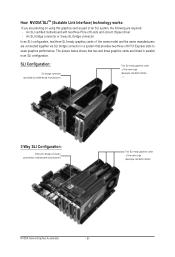
... SLI configuration, two/three SLI-ready graphics cards of the same model and the same manufacturers are connected together via SLI bridge connector in an SLI configuration. SLI Configuration: SLI bridge connector (provided by motherboard manufacturer) Two SLI-ready graphics cards of the same type. (Example: GV-N28-1GH-B) 3-Way SLI Configuration: 3-Way SLI bridge connector (provided by motherboard manufacturer) Two SLI-ready graphics cards of the same type. (Example: GV-N28-1GH-B) NVIDIA Series Graphics Accelerator - 6 - The picture below shows that provides two/three x16 PCI Express...
... SLI configuration, two/three SLI-ready graphics cards of the same model and the same manufacturers are connected together via SLI bridge connector in an SLI configuration. SLI Configuration: SLI bridge connector (provided by motherboard manufacturer) Two SLI-ready graphics cards of the same type. (Example: GV-N28-1GH-B) 3-Way SLI Configuration: 3-Way SLI bridge connector (provided by motherboard manufacturer) Two SLI-ready graphics cards of the same type. (Example: GV-N28-1GH-B) NVIDIA Series Graphics Accelerator - 6 - The picture below shows that provides two/three x16 PCI Express...
Manual
Page 7
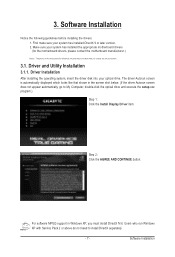
..., insert the driver disk into your system has installed DirectX 9 or later version. 2. Users who run Windows XP with Service Pack 2 or above do not need to My Computer, double-click the optical drive and execute the setup.exe program.) Step 1: Click the Install Display Driver item. Software Installation 3. Software Installation Notice the following guidelines before installing the drivers: 1. First make sure your optical drive. Driver and Utility Installation 3.1.1. For software MPEG support in this manual are for...
..., insert the driver disk into your system has installed DirectX 9 or later version. 2. Users who run Windows XP with Service Pack 2 or above do not need to My Computer, double-click the optical drive and execute the setup.exe program.) Step 1: Click the Install Display Driver item. Software Installation 3. Software Installation Notice the following guidelines before installing the drivers: 1. First make sure your optical drive. Driver and Utility Installation 3.1.1. For software MPEG support in this manual are for...
Manual
Page 8
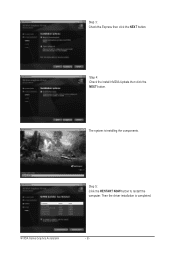
Then the driver installation is installing the components. NVIDIA Series Graphics Accelerator - 8 - Step 3: Check the Express then click the NEXT button. Step 4: Check the Install NVIDIA Update then click the NEXT button. The system is completed. Step 5: Click the RESTART NOW button to restart the computer.
Then the driver installation is installing the components. NVIDIA Series Graphics Accelerator - 8 - Step 3: Check the Express then click the NEXT button. Step 4: Check the Install NVIDIA Update then click the NEXT button. The system is completed. Step 5: Click the RESTART NOW button to restart the computer.

Manual
Page 10
... users can set different profiles. Function: When it 's locked, GPU CLOCK/MEMORY CLOCK/MINIMUM VOLTAGE/POWER TARGET can be changed. Function: Return to set up MONITORING、GPU CLOCK、MEMORY CLOCK、FAN、 MINIMUM VOLTAGE、POWER TARGET、OSD、ONLINE SUPPORT. NVIDIA Series Graphics Accelerator - 10 - OC GURU II: Profiles Users have 5 Profiles, 1/ 2/ 3/ 4/ 5 , to the previous applied setup. Function: Apply to what has just been setup. Function: Restore the default setup. Function: When it 's unlocked, GPU CLOCK/MEMORY CLOCK/MINIMUM VOLTAGE...
... users can set different profiles. Function: When it 's locked, GPU CLOCK/MEMORY CLOCK/MINIMUM VOLTAGE/POWER TARGET can be changed. Function: Return to set up MONITORING、GPU CLOCK、MEMORY CLOCK、FAN、 MINIMUM VOLTAGE、POWER TARGET、OSD、ONLINE SUPPORT. NVIDIA Series Graphics Accelerator - 10 - OC GURU II: Profiles Users have 5 Profiles, 1/ 2/ 3/ 4/ 5 , to the previous applied setup. Function: Apply to what has just been setup. Function: Restore the default setup. Function: When it 's unlocked, GPU CLOCK/MEMORY CLOCK/MINIMUM VOLTAGE...
Manual
Page 14
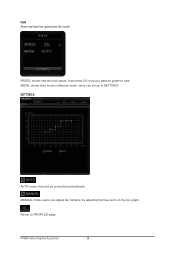
MODE: shows Auto mode or Manual mode, users can adjust fan behavior by adjusting the blue point on the fan graph. MANUAL mode, users can set up in SETTINGS SETTINGS: AUTO mode, fans will show 0% if using a passive graphics card. FAN Show real time fan speed and fan mode SPEED: shows real time fan speed, it will be controlled automatically. NVIDIA Series Graphics Accelerator - 14 - Return to PROFILES page.
MODE: shows Auto mode or Manual mode, users can adjust fan behavior by adjusting the blue point on the fan graph. MANUAL mode, users can set up in SETTINGS SETTINGS: AUTO mode, fans will show 0% if using a passive graphics card. FAN Show real time fan speed and fan mode SPEED: shows real time fan speed, it will be controlled automatically. NVIDIA Series Graphics Accelerator - 14 - Return to PROFILES page.

Manual
Page 15
Software Installation Show OSD HOT KEY and OSD location Click SETTINGS to change MINIMUM VOLTAGE. MINIMUM VOLTAGE Show and set up MINIMUM VOLTAGE When changing MINIMUM VOLTAGE, represents PLUS and represents MINUS. POWER TARGET Show and set up POWER TARGET When changing POWER TARGET, represents PLUS and represents MINUS. Users can enter numbers directly to OSD settings - 15 -
Software Installation Show OSD HOT KEY and OSD location Click SETTINGS to change MINIMUM VOLTAGE. MINIMUM VOLTAGE Show and set up MINIMUM VOLTAGE When changing MINIMUM VOLTAGE, represents PLUS and represents MINUS. POWER TARGET Show and set up POWER TARGET When changing POWER TARGET, represents PLUS and represents MINUS. Users can enter numbers directly to OSD settings - 15 -
Manual
Page 17
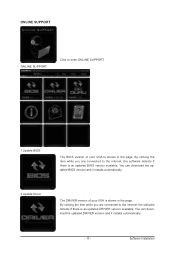
ONLINE SUPPORT ONLINE SUPPORT: Click to enter ONLINE SUPPORT 1.Update BIOS: The BIOS version of your VGA is shown in the page. You can download the updated DRIVER version and it installs automatically. 2.Update Driver The DRIVER version of your VGA is shown in the page. You can download the updated BIOS version and it installs automatically. - 17 - By clicking the item while you are connected to the internet, the software detects if there is an updated DRIVER version available. By clicking...
ONLINE SUPPORT ONLINE SUPPORT: Click to enter ONLINE SUPPORT 1.Update BIOS: The BIOS version of your VGA is shown in the page. You can download the updated DRIVER version and it installs automatically. 2.Update Driver The DRIVER version of your VGA is shown in the page. You can download the updated BIOS version and it installs automatically. - 17 - By clicking the item while you are connected to the internet, the software detects if there is an updated DRIVER version available. By clicking...
Manual
Page 18
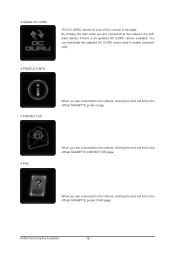
... can download the updated OC GURU version and it installs automatically. 4.PRODUCT INFO 5.CONTECT US When you are connected to the internet, clicking the item will link to the official GIGABYTE product page. 6.FAQ When you are connected to the official GIGABYTE product FAQ page. When you are connected to the internet, clicking the item will link to the internet, the software detects...
... can download the updated OC GURU version and it installs automatically. 4.PRODUCT INFO 5.CONTECT US When you are connected to the internet, clicking the item will link to the official GIGABYTE product page. 6.FAQ When you are connected to the official GIGABYTE product FAQ page. When you are connected to the internet, clicking the item will link to the internet, the software detects...
Manual
Page 19
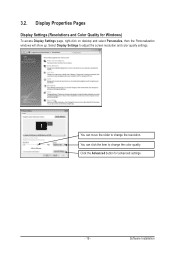
You can move the slider to change the color quality. Click the Advanced button for Windows) To access Display Settings page, right-click on desktop and select Personalize, then the Personalization windows will show up. Display Properties Pages Display Settings (Resolutions and Color Quality for advanced settings. - 19 - Select Display Settings to change the resolution. Software Installation 3.2. You can click the item to adjust the screen resolution and color quality settings.
You can move the slider to change the color quality. Click the Advanced button for Windows) To access Display Settings page, right-click on desktop and select Personalize, then the Personalization windows will show up. Display Properties Pages Display Settings (Resolutions and Color Quality for advanced settings. - 19 - Select Display Settings to change the resolution. Software Installation 3.2. You can click the item to adjust the screen resolution and color quality settings.
Manual
Page 20
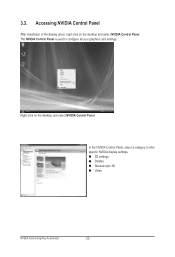
The NVIDIA Control Panel is used to alter specific NVIDIA display settings. 3D settings Display Stereoscopic 3D Video NVIDIA Series Graphics Accelerator - 20 - Right-click on the desktop and select NVIDIA Control Panel. 3.3. In the NVIDIA Control Panel, select a category to configure all your graphics card settings. Accessing NVIDIA Control Panel After installation of the display driver, right-click on the desktop and select NVIDIA Control Panel.
The NVIDIA Control Panel is used to alter specific NVIDIA display settings. 3D settings Display Stereoscopic 3D Video NVIDIA Series Graphics Accelerator - 20 - Right-click on the desktop and select NVIDIA Control Panel. 3.3. In the NVIDIA Control Panel, select a category to configure all your graphics card settings. Accessing NVIDIA Control Panel After installation of the display driver, right-click on the desktop and select NVIDIA Control Panel.
Manual
Page 21
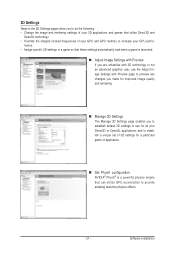
Software Installation 3D Settings Tasks in the 3D Settings pages allow you to establish default 3D settings to use the Adjust Image Settings with 3D technology or not an advanced graphics user, use for all your Direct3D or OpenGL applications and to establish a unique set of 3D settings for improved image quality and rendering. Manage 3D Settings The Manage 3D Settings page enables you to do the following...
Software Installation 3D Settings Tasks in the 3D Settings pages allow you to establish default 3D settings to use the Adjust Image Settings with 3D technology or not an advanced graphics user, use for all your Direct3D or OpenGL applications and to establish a unique set of 3D settings for improved image quality and rendering. Manage 3D Settings The Manage 3D Settings page enables you to do the following...

Manual
Page 22
... Series Graphics Accelerator - 22 - Display A variety of display features enable you to further manipulate and configure your display settings to do the following: • Move CRT screen position • Change resolution • Adjust desktop color settings • Rotate display • Manage custom resolutions • Set up multiple displays Change Resolution Using the Change Resolution controls, you to optimize the use of information appearing on your displays. Tasks in the Display pages allow you can change the color setting, reduce screen flickering, or adjust...
... Series Graphics Accelerator - 22 - Display A variety of display features enable you to further manipulate and configure your display settings to do the following: • Move CRT screen position • Change resolution • Adjust desktop color settings • Rotate display • Manage custom resolutions • Set up multiple displays Change Resolution Using the Change Resolution controls, you to optimize the use of information appearing on your displays. Tasks in the Display pages allow you can change the color setting, reduce screen flickering, or adjust...

Manual
Page 23
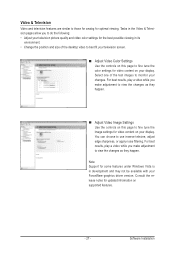
... change video color settings, go to Adjust Video Color Settings under the Video and TV section from the Start page. Rotate Display The NVIDIA Rotate features enable you have rotated your physical display and need to rotate the desktop to match the orientation of your display. View HDCP status Use this page to set the contrast, sharpness, and color depth (Digital Vibrance) of your desktop to check if your desktop. Software Installation...
... change video color settings, go to Adjust Video Color Settings under the Video and TV section from the Start page. Rotate Display The NVIDIA Rotate features enable you have rotated your physical display and need to rotate the desktop to match the orientation of your display. View HDCP status Use this page to set the contrast, sharpness, and color depth (Digital Vibrance) of your desktop to check if your desktop. Software Installation...
Manual
Page 24
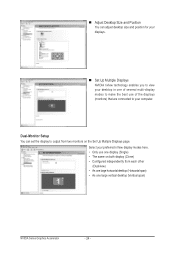
... - Dual-Monitor Setup You can adjust desktop size and position for your displays. Set Up Multiple Displays NVIDIA nView technology enables you to view your preferred nView display modes here. • Only use one display (Single) • The same on both display (Clone) • Configured independently from each other (Dualview) • As one large horizontal desktop (Horizontal span) • As one of several multi-display modes to make the best use of the displays (monitors) that are connected to output...
... - Dual-Monitor Setup You can adjust desktop size and position for your displays. Set Up Multiple Displays NVIDIA nView technology enables you to view your preferred nView display modes here. • Only use one display (Single) • The same on both display (Clone) • Configured independently from each other (Dualview) • As one large horizontal desktop (Horizontal span) • As one of several multi-display modes to make the best use of the displays (monitors) that are connected to output...
Manual
Page 27
.... • Change the position and size of the test images to monitor your display. Select one of the desktop video to best fit your television screen. Adjust Video Color Settings Use the controls on this page to fine tune the image settings for video content on supported features. - 27 - Video & Television Video and television features are similar to those for analog for updated information on your ForceWare graphics driver version. For best...
.... • Change the position and size of the test images to monitor your display. Select one of the desktop video to best fit your television screen. Adjust Video Color Settings Use the controls on this page to fine tune the image settings for video content on supported features. - 27 - Video & Television Video and television features are similar to those for analog for updated information on your ForceWare graphics driver version. For best...
Manual
Page 28
... graphics card when you install the graphics driver. For more assistance, use the Troubleshooting Guide located in the Windows Help or contact your computer's manual or manufacturer. (NOTE: Some manufacturers do not allow the built-in graphics to be disabled or to find the desired monitor color/resolution settings: The color and screen resolution options available for selection depend on the graphics card being installed. 4. For more advanced troubleshooting information. Press on your motherboard...
... graphics card when you install the graphics driver. For more assistance, use the Troubleshooting Guide located in the Windows Help or contact your computer's manual or manufacturer. (NOTE: Some manufacturers do not allow the built-in graphics to be disabled or to find the desired monitor color/resolution settings: The color and screen resolution options available for selection depend on the graphics card being installed. 4. For more advanced troubleshooting information. Press on your motherboard...


