
Manual
Page 1
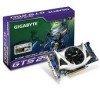
... transmitted in technology, some of the specifications might be out of date before publication of this card. GV-N250-1GI/ GV-N250-512I NVIDIA® GeForceTM GTS 250 Graphics Accelerator User's Manual Rev. 102 12MM-N250GI-102R Copyright © 2009 GIGABYTE TECHNOLOGY CO., LTD Copyright by U.S. Notice Please do not remove any errors or omissions that is prohibited. No part of this this graphics card. patents and other limited viewing uses only...
... transmitted in technology, some of the specifications might be out of date before publication of this card. GV-N250-1GI/ GV-N250-512I NVIDIA® GeForceTM GTS 250 Graphics Accelerator User's Manual Rev. 102 12MM-N250GI-102R Copyright © 2009 GIGABYTE TECHNOLOGY CO., LTD Copyright by U.S. Notice Please do not remove any errors or omissions that is prohibited. No part of this this graphics card. patents and other limited viewing uses only...
Manual
Page 4
... System Requirements 5 2. Board Layout ...6 2.2. Introduction ...5 1.1. GIGABYTE Gamer HUD Lite on Driver Disk 12 3.2. Display Properties Pages 14 3.3. Troubleshooting Tips 23 5. Features ...5 1.2. Hardware Installation 6 2.1. Driver and Utility Installation 10 3.1.1. Regulatory Statements 27 - 4 - Hardware Installation ...8 3. Software Installation 10 3.1. Appendix ...24 5.1. How to Reflash the BIOS in MS-DOS Mode 24 5.2. Driver Installation ...10 3.1.2. Resolutions and Color Depth Tables 25 5.3. Table of Contents 1. Accessing NVIDIA Control Panel...
... System Requirements 5 2. Board Layout ...6 2.2. Introduction ...5 1.1. GIGABYTE Gamer HUD Lite on Driver Disk 12 3.2. Display Properties Pages 14 3.3. Troubleshooting Tips 23 5. Features ...5 1.2. Hardware Installation 6 2.1. Driver and Utility Installation 10 3.1.1. Regulatory Statements 27 - 4 - Hardware Installation ...8 3. Software Installation 10 3.1. Appendix ...24 5.1. How to Reflash the BIOS in MS-DOS Mode 24 5.2. Driver Installation ...10 3.1.2. Resolutions and Color Depth Tables 25 5.3. Table of Contents 1. Accessing NVIDIA Control Panel...

Manual
Page 5
Minimum System Requirements • Hardware - Windows® 7 - Windows® Vista - Windows® XP with 512M GDDR3 memory (For GV-N250-512I only) • Supports DirectX 10 • Supports NVIDIA® SLITM (Scalable Link Interface) technology • Supports 1 HDMI connector • Supports 1 D-Sub connector • Supports 1 DVI-I connectors • Supports HDCP (High-Bandwidth Digital Content Protection) technology 1.2. Intel® Pentium®/CoreTM 2 or AMD AthlonTM/PhenomTM - 128 MB of system memory; 2 GB or more for software installation (CD-ROM or DVD-ROM...
Minimum System Requirements • Hardware - Windows® 7 - Windows® Vista - Windows® XP with 512M GDDR3 memory (For GV-N250-512I only) • Supports DirectX 10 • Supports NVIDIA® SLITM (Scalable Link Interface) technology • Supports 1 HDMI connector • Supports 1 D-Sub connector • Supports 1 DVI-I connectors • Supports HDCP (High-Bandwidth Digital Content Protection) technology 1.2. Intel® Pentium®/CoreTM 2 or AMD AthlonTM/PhenomTM - 128 MB of system memory; 2 GB or more for software installation (CD-ROM or DVD-ROM...

Manual
Page 6
Board Layout SLI Connector HDMI Connector D-Sub monitor Connector (15-pin) DVI-I Connector Hardware Installation 2.1. HDMI Connector D-Sub monitor Connector (15-pin) DVI-I Connector HDMI TV or Analog LCD Monitor Analog Monitor DVI Output Digital LCD Monitor GV-N250 Series Graphics Accelerator - 6 - 2.
Board Layout SLI Connector HDMI Connector D-Sub monitor Connector (15-pin) DVI-I Connector Hardware Installation 2.1. HDMI Connector D-Sub monitor Connector (15-pin) DVI-I Connector HDMI TV or Analog LCD Monitor Analog Monitor DVI Output Digital LCD Monitor GV-N250 Series Graphics Accelerator - 6 - 2.
Manual
Page 8
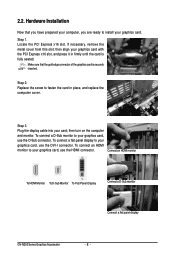
... computer and monitor. Plug the display cable into your graphics card, use the D-Sub connector. Replace the screw to install your graphics card with the PCI Express x16 slot, and press it in place, and replace the computer cover. Connect an HDMI monitor To HDMI Monitor To D-Sub Monitor To Flat Panel Display Connect a D-Sub monitor Connect a flat panel display GV-N250 Series Graphics Accelerator - 8 - Step 2. To connect an HDMI monitor to your graphics card, use the DVI-I connector. Hardware Installation Now that the gold edge connector of the graphics card is fully...
... computer and monitor. Plug the display cable into your graphics card, use the D-Sub connector. Replace the screw to install your graphics card with the PCI Express x16 slot, and press it in place, and replace the computer cover. Connect an HDMI monitor To HDMI Monitor To D-Sub Monitor To Flat Panel Display Connect a D-Sub monitor Connect a flat panel display GV-N250 Series Graphics Accelerator - 8 - Step 2. To connect an HDMI monitor to your graphics card, use the DVI-I connector. Hardware Installation Now that the gold edge connector of the graphics card is fully...

Manual
Page 10
... motherboard drivers (for the motherboard drivers, please contact the motherboard manufacturer.) 3.1. Software Installation Notice the following guidelines before installing the drivers: 1. Driver Installation After installing the operating system, insert the driver disk into your optical drive. Users who run Windows XP with Service Pack 2 or above do not need to My Computer, double-click the optical drive and execute the setup.exe program.) Step 1: Click the Install Display Driver item. GV-N250 Series Graphics Accelerator - 10 - For software MPEG support in the screen...
... motherboard drivers (for the motherboard drivers, please contact the motherboard manufacturer.) 3.1. Software Installation Notice the following guidelines before installing the drivers: 1. Driver Installation After installing the operating system, insert the driver disk into your optical drive. Users who run Windows XP with Service Pack 2 or above do not need to My Computer, double-click the optical drive and execute the setup.exe program.) Step 1: Click the Install Display Driver item. GV-N250 Series Graphics Accelerator - 10 - For software MPEG support in the screen...

Manual
Page 12
Step 3: Click the Next button. 3.1.2. The system is completed. GIGABYTE Gamer HUD Lite on Driver Disk Step 1: Click the GIGABYTE Gamer HUD Lite item. Step 5: Click the Finish button. Step 4: Click the Install button. Step 2: Choose the language for the installation and click the OK button. GV-N250 Series Graphics Accelerator - 12 - Then the installation of the GIGABYTE Gamer HUD Lite is installing the components.
Step 3: Click the Next button. 3.1.2. The system is completed. GIGABYTE Gamer HUD Lite on Driver Disk Step 1: Click the GIGABYTE Gamer HUD Lite item. Step 5: Click the Finish button. Step 4: Click the Install button. Step 2: Choose the language for the installation and click the OK button. GV-N250 Series Graphics Accelerator - 12 - Then the installation of the GIGABYTE Gamer HUD Lite is installing the components.
Manual
Page 13
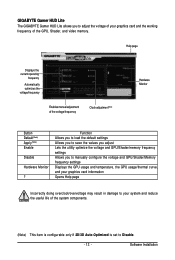
... the values you adjust Lets the utility optimize the voltage and GPU/Shader/memory frequency settings Allows you to Disable. - 13 - Software Installation GIGABYTE Gamer HUD Lite The GIGABYTE Gamer HUD Lite allows you to manually configure the voltage and GPU/Shader/Memory frequency settings Displays the GPU usage and temperature, the GPU usage/thermal curve, and your graphics card information Opens Help page Incorrectly doing overclock/overvoltage may result in damage to your system and reduce the useful life of...
... the values you adjust Lets the utility optimize the voltage and GPU/Shader/memory frequency settings Allows you to Disable. - 13 - Software Installation GIGABYTE Gamer HUD Lite The GIGABYTE Gamer HUD Lite allows you to manually configure the voltage and GPU/Shader/Memory frequency settings Displays the GPU usage and temperature, the GPU usage/thermal curve, and your graphics card information Opens Help page Incorrectly doing overclock/overvoltage may result in damage to your system and reduce the useful life of...
Manual
Page 14
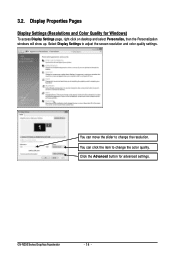
Select Display Settings to change the color quality. You can click the item to change the resolution. Display Properties Pages Display Settings (Resolutions and Color Quality for advanced settings. Click the Advanced button for Windows) To access Display Settings page, right-click on desktop and select Personalize, then the Personalization windows will show up. 3.2. GV-N250 Series Graphics Accelerator - 14 - You can move the slider to adjust the screen resolution and color quality settings.
Select Display Settings to change the color quality. You can click the item to change the resolution. Display Properties Pages Display Settings (Resolutions and Color Quality for advanced settings. Click the Advanced button for Windows) To access Display Settings page, right-click on desktop and select Personalize, then the Personalization windows will show up. 3.2. GV-N250 Series Graphics Accelerator - 14 - You can move the slider to adjust the screen resolution and color quality settings.

Manual
Page 15
... the NVIDIA Control Panel to access the NVIDIA Control Panel. Or you 'll see the Generic PnP Monitor and NVIDIA GeForce GTS 250 Properties dialog box. Select Display Settings. Click the GeForce GTS 250 tab to launch the NVIDIA Control Panel. - 15 - The NVIDIA Control Panel is used to configure all your graphics card settings. Software Installation Accessing NVIDIA Control Panel After installation of the display driver, right-click on the desktop and select NVIDIA Control Panel. When the Display Settings dialog box...
... the NVIDIA Control Panel to access the NVIDIA Control Panel. Or you 'll see the Generic PnP Monitor and NVIDIA GeForce GTS 250 Properties dialog box. Select Display Settings. Click the GeForce GTS 250 tab to launch the NVIDIA Control Panel. - 15 - The NVIDIA Control Panel is used to configure all your graphics card settings. Software Installation Accessing NVIDIA Control Panel After installation of the display driver, right-click on the desktop and select NVIDIA Control Panel. When the Display Settings dialog box...

Manual
Page 16
The categories are : „ Standard „ Advanced „ Custom GV-N250 Series Graphics Accelerator - 16 - In the NVIDIA Control Panel, select a category to alter specific NVIDIA display settings. The supported modes are : „ 3D Settings „ Display „ Video & Television In the NVIDIA Control Panel, change a view if you . „ Standard Settings „ Advanced Settings The following pages provide details on configuring advanced settings. Select the view of the NVIDIA Control Panel that is most appropriate for you want.
The categories are : „ Standard „ Advanced „ Custom GV-N250 Series Graphics Accelerator - 16 - In the NVIDIA Control Panel, select a category to alter specific NVIDIA display settings. The supported modes are : „ 3D Settings „ Display „ Video & Television In the NVIDIA Control Panel, change a view if you . „ Standard Settings „ Advanced Settings The following pages provide details on configuring advanced settings. Select the view of the NVIDIA Control Panel that is most appropriate for you want.

Manual
Page 17
... install two graphics cards with Preview page to preview any changes you make for improved image quality and rendering. „ Manage 3D Settings (Note 1) The Manage 3D Settings page enables you to establish default 3D settings to enhance the graphics card's performance. (Note 1) This item is launched. „ Adjust Image Settings with Preview If you are unfamiliar with 3D technology or not an advanced graphics user, use...
... install two graphics cards with Preview page to preview any changes you make for improved image quality and rendering. „ Manage 3D Settings (Note 1) The Manage 3D Settings page enables you to establish default 3D settings to enhance the graphics card's performance. (Note 1) This item is launched. „ Adjust Image Settings with Preview If you are unfamiliar with 3D technology or not an advanced graphics user, use...

Manual
Page 18
GV-N250 Series Graphics Accelerator - 18 - This is present only in Advanced view mode. Tasks in the Display pages allow you can use your mouse (by clicking on the arrow keys on this page) or the arrow keys on your display. (Note) This item is a useful alternative to using the controls (buttons) on your actual physical display. „ Change Resolution Using the Change Resolution controls, you to do the following: •...
GV-N250 Series Graphics Accelerator - 18 - This is present only in Advanced view mode. Tasks in the Display pages allow you can use your mouse (by clicking on the arrow keys on this page) or the arrow keys on your display. (Note) This item is a useful alternative to using the controls (buttons) on your actual physical display. „ Change Resolution Using the Change Resolution controls, you to do the following: •...
Manual
Page 19
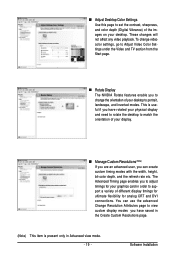
... enables you to adjust timings for analog CRT and DVI connections. You can create custom timing modes with the width, height, bit-color depth, and the refresh rate etc. Software Installation To change video color settings, go to Adjust Video Color Settings under the Video and TV section from the Start page. „ Rotate Display The NVIDIA Rotate features enable you to change the orientation of your desktop to support a variety of the images on your desktop. „ Adjust Desktop Color Settings Use...
... enables you to adjust timings for analog CRT and DVI connections. You can create custom timing modes with the width, height, bit-color depth, and the refresh rate etc. Software Installation To change video color settings, go to Adjust Video Color Settings under the Video and TV section from the Start page. „ Rotate Display The NVIDIA Rotate features enable you to change the orientation of your desktop to support a variety of the images on your desktop. „ Adjust Desktop Color Settings Use...

Manual
Page 20
... horizontal desktop (Horizontal span) (Note) • As one virtual desktop. GV-N250 Series Graphics Accelerator - 20 - „ Set Up Multiple Displays NVIDIA nView technology enables you to view your desktop in one of several multi-display modes to make the best use of the same desktop. (2) Configured independently from each other (Dualview) Dualview mode indicates that both display (Clone) • Configured independently from each display as when the application spans displays. (Note) This item is present only in Windows XP...
... horizontal desktop (Horizontal span) (Note) • As one virtual desktop. GV-N250 Series Graphics Accelerator - 20 - „ Set Up Multiple Displays NVIDIA nView technology enables you to view your desktop in one of several multi-display modes to make the best use of the same desktop. (2) Configured independently from each other (Dualview) Dualview mode indicates that both display (Clone) • Configured independently from each display as when the application spans displays. (Note) This item is present only in Windows XP...

Manual
Page 21
Software Installation (3) As one large horizontal desktop (Horizontal span) (Note 1) Horizontal Span mode indicates that both displays in Windows XP. (Note 2) By an HDMI-to-DVI adapter. (Note 3) By a DVI-to-D-Sub adapter. - 21 - The height of each display is present only in the display pair function as one wide virtual desktop. Horizontal Span Mode Vertical Span Mode Display Matrix Model CRT+HDMI CRT+DVI DVI+HDMI DVI+HDMI+CRT DVI +DVI(Note2) CRT+CRT (Note 3) GV-N250-1GI Yes Yes Yes No Yes Yes GV-N250-512I Yes Yes Yes...
Software Installation (3) As one large horizontal desktop (Horizontal span) (Note 1) Horizontal Span mode indicates that both displays in Windows XP. (Note 2) By an HDMI-to-DVI adapter. (Note 3) By a DVI-to-D-Sub adapter. - 21 - The height of each display is present only in the display pair function as one wide virtual desktop. Horizontal Span Mode Vertical Span Mode Display Matrix Model CRT+HDMI CRT+DVI DVI+HDMI DVI+HDMI+CRT DVI +DVI(Note2) CRT+CRT (Note 3) GV-N250-1GI Yes Yes Yes No Yes Yes GV-N250-512I Yes Yes Yes...

Manual
Page 22
... for analog for optimal viewing. GV-N250 Series Graphics Accelerator - 22 - Select one of the desktop video to best fit your television screen.. „ Adjust Video Color Settings Use the controls on this page to view the changes as they happen. For best results, play a video while you make adjustment to view the changes as they happen. „ Adjust Video Image Settings Use the controls on this page to fine tune the color settings for updated information on your changes. Consult...
... for analog for optimal viewing. GV-N250 Series Graphics Accelerator - 22 - Select one of the desktop video to best fit your television screen.. „ Adjust Video Color Settings Use the controls on this page to view the changes as they happen. For best results, play a video while you make adjustment to view the changes as they happen. „ Adjust Video Image Settings Use the controls on this page to fine tune the color settings for updated information on your changes. Consult...

Manual
Page 23
... the monitor's manual.) - 23 - Troubleshooting Tips The following troubleshooting tips may help if you install the graphics driver. „ Restart your monitor's setting using monitor's adjust panel to make the screen look focused, crisp, and sharp. (Please refer to become the secondary display.) „ Make sure you selected the appropriate display device and graphics card when you experience problems. Contact your dealer or GIGABYTE for selection depend on your motherboard. Troubleshooting Tips...
... the monitor's manual.) - 23 - Troubleshooting Tips The following troubleshooting tips may help if you install the graphics driver. „ Restart your monitor's setting using monitor's adjust panel to make the screen look focused, crisp, and sharp. (Please refer to become the secondary display.) „ Make sure you selected the appropriate display device and graphics card when you experience problems. Contact your dealer or GIGABYTE for selection depend on your motherboard. Troubleshooting Tips...

Manual
Page 24
... computer in MS-DOS mode. (You may need a startup disk to A:\>. 4. GV-N250 Series Graphics Accelerator - 24 - Change the command prompt to restart the computer in MS-DOS Mode 1. Wait until it's done, then restart your hard disk(s) or floppy disk. This procedure assumes drive A. 2. p [BIOS file name] (example: gvf19 -p n2501gi.F2) and press Enter. 6. To flash BIOS, at the A:\> prompt, type[BIOS flash utility name] -s [BIOS file name] (example...
... computer in MS-DOS mode. (You may need a startup disk to A:\>. 4. GV-N250 Series Graphics Accelerator - 24 - Change the command prompt to restart the computer in MS-DOS Mode 1. Wait until it's done, then restart your hard disk(s) or floppy disk. This procedure assumes drive A. 2. p [BIOS file name] (example: gvf19 -p n2501gi.F2) and press Enter. 6. To flash BIOS, at the A:\> prompt, type[BIOS flash utility name] -s [BIOS file name] (example...

Manual
Page 26
GV-N250 Series Graphics Accelerator - 26 - Display Refresh Color Depth (bpp) Screen Rate 8bpp(256 color) 16bpp(65K color) 32bpp(16.7M) Resolution 1600 x 1200 (Hz) 60~100 Standard mode 3 High mode 3 True mode 3 120 3 3 X 1920 x 1080 (16:9) 60~85 3 3 3 100 3 3 X 1920 x 1200 (16:10) 60~85 3 3 3 100 3 3 X 1920 x 1440 60~85 3 3 3 2048 x 1536 60~85 3 3 3 2560 x 1600 60 3 3 3 (Dual-Link) * This table is for reference only. The actual resolutions supported depend on the monitor you use.
GV-N250 Series Graphics Accelerator - 26 - Display Refresh Color Depth (bpp) Screen Rate 8bpp(256 color) 16bpp(65K color) 32bpp(16.7M) Resolution 1600 x 1200 (Hz) 60~100 Standard mode 3 High mode 3 True mode 3 120 3 3 X 1920 x 1080 (16:9) 60~85 3 3 3 100 3 3 X 1920 x 1200 (16:10) 60~85 3 3 3 100 3 3 X 1920 x 1440 60~85 3 3 3 2048 x 1536 60~85 3 3 3 2560 x 1600 60 3 3 3 (Dual-Link) * This table is for reference only. The actual resolutions supported depend on the monitor you use.


