Manual
Page 1
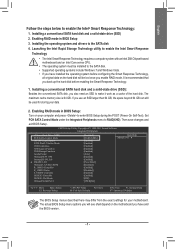
...[Enabled] [IDE] [3F8/IQR4] Item Help Menu Level Move Enter: Select F5: Previous Values +/-/PU/PD: Value F10: Save F6: Fail-Safe Defaults ESC: Exit F1: General Help F7: Optimized Defaults The BIOS Setup menus described here may differ from the exact settings for storing your motherboard. Enabling... hard disk and a solid-state drive (SSD): Besides the conventional SATA disk, you will be used for your data. 2. The actual BIOS Setup menu options you also need an SSD to the SATA disk 4. Launching the Intel Rapid Storage Technology utility to enable the Intel Smart ...
...[Enabled] [IDE] [3F8/IQR4] Item Help Menu Level Move Enter: Select F5: Previous Values +/-/PU/PD: Value F10: Save F6: Fail-Safe Defaults ESC: Exit F1: General Help F7: Optimized Defaults The BIOS Setup menus described here may differ from the exact settings for storing your motherboard. Enabling... hard disk and a solid-state drive (SSD): Besides the conventional SATA disk, you will be used for your data. 2. The actual BIOS Setup menu options you also need an SSD to the SATA disk 4. Launching the Intel Rapid Storage Technology utility to enable the Intel Smart ...
Manual
Page 35
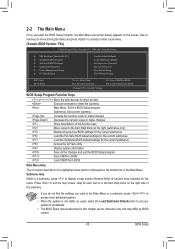
...are for the current submenus Access the Q-Flash utility Display system information Save all the changes and exit the BIOS Setup program Save CMOS to BIOS Load CMOS from BIOS Main Menu Help The on-screen description of a highlighted setup option is displayed on the screen. Use ...Without Saving ESC: Quit F8: Q-Flash Select Item F10: Save & Exit Setup Change CPU's Clock & Voltage F11: Save CMOS to BIOS F12: Load CMOS from BIOS BIOS Setup Program Function Keys Move the selection bar to select an item Execute command or enter the submenu Main Menu: Exit the...
...are for the current submenus Access the Q-Flash utility Display system information Save all the changes and exit the BIOS Setup program Save CMOS to BIOS Load CMOS from BIOS Main Menu Help The on-screen description of a highlighted setup option is displayed on the screen. Use ...Without Saving ESC: Quit F8: Q-Flash Select Item F10: Save & Exit Setup Change CPU's Clock & Voltage F11: Save CMOS to BIOS F12: Load CMOS from BIOS BIOS Setup Program Function Keys Move the selection bar to select an item Execute command or enter the submenu Main Menu: Exit the...

Manual
Page 37
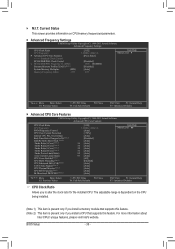
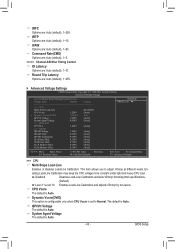
...Advanced Voltage Settings } Miscellaneous Settings [Press Enter] [Press Enter] [Press Enter] [Press Enter] [Press Enter] Item Help Menu Level BIOS Version BCLK CPU Frequency Memory Frequency Total Memory Size CPU Temperature F2a 99.80 MHz 3094.12 MHz 1332.71 MHz 1024 MB 45oC Vcore... DRAM Voltage 1.280V 1.696V Move Enter: Select F5: Previous Values +/-/PU/PD: Value F10: Save F6: Fail-Safe Defaults ESC: Exit F1: General Help F7: Optimized Defaults This...
...Advanced Voltage Settings } Miscellaneous Settings [Press Enter] [Press Enter] [Press Enter] [Press Enter] [Press Enter] Item Help Menu Level BIOS Version BCLK CPU Frequency Memory Frequency Total Memory Size CPU Temperature F2a 99.80 MHz 3094.12 MHz 1332.71 MHz 1024 MB 45oC Vcore... DRAM Voltage 1.280V 1.696V Move Enter: Select F5: Previous Values +/-/PU/PD: Value F10: Save F6: Fail-Safe Defaults ESC: Exit F1: General Help F7: Optimized Defaults This...
Manual
Page 38
The adjustable range is present only if you to alter the clock ratio for the installed CPU. BIOS Setup - 38 - Current Status This screen provides information on the CPU being installed. (Note 1) This item is present only if you install a ...] CPU Thermal Monitor (Note 2) [Auto] CPU EIST Function (Note 2) [Auto] Bi-Directional PROCHOT (Note 2) [Auto] Item Help Menu Level Move Enter: Select F5: Previous Values +/-/PU/PD: Value F10: Save F6: Fail-Safe Defaults ESC: Exit F1: General Help F7: Optimized Defaults CPU Clock Ratio Allows you install...
The adjustable range is present only if you to alter the clock ratio for the installed CPU. BIOS Setup - 38 - Current Status This screen provides information on the CPU being installed. (Note 1) This item is present only if you install a ...] CPU Thermal Monitor (Note 2) [Auto] CPU EIST Function (Note 2) [Auto] Bi-Directional PROCHOT (Note 2) [Auto] Item Help Menu Level Move Enter: Select F5: Previous Values +/-/PU/PD: Value F10: Save F6: Fail-Safe Defaults ESC: Exit F1: General Help F7: Optimized Defaults CPU Clock Ratio Allows you install...

Manual
Page 41
... performance level. Channel Interleaving Enables or disables memory channel interleaving. Standard Lets the system operate at its best performance level. BIOS Setup Memory Frequency(Mhz) The first memory frequency value is dependent on the CPU being used . Profile DDR Voltage When...[Auto] 1333 [Turbo] [Auto] 1.5V 1.05V Auto Auto [Press Enter] [Press Enter] Item Help Menu Level Move Enter: Select F5: Previous Values +/-/PU/PD: Value F10: Save F6: Fail-Safe Defaults ESC: Exit F1: General Help F7: Optimized Defaults Extreme Memory Profile (X.M.P.) , (...
... performance level. Channel Interleaving Enables or disables memory channel interleaving. Standard Lets the system operate at its best performance level. BIOS Setup Memory Frequency(Mhz) The first memory frequency value is dependent on the CPU being used . Profile DDR Voltage When...[Auto] 1333 [Turbo] [Auto] 1.5V 1.05V Auto Auto [Press Enter] [Press Enter] Item Help Menu Level Move Enter: Select F5: Previous Values +/-/PU/PD: Value F10: Save F6: Fail-Safe Defaults ESC: Exit F1: General Help F7: Optimized Defaults Extreme Memory Profile (X.M.P.) , (...

Manual
Page 42
... Auto Auto Auto Auto Auto Auto Auto Auto Auto Auto Auto Auto Item Help Menu Level Move Enter: Select F5: Previous Values +/-/PU/PD: Value F10: Save F6: Fail-Safe Defaults ESC: Exit F1: General Help F7: Optimized Defaults >>>>>...increase memory performance and stability. tRAS Options are: Auto (default), 1~31. >>>>> Channel A/B Advanced Timing Control tRC Options are : Auto (default), 1~10 BIOS Setup - 42 - tWR Options are : Auto (default), 1~7. tRRD Options are : Auto (default), 1~15. Rank Interleaving Enables or disables memory rank ...
... Auto Auto Auto Auto Auto Auto Auto Auto Auto Auto Auto Auto Item Help Menu Level Move Enter: Select F5: Previous Values +/-/PU/PD: Value F10: Save F6: Fail-Safe Defaults ESC: Exit F1: General Help F7: Optimized Defaults >>>>>...increase memory performance and stability. tRAS Options are: Auto (default), 1~31. >>>>> Channel A/B Advanced Timing Control tRC Options are : Auto (default), 1~10 BIOS Setup - 42 - tWR Options are : Auto (default), 1~7. tRRD Options are : Auto (default), 1~15. Rank Interleaving Enables or disables memory rank ...
Manual
Page 43
... [Auto] Ch-A Address VRef. 0.750V [Auto] Ch-B Address VRef. 0.750V [Auto] Item Help Menu Level Move Enter: Select F5: Previous Values +/-/PU/PD: Value F10: Save F6: Fail-Safe Defaults ESC: Exit F1: General Help F7: Optimized Defaults >>> CPU Multi-Steps Load...This option is configurable only when CPU Vcore is Auto. tRTP Options are : Auto (default), 1~63. tFAW Options are : Auto (default), 1~15. BIOS Setup Command Rate(CMD) Options are: Auto (default), 1~3. >>>>> Channel A/B Misc Timing Control IO Latency Options are: Auto (default), 1~31. En-...
... [Auto] Ch-A Address VRef. 0.750V [Auto] Ch-B Address VRef. 0.750V [Auto] Item Help Menu Level Move Enter: Select F5: Previous Values +/-/PU/PD: Value F10: Save F6: Fail-Safe Defaults ESC: Exit F1: General Help F7: Optimized Defaults >>> CPU Multi-Steps Load...This option is configurable only when CPU Vcore is Auto. tRTP Options are : Auto (default), 1~63. tFAW Options are : Auto (default), 1~15. BIOS Setup Command Rate(CMD) Options are: Auto (default), 1~3. >>>>> Channel A/B Misc Timing Control IO Latency Options are: Auto (default), 1~31. En-...
Manual
Page 44
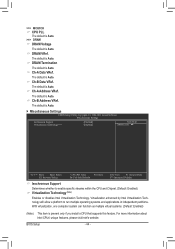
...Miscellaneous Settings Isochronous Support Virtualization Technology (Note) [Enabled] [Enabled] Item Help Menu Level Move Enter: Select F5: Previous Values +/-/PU/PD: Value F10: Save F6: Fail-Safe Defaults ESC: Exit F1: General Help F7: Optimized Defaults... Isochronous Support Determines whether to run multiple operating systems and applications in independent partitions. The default is Auto. BIOS Setup - 44 - With virtualization, one computer system can function as multiple virtual systems. (Default: Enabled) (Note) This...
...Miscellaneous Settings Isochronous Support Virtualization Technology (Note) [Enabled] [Enabled] Item Help Menu Level Move Enter: Select F5: Previous Values +/-/PU/PD: Value F10: Save F6: Fail-Safe Defaults ESC: Exit F1: General Help F7: Optimized Defaults... Isochronous Support Determines whether to run multiple operating systems and applications in independent partitions. The default is Auto. BIOS Setup - 44 - With virtualization, one computer system can function as multiple virtual systems. (Default: Enabled) (Note) This...

Manual
Page 45
...arrow key to set the date. For example, 1 p.m. is week (read-only), month, date and year. The date format is 13:0:0. BIOS Setup 2-4 Standard CMOS Features CMOS Setup Utility-Copyright (C) 1984-2011 Award Software Standard CMOS Features Date (mm:dd:yy) Time (hh:mm:...] [None] [None] [None] [None] [None] [None] [None] [None] [None] Halt On [All, But Keyboard] Base Memory 640K Move Enter: Select F5: Previous Values +/-/PU/PD: Value F10: Save F6: Fail-Safe Defaults ESC: Exit F1: General Help F7: Optimized Defaults CMOS Setup Utility-Copyright (C) 1984-2011...
...arrow key to set the date. For example, 1 p.m. is week (read-only), month, date and year. The date format is 13:0:0. BIOS Setup 2-4 Standard CMOS Features CMOS Setup Utility-Copyright (C) 1984-2011 Award Software Standard CMOS Features Date (mm:dd:yy) Time (hh:mm:...] [None] [None] [None] [None] [None] [None] [None] [None] [None] Halt On [All, But Keyboard] Base Memory 640K Move Enter: Select F5: Previous Values +/-/PU/PD: Value F10: Save F6: Fail-Safe Defaults ESC: Exit F1: General Help F7: Optimized Defaults CMOS Setup Utility-Copyright (C) 1984-2011...

Manual
Page 47
...] [Auto] [Hard Disk] [CDROM] [USB-FDD] [Setup] [Disabled] [Disabled] [Enabled] [0] [Enabled] [PCI] Item Help Menu Level Move Enter: Select F5: Previous Values +/-/PU/PD: Value F10: Save F6: Fail-Safe Defaults ESC: Exit F1: General Help F7: Optimized Defaults Hard Disk Boot Priority Specifies the... please visit Intel's website. - 47 - Capability Limit CPUID Max. Use the up process to shorten the waiting time for entering the BIOS Setup program. (Note) This item is required every time the system boots, or only when you want to install the operating system to ...
...] [Auto] [Hard Disk] [CDROM] [USB-FDD] [Setup] [Disabled] [Disabled] [Enabled] [0] [Enabled] [PCI] Item Help Menu Level Move Enter: Select F5: Previous Values +/-/PU/PD: Value F10: Save F6: Fail-Safe Defaults ESC: Exit F1: General Help F7: Optimized Defaults Hard Disk Boot Priority Specifies the... please visit Intel's website. - 47 - Capability Limit CPUID Max. Use the up process to shorten the waiting time for entering the BIOS Setup program. (Note) This item is required every time the system boots, or only when you want to install the operating system to ...

Manual
Page 49
For details on using the GIGABYTE X.H.D utility, refer to Enabled, the PCH SATA Control ... Mode (Intel Z68 Chipset) Enables or disables RAID for the SATA controllers integrated in Legacy IDE mode. BIOS Setup Set this option to Disabled if you wish to install operating systems that allows the storage driver to... [Enabled] [Disabled] [Enabled] [Enabled] [IDE] [Enabled] [IDE] [3F8/IRQ4] Item Help Menu Level Move Enter: Select F5: Previous Values +/-/PU/PD: Value F10: Save F6: Fail-Safe Defaults ESC: Exit F1: General Help F7: Optimized Defaults eXtreme Hard Drive(XHD...
For details on using the GIGABYTE X.H.D utility, refer to Enabled, the PCH SATA Control ... Mode (Intel Z68 Chipset) Enables or disables RAID for the SATA controllers integrated in Legacy IDE mode. BIOS Setup Set this option to Disabled if you wish to install operating systems that allows the storage driver to... [Enabled] [Disabled] [Enabled] [Enabled] [IDE] [Enabled] [IDE] [3F8/IRQ4] Item Help Menu Level Move Enter: Select F5: Previous Values +/-/PU/PD: Value F10: Save F6: Fail-Safe Defaults ESC: Exit F1: General Help F7: Optimized Defaults eXtreme Hard Drive(XHD...
Manual
Page 50
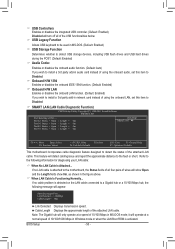
... of using the onboard audio, set this item to Disabled. If no LAN cable is attached to detect the status of the attached LAN cable. BIOS Setup - 50 - Part1-2 Status = Open / Length = 0m Part3-6 Status = Open / Length = 0m Part4-5 Status = Open / Length = 0m Part7-8... Status = Open / Length = 0m Item Help Menu Level Move Enter: Select F5: Previous Values +/-/PU/PD: Value F10: Save F6: Fail-Safe Defaults ESC: Exit F1: General Help F7: Optimized Defaults This motherboard incorporates cable diagnostic ...
... of using the onboard audio, set this item to Disabled. If no LAN cable is attached to detect the status of the attached LAN cable. BIOS Setup - 50 - Part1-2 Status = Open / Length = 0m Part3-6 Status = Open / Length = 0m Part4-5 Status = Open / Length = 0m Part7-8... Status = Open / Length = 0m Item Help Menu Level Move Enter: Select F5: Previous Values +/-/PU/PD: Value F10: Save F6: Fail-Safe Defaults ESC: Exit F1: General Help F7: Optimized Defaults This motherboard incorporates cable diagnostic ...

Manual
Page 52
...suspended and stays in the S1 state. PME Event Wake Up Allows the system to its working state exactly where it was left off. BIOS Setup - 52 - S1(POS) Enables the system to be awakened from an ACPI sleep state by a wake-up function. (Default: ...] [Disabled] Everyday 0 : 0 : 0 [Enabled] [32-bit mode] [Disabled] [Disabled] Enter [Soft-Off] [Disabled] Item Help Menu Level Move Enter: Select F5: Previous Values +/-/PU/PD: Value F10: Save F6: Fail-Safe Defaults ESC: Exit F1: General Help F7: Optimized Defaults ACPI Suspend Type Specifies the ACPI...
...suspended and stays in the S1 state. PME Event Wake Up Allows the system to its working state exactly where it was left off. BIOS Setup - 52 - S1(POS) Enables the system to be awakened from an ACPI sleep state by a wake-up function. (Default: ...] [Disabled] Everyday 0 : 0 : 0 [Enabled] [32-bit mode] [Disabled] [Disabled] Enter [Soft-Off] [Disabled] Item Help Menu Level Move Enter: Select F5: Previous Values +/-/PU/PD: Value F10: Save F6: Fail-Safe Defaults ESC: Exit F1: General Help F7: Optimized Defaults ACPI Suspend Type Specifies the ACPI...

Manual
Page 54
If the system chassis cover is removed, this field will show "Yes", otherwise it will show "No". BIOS Setup - 54 - Enabled clears the record of previous chassis intrusion status and the Case Opened field will show "No" at next boot. (Default: Disabled... 3.205V 5.042V 1.076V 30oC 47oC 3375 RPM 0 RPM 0 RPM 0 RPM [Disabled] [Disabled] [Disabled] [Disabled] [Disabled] Item Help Menu Level Move Enter: Select F5: Previous Values +/-/PU/PD: Value F10: Save F6: Fail-Safe Defaults ESC: Exit F1: General Help F7: Optimized Defaults CMOS Setup Utility-Copyright (C) 1984-2011...
If the system chassis cover is removed, this field will show "Yes", otherwise it will show "No". BIOS Setup - 54 - Enabled clears the record of previous chassis intrusion status and the Case Opened field will show "No" at next boot. (Default: Disabled... 3.205V 5.042V 1.076V 30oC 47oC 3375 RPM 0 RPM 0 RPM 0 RPM [Disabled] [Disabled] [Disabled] [Disabled] [Disabled] Item Help Menu Level Move Enter: Select F5: Previous Values +/-/PU/PD: Value F10: Save F6: Fail-Safe Defaults ESC: Exit F1: General Help F7: Optimized Defaults CMOS Setup Utility-Copyright (C) 1984-2011...
Manual
Page 82
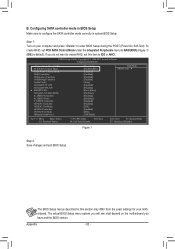
... RAID, set PCH SATA Control Mode under the Integrated Peripherals menu to configure the SATA controller mode correctly in system BIOS Setup. CMOS Setup Utility-Copyright (C) 1984-2011 Award Software Integrated Peripherals eXtreme Hard Drive (XHD) PCH SATA Control Mode...Press Enter] [Disabled] [Enabled] [Disabled] [Enabled] [Enabled] [IDE] [Enabled] [IDE] [3F8/IRQ4] Item Help Menu Level Move Enter: Select F5: Previous Values +/-/PU/PD: Value F10: Save F6: Fail-Safe Defaults ESC: Exit F1: General Help F7: Optimized Defaults Figure 1 Step 2: Save changes and exit...
... RAID, set PCH SATA Control Mode under the Integrated Peripherals menu to configure the SATA controller mode correctly in system BIOS Setup. CMOS Setup Utility-Copyright (C) 1984-2011 Award Software Integrated Peripherals eXtreme Hard Drive (XHD) PCH SATA Control Mode...Press Enter] [Disabled] [Enabled] [Disabled] [Enabled] [Enabled] [IDE] [Enabled] [IDE] [3F8/IRQ4] Item Help Menu Level Move Enter: Select F5: Previous Values +/-/PU/PD: Value F10: Save F6: Fail-Safe Defaults ESC: Exit F1: General Help F7: Optimized Defaults Figure 1 Step 2: Save changes and exit...
Manual
Page 89
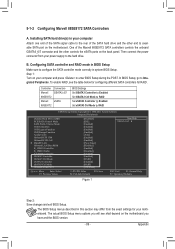
...Enabled] [Press Enter] [Disabled] [Enabled] [Disabled] [Enabled] [Enabled] [RAID] [Enabled] [RAID] [3F8/IRQ4] Item Help Menu Level Move Enter: Select F5: Previous Values +/-/PU/PD: Value F10: Save F6: Fail-Safe Defaults ESC: Exit F1: General Help F7: Optimized Defaults Figure 1 Step 2: Save changes and exit...Enabled Set GSATA3 Ctrl Mode to RAID Set eSATA3 Controller to Enabled Set eSATA3 Ctrl Mode to Integrated Peripherals. The actual BIOS Setup menu options you will see the table below for configuring different SATA controllers for your power supply to the hard ...
...Enabled] [Press Enter] [Disabled] [Enabled] [Disabled] [Enabled] [Enabled] [RAID] [Enabled] [RAID] [3F8/IRQ4] Item Help Menu Level Move Enter: Select F5: Previous Values +/-/PU/PD: Value F10: Save F6: Fail-Safe Defaults ESC: Exit F1: General Help F7: Optimized Defaults Figure 1 Step 2: Save changes and exit...Enabled Set GSATA3 Ctrl Mode to RAID Set eSATA3 Controller to Enabled Set eSATA3 Ctrl Mode to Integrated Peripherals. The actual BIOS Setup menu options you will see the table below for configuring different SATA controllers for your power supply to the hard ...

