Manual
Page 1
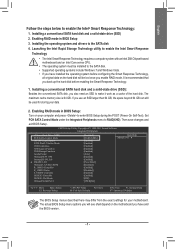
... Besides the conventional SATA disk, you back up the hard disk before configuring the Smart Response Technology, all original data on the motherboard you enable RAID mode. Enabling RAID mode in BIOS Setup 3. CMOS Setup Utility-Copyright (C) 1984-2011 Award Software Integrated Peripherals eXtreme Hard Drive...: General Help F7: Optimized Defaults The BIOS Setup menus described here may differ from the exact settings for storing your motherboard. Installing the operating system and drivers to RAID(XHD). If you use an SSD larger than 64 GB, the space beyond 64 GB can still be ...
... Besides the conventional SATA disk, you back up the hard disk before configuring the Smart Response Technology, all original data on the motherboard you enable RAID mode. Enabling RAID mode in BIOS Setup 3. CMOS Setup Utility-Copyright (C) 1984-2011 Award Software Integrated Peripherals eXtreme Hard Drive...: General Help F7: Optimized Defaults The BIOS Setup menus described here may differ from the exact settings for storing your motherboard. Installing the operating system and drivers to RAID(XHD). If you use an SSD larger than 64 GB, the space beyond 64 GB can still be ...
Manual
Page 2
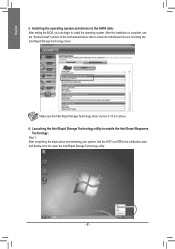
... the SATA disk: After setting the BIOS, you can begin to install all motherboard drivers, including the Intel Rapid Storage Technology driver. After the installation is 10.5 or above and restarting your system, find the IRST icon in the notification area and double... above . 4. Launching the Intel Rapid Storage Technology utility to open the Intel Rapid Storage Technology utility. - 2 - Make sure the Intel Rapid Storage Technology driver version is complete, use the "Xpress Install" function of the motherboard driver disk to install the operating system. English 3.
... the SATA disk: After setting the BIOS, you can begin to install all motherboard drivers, including the Intel Rapid Storage Technology driver. After the installation is 10.5 or above and restarting your system, find the IRST icon in the notification area and double... above . 4. Launching the Intel Rapid Storage Technology utility to open the Intel Rapid Storage Technology utility. - 2 - Make sure the Intel Rapid Storage Technology driver version is complete, use the "Xpress Install" function of the motherboard driver disk to install the operating system. English 3.
Manual
Page 3
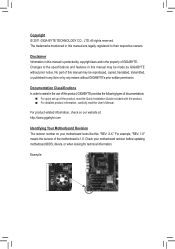
... CO., LTD. The trademarks mentioned in this product, GIGABYTE provides the following types of documentations: For quick set-up of GIGABYTE. For product-related information, check on our website at: http://www.gigabyte.com Identifying Your Motherboard Revision The revision number on your motherboard revision before updating motherboard BIOS, drivers, or when looking for technical information.
... CO., LTD. The trademarks mentioned in this product, GIGABYTE provides the following types of documentations: For quick set-up of GIGABYTE. For product-related information, check on our website at: http://www.gigabyte.com Identifying Your Motherboard Revision The revision number on your motherboard revision before updating motherboard BIOS, drivers, or when looking for technical information.
Manual
Page 6
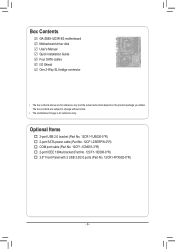
... port cable (Part No. 12CF1-1CM001-3*R) 2-port IEEE 1394a bracket (Part No. 12CF1-1IE008-0*R) 3.5" Front Panel with 2 USB 3.0/2.0 ports (Part No. 12CR1-FPX582-0*R) - 6 - Box Contents GA-Z68X-UD3R-B3 motherboard Motherboard driver disk User's Manual Quick Installation Guide Four SATA cables I/O Shield One 2-Way SLI bridge connector • The box contents above are subject to change without...
... port cable (Part No. 12CF1-1CM001-3*R) 2-port IEEE 1394a bracket (Part No. 12CF1-1IE008-0*R) 3.5" Front Panel with 2 USB 3.0/2.0 ports (Part No. 12CR1-FPX582-0*R) - 6 - Box Contents GA-Z68X-UD3R-B3 motherboard Motherboard driver disk User's Manual Quick Installation Guide Four SATA cables I/O Shield One 2-Way SLI bridge connector • The box contents above are subject to change without...

Manual
Page 18
... and then pull the card straight up from the slot. If necessary, go to BIOS Setup to install an expansion card: • Make sure the motherboard supports the expansion card. PCI Express x1 Slot PCI Express x16 Slot PCI Slot Follow the steps below to prevent hardware damage. Make sure the.... Remove the metal slot cover from the power outlet before you begin to make any required BIOS changes for your expansion card(s). 777 Install the driver provided with a screw. 555 After installing all expansion cards, replace the chassis cover(s). 666 Turn on your card.
... and then pull the card straight up from the slot. If necessary, go to BIOS Setup to install an expansion card: • Make sure the motherboard supports the expansion card. PCI Express x1 Slot PCI Express x16 Slot PCI Slot Follow the steps below to prevent hardware damage. Make sure the.... Remove the metal slot cover from the power outlet before you begin to make any required BIOS changes for your expansion card(s). 777 Install the driver provided with a screw. 555 After installing all expansion cards, replace the chassis cover(s). 666 Turn on your card.
Manual
Page 19
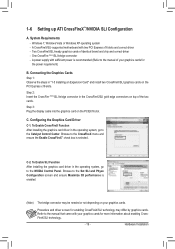
... bridge connector in the operating system, go to the manual that came with two PCI Express x16 slots and correct driver - Procedure and driver screen for enabling CrossFireX/SLI technology may be needed or not depending on top of the two cards. Connecting the Graphics... SLI Configuration A. Windows 7, Windows Vista or Windows XP operating system - A CrossFireX/SLI-supported motherboard with your graphics cards. To Enable SLI Function After installing the graphics card driver in "1-5 Installing an Expansion Card" and install two CrossFireX/SLI graphics cards on the PCIEX16 slot...
... bridge connector in the operating system, go to the manual that came with two PCI Express x16 slots and correct driver - Procedure and driver screen for enabling CrossFireX/SLI technology may be needed or not depending on top of the two cards. Connecting the Graphics... SLI Configuration A. Windows 7, Windows Vista or Windows XP operating system - A CrossFireX/SLI-supported motherboard with your graphics cards. To Enable SLI Function After installing the graphics card driver in "1-5 Installing an Expansion Card" and install two CrossFireX/SLI graphics cards on the PCIEX16 slot...
Manual
Page 34
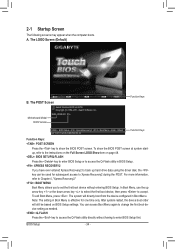
... Award Modular BIOS v6.00PG Copyright (C) 1984-2011, Award Software, Inc. In Boot Menu, use the up hard drive data using the driver disk, the key can access Boot Menu again to change the first boot device setting as needed. : Q-FLASH Press the key to access...directly without entering BIOS Setup. To exit Boot Menu, press . The system will still be used for one time only. BIOS Setup - 34 - A. Motherboard Model BIOS Version Z68X-UD3R-B3 F1a . . . . : BIOS Setup : XpressRecovery2 : Boot Menu : Qflash 04/13/2011-Z68-7A89WG05C-00 Function Keys Function Keys Function Keys: :...
... Award Modular BIOS v6.00PG Copyright (C) 1984-2011, Award Software, Inc. In Boot Menu, use the up hard drive data using the driver disk, the key can access Boot Menu again to change the first boot device setting as needed. : Q-FLASH Press the key to access...directly without entering BIOS Setup. To exit Boot Menu, press . The system will still be used for one time only. BIOS Setup - 34 - A. Motherboard Model BIOS Version Z68X-UD3R-B3 F1a . . . . : BIOS Setup : XpressRecovery2 : Boot Menu : Qflash 04/13/2011-Z68-7A89WG05C-00 Function Keys Function Keys Function Keys: :...
Manual
Page 59
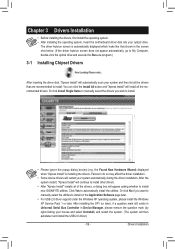
... box will appear asking whether to do so may affect the driver installation. • Some device drivers will restart your system and then list all the recommended drivers. Failure to install new GIGABYTE utilities. Click Yes to install. After installing the SP1 (or later...remove the question mark (by right-clicking your optical drive. Chapter 3 Drivers Installation • Before installing the drivers, first install the operating system. • After installing the operating system, insert the motherboard driver disk into your mouse and select Uninstall) and restart the system. ...
... box will appear asking whether to do so may affect the driver installation. • Some device drivers will restart your system and then list all the recommended drivers. Failure to install new GIGABYTE utilities. Click Yes to install. After installing the SP1 (or later...remove the question mark (by right-clicking your optical drive. Chapter 3 Drivers Installation • Before installing the drivers, first install the operating system. • After installing the operating system, insert the motherboard driver disk into your mouse and select Uninstall) and restart the system. ...
Manual
Page 60
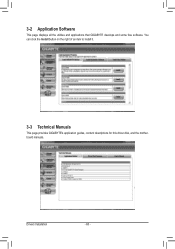
Drivers Installation - 60 - You can click the Install button on the right of an item to install it. 3-3 Technical Manuals This page provides GIGABYTE's application guides, content descriptions for this driver disk, and the motherboard manuals. 3-2 Application Software This page displays all the utilities and applications that GIGABYTE develops and some free software.
Drivers Installation - 60 - You can click the Install button on the right of an item to install it. 3-3 Technical Manuals This page provides GIGABYTE's application guides, content descriptions for this driver disk, and the motherboard manuals. 3-2 Application Software This page displays all the utilities and applications that GIGABYTE develops and some free software.
Manual
Page 64
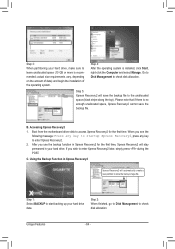
... if there is installed, click Start, right-click the Computer and select Manage. Step 1: Select BACKUP to store the backup image file. Boot from the motherboard driver disk to check disk allocation. Step 2: When finished, go to Disk Management to access Xpress Recovery2 for the first time, Xpress Recovery2 will save the...
... if there is installed, click Start, right-click the Computer and select Manage. Step 1: Select BACKUP to store the backup image file. Boot from the motherboard driver disk to check disk allocation. Step 2: When finished, go to Disk Management to access Xpress Recovery2 for the first time, Xpress Recovery2 will save the...
Manual
Page 73
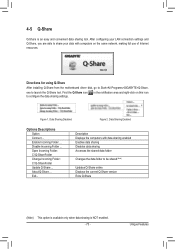
... data sharing enabled Enables data sharing Disables data sharing Accesses the shared data folder Changes the data folder to Start>All Programs>GIGABYTE>Q-Share. in the notification area and right-click on the same network, making full use of Internet resources. About Q-Share...computers on this icon Figure 1. 4-5 Q-Share Q-Share is NOT enabled. - 73 - Directions for using Q-Share After installing Q-Share from the motherboard driver disk, go to be shared (Note) Updates Q-Share online Displays the current Q-Share version Exits Q-Share (Note) This option is available only ...
... data sharing enabled Enables data sharing Disables data sharing Accesses the shared data folder Changes the data folder to Start>All Programs>GIGABYTE>Q-Share. in the notification area and right-click on the same network, making full use of Internet resources. About Q-Share...computers on this icon Figure 1. 4-5 Q-Share Q-Share is NOT enabled. - 73 - Directions for using Q-Share After installing Q-Share from the motherboard driver disk, go to be shared (Note) Updates Q-Share online Displays the current Q-Share version Exits Q-Share (Note) This option is available only ...
Manual
Page 79
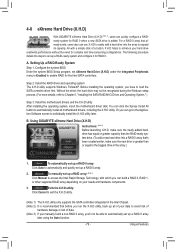
... helps to enable RAID for RAID 0. You can click the Xpress Install All button to set up all motherboard drivers, including the X.H.D utility. Using GIGABYTE eXtreme Hard Drive (X.H.D) Instructions: (Note 2) Before launching X.H.D, make sure the newly added harddrive has equal or... 0 array: Click Auto to Chapter 5, "Installing the SATA RAID/AHCI Driver and Operating System." ) Step 3: Install the motherboard drivers and the X.H.D utiltiy After installing the operating system, insert the motherboard driver disk. A. Setting Up a RAID-Ready System Step 1: Configure the system...
... helps to enable RAID for RAID 0. You can click the Xpress Install All button to set up all motherboard drivers, including the X.H.D utility. Using GIGABYTE eXtreme Hard Drive (X.H.D) Instructions: (Note 2) Before launching X.H.D, make sure the newly added harddrive has equal or... 0 array: Click Auto to Chapter 5, "Installing the SATA RAID/AHCI Driver and Operating System." ) Step 3: Install the motherboard drivers and the X.H.D utiltiy After installing the operating system, insert the motherboard driver disk. A. Setting Up a RAID-Ready System Step 1: Configure the system...
Manual
Page 81
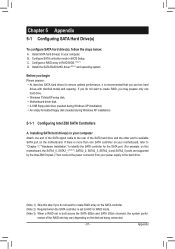
Install the SATA RAID/AHCI driver (Note 2) and operating system. Installing SATA hard drive(s) in your power supply to the hard drive. (Note 1) Skip this motherboard, the SATA3_0, SATA3_1 (Note 3), SATA2_2, SATA2_3, SATA2_4 and SATA2_5 ports are supported by the Intel Z68 Chipset.)... two SATA hard drives (to ensure optimal performance, it is more than one hard drive. • Windows 7/Vista/XP setup disk. • Motherboard driver disk. • A USB floppy disk drive (needed during Windows XP installation) • An empty formatted floppy disk (needed during Windows XP installation...
Install the SATA RAID/AHCI driver (Note 2) and operating system. Installing SATA hard drive(s) in your power supply to the hard drive. (Note 1) Skip this motherboard, the SATA3_0, SATA3_1 (Note 3), SATA2_2, SATA2_3, SATA2_4 and SATA2_5 ports are supported by the Intel Z68 Chipset.)... two SATA hard drives (to ensure optimal performance, it is more than one hard drive. • Windows 7/Vista/XP setup disk. • Motherboard driver disk. • A USB floppy disk drive (needed during Windows XP installation) • An empty formatted floppy disk (needed during Windows XP installation...
Manual
Page 94
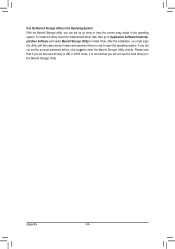
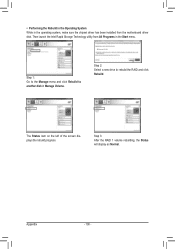
... or AHCI mode, it is normal that you will not see the hard drive(s) in the Marvell Storage Utility. To install the utility, insert the motherboard driver disk, then go to Application Software\Install Application Software and select Marvell Storage Utility to install. Note: After the installation, you must login the utility...
... or AHCI mode, it is normal that you will not see the hard drive(s) in the Marvell Storage Utility. To install the utility, insert the motherboard driver disk, then go to Application Software\Install Application Software and select Marvell Storage Utility to install. Note: After the installation, you must login the utility...
Manual
Page 95
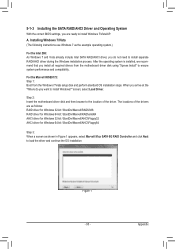
...you want to install Windows?" Step 2: Insert the motherboard driver disk and then browse to the location of the drivers are ready to install Windows 7/Vista/XP. For the Marvell 88SE9172: Step 1: Boot from the motherboard driver disk using "Xpress Install" to ensure system performance... and compatibility. screen, select Load Driver. Appendix A. When you arrive at the "Where do not need to install separate RAID/AHCI driver during the Windows installation process. 5-1-3 ...
...you want to install Windows?" Step 2: Insert the motherboard driver disk and then browse to the location of the drivers are ready to install Windows 7/Vista/XP. For the Marvell 88SE9172: Step 1: Boot from the motherboard driver disk using "Xpress Install" to ensure system performance... and compatibility. screen, select Load Driver. Appendix A. When you arrive at the "Where do not need to install separate RAID/AHCI driver during the Windows installation process. 5-1-3 ...
Manual
Page 96
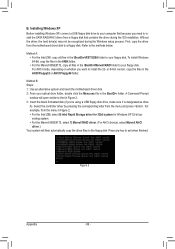
...during the OS installation. Method B: Steps: 1: Use an alternative system and insert the motherboard driver disk. 2: From your computer first because you need to install the SATA RAID/AHCI driver from the motherboard driver disk to the methods below. For example, from the menu and press . Figure ...2 Appendix - 96 - Select the controller driver by pressing the corresponding letter from the menu in Figure 2. ...
...during the OS installation. Method B: Steps: 1: Use an alternative system and insert the motherboard driver disk. 2: From your computer first because you need to install the SATA RAID/AHCI driver from the motherboard driver disk to the methods below. For example, from the menu and press . Figure ...2 Appendix - 96 - Select the controller driver by pressing the corresponding letter from the menu in Figure 2. ...
Manual
Page 100
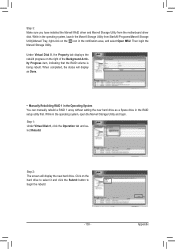
• Performing the Rebuild in the Operating System While in the Start menu. Appendix - 100 - Then launch the Intel Rapid Storage Technology utility from All Programs in the operating system, make sure the chipset driver has been installed from the motherboard driver disk. The Status item on the left of the screen displays the rebuild progress. Step 1: Go to the Manage menu and click Rebuild to rebuild the RAID and click Rebuild. Step 2: Select a new drive to another disk in Manage Volume. Step 3: After the RAID 1 volume rebuilding, the Status will display as Normal.
• Performing the Rebuild in the Operating System While in the Start menu. Appendix - 100 - Then launch the Intel Rapid Storage Technology utility from All Programs in the operating system, make sure the chipset driver has been installed from the motherboard driver disk. The Status item on the left of the screen displays the rebuild progress. Step 1: Go to the Manage menu and click Rebuild to rebuild the RAID and click Rebuild. Step 2: Select a new drive to another disk in Manage Volume. Step 3: After the RAID 1 volume rebuilding, the Status will display as Normal.
Manual
Page 103
...Activity Progress item, indicating that the RAID volume is being rebuilt. While in the operating system, launch the Marvell Storage Utility from the motherboard driver disk. When completed, the status will display the new hard drive. Step 1: Under Virtual Disk 0, click the Operation tab and select ... the Marvell Storage Utility. While in the RAID setup utility first. Appendix Step 3: Make sure you have installed the Marvell RAID driver and Marvell Storage Utility from Start\All Programs\Marvell Storage Utility\Marvell Tray, right-click on the icon in the notification area, ...
...Activity Progress item, indicating that the RAID volume is being rebuilt. While in the operating system, launch the Marvell Storage Utility from the motherboard driver disk. When completed, the status will display the new hard drive. Step 1: Under Virtual Disk 0, click the Operation tab and select ... the Marvell Storage Utility. While in the RAID setup utility first. Appendix Step 3: Make sure you have installed the Marvell RAID driver and Marvell Storage Utility from Start\All Programs\Marvell Storage Utility\Marvell Tray, right-click on the icon in the notification area, ...
Manual
Page 104
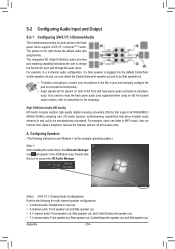
...audio module), refer to the following instructions use Windows 7 as the example operating system.) Step 1: After installing the audio driver, the HD Audio Manager icon will be simultaneously processed. HD Audio features multistreaming capabilities that allow multiple audio streams (in a...instructions on the back panel which support 2/4/5.1/7.1-channel (Note) audio. 5-2 Configuring Audio Input and Output 5-2-1 Configuring 2/4/5.1/7.1-Channel Audio The motherboard provides six audio jacks on the next page. For example, in and out) to the right shows the default audio jack assignments...
...audio module), refer to the following instructions use Windows 7 as the example operating system.) Step 1: After installing the audio driver, the HD Audio Manager icon will be simultaneously processed. HD Audio features multistreaming capabilities that allow multiple audio streams (in a...instructions on the back panel which support 2/4/5.1/7.1-channel (Note) audio. 5-2 Configuring Audio Input and Output 5-2-1 Configuring 2/4/5.1/7.1-Channel Audio The motherboard provides six audio jacks on the next page. For example, in and out) to the right shows the default audio jack assignments...
Manual
Page 111
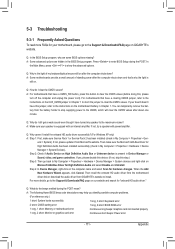
.../amplifier. Then install the onboard HD audio driver from the motherboard driver disk or download the audio driver from GIGABYTE's website to My Computer > Properties > Hardware > Device Manager > System devices and right-click on the motherboard battery in Device Manager or Sound, video,... 1 long, 3 short: Keyboard error 2 short: CMOS setting error 1 long, 9 short: BIOS ROM error 1 long, 1 short: Memory or motherboard error Continuous long beeps: Graphics card not inserted properly 1 long, 2 short: Monitor or graphics card error Continuous short beeps: Power error - 111 -...
.../amplifier. Then install the onboard HD audio driver from the motherboard driver disk or download the audio driver from GIGABYTE's website to My Computer > Properties > Hardware > Device Manager > System devices and right-click on the motherboard battery in Device Manager or Sound, video,... 1 long, 3 short: Keyboard error 2 short: CMOS setting error 1 long, 9 short: BIOS ROM error 1 long, 1 short: Memory or motherboard error Continuous long beeps: Graphics card not inserted properly 1 long, 2 short: Monitor or graphics card error Continuous short beeps: Power error - 111 -...


