
Manual
Page 1
... button, X.H.D helps to automatically install all motherboard drivers, including the X.H.D utility. A. Setting Up a RAID-Ready System Step 1: Configure the system BIOS Enter the system BIOS Setup program, set up a RAID 0 array. 2. Using GIGABYTE eXtreme Hard Drive (X.H.D) Instructions:(Note 2) Before launching...Or you have to individually install the X.H.D utility later. eXtreme Hard Drive (X.H.D) With GIGABYTE eXtreme Hard Drive (X.H.D)(Note 1), users can quickly configure a RAIDready system for RAID 0 when a new SATA drive is recommended that 's been created earlier, make sure ...
... button, X.H.D helps to automatically install all motherboard drivers, including the X.H.D utility. A. Setting Up a RAID-Ready System Step 1: Configure the system BIOS Enter the system BIOS Setup program, set up a RAID 0 array. 2. Using GIGABYTE eXtreme Hard Drive (X.H.D) Instructions:(Note 2) Before launching...Or you have to individually install the X.H.D utility later. eXtreme Hard Drive (X.H.D) With GIGABYTE eXtreme Hard Drive (X.H.D)(Note 1), users can quickly configure a RAIDready system for RAID 0 when a new SATA drive is recommended that 's been created earlier, make sure ...
Manual
Page 5
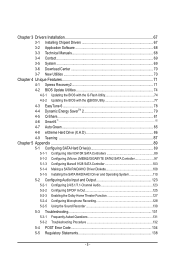
... 67 3-1 Installing Chipset Drivers 67 3-2 Application Software 68 3-3 Technical Manuals 68 3-4 Contact...69 3-5 System...69 3-6 Download Center 70 3-7 New Utilities...70 Chapter 4 ... Hard Drive(s 89 5-1-1 Configuring Intel ICH10R SATA Controllers 89 5-1-2 Configuring JMicron JMB362/GIGABYTE SATA2 SATA Controller 97 5-1-3 Configuring Marvell 9128 SATA Controller 103 5-1-4 Making a SATA RAID/AHCI Driver Diskette 108 5-1-5 Installing the SATA RAID/AHCI Driver and Operating System 110 5-2 Configuring Audio Input and Output 123 5-2-1 Configuring 2/4/5.1/7.1-Channel Audio...
... 67 3-1 Installing Chipset Drivers 67 3-2 Application Software 68 3-3 Technical Manuals 68 3-4 Contact...69 3-5 System...69 3-6 Download Center 70 3-7 New Utilities...70 Chapter 4 ... Hard Drive(s 89 5-1-1 Configuring Intel ICH10R SATA Controllers 89 5-1-2 Configuring JMicron JMB362/GIGABYTE SATA2 SATA Controller 97 5-1-3 Configuring Marvell 9128 SATA Controller 103 5-1-4 Making a SATA RAID/AHCI Driver Diskette 108 5-1-5 Installing the SATA RAID/AHCI Driver and Operating System 110 5-2 Configuring Audio Input and Output 123 5-2-1 Configuring 2/4/5.1/7.1-Channel Audio...
Manual
Page 56
... of using the onboard LAN, set this option to Disabled if you wish to install operating systems that allows the storage driver to operate in Native IDE mode. RAID(XHD) Enables RAID for the SATA controllers. SATA Port0-3 Native Mode (Intel ICH10R South Bridge) Specifies the operating mode of the USB functionalities below...
... of using the onboard LAN, set this option to Disabled if you wish to install operating systems that allows the storage driver to operate in Native IDE mode. RAID(XHD) Enables RAID for the SATA controllers. SATA Port0-3 Native Mode (Intel ICH10R South Bridge) Specifies the operating mode of the USB functionalities below...
Manual
Page 58
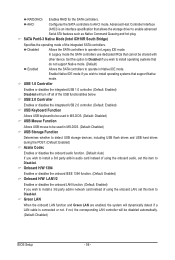
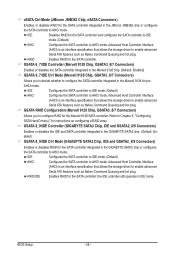
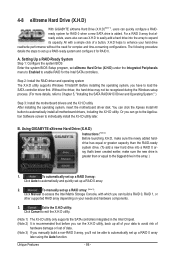
...Command Queuing and hot plug. Advanced Host Controller Interface (AHCI) is an interface specification that allows the storage driver to AHCI mode. GSATA RAID Configuration (Marvell 9128 Chip, GSATA3_6/7 Connectors) Allows you to decide whether to configure the SATA controller integrated in... Serial ATA features such as Native Command Queuing and hot plug. IDE Disables RAID for instructions on configuring a RAID array. RAID Enables RAID for the SATA controller; GSATA 8_9/IDE Controller (GIGABYTE SATA2 Chip, IDE and GSATA2_8/9 Connectors) Enables or disables the IDE and ...
...Command Queuing and hot plug. Advanced Host Controller Interface (AHCI) is an interface specification that allows the storage driver to AHCI mode. GSATA RAID Configuration (Marvell 9128 Chip, GSATA3_6/7 Connectors) Allows you to decide whether to configure the SATA controller integrated in... Serial ATA features such as Native Command Queuing and hot plug. IDE Disables RAID for instructions on configuring a RAID array. RAID Enables RAID for the SATA controller; GSATA 8_9/IDE Controller (GIGABYTE SATA2 Chip, IDE and GSATA2_8/9 Connectors) Enables or disables the IDE and ...
Manual
Page 71
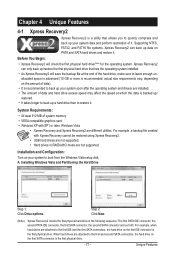
...drives are attached to the first IDE and the first SATA connectors, the hard drive on your system soon after the operating system and drivers are not supported. For example, a backup file created with SP1 or later, Windows Vista • Xpress Recovery and Xpress Recovery2 are ...different utilities. Step 2: Click New. (Note) Xpress Recovery2 checks the first physical hard drive in RAID/AHCI mode are installed. • The amount of it . Unique Features actual size requirements vary, depending on the amount of data). •...
...drives are attached to the first IDE and the first SATA connectors, the hard drive on your system soon after the operating system and drivers are not supported. For example, a backup file created with SP1 or later, Windows Vista • Xpress Recovery and Xpress Recovery2 are ...different utilities. Step 2: Click New. (Note) Xpress Recovery2 checks the first physical hard drive in RAID/AHCI mode are installed. • The amount of it . Unique Features actual size requirements vary, depending on the amount of data). •...
Manual
Page 86
... Matrix Storage Console, with a simple click of a button, X.H.D helps to load the SATA controller driver first. Step 2: Install the RAID driver and operating system The X.H.D utility supports Windows 7/Vista/XP. Unique Features - 86 - To manually set up a RAID 0 array. 2. Using GIGABYTE eXtreme Hard Drive (X.H.D) Instructions:(Note 2) Before launching X.H.D, make sure the new drive is added...
... Matrix Storage Console, with a simple click of a button, X.H.D helps to load the SATA controller driver first. Step 2: Install the RAID driver and operating system The X.H.D utility supports Windows 7/Vista/XP. Unique Features - 86 - To manually set up a RAID 0 array. 2. Using GIGABYTE eXtreme Hard Drive (X.H.D) Instructions:(Note 2) Before launching X.H.D, make sure the new drive is added...
Manual
Page 89
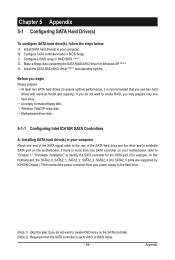
...Windows XP. (Note 2) E. Install SATA hard drive(s) in BIOS Setup. Install the SATA RAID/AHCI driver (Note 2) and operating system. If you do not want to create RAID array on the motherboard. If there is more than one SATA controller on your power supply to...; An empty formatted floppy disk. • Windows Vista/XP setup disk. • Motherboard driver disk. 5-1-1 Configuring Intel ICH10R SATA Controllers A. Configure a RAID array in your computer. Installing SATA hard drive(s) in RAID BIOS. (Note 1) D. Appendix Before you begin Please prepare: • At least two SATA...
...Windows XP. (Note 2) E. Install SATA hard drive(s) in BIOS Setup. Install the SATA RAID/AHCI driver (Note 2) and operating system. If you do not want to create RAID array on the motherboard. If there is more than one SATA controller on your power supply to...; An empty formatted floppy disk. • Windows Vista/XP setup disk. • Motherboard driver disk. 5-1-1 Configuring Intel ICH10R SATA Controllers A. Configure a RAID array in your computer. Installing SATA hard drive(s) in RAID BIOS. (Note 1) D. Appendix Before you begin Please prepare: • At least two SATA...
Manual
Page 93
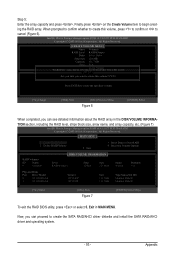
...(0) Member Disk(0) [hi]-Select [ESC]-Exit Figure 7 [ENTER]-Select Menu To exit the RAID BIOS utility, press or select 5. Finally press on the Create Volume item to create the SATA RAID/AHCI driver diskette and install the SATA RAID/AHCI driver and operating system. - 93 - Intel(R) Matrix Storage Manager option ROM v8.9.0.1023 PCH-D wRAID5...
...(0) Member Disk(0) [hi]-Select [ESC]-Exit Figure 7 [ENTER]-Select Menu To exit the RAID BIOS utility, press or select 5. Finally press on the Create Volume item to create the SATA RAID/AHCI driver diskette and install the SATA RAID/AHCI driver and operating system. - 93 - Intel(R) Matrix Storage Manager option ROM v8.9.0.1023 PCH-D wRAID5...
Manual
Page 102
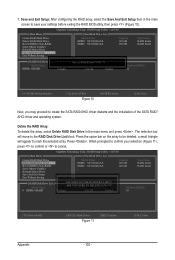
...RAID/ AHCI driver and operating system. When prompted to confirm your settings before exiting the RAID BIOS utility, then press (Figure 10). [ Main Menu ] Create RAID Disk Drive Delete RAID Disk Drive Revert HDD to Non-RAID Solve Mirror Conflict Rebuild Mirror Drive Save And Exit Setup Exit Without Saving Gigabyte Technology Corp. RAID... ST3120026AS Capacity 120 GB 120 GB Type/Status RAID Inside RAID Inside [ RAID Disk Drive List ] Save to Non-RAID Solve Mirror Conflict Rebuild Mirror Drive Save And Exit Setup Exit Without Saving Gigabyte Technology Corp. ARE YOU SURE TO DELETE (Y/N)...
...RAID/ AHCI driver and operating system. When prompted to confirm your settings before exiting the RAID BIOS utility, then press (Figure 10). [ Main Menu ] Create RAID Disk Drive Delete RAID Disk Drive Revert HDD to Non-RAID Solve Mirror Conflict Rebuild Mirror Drive Save And Exit Setup Exit Without Saving Gigabyte Technology Corp. RAID... ST3120026AS Capacity 120 GB 120 GB Type/Status RAID Inside RAID Inside [ RAID Disk Drive List ] Save to Non-RAID Solve Mirror Conflict Rebuild Mirror Drive Save And Exit Setup Exit Without Saving Gigabyte Technology Corp. ARE YOU SURE TO DELETE (Y/N)...
Manual
Page 103
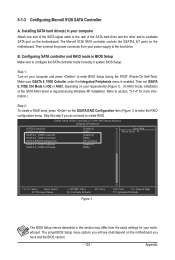
.../7 ports on the motherboard you do not want to the hard drive. Configuring SATA controller and RAID mode in your computer and press to the rear of the SATA AHCI driver is enabled. Skip this section may differ from your requirements (Figure 1). (In AHCI mode,... CMOS Setup Utility-Copyright (C) 1984-2009 Award Software Integrated Peripherals eSATA Controller eSATA Ctrl Mode GSATA 6_7/IDE Controller GSATA 6_7/IDE Ctrl Mode GSATA RAID Configuration GSATA 8_9/IDE Controller GSATA 8_9/IDE Ctrl Mode [Enabled] [IDE] [Enabled] [IDE] [Press Enter] [Enabled] [IDE] Item Help...
.../7 ports on the motherboard you do not want to the hard drive. Configuring SATA controller and RAID mode in your computer and press to the rear of the SATA AHCI driver is enabled. Skip this section may differ from your requirements (Figure 1). (In AHCI mode,... CMOS Setup Utility-Copyright (C) 1984-2009 Award Software Integrated Peripherals eSATA Controller eSATA Ctrl Mode GSATA 6_7/IDE Controller GSATA 6_7/IDE Ctrl Mode GSATA RAID Configuration GSATA 8_9/IDE Controller GSATA 8_9/IDE Ctrl Mode [Enabled] [IDE] [Enabled] [IDE] [Press Enter] [Enabled] [IDE] Item Help...

Manual
Page 107
...F10: Exit/Save ESC: Return Figure 8 Use the Marvell RAID Utility in the Operating System: With the Marvell RAID utility, you may proceed to create the SATA driver diskette (for AHCI mode) and the installation of the SATA driver and operating system. Note: After the installation, you must... BIOS Setup (c) 2009 Marvell Technology Group Ltd. Appendix To install the utility, insert the motherboard driver disk, then go to Application Software\Install GIGABYTE Utilities and select Marvell Raid Utility to display the Delete option. Now, you can set the account password before, click Login...
...F10: Exit/Save ESC: Return Figure 8 Use the Marvell RAID Utility in the Operating System: With the Marvell RAID utility, you may proceed to create the SATA driver diskette (for AHCI mode) and the installation of the SATA driver and operating system. Note: After the installation, you must... BIOS Setup (c) 2009 Marvell Technology Group Ltd. Appendix To install the utility, insert the motherboard driver disk, then go to Application Software\Install GIGABYTE Utilities and select Marvell Raid Utility to display the Delete option. Now, you can set the account password before, click Login...
Manual
Page 108
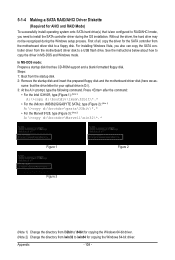
...copy the SATA controller driver from the motherboard driver disk to install the SATA controller driver during the Windows setup process. Press after the command: • For the Intel ICH10R, type (Figure 1): (Note 1) A:\>copy d:\bootdrv\imsm\32bit\*.* • For the JMicron JMB362/GIGABYTE SATA2, type (... disk. 2: Remove the startup disk and insert the prepared floppy disk and the motherboard driver disk (here we as- 5-1-4 Making a SATA RAID/AHCI Driver Diskette (Required for AHCI and RAID Mode) To successfully install operating system onto SATA hard drive(s) that is D:\). 3: At...
...copy the SATA controller driver from the motherboard driver disk to install the SATA controller driver during the Windows setup process. Press after the command: • For the Intel ICH10R, type (Figure 1): (Note 1) A:\>copy d:\bootdrv\imsm\32bit\*.* • For the JMicron JMB362/GIGABYTE SATA2, type (... disk. 2: Remove the startup disk and insert the prepared floppy disk and the motherboard driver disk (here we as- 5-1-4 Making a SATA RAID/AHCI Driver Diskette (Required for AHCI and RAID Mode) To successfully install operating system onto SATA hard drive(s) that is D:\). 3: At...
Manual
Page 110
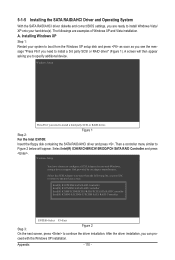
... and press . Windows Setup You have chosen to install a 3rd party SCSI or RAID driver" (Figure 1). Intel(R) ICH7R/DH SATA RAID Controller Intel(R) ICH7MDH SATA RAID Controller Intel(R) ICH8R/ICH9R/ICH10R/DO/PCH SATA RAID Controller Intel(R) ICH8M-E/ICH9M-E/PCHM SATA RAID Controller ENTER=Select F3=Exit Step 3: Figure 2 On the next screen, press to specify...
... and press . Windows Setup You have chosen to install a 3rd party SCSI or RAID driver" (Figure 1). Intel(R) ICH7R/DH SATA RAID Controller Intel(R) ICH7MDH SATA RAID Controller Intel(R) ICH8R/ICH9R/ICH10R/DO/PCH SATA RAID Controller Intel(R) ICH8M-E/ICH9M-E/PCHM SATA RAID Controller ENTER=Select F3=Exit Step 3: Figure 2 On the next screen, press to specify...
Manual
Page 111
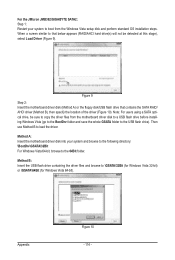
... Marvell 9128: Insert the floppy disk containing the SATA AHCI driver and press . RAID/AHCI Driver for GIGABYTE GBB36X Controller (x32) and press . Then select Marvell 91xx SATA Controller 32bit Driver and press . For the JMicron JMB362/GIGABYTE SATA2: Insert the floppy disk containing the SATA RAID/AHCI driver and press . First select Marvell shared library (install first...
... Marvell 9128: Insert the floppy disk containing the SATA AHCI driver and press . RAID/AHCI Driver for GIGABYTE GBB36X Controller (x32) and press . Then select Marvell 91xx SATA Controller 32bit Driver and press . For the JMicron JMB362/GIGABYTE SATA2: Insert the floppy disk containing the SATA RAID/AHCI driver and press . First select Marvell shared library (install first...
Manual
Page 112
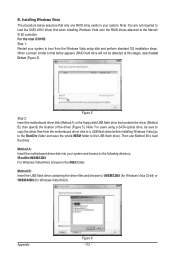
...: For users using a SATA optical drive, be detected at this stage), select Load Driver (Figure 5). Figure 5 Step 2: Insert the motherboard driver disk (Method A) or the floppy disk/USB flash drive that only one RAID array exists in your system to the Marvell 9128 controller. Note: You are not required... to load the SATA AHCI driver first when installing Windows Vista onto the RAID drives attached to boot from the motherboard driver disk to a USB flash drive before installing Windows Vista (go to the BootDrv folder and save...
...: For users using a SATA optical drive, be detected at this stage), select Load Driver (Figure 5). Figure 5 Step 2: Insert the motherboard driver disk (Method A) or the floppy disk/USB flash drive that only one RAID array exists in your system to the Marvell 9128 controller. Note: You are not required... to load the SATA AHCI driver first when installing Windows Vista onto the RAID drives attached to boot from the motherboard driver disk to a USB flash drive before installing Windows Vista (go to the BootDrv folder and save...
Manual
Page 113
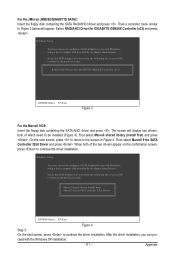
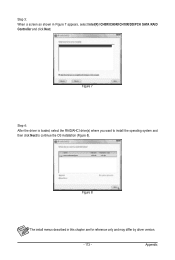
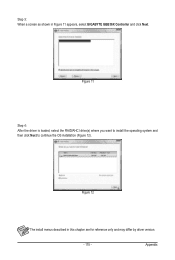
Figure 8 The install menus described in Figure 7 appears, select Intel(R) ICH8R/ICH9R/ICH10R/DO/PCH SATA RAID Controller and click Next. Step 3: When a screen as shown in this chapter are for reference only and may differ by driver version. - 113 - Figure 7 Step 4: After the driver is loaded, select the RAID/AHCI drive(s) where you want to install the operating system and then click Next to continue the OS installation (Figure 8). Appendix
Figure 8 The install menus described in Figure 7 appears, select Intel(R) ICH8R/ICH9R/ICH10R/DO/PCH SATA RAID Controller and click Next. Step 3: When a screen as shown in this chapter are for reference only and may differ by driver version. - 113 - Figure 7 Step 4: After the driver is loaded, select the RAID/AHCI drive(s) where you want to install the operating system and then click Next to continue the OS installation (Figure 8). Appendix
Manual
Page 114
... folder to the USB flash drive). Figure 9 Step 2: Insert the motherboard driver disk (Method A) or the floppy disk/USB flash drive that below appears (RAID/AHCI hard drive(s) will not be sure to copy the driver files from the Windows Vista setup disk and perform standard OS installation steps. ...Then use Method B to \GSATA\32Bit (for Windows Vista 32-bit) or \GSATA\64Bit (for Windows Vista 64-bit). For the JMicron JMB362/GIGABYTE SATA2...
... folder to the USB flash drive). Figure 9 Step 2: Insert the motherboard driver disk (Method A) or the floppy disk/USB flash drive that below appears (RAID/AHCI hard drive(s) will not be sure to copy the driver files from the Windows Vista setup disk and perform standard OS installation steps. ...Then use Method B to \GSATA\32Bit (for Windows Vista 32-bit) or \GSATA\64Bit (for Windows Vista 64-bit). For the JMicron JMB362/GIGABYTE SATA2...
Manual
Page 115
Step 3: When a screen as shown in this chapter are for reference only and may differ by driver version. - 115 - Figure 12 The install menus described in Figure 11 appears, select GIGABYTE GBB36X Controller and click Next. Figure 11 Step 4: After the driver is loaded, select the RAID/AHCI drive(s) where you want to install the operating system and then click Next to continue the OS installation (Figure 12). Appendix
Step 3: When a screen as shown in this chapter are for reference only and may differ by driver version. - 115 - Figure 12 The install menus described in Figure 11 appears, select GIGABYTE GBB36X Controller and click Next. Figure 11 Step 4: After the driver is loaded, select the RAID/AHCI drive(s) where you want to install the operating system and then click Next to continue the OS installation (Figure 12). Appendix
Manual
Page 117
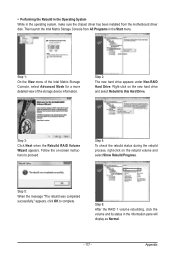
...the message "The rebuild was completed successfully," appears, click OK to this Hard Drive. Step 2: The new hard drive appears under Non-RAID Hard Drive. Right-click on the new hard drive and select Rebuild to complete. Appendix Then launch the Intel Matrix Storage Console from the... motherboard driver disk. Step 3: Click Next when the Rebuild RAID Volume Wizard appears. Step 6: After the RAID 1 volume rebuilding, click the volume and its status in the Start menu. Follow the on...
...the message "The rebuild was completed successfully," appears, click OK to this Hard Drive. Step 2: The new hard drive appears under Non-RAID Hard Drive. Right-click on the new hard drive and select Rebuild to complete. Appendix Then launch the Intel Matrix Storage Console from the... motherboard driver disk. Step 3: Click Next when the Rebuild RAID Volume Wizard appears. Step 6: After the RAID 1 volume rebuilding, click the volume and its status in the Start menu. Follow the on...
Manual
Page 120
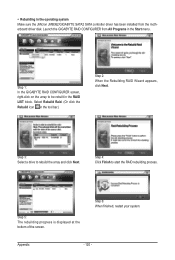
..., right-click on the array to be rebuilt in the operating system Make sure the JMicron JMB362/GIGABYTE SATA2 SATA controller driver has been installed from All Programs in the tool bar.) Step 2: When the Rebuilding RAID Wizard appears, click Next. Step 4: Click Finish to rebuild the array and click Next. Step 3: Select...
..., right-click on the array to be rebuilt in the operating system Make sure the JMicron JMB362/GIGABYTE SATA2 SATA controller driver has been installed from All Programs in the tool bar.) Step 2: When the Rebuilding RAID Wizard appears, click Next. Step 4: Click Finish to rebuild the array and click Next. Step 3: Select...


