Manual
Page 3
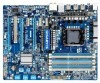
... and is 1.0. For product-related information, check on our website at: http://www.gigabyte.com Identifying Your Motherboard Revision The revision number on your motherboard revision before updating motherboard BIOS, drivers, or when looking for technical information. Example: All rights reserved. For detailed... without prior notice. No part of this manual may be reproduced, copied, translated, transmitted, or published in the use GIGABYTE's unique features, read or download the information on/from the Support&Downloads\Motherboard\Technology Guide page on how to their respective...
... and is 1.0. For product-related information, check on our website at: http://www.gigabyte.com Identifying Your Motherboard Revision The revision number on your motherboard revision before updating motherboard BIOS, drivers, or when looking for technical information. Example: All rights reserved. For detailed... without prior notice. No part of this manual may be reproduced, copied, translated, transmitted, or published in the use GIGABYTE's unique features, read or download the information on/from the Support&Downloads\Motherboard\Technology Guide page on how to their respective...
Manual
Page 5
... 3-3 Technical Manuals 60 3-4 Contact...61 3-5 System...61 3-6 Download Center 62 3-7 New Utilities...62 Chapter 4 Unique Features 63 4-1 Xpress Recovery2 63 4-2 BIOS Update Utilities 66 4-2-1 Updating the BIOS with the Q-Flash Utility 66 4-2-2 Updating the BIOS with the @BIOS Utility 69 4-3 EasyTune 6...70 4-4 Dynamic Energy Saver™ 2 71 4-5 Q-Share...73 4-6 Smart 6™ ...74 4-7 Auto Green...77 4-8 eXtreme Hard...
... 3-3 Technical Manuals 60 3-4 Contact...61 3-5 System...61 3-6 Download Center 62 3-7 New Utilities...62 Chapter 4 Unique Features 63 4-1 Xpress Recovery2 63 4-2 BIOS Update Utilities 66 4-2-1 Updating the BIOS with the Q-Flash Utility 66 4-2-2 Updating the BIOS with the @BIOS Utility 69 4-3 EasyTune 6...70 4-4 Dynamic Energy Saver™ 2 71 4-5 Q-Share...73 4-6 Smart 6™ ...74 4-7 Auto Green...77 4-8 eXtreme Hard...
Manual
Page 31
... saving system parameters and loading operating system, etc. Chapter 2 BIOS Setup BIOS (Basic Input and Output System) records hardware parameters of the system in the CMOS on . To upgrade the BIOS, use either the GIGABYTE Q-Flash or @BIOS utility. • Q-Flash allows the user to quickly and easily... the user to modify basic system configuration settings or to boot. To flash the BIOS, do not encounter problems using the Q-Flash and @BIOS utilities, refer to Chapter 4, "BIOS Update Utilities." • Because BIOS flashing is potentially risky, if you can press + in the main menu of the...
... saving system parameters and loading operating system, etc. Chapter 2 BIOS Setup BIOS (Basic Input and Output System) records hardware parameters of the system in the CMOS on . To upgrade the BIOS, use either the GIGABYTE Q-Flash or @BIOS utility. • Q-Flash allows the user to quickly and easily... the user to modify basic system configuration settings or to boot. To flash the BIOS, do not encounter problems using the Q-Flash and @BIOS utilities, refer to Chapter 4, "BIOS Update Utilities." • Because BIOS flashing is potentially risky, if you can press + in the main menu of the...
Manual
Page 56
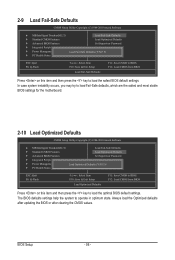
...Award Software MB Intelligent Tweaker(M.I .T.) Load Fail-Safe Defaults Standard CMOS Features Load Optimized Defaults Advanced BIOS Features Set Supervisor Password Integrated Peripherals Set User Password Power Management Setup PC Health Status Load Optimized ...& Exit Setup Load Optimized Defaults F11: Save CMOS to BIOS F12: Load CMOS from BIOS Press on this item and then press the key to load the safest BIOS default settings. Always load the Optimized defaults after updating the BIOS or after clearing the CMOS values.
...Award Software MB Intelligent Tweaker(M.I .T.) Load Fail-Safe Defaults Standard CMOS Features Load Optimized Defaults Advanced BIOS Features Set Supervisor Password Integrated Peripherals Set User Password Power Management Setup PC Health Status Load Optimized ...& Exit Setup Load Optimized Defaults F11: Save CMOS to BIOS F12: Load CMOS from BIOS Press on this item and then press the key to load the safest BIOS default settings. Always load the Optimized defaults after updating the BIOS or after clearing the CMOS values.
Manual
Page 62
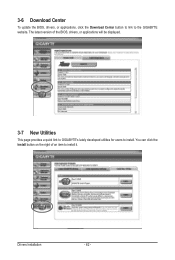
The latest version of an item to install it. You can click the Install button on the right of the BIOS, drivers, or applications will be displayed. 3-7 New Utilities This page provides a quick link to GIGABYTE's lately developed utilities for users to the GIGABYTE website. 3-6 Download Center To update the BIOS, drivers, or applications, click the Download Center button to link to install. Drivers Installation - 62 -
The latest version of an item to install it. You can click the Install button on the right of the BIOS, drivers, or applications will be displayed. 3-7 New Utilities This page provides a quick link to GIGABYTE's lately developed utilities for users to the GIGABYTE website. 3-6 Download Center To update the BIOS, drivers, or applications, click the Download Center button to link to install. Drivers Installation - 62 -
Manual
Page 66
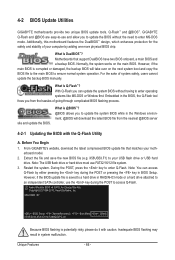
... Q-Flash by adding one more physical BIOS chip. What is saved to update the system BIOS while in BIOS Setup. Before You Begin 1. X58-USB3 E7 . . . . : BIOS Setup : XpressRecovery2 : Boot Menu : Qflash 07/05/2010-X58-ICH10-7A89QG0PC-00 Because BIOS flashing is Q-Flash™? 4-2 BIOS Update Utilities GIGABYTE motherboards provide two unique BIOS update tools, Q-Flash™ and @BIOS™. Note: The USB flash...
... Q-Flash by adding one more physical BIOS chip. What is saved to update the system BIOS while in BIOS Setup. Before You Begin 1. X58-USB3 E7 . . . . : BIOS Setup : XpressRecovery2 : Boot Menu : Qflash 07/05/2010-X58-ICH10-7A89QG0PC-00 Because BIOS flashing is Q-Flash™? 4-2 BIOS Update Utilities GIGABYTE motherboards provide two unique BIOS update tools, Q-Flash™ and @BIOS™. Note: The USB flash...
Manual
Page 67
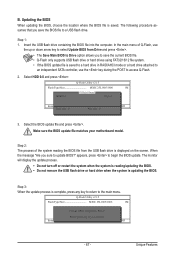
... that you sure to the main menu. Select the BIOS update file and press . CoaodpyCMBIOOSS DcoemfapuletteEdn-aPbaless !! Updating the BIOS When updating the BIOS, choose the location where the BIOS file is complete, press any key to return to update BIOS?" Select HDD 0-0 and press . Step 1: 1. ...drive. B. Insert the USB flash drive containing the BIOS file into the computer. In the main menu of the system reading the BIOS file from Drive Save BIOS to begin the BIOS update. Make sure the BIOS update file matches your motherboard model. appears, press to...
... that you sure to the main menu. Select the BIOS update file and press . CoaodpyCMBIOOSS DcoemfapuletteEdn-aPbaless !! Updating the BIOS When updating the BIOS, choose the location where the BIOS file is complete, press any key to return to update BIOS?" Select HDD 0-0 and press . Step 1: 1. ...drive. B. Insert the USB flash drive containing the BIOS file into the computer. In the main menu of the system reading the BIOS file from Drive Save BIOS to begin the BIOS update. Make sure the BIOS update file matches your motherboard model. appears, press to...
Manual
Page 68
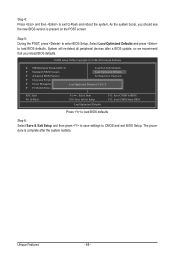
...BIOS version is complete after a BIOS update, so we recommend that you reload BIOS defaults. Select Load Optimized Defaults and press to exit Q-Flash and reboot the system. The procedure is present on the POST screen. Unique Features - 68 - Step 4: Press and then to load BIOS...Award Software MB Intelligent Tweaker(M.I.T.) Load Fail-Safe Defaults Standard CMOS Features Load Optimized Defaults Advanced BIOS Features Set Supervisor Password Integrated Peripherals Set User Password Power Management Setup PC Health Status Load ...
...BIOS version is complete after a BIOS update, so we recommend that you reload BIOS defaults. Select Load Optimized Defaults and press to exit Q-Flash and reboot the system. The procedure is present on the POST screen. Unique Features - 68 - Step 4: Press and then to load BIOS...Award Software MB Intelligent Tweaker(M.I.T.) Load Fail-Safe Defaults Standard CMOS Features Load Optimized Defaults Advanced BIOS Features Set Supervisor Password Integrated Peripherals Set User Password Power Management Setup PC Health Status Load ...
Manual
Page 69
... failures when performing a BIOS update. 2. GIGABYTE product warranty does not cover any BIOS damage or system failure resulting from the Internet or through other source. Using @BIOS 1. Do not use the G.O.M. (GIGABYTE Online Management) function when using @BIOS. 4. Make sure that the BIOS file to save the BIOS update file obtained from an inadequate BIOS flashing. If the BIOS update file for example...
... failures when performing a BIOS update. 2. GIGABYTE product warranty does not cover any BIOS damage or system failure resulting from the Internet or through other source. Using @BIOS 1. Do not use the G.O.M. (GIGABYTE Online Management) function when using @BIOS. 4. Make sure that the BIOS file to save the BIOS update file obtained from an inadequate BIOS flashing. If the BIOS update file for example...

Manual
Page 72
... close the application. (Note 1) Before using the Dynamic Energy SaverTM 2 function, make sure the CPU Enhanced Halt (C1E) and CPU EIST Function items in the BIOS Setup program are able to run in power-saving mode will light on) 9 3-Level Power Saving Switch (Default:1) (Note 2) 10 Advanced Settings 11 Dual Power... accumulated in a set period of the devices currently in taskbar) 14 INFO/Help 15 Motherboard Phase LED On/Off Switch (Default: On) 16 Live Utility Update (Check for the first time (Note 3). 12 13 14 3 2 4 65 7 1 8 10 11 9 15 16 Total Mode -
... close the application. (Note 1) Before using the Dynamic Energy SaverTM 2 function, make sure the CPU Enhanced Halt (C1E) and CPU EIST Function items in the BIOS Setup program are able to run in power-saving mode will light on) 9 3-Level Power Saving Switch (Default:1) (Note 2) 10 Advanced Settings 11 Dual Power... accumulated in a set period of the devices currently in taskbar) 14 INFO/Help 15 Motherboard Phase LED On/Off Switch (Default: On) 16 Live Utility Update (Check for the first time (Note 3). 12 13 14 3 2 4 65 7 1 8 10 11 9 15 16 Total Mode -
Manual
Page 99
... sound even though I clear the CMOS values? For motherboards that 's why the light is present in the BIOS Setup program. When the Add New Hardware Wizard appears, click Cancel. If not, please update it from GIGABYTE's website to install. Step 2: Check if Audio Device on High Definition Audio Bus or Unknown device is...
... sound even though I clear the CMOS values? For motherboards that 's why the light is present in the BIOS Setup program. When the Add New Hardware Wizard appears, click Cancel. If not, please update it from GIGABYTE's website to install. Step 2: Check if Audio Device on High Definition Audio Bus or Unknown device is...


