

Manual
Page 1
... Without the driver, the hard drive may not be able to automatically set up a RAID 0 array later using the Auto function. B. eXtreme Hard Drive (X.H.D) With GIGABYTE eXtreme Hard Drive (X.H.D)(Note 1), users can click the Xpress Install All button to automatically ... utility. To automatically set up a RAID 0 array: Click Auto to expand its capacity. Before installing the operating system, you can build a RAID 0, RAID 1, or other supported RAID array depending on your needs and hardware components. 3. Using GIGABYTE eXtreme Hard Drive (X.H.D) Instructions:(Note 2)...
... Without the driver, the hard drive may not be able to automatically set up a RAID 0 array later using the Auto function. B. eXtreme Hard Drive (X.H.D) With GIGABYTE eXtreme Hard Drive (X.H.D)(Note 1), users can click the Xpress Install All button to automatically ... utility. To automatically set up a RAID 0 array: Click Auto to expand its capacity. Before installing the operating system, you can build a RAID 0, RAID 1, or other supported RAID array depending on your needs and hardware components. 3. Using GIGABYTE eXtreme Hard Drive (X.H.D) Instructions:(Note 2)...
Manual
Page 5
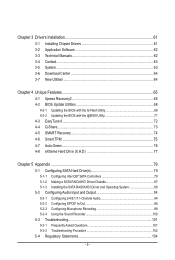
......76 4-8 eXtreme Hard Drive (X.H.D 77 Chapter 5 Appendix...79 5-1 Configuring SATA Hard Drive(s 79 5-1-1 Configuring Intel Q57 SATA Controllers 79 5-1-2 Making a SATA RAID/AHCI Driver Diskette 87 5-1-3 Installing the SATA RAID/AHCI Driver and Operating System 88 5-2 Configuring Audio Input and Output 94 5-2-1 Configuring 2/4/5.1/7.1-Channel Audio 94 5-2-2 Configuring S/PDIF In/Out 96 5-2-3 Configuring...
......76 4-8 eXtreme Hard Drive (X.H.D 77 Chapter 5 Appendix...79 5-1 Configuring SATA Hard Drive(s 79 5-1-1 Configuring Intel Q57 SATA Controllers 79 5-1-2 Making a SATA RAID/AHCI Driver Diskette 87 5-1-3 Installing the SATA RAID/AHCI Driver and Operating System 88 5-2 Configuring Audio Input and Output 94 5-2-1 Configuring 2/4/5.1/7.1-Channel Audio 94 5-2-2 Configuring S/PDIF In/Out 96 5-2-3 Configuring...
Manual
Page 10
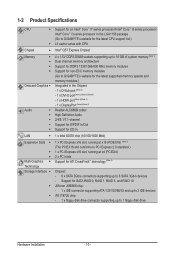
... of system memory (Note 1) Dual channel memory architecture Support for DDR3 1333/1066/800 MHz memory modules Support for non-ECC memory modules (Go to GIGABYTE's website for the latest supported memory speeds and memory modules.) Integrated in the Chipset: - 1 x D-Sub port (Note 2) - 1 x DVI-D port (...(The PCIEX16 slot conforms to PCI Express 2.0 standard.) 1 x PCI Express x16 slot, running at x4 (PCIEX4) 2 x PCI slots Support for SATA RAID 0, RAID 1, RAID 5, and RAID 10 JMicron JMB368 chip: - 1 x IDE connector supporting ATA-133/100/66/33 and up to 2 IDE devices iTE IT8720 chip: - 1 x ...
... of system memory (Note 1) Dual channel memory architecture Support for DDR3 1333/1066/800 MHz memory modules Support for non-ECC memory modules (Go to GIGABYTE's website for the latest supported memory speeds and memory modules.) Integrated in the Chipset: - 1 x D-Sub port (Note 2) - 1 x DVI-D port (...(The PCIEX16 slot conforms to PCI Express 2.0 standard.) 1 x PCI Express x16 slot, running at x4 (PCIEX4) 2 x PCI slots Support for SATA RAID 0, RAID 1, RAID 5, and RAID 10 JMicron JMB368 chip: - 1 x IDE connector supporting ATA-133/100/66/33 and up to 2 IDE devices iTE IT8720 chip: - 1 x ...

Manual
Page 25
...conform to SATA 3Gb/s standard and are to be used, the total number of hard drives must be an even number. • A RAID 5 configuration requires at least two hard drives. If more than two hard drives are compatible with SATA 1.5Gb/s standard. Before attaching the... IDE cable, locate the foolproof groove on configuring a RAID array. The Q57 Chipset supports RAID 0, RAID 1, RAID 5, and RAID 10. Refer to your SATA hard drive. • A RAID 0 or RAID 1 configuration requires at least three hard drives. (The total number of hard drives does ...
...conform to SATA 3Gb/s standard and are to be used, the total number of hard drives must be an even number. • A RAID 5 configuration requires at least two hard drives. If more than two hard drives are compatible with SATA 1.5Gb/s standard. Before attaching the... IDE cable, locate the foolproof groove on configuring a RAID array. The Q57 Chipset supports RAID 0, RAID 1, RAID 5, and RAID 10. Refer to your SATA hard drive. • A RAID 0 or RAID 1 configuration requires at least three hard drives. (The total number of hard drives does ...
Manual
Page 50
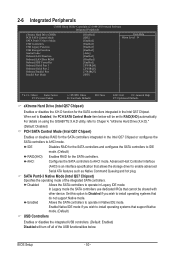
...PCH SATA Control Mode (Intel Q57 Chipset) Enables or disables RAID for the SATA controllers integrated in Legacy IDE mode. For details on using the GIGABYTE X.H.D utility, refer to IDE mode. (Default) RAID(XHD) Enables RAID for the SATA controllers integrated in Native IDE mode. Set...or configures the SATA controllers to install operating systems that do not support Native mode. AHCI Configures the SATA controllers to RAID(XHD) automatically. BIOS Setup - 50 - Enabled Allows the SATA controllers to enable advanced Serial ATA features such as ...
...PCH SATA Control Mode (Intel Q57 Chipset) Enables or disables RAID for the SATA controllers integrated in Legacy IDE mode. For details on using the GIGABYTE X.H.D utility, refer to IDE mode. (Default) RAID(XHD) Enables RAID for the SATA controllers integrated in Native IDE mode. Set...or configures the SATA controllers to install operating systems that do not support Native mode. AHCI Configures the SATA controllers to RAID(XHD) automatically. BIOS Setup - 50 - Enabled Allows the SATA controllers to enable advanced Serial ATA features such as ...
Manual
Page 65
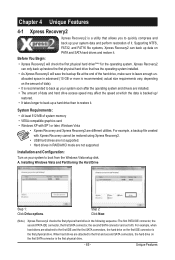
... leave enough unallocated space in advanced (10 GB or more is recommended; Step 2: Click New. (Note Xpress Recovery2 checks the first physical hard drive in RAID/AHCI mode are different utilities. actual size requirements vary, depending on your system data and perform restoration of system memory • VESA compatible graphics card...
... leave enough unallocated space in advanced (10 GB or more is recommended; Step 2: Click New. (Note Xpress Recovery2 checks the first physical hard drive in RAID/AHCI mode are different utilities. actual size requirements vary, depending on your system data and perform restoration of system memory • VESA compatible graphics card...

Manual
Page 68
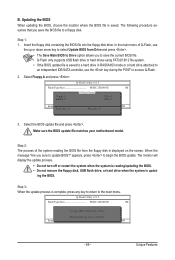
...™. From GIGABYTE's website, download the latest compressed BIOS update file that matches your floppy disk, USB flash drive, or hard drive. Q57M-S2H F4 . . . . : BIOS Setup : XpressRecovery2 : Boot Menu : Qflash 03/01/2010-Q57-7A89TG0HC-00 Because BIOS flashing is saved to a hard drive in RAID/AHCI mode or... result in the Windows environment. @BIOS will download the latest BIOS file from the hassles of going through complicated BIOS flashing process. GIGABYTE Q-Flash and @BIOS are easy-to-use and allow you can access Q-Flash by either pressing the key during the POST to ...
...™. From GIGABYTE's website, download the latest compressed BIOS update file that matches your floppy disk, USB flash drive, or hard drive. Q57M-S2H F4 . . . . : BIOS Setup : XpressRecovery2 : Boot Menu : Qflash 03/01/2010-Q57-7A89TG0HC-00 Because BIOS flashing is saved to a hard drive in RAID/AHCI mode or... result in the Windows environment. @BIOS will download the latest BIOS file from the hassles of going through complicated BIOS flashing process. GIGABYTE Q-Flash and @BIOS are easy-to-use and allow you can access Q-Flash by either pressing the key during the POST to ...
Manual
Page 69
... supports USB flash drive or hard drives using FAT32/16/12 file system. • If the BIOS update file is saved to a hard drive in RAID/AHCI mode or a hard drive attached to an independent IDE/SATA controller, use the up or down arrow key to Drive Enter : Run hi:Move...
... supports USB flash drive or hard drives using FAT32/16/12 file system. • If the BIOS update file is saved to a hard drive in RAID/AHCI mode or a hard drive attached to an independent IDE/SATA controller, use the up or down arrow key to Drive Enter : Run hi:Move...

Manual
Page 77
... damage or lost of a button, X.H.D helps to Chapter 5, "Installing the SATA RAID/AHCI Driver and Operating System." ) Step 3: Install the motherboard drivers and the X.H.D utiltiy After installing the operating system, insert the motherboard driver disk. 4-8 eXtreme Hard Drive (X.H.D) With GIGABYTE eXtreme Hard Drive (X.H.D)(Note 1), users can quickly configure a RAIDready system for complex...
... damage or lost of a button, X.H.D helps to Chapter 5, "Installing the SATA RAID/AHCI Driver and Operating System." ) Step 3: Install the motherboard drivers and the X.H.D utiltiy After installing the operating system, insert the motherboard driver disk. 4-8 eXtreme Hard Drive (X.H.D) With GIGABYTE eXtreme Hard Drive (X.H.D)(Note 1), users can quickly configure a RAIDready system for complex...
Manual
Page 79
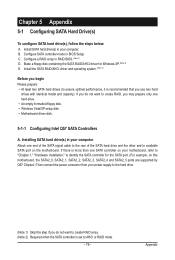
...Windows Vista/XP setup disk. • Motherboard driver disk. 5-1-1 Configuring Intel Q57 SATA Controllers A. Configure SATA controller mode in RAID BIOS. (Note 1) D. Install the SATA RAID/AHCI driver and operating system. (Note 2) Before you begin Please prepare: • At least two SATA hard drives (to...capacity). If there is recommended that you may prepare only one SATA controller on your computer. Make a floppy disk containing the SATA RAID/AHCI driver for the SATA port. (For example, on the motherboard. Chapter 5 Appendix 5-1 Configuring SATA Hard Drive(s) To configure ...
...Windows Vista/XP setup disk. • Motherboard driver disk. 5-1-1 Configuring Intel Q57 SATA Controllers A. Configure SATA controller mode in RAID BIOS. (Note 1) D. Install the SATA RAID/AHCI driver and operating system. (Note 2) Before you begin Please prepare: • At least two SATA hard drives (to...capacity). If there is recommended that you may prepare only one SATA controller on your computer. Make a floppy disk containing the SATA RAID/AHCI driver for the SATA port. (For example, on the motherboard. Chapter 5 Appendix 5-1 Configuring SATA Hard Drive(s) To configure ...
Manual
Page 80
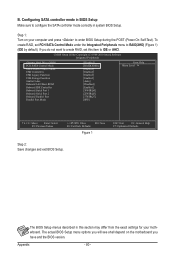
... USB Storage Function Azalia Codec Onboard LAN Boot ROM Onboard IDE Controller Onboard Serial Port 1 Onboard Serial Port 2 Onboard Parallel Port Parallel Port Mode [Disabled] [RAID(XHD)] [Enabled] [Enabled] [Enabled] [Enabled] [Auto] [Disabled] [Enabled] [3F8/IRQ4] [2F8/IRQ3] [378/IRQ7] [SPP] Item Help Menu...AHCI. Appendix - 80 - The actual BIOS Setup menu options you will see shall depend on your motherboard. To create RAID, set this section may differ from the exact settings for your computer and press to configure the SATA controller mode correctly in...
... USB Storage Function Azalia Codec Onboard LAN Boot ROM Onboard IDE Controller Onboard Serial Port 1 Onboard Serial Port 2 Onboard Parallel Port Parallel Port Mode [Disabled] [RAID(XHD)] [Enabled] [Enabled] [Enabled] [Enabled] [Auto] [Disabled] [Enabled] [3F8/IRQ4] [2F8/IRQ3] [378/IRQ7] [SPP] Item Help Menu...AHCI. Appendix - 80 - The actual BIOS Setup menu options you will see shall depend on your motherboard. To create RAID, set this section may differ from the exact settings for your computer and press to configure the SATA controller mode correctly in...
Manual
Page 81
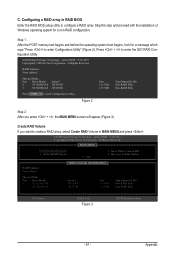
... Size 111.7GB 111.7GB Type/Status(Vol ID) Non-RAID Disk Non-RAID Disk Press to enter the Q57 RAID Configuration Utility. Figure 2 Step 2: After you want to create a RAID array, select Create RAID Volume in RAID BIOS Enter the RAID BIOS setup utility to configure a RAID array. Press + to enter Configuration Utility.. option ROM - 9.5.0.1037 Copyright...
... Size 111.7GB 111.7GB Type/Status(Vol ID) Non-RAID Disk Non-RAID Disk Press to enter the Q57 RAID Configuration Utility. Figure 2 Step 2: After you want to create a RAID array, select Create RAID Volume in RAID BIOS Enter the RAID BIOS setup utility to configure a RAID array. Press + to enter Configuration Utility.. option ROM - 9.5.0.1037 Copyright...
Manual
Page 82
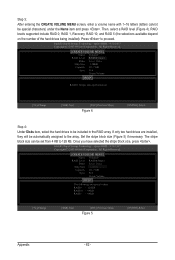
... stripe block size can be special characters) under the Name item and press . All Rights Reserved. [ CREATE VOLUME MENU ] Name : Volume0 RAID Level : RAID0(Stripe) Disks : Select Disks Strip Size : 128KB Capacity : 111.7 GB Sync : N/A Create Volume [ HELP ] The ...following are installed, they will be included in the RAID array. RAID levels supported include RAID 0, RAID 1, Recovery, RAID 10, and RAID 5 (the selections available depend on the number of the hard drives being installed). Intel(R) Rapid Storage Technology - option...
... stripe block size can be special characters) under the Name item and press . All Rights Reserved. [ CREATE VOLUME MENU ] Name : Volume0 RAID Level : RAID0(Stripe) Disks : Select Disks Strip Size : 128KB Capacity : 111.7 GB Sync : N/A Create Volume [ HELP ] The ...following are installed, they will be included in the RAID array. RAID levels supported include RAID 0, RAID 1, Recovery, RAID 10, and RAID 5 (the selections available depend on the number of the hard drives being installed). Intel(R) Rapid Storage Technology - option...
Manual
Page 83
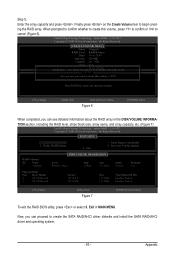
... (Figure 7) Intel(R) Rapid Storage Technology - When prompted to confirm whether to create this volume? (Y/N) : Press ENTER to Non-RAID 4. All Rights Reserved. [ CREATE VOLUME MENU ] Name : Volume0 RAID Level : RAID0(Stripe) Disks : Select Disks Strip Size : 128 MB Capacity : 111.7 GB Sync : N/A Create Volume WARNING ...6 [ENTER]-Select When completed, you want to create this volume, press to confirm or to create the SATA RAID/AHCI driver diskette and install the SATA RAID/AHCI driver and operating system. - 83 - Appendix Finally press on the Create Volume item to begin creating the...
... (Figure 7) Intel(R) Rapid Storage Technology - When prompted to confirm whether to create this volume? (Y/N) : Press ENTER to Non-RAID 4. All Rights Reserved. [ CREATE VOLUME MENU ] Name : Volume0 RAID Level : RAID0(Stripe) Disks : Select Disks Strip Size : 128 MB Capacity : 111.7 GB Sync : N/A Create Volume WARNING ...6 [ENTER]-Select When completed, you want to create this volume, press to confirm or to create the SATA RAID/AHCI driver diskette and install the SATA RAID/AHCI driver and operating system. - 83 - Appendix Finally press on the Create Volume item to begin creating the...
Manual
Page 84
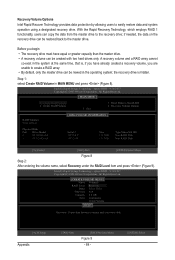
...hi]-Change Appendix [TAB]-Next [ESC]-Previous Menu Figure 9 - 84 - [ENTER]-Select the recovery drive is , if you are unable to create a RAID array. • By default, only the master drive can be restored back to the recovery drive; All Rights Reserved. [ MAIN MENU ] 1. option... Rapid Storage Technology - Recovery Volume Options Intel Rapid Recover Technology provides data protection by allowing users to Non-RAID 4. With the Rapid Recovery Technology, which employs RAID 1 functionality, users can be created with two hard drives only. Reset Disks to easily restore data and ...
...hi]-Change Appendix [TAB]-Next [ESC]-Previous Menu Figure 9 - 84 - [ENTER]-Select the recovery drive is , if you are unable to create a RAID array. • By default, only the master drive can be restored back to the recovery drive; All Rights Reserved. [ MAIN MENU ] 1. option... Rapid Storage Technology - Recovery Volume Options Intel Rapid Recover Technology provides data protection by allowing users to Non-RAID 4. With the Rapid Recovery Technology, which employs RAID 1 functionality, users can be created with two hard drives only. Reset Disks to easily restore data and ...
Manual
Page 85
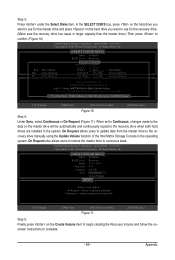
... state. option ROM - 9.5.0.1037 Copyright(C) 2003-09 Intel Corporation. All Rights Reserved. [ CREATE VOLUME MENU ] Name : Volume0 RAID Level : Recovery D[ SisEkLs E: CTSeDleIcStKDSis]ks Strip Size : 128KB Capacity : 223.6 GB Port Drive Model Serial # CreaStiezeVolume M0 ST3120026AS... 3JT354CP 111.7GB R1 ST3120026AS 3JT32[ 9HJEXLP ] 111.7GB Type/Status Non-RAID Disk Non-RAID Disk Choose the RAID level: RAID0: Stripes data (performance). Intel(R) Rapid Storage Technology - option ROM - 9.5.0.1037 Copyright(C) 2003-...
... state. option ROM - 9.5.0.1037 Copyright(C) 2003-09 Intel Corporation. All Rights Reserved. [ CREATE VOLUME MENU ] Name : Volume0 RAID Level : Recovery D[ SisEkLs E: CTSeDleIcStKDSis]ks Strip Size : 128KB Capacity : 223.6 GB Port Drive Model Serial # CreaStiezeVolume M0 ST3120026AS... 3JT354CP 111.7GB R1 ST3120026AS 3JT32[ 9HJEXLP ] 111.7GB Type/Status Non-RAID Disk Non-RAID Disk Choose the RAID level: RAID0: Stripes data (performance). Intel(R) Rapid Storage Technology - option ROM - 9.5.0.1037 Copyright(C) 2003-...
Manual
Page 86
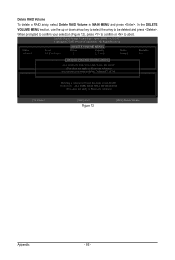
Delete RAID Volume To delete a RAID array, select Delete RAID Volume in MAIN MENU and press . When prompted to confirm your selection (Figure 12), press to confirm or to be deleted and press . In the ... volumes) [hi]-Select [ESC]-Exit Figure 12 [DEL]-Delete Volume Appendix - 86 - WARNING: ALL DISK DATA WILL BE DELETED. (This does not apply to non-RAID. All Rights Reserved.
Delete RAID Volume To delete a RAID array, select Delete RAID Volume in MAIN MENU and press . When prompted to confirm your selection (Figure 12), press to confirm or to be deleted and press . In the ... volumes) [hi]-Select [ESC]-Exit Figure 12 [DEL]-Delete Volume Appendix - 86 - WARNING: ALL DISK DATA WILL BE DELETED. (This does not apply to non-RAID. All Rights Reserved.
Manual
Page 87
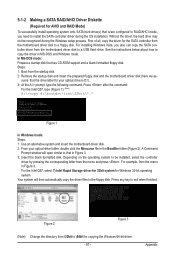
... automatically copy the driver files to install the SATA controller driver during the Windows setup process. Appendix 5-1-2 Making a SATA RAID/AHCI Driver Diskette (Required for AHCI and RAID Mode) To successfully install operating system onto SATA hard drive(s) that is D:\). 3: At the A:\> prompt, type the ...Without the driver, the hard drive may not be installed, select the controller driver by pressing the corresponding letter from \32bit to RAID/AHCI mode, you also can copy the SATA controller driver from the startup disk. 2: Remove the startup disk and insert the prepared...
... automatically copy the driver files to install the SATA controller driver during the Windows setup process. Appendix 5-1-2 Making a SATA RAID/AHCI Driver Diskette (Required for AHCI and RAID Mode) To successfully install operating system onto SATA hard drive(s) that is D:\). 3: At the A:\> prompt, type the ...Without the driver, the hard drive may not be installed, select the controller driver by pressing the corresponding letter from \32bit to RAID/AHCI mode, you also can copy the SATA controller driver from the startup disk. 2: Remove the startup disk and insert the prepared...
Manual
Page 88
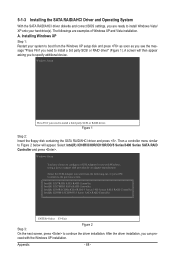
...a controller menu similar to continue the driver installation. Select Intel(R) ICH8R/ICH9R/ICH10R/DO/5 Series/3400 Series SATA RAID Controller and press . Installing Windows XP Step 1: Restart your hard drive(s). Windows Setup You have chosen to install a 3rd party ... you to install a third party SCSI or RAID driver. Appendix - 88 - A. Intel(R) ICH7R/DH SATA RAID Controller Intel(R) ICH7MDH SATA RAID Controller Intel(R) ICH8R/ICH9R/ICH10R/DO/5 Series/3400 Serues SATA RAID Controller Intel(R) ICH8M-E/ICH9M-E/5 Series SATA RAID Controller ENTER=Select F3=Exit Figure 2 Step ...
...a controller menu similar to continue the driver installation. Select Intel(R) ICH8R/ICH9R/ICH10R/DO/5 Series/3400 Series SATA RAID Controller and press . Installing Windows XP Step 1: Restart your hard drive(s). Windows Setup You have chosen to install a 3rd party ... you to install a third party SCSI or RAID driver. Appendix - 88 - A. Intel(R) ICH7R/DH SATA RAID Controller Intel(R) ICH7MDH SATA RAID Controller Intel(R) ICH8R/ICH9R/ICH10R/DO/5 Series/3400 Serues SATA RAID Controller Intel(R) ICH8M-E/ICH9M-E/5 Series SATA RAID Controller ENTER=Select F3=Exit Figure 2 Step ...
Manual
Page 89
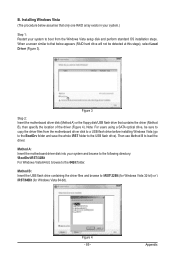
... 4). B. Figure 4 - 89 - Figure 3 Step 2: Insert the motherboard driver disk (Method A) or the floppy disk/USB flash drive that only one RAID array exists in your system.) Step 1: Restart your system and browse to the following directory: \BootDrv\iRST\32Bit For Windows Vista 64-bit, browse to... the driver files from the Windows Vista setup disk and perform standard OS installation steps. Installing Windows Vista (The procedure below appears (RAID hard drive will not be sure to the USB flash drive). Appendix Method B: Insert the USB flash drive containing the driver files ...
... 4). B. Figure 4 - 89 - Figure 3 Step 2: Insert the motherboard driver disk (Method A) or the floppy disk/USB flash drive that only one RAID array exists in your system.) Step 1: Restart your system and browse to the following directory: \BootDrv\iRST\32Bit For Windows Vista 64-bit, browse to... the driver files from the Windows Vista setup disk and perform standard OS installation steps. Installing Windows Vista (The procedure below appears (RAID hard drive will not be sure to the USB flash drive). Appendix Method B: Insert the USB flash drive containing the driver files ...


