
Manual
Page 1
..., insert the motherboard driver disk. You can click the Xpress Install All button to automatically install all of data. (Note 3) If you manually build a non-RAID 0 array, you run the X.H.D utility, back up a RAID 0 array later using the Auto function. To automatically... set up all motherboard drivers, including the X.H.D utility. eXtreme Hard Drive (X.H.D) With GIGABYTE eXtreme Hard Drive (X.H.D)(Note 1), users can build a RAID 0, RAID 1, or other supported RAID array depending on your needs and hardware components. 3....
..., insert the motherboard driver disk. You can click the Xpress Install All button to automatically install all of data. (Note 3) If you manually build a non-RAID 0 array, you run the X.H.D utility, back up a RAID 0 array later using the Auto function. To automatically... set up all motherboard drivers, including the X.H.D utility. eXtreme Hard Drive (X.H.D) With GIGABYTE eXtreme Hard Drive (X.H.D)(Note 1), users can build a RAID 0, RAID 1, or other supported RAID array depending on your needs and hardware components. 3....

Manual
Page 1
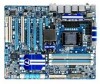
GA-P55A-UD7 LGA1156 socket motherboard for Intel® Core™ i7 processor family/ Intel® Core™ i5 processor family/Intel® Core™ i3 processor family User's Manual Rev. 1001 12ME-P55AUD7-1001R
GA-P55A-UD7 LGA1156 socket motherboard for Intel® Core™ i7 processor family/ Intel® Core™ i5 processor family/Intel® Core™ i3 processor family User's Manual Rev. 1001 12ME-P55AUD7-1001R
Manual
Page 3
... the Quick Installation Guide included with the product. No part of this manual may be made by copyright laws and is the property of GIGABYTE. All rights reserved. Check your motherboard looks like this manual is 1.0. Changes to use of this manual are legally registered to assist in any form or by any means...
... the Quick Installation Guide included with the product. No part of this manual may be made by copyright laws and is the property of GIGABYTE. All rights reserved. Check your motherboard looks like this manual is 1.0. Changes to use of this manual are legally registered to assist in any form or by any means...

Manual
Page 5
Chapter 3 Drivers Installation 65 3-1 Installing Chipset Drivers 65 3-2 Application Software 66 3-3 Technical Manuals 66 3-4 Contact...67 3-5 System...67 3-6 Download Center 68 3-7 New Utilities...68 Chapter 4 Unique Features 69 4-1 Xpress Recovery2 69... 84 4-9 Teaming 85 Chapter 5 Appendix...87 5-1 Configuring SATA Hard Drive(s 87 5-1-1 Configuring Intel P55 SATA Controllers 87 5-1-2 Configuring JMicron JMB362/GIGABYTE SATA2 SATA Controller 95 5-1-3 Configuring Marvell 9128 SATA Controller 101 5-1-4 Making a SATA RAID/AHCI Driver Diskette 106 5-1-5 Installing the SATA RAID/AHCI ...
Chapter 3 Drivers Installation 65 3-1 Installing Chipset Drivers 65 3-2 Application Software 66 3-3 Technical Manuals 66 3-4 Contact...67 3-5 System...67 3-6 Download Center 68 3-7 New Utilities...68 Chapter 4 Unique Features 69 4-1 Xpress Recovery2 69... 84 4-9 Teaming 85 Chapter 5 Appendix...87 5-1 Configuring SATA Hard Drive(s 87 5-1-1 Configuring Intel P55 SATA Controllers 87 5-1-2 Configuring JMicron JMB362/GIGABYTE SATA2 SATA Controller 95 5-1-3 Configuring Marvell 9128 SATA Controller 101 5-1-4 Making a SATA RAID/AHCI Driver Diskette 106 5-1-5 Installing the SATA RAID/AHCI ...
Manual
Page 6
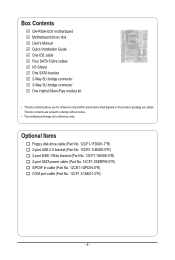
... In cable (Part No. 12CR1-1SPDIN-0*R) COM port cable (Part No. 12CF1-1CM001-3*R) - 6 - The box contents are for reference only. Box Contents GA-P55A-UD7 motherboard Motherboard driver disk User's Manual Quick Installation Guide One IDE cable Four SATA 3Gb/s cables I/O Shield One SATA bracket 2-Way SLI bridge connector 3-Way SLI bridge connector One...
... In cable (Part No. 12CR1-1SPDIN-0*R) COM port cable (Part No. 12CF1-1CM001-3*R) - 6 - The box contents are for reference only. Box Contents GA-P55A-UD7 motherboard Motherboard driver disk User's Manual Quick Installation Guide One IDE cable Four SATA 3Gb/s cables I/O Shield One SATA bracket 2-Way SLI bridge connector 3-Way SLI bridge connector One...

Manual
Page 9
... supply voltage has been set according to wear an electrostatic discharge (ESD) wrist strap when handling electronic com- Prior to installation, carefully read the user's manual and follow these procedures: • Prior to installation, do not have an ESD wrist strap, keep your hands dry and first touch a metal object to...
... supply voltage has been set according to wear an electrostatic discharge (ESD) wrist strap when handling electronic com- Prior to installation, carefully read the user's manual and follow these procedures: • Prior to installation, do not have an ESD wrist strap, keep your hands dry and first touch a metal object to...

Manual
Page 15
... the installed CPU. Push down each push pin. Check that the Male and Female push pins are joined closely. (Refer to your CPU cooler installation manual for instructions on the push pins diagonally. Inadequately removing the CPU cooler may adhere to the CPU. 1-3-2 Installing the CPU Cooler Follow the steps below...
... the installed CPU. Push down each push pin. Check that the Male and Female push pins are joined closely. (Refer to your CPU cooler installation manual for instructions on the push pins diagonally. Inadequately removing the CPU cooler may adhere to the CPU. 1-3-2 Installing the CPU Cooler Follow the steps below...
Manual
Page 19
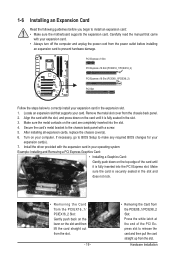
... prevent hardware damage. After installing all expansion cards, replace the chassis cover(s). 6. Hardware Installation Make sure the metal contacts on your card. Carefully read the manual that supports your computer. PCI Express x1 Slot PCI Express x16 Slot (PCIEX16_1/PCIEX16_2) PCI Express x16 Slot (PCIEX8_1/PCIEX8_2) PCI Slot Follow the steps...
... prevent hardware damage. After installing all expansion cards, replace the chassis cover(s). 6. Hardware Installation Make sure the metal contacts on your card. Carefully read the manual that supports your computer. PCI Express x1 Slot PCI Express x16 Slot (PCIEX16_1/PCIEX16_2) PCI Express x16 Slot (PCIEX8_1/PCIEX8_2) PCI Slot Follow the steps...
Manual
Page 20
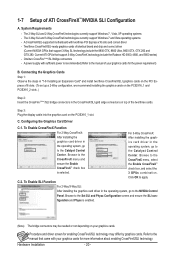
..., 8800 Ultra, 9800 GTX, GTX 260 and GTX 280. For 3-Way CrossFireX: After installing the graphics card driver in the operating system, go to the manual that came with your graphics cards for enabling CrossFireX/SLI technology may be needed or not depending on your graphics cards for the power requirement... the Enable CrossFireX™ check box is recommended (Refer to the Set SLI and Physx Configuration screen and ensure the SLI con- Browse to the manual of ATI CrossFireX™/NVIDIA SLI Configuration A. 1-7 Setup of your graphics cards. System Requirements -
..., 8800 Ultra, 9800 GTX, GTX 260 and GTX 280. For 3-Way CrossFireX: After installing the graphics card driver in the operating system, go to the manual that came with your graphics cards for enabling CrossFireX/SLI technology may be needed or not depending on your graphics cards for the power requirement... the Enable CrossFireX™ check box is recommended (Refer to the Set SLI and Physx Configuration screen and ensure the SLI con- Browse to the manual of ATI CrossFireX™/NVIDIA SLI Configuration A. 1-7 Setup of your graphics cards. System Requirements -

Manual
Page 25
... the power outlet before clearing the CMOS values. • After system restart, go to BIOS Setup to load factory defaults (select Load Optimized Defaults) or manually configure the BIOS settings (refer to Chapter 4, "Dynamic Energy Saver™ 2," for BIOS configurations). Hardware Installation PHASE LED The Phase LEDs indicate the CPU loading...
... the power outlet before clearing the CMOS values. • After system restart, go to BIOS Setup to load factory defaults (select Load Optimized Defaults) or manually configure the BIOS settings (refer to Chapter 4, "Dynamic Energy Saver™ 2," for BIOS configurations). Hardware Installation PHASE LED The Phase LEDs indicate the CPU loading...

Manual
Page 34
... and have digital audio output from the HDMI display at the same time. For information about connecting the S/PDIF digital audio cable, carefully read the manual for digital audio output from your expansion card. 1 Pin No. Definition 1 SPDIFO 2 GND Hardware Installation - 34 - For purchasing the optional S/PDIF In cable, please contact...
... and have digital audio output from the HDMI display at the same time. For information about connecting the S/PDIF digital audio cable, carefully read the manual for digital audio output from your expansion card. 1 Pin No. Definition 1 SPDIFO 2 GND Hardware Installation - 34 - For purchasing the optional S/PDIF In cable, please contact...

Manual
Page 43
... wait for automated system reboot, or clear the CMOS values to reset the board to default values. (Default: Disabled) BCLK Frequency(Mhz) Allows you to manually set the CPU base clock. Only allows the CPU to detect whether an overheating is occurring to 600 MHz. The adjustable range is dependent on...
... wait for automated system reboot, or clear the CMOS values to reset the board to default values. (Default: Disabled) BCLK Frequency(Mhz) Allows you to manually set the CPU base clock. Only allows the CPU to detect whether an overheating is occurring to 600 MHz. The adjustable range is dependent on...

Manual
Page 44
...; CPU Clock Skew Allows you to the Chipset clock. BIOS Setup - 44 - PCI Express Frequency(Mhz) Allows you to set the CPU clock prior to manually set the system memory multiplier. Auto sets the PCIe clock frequency to standard 100 MHz. (Default: Auto) >>>>> Advanced Clock Control CPU Clock Drive Allows you...
...; CPU Clock Skew Allows you to the Chipset clock. BIOS Setup - 44 - PCI Express Frequency(Mhz) Allows you to set the CPU clock prior to manually set the system memory multiplier. Auto sets the PCIe clock frequency to standard 100 MHz. (Default: Auto) >>>>> Advanced Clock Control CPU Clock Drive Allows you...

Manual
Page 51
...this item to None so the system will skip the detection of the device during the POST for faster system startup. • Manual Allows you to manually enter the specifications of the hard drive when the hard drive access mode is set this item to None so the system will skip...channel. Sector Number of heads. BIOS Setup No Errors The system boot will stop for any error. If you wish to enter the parameters manually, refer to CHS. Memory These fields are read-only and are determined by using one of memory installed on the hard drive. Total Memory...
...this item to None so the system will skip the detection of the device during the POST for faster system startup. • Manual Allows you to manually enter the specifications of the hard drive when the hard drive access mode is set this item to None so the system will skip...channel. Sector Number of heads. BIOS Setup No Errors The system boot will stop for any error. If you wish to enter the parameters manually, refer to CHS. Memory These fields are read-only and are determined by using one of memory installed on the hard drive. Total Memory...
Manual
Page 65
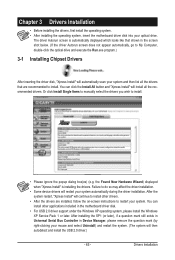
... install other drivers. • After the drivers are recommended to install. • Please ignore the popup dialog box(es) (e.g. Or click Install Single Items to manually select the drivers you wish to install.
... install other drivers. • After the drivers are recommended to install. • Please ignore the popup dialog box(es) (e.g. Or click Install Single Items to manually select the drivers you wish to install.

Manual
Page 66
Drivers Installation - 66 - 3-2 Application Software This page displays all the utilities and applications that GIGABYTE develops and some free software. You can click the Install button on the right of an item to install it. 3-3 Technical Manuals This page provides GIGABYTE's application guides, content descriptions for this driver disk, and the motherboard manuals.
Drivers Installation - 66 - 3-2 Application Software This page displays all the utilities and applications that GIGABYTE develops and some free software. You can click the Install button on the right of an item to install it. 3-3 Technical Manuals This page provides GIGABYTE's application guides, content descriptions for this driver disk, and the motherboard manuals.

Manual
Page 72
... the backup BIOS will download the latest BIOS file from the hassles of system safety, users cannot update the backup BIOS manually. Unique Features - 72 - From GIGABYTE's website, download the latest compressed BIOS update file that support DualBIOS have two BIOS onboard, a main BIOS and a backup... potentially risky, please do it with the Q-Flash Utility A. Note: The USB flash drive or hard drive must use FAT32/16/12 file system. 3. P55A-UD7 D25 . . . . : BIOS Setup : XpressRecovery2 : Boot Menu : Qflash 01/05/2010-P55-7A89TG06C-00 Because BIOS flashing is @BIOS™? ...
... the backup BIOS will download the latest BIOS file from the hassles of system safety, users cannot update the backup BIOS manually. Unique Features - 72 - From GIGABYTE's website, download the latest compressed BIOS update file that support DualBIOS have two BIOS onboard, a main BIOS and a backup... potentially risky, please do it with the Q-Flash Utility A. Note: The USB flash drive or hard drive must use FAT32/16/12 file system. 3. P55A-UD7 D25 . . . . : BIOS Setup : XpressRecovery2 : Boot Menu : Qflash 01/05/2010-P55-7A89TG06C-00 Because BIOS flashing is @BIOS™? ...

Manual
Page 75
... your motherboard is unable to boot. - 75 - Before You Begin 1. Follow the on the @BIOS server site, please manually download the BIOS update file from GIGABYTE's website and follow the instructions in a corrupted BIOS or a system that the BIOS file to be flashed matches your system ... Internet connection is stable and do so may result in "Update the BIOS without Using the Internet Update Function: Click Update BIOS from GIGABYTE Server, select the @BIOS server site closest to complete. 3. Make sure that is not present on -screen instructions to save the BIOS...
... your motherboard is unable to boot. - 75 - Before You Begin 1. Follow the on the @BIOS server site, please manually download the BIOS update file from GIGABYTE's website and follow the instructions in a corrupted BIOS or a system that the BIOS file to be flashed matches your system ... Internet connection is stable and do so may result in "Update the BIOS without Using the Internet Update Function: Click Update BIOS from GIGABYTE Server, select the @BIOS server site closest to complete. 3. Make sure that is not present on -screen instructions to save the BIOS...

Manual
Page 84
...the driver, the hard drive may not be able to automatically set up a RAID 0 array later using the Auto function. To manually set eXtreme Hard Drive (X.H.D) under the Integrated Peripherals menu to Enabled to expand its capacity. B. Step 2: Install the RAID driver ...to exit the X.H.D utility. (Note 1) The X.H.D utility only supports the SATA controllers integrated in the array. ) 1. 4-8 eXtreme Hard Drive (X.H.D) With GIGABYTE eXtreme Hard Drive (X.H.D)(Note 1), users can use X.H.D to easily add a hard drive into a RAID 0 array that already exists, users also can quickly ...
...the driver, the hard drive may not be able to automatically set up a RAID 0 array later using the Auto function. To manually set eXtreme Hard Drive (X.H.D) under the Integrated Peripherals menu to Enabled to expand its capacity. B. Step 2: Install the RAID driver ...to exit the X.H.D utility. (Note 1) The X.H.D utility only supports the SATA controllers integrated in the array. ) 1. 4-8 eXtreme Hard Drive (X.H.D) With GIGABYTE eXtreme Hard Drive (X.H.D)(Note 1), users can use X.H.D to easily add a hard drive into a RAID 0 array that already exists, users also can quickly ...

Manual
Page 85
... system when completed. Restart your hub's specifications. Point to All Programs, Realtek, Diagnostic Utility, Realtek Ethernet Diagnostic Utility to your network switch or router device manual for the two available adapters and click OK. Unique Features
... system when completed. Restart your hub's specifications. Point to All Programs, Realtek, Diagnostic Utility, Realtek Ethernet Diagnostic Utility to your network switch or router device manual for the two available adapters and click OK. Unique Features


