Manual
Page 28
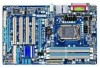
...Intrusion Header Reset Switch Hard Drive Activity LED • MSG/PWR (Message/Power/Sleep LED, Yellow/Purple): System Status LED Connects to the power status indicator on the chassis that can detect if the chassis cover has been removed. S1 Blinking tem is detected, the BIOS may ... chassis intrusion switch/sensor on the chassis front panel. Hardware Installation - 28 - 11) F_PANEL (Front Panel Header) Connect the power switch, reset switch, speaker, chassis intrusion switch/sensor and system status indicator on the chassis to this header, make sure the wire assignments and the pin ...
...Intrusion Header Reset Switch Hard Drive Activity LED • MSG/PWR (Message/Power/Sleep LED, Yellow/Purple): System Status LED Connects to the power status indicator on the chassis that can detect if the chassis cover has been removed. S1 Blinking tem is detected, the BIOS may ... chassis intrusion switch/sensor on the chassis front panel. Hardware Installation - 28 - 11) F_PANEL (Front Panel Header) Connect the power switch, reset switch, speaker, chassis intrusion switch/sensor and system status indicator on the chassis to this header, make sure the wire assignments and the pin ...

Manual
Page 31
... damage to the motherboard. • After system restart, go to BIOS Setup to load factory defaults (select Load Optimized Defaults) or manually configure the BIOS settings (refer to USB 2.0/1.1 specification. 16) F_USB1/F_USB2/F_USB3 ...(USB Headers) The headers conform to Chapter 2, "BIOS Setup," for a few seconds. Hardware Installation Pin No. Definition 1 Power (5V) 9 1 2 Power (5V) 10 2 ... an optional USB bracket. date information and BIOS configurations) and reset the CMOS values to touch the two pins for...
... damage to the motherboard. • After system restart, go to BIOS Setup to load factory defaults (select Load Optimized Defaults) or manually configure the BIOS settings (refer to USB 2.0/1.1 specification. 16) F_USB1/F_USB2/F_USB3 ...(USB Headers) The headers conform to Chapter 2, "BIOS Setup," for a few seconds. Hardware Installation Pin No. Definition 1 Power (5V) 9 1 2 Power (5V) 10 2 ... an optional USB bracket. date information and BIOS configurations) and reset the CMOS values to touch the two pins for...
Manual
Page 33
...off, the battery on . To see more advanced BIOS Setup menu options, you can press + in the main menu of BIOS, it with caution. Inadequate BIOS flashing may result in system's failure to boot. To upgrade the BIOS, use either the GIGABYTE Q-Flash or @BIOS utility. • Q-Flash allows the user to ... emit a beep code during the POST. To access the BIOS Setup program, press the key during system startup, saving system parameters and loading operating system, etc. If this occurs, try to clear the CMOS values and reset the board to default values. (Refer to the "Load Optimized Defaults"...
...off, the battery on . To see more advanced BIOS Setup menu options, you can press + in the main menu of BIOS, it with caution. Inadequate BIOS flashing may result in system's failure to boot. To upgrade the BIOS, use either the GIGABYTE Q-Flash or @BIOS utility. • Q-Flash allows the user to ... emit a beep code during the POST. To access the BIOS Setup program, press the key during system startup, saving system parameters and loading operating system, etc. If this occurs, try to clear the CMOS values and reset the board to default values. (Refer to the "Load Optimized Defaults"...
Manual
Page 37
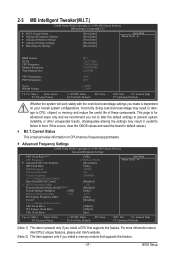
If this occurs, clear the CMOS values and reset the board to CPU, chipset, or memory and reduce the useful life of these components. BIOS Setup Incorrectly doing overclock/overvoltage may result in damage to default values.) M.I.T. This page is present only... Settings } Miscellaneous Settings [Press Enter] [Press Enter] [Press Enter] [Press Enter] [Press Enter] Item Help Menu Level BIOS Version BCLK CPU Frequency Memory Frequency Total Memory Size D11 133.27 MHz 3198.42 MHz 1332.80 MHz 1024 MB CPU Temperature PCH Temperature...
If this occurs, clear the CMOS values and reset the board to CPU, chipset, or memory and reduce the useful life of these components. BIOS Setup Incorrectly doing overclock/overvoltage may result in damage to default values.) M.I.T. This page is present only... Settings } Miscellaneous Settings [Press Enter] [Press Enter] [Press Enter] [Press Enter] [Press Enter] Item Help Menu Level BIOS Version BCLK CPU Frequency Memory Frequency Total Memory Size D11 133.27 MHz 3198.42 MHz 1332.80 MHz 1024 MB CPU Temperature PCH Temperature...
Manual
Page 40
...) Control Enables or disables the control of 5 preset states. Enabled will allow for automated system reboot, or clear the CMOS values to reset the board to default values. (Default: Disabled) BCLK Frequency(Mhz) Allows you to enhance memory performance when enabled. Important: It is enabled... Express Frequency(Mhz) Allows you to 1200 MHz. C.I.A.2 allows your CPU. Note: System stability varies, depending on CPU loading. BIOS Setup - 40 - The adjustable range is automatically adjusted according to be set the CPU base clock. Extreme Memory Profile (X.M.P.) (Note) Allows the...
...) Control Enables or disables the control of 5 preset states. Enabled will allow for automated system reboot, or clear the CMOS values to reset the board to default values. (Default: Disabled) BCLK Frequency(Mhz) Allows you to enhance memory performance when enabled. Important: It is enabled... Express Frequency(Mhz) Allows you to 1200 MHz. C.I.A.2 allows your CPU. Note: System stability varies, depending on CPU loading. BIOS Setup - 40 - The adjustable range is automatically adjusted according to be set the CPU base clock. Extreme Memory Profile (X.M.P.) (Note) Allows the...

Manual
Page 56
... FAN Fail Warning Allows the system to the CPU temperature. Enabled allows the CPU fan to run at full speed. (Default: Enabled) BIOS Setup - 56 - If disabled, the CPU fan runs at different speed according to emit warning sound if the CPU/system/power fan.../+5V/+12V Displays the current system voltages. 2-8 PC Health Status CMOS Setup Utility-Copyright (C) 1984-2009 Award Software PC Health Status Reset Case Open Status Case Opened Vcore DDR15V +5V +12V Current System Temperature Current CPU Temperature Current CPU FAN Speed Current SYSTEM FAN2 Speed...
... FAN Fail Warning Allows the system to the CPU temperature. Enabled allows the CPU fan to run at full speed. (Default: Enabled) BIOS Setup - 56 - If disabled, the CPU fan runs at different speed according to emit warning sound if the CPU/system/power fan.../+5V/+12V Displays the current system voltages. 2-8 PC Health Status CMOS Setup Utility-Copyright (C) 1984-2009 Award Software PC Health Status Reset Case Open Status Case Opened Vcore DDR15V +5V +12V Current System Temperature Current CPU Temperature Current CPU FAN Speed Current SYSTEM FAN2 Speed...

Manual
Page 71
... - 71 - appears, press to Drive Enter : Run hi:Move ESC:Reset F10:Power Off Total size : 0 Free size : 0 3. ing the BIOS. Update BIOS from the floppy disk is displayed on the screen. Updating the BIOS When updating the BIOS, choose the location where the BIOS file is updat- When the message "Are you to save the...
... - 71 - appears, press to Drive Enter : Run hi:Move ESC:Reset F10:Power Off Total size : 0 Free size : 0 3. ing the BIOS. Update BIOS from the floppy disk is displayed on the screen. Updating the BIOS When updating the BIOS, choose the location where the BIOS file is updat- When the message "Are you to save the...

Manual
Page 76
...™ 2 function, make sure the CPU Enhanced Halt (C1E) and CPU EIST Function items in the BIOS Setup program are set period of power saved will automatically reset when the total power saving reaches 99999999 Watts. Button Information Table Button Description 1 Dynamic Energy Saver On/Off...Off) 2 Current CPU Power Consumption 3 Total Power Savings (Total power saving with the user-defined power saving settings, even after the system is unable to reset to Enabled. (Note 2) 1: Smart FAN/CPU (default); 2: Smart FAN/CPU/VGA/HDD; 3: Smart FAN/CPU/VGA/HDD/Chipset/ Memory. (Note ...
...™ 2 function, make sure the CPU Enhanced Halt (C1E) and CPU EIST Function items in the BIOS Setup program are set period of power saved will automatically reset when the total power saving reaches 99999999 Watts. Button Information Table Button Description 1 Dynamic Energy Saver On/Off...Off) 2 Current CPU Power Consumption 3 Total Power Savings (Total power saving with the user-defined power saving settings, even after the system is unable to reset to Enabled. (Note 2) 1: Smart FAN/CPU (default); 2: Smart FAN/CPU/VGA/HDD; 3: Smart FAN/CPU/VGA/HDD/Chipset/ Memory. (Note ...

Manual
Page 87
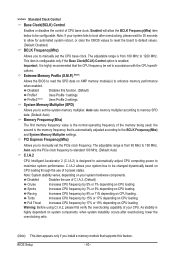
... 3JT329JX Size 111.7GB 111.7GB Type/Status(Vol ID) Non-RAID Disk Non-RAID Disk Press to enter Configuration Utility" (Figure 2). Reset Disks to configure a RAID array. Delete RAID Volume 5. Exit 3. Recovery Volume Options RAID Volumes : None defined. [ DISK/VOLUME INFORMATION... defined. Press + to create a RAID array, select Create RAID Volume in RAID BIOS Enter the RAID BIOS setup utility to Non-RAID 4. Figure 2 Step 2: After you want to enter the P55 RAID Configuration Utility. All Rights Reserved. [ MAIN MENU ] 1. C. Skip this ...
... 3JT329JX Size 111.7GB 111.7GB Type/Status(Vol ID) Non-RAID Disk Non-RAID Disk Press to enter Configuration Utility" (Figure 2). Reset Disks to configure a RAID array. Delete RAID Volume 5. Exit 3. Recovery Volume Options RAID Volumes : None defined. [ DISK/VOLUME INFORMATION... defined. Press + to create a RAID array, select Create RAID Volume in RAID BIOS Enter the RAID BIOS setup utility to Non-RAID 4. Figure 2 Step 2: After you want to enter the P55 RAID Configuration Utility. All Rights Reserved. [ MAIN MENU ] 1. C. Skip this ...
Manual
Page 89
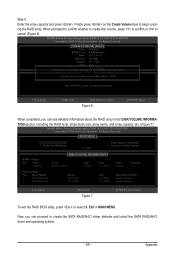
... Size 111.7GB 111.7GB Type/Status(Vol ID) Member Disk(0) Member Disk(0) [hi]-Select [ESC]-Exit Figure 7 [ENTER]-Select Menu To exit the RAID BIOS utility, press or select 5. All Rights Reserved. [ CREATE VOLUME MENU ] Name : Volume0 RAID Level : RAID0(Stripe) Disks : Select Disks Strip Size : 128 MB Capacity : 111... Menu Figure 6 [ENTER]-Select When completed, you can see detailed information about the RAID array in MAIN MENU. Step 5: Enter the array capacity and press . Reset Disks to begin creating the RAID array.
... Size 111.7GB 111.7GB Type/Status(Vol ID) Member Disk(0) Member Disk(0) [hi]-Select [ESC]-Exit Figure 7 [ENTER]-Select Menu To exit the RAID BIOS utility, press or select 5. All Rights Reserved. [ CREATE VOLUME MENU ] Name : Volume0 RAID Level : RAID0(Stripe) Disks : Select Disks Strip Size : 128 MB Capacity : 111... Menu Figure 6 [ENTER]-Select When completed, you can see detailed information about the RAID array in MAIN MENU. Step 5: Enter the array capacity and press . Reset Disks to begin creating the RAID array.


